MODS!!! Lets see em!!
Recent › Forums › Main Forum › Sharpener and Accessory Maintenance › MODS › MODS!!! Lets see em!!
- This topic has 291 replies, 53 voices, and was last updated 05/13/2024 at 4:11 pm by
Micheal Fuller.
-
AuthorPosts
-
03/18/2020 at 2:25 am #53767
That’s really interesting. I’ve never had to try the high end of the angle range. I’ll have to check mine out. I would think the WE-manufactured parts would have a similar problem, but it stands to reason that they would have tested the full range of angles.
03/18/2020 at 8:14 am #53771Tom,
WE OEM ball joint has a smaller diameter rod than the threads, it is on the inside of the adjustment knob. Which doesn’t hinder the circular range of motion while sharpening. I wasn’t looking for more degree adjustment, just my sharpening motion not being dimisished. Hope that makes sense
Attachments:
You must be logged in to access attached files.
3 users thanked author for this post.
03/20/2020 at 3:38 am #53775Hi All! Just a quick shout out to Marc H. for his great work on racks. I received my custom-built unit this past week and could not be happier with the quality. Great customer service (lots of communication, pictures, etc.). Too bad I don’t need lots of racks, because it’s just so nice to deal with Marc!
Highly recommended.
03/21/2020 at 10:34 am #53789Here’s another shout out for Ed’s (NotSharpEnuff) upgraded micro adjustment kit.
I recently bought a WE130. Used it for a while and noted the items that I personally wasn’t that satisfied with. They fell in three primary areas – fine angle adjustment; ease of adjusting angles; angle accuracy.
Most of my sharpening is on kitchen knives and pocket knives. I also knew that I wanted to re-profile most of my knives with different angles as I’m not hard on the kitchen knives and I use them constantly.
The first thing I did was flip the angle bar so I had infinite angle adjustability and no visual aids when setting the angle. That also forced me to use the angle cube all the time – even when changing grits.
Recently I bought Ed’s micro angle adjustment kit with the “L” arms and the RC dust covers – one for each arm and one for the center tension arm. Wow, Ed supplies a great kit! There are lots of pics already here, so I won’t post mine as they’d just look similar to everyone else’s.
During Ed’s and my email exchange we chatted about longer adjusters. He included them with my kit and I gotta say, I really like the extra room to dial back the stanchion jam knob, fine tune with the longer bolt, then tighten the jam knob. Easy peasy and lots of room for my fingers.
Though I haven’t done it yet, I could shorten the “L” arm bolts about an inch or so – as supplied, they are ~2.5″ long and don’t really need to be that long. For those that push the arms to the rear, that might be an option.
As a practice, I keep everything running towards the front of the WE. More a safety precaution as I like my fingers and don’t really want any accidents. Plus I keep and return everything to the pelican case that I bought with the WE.
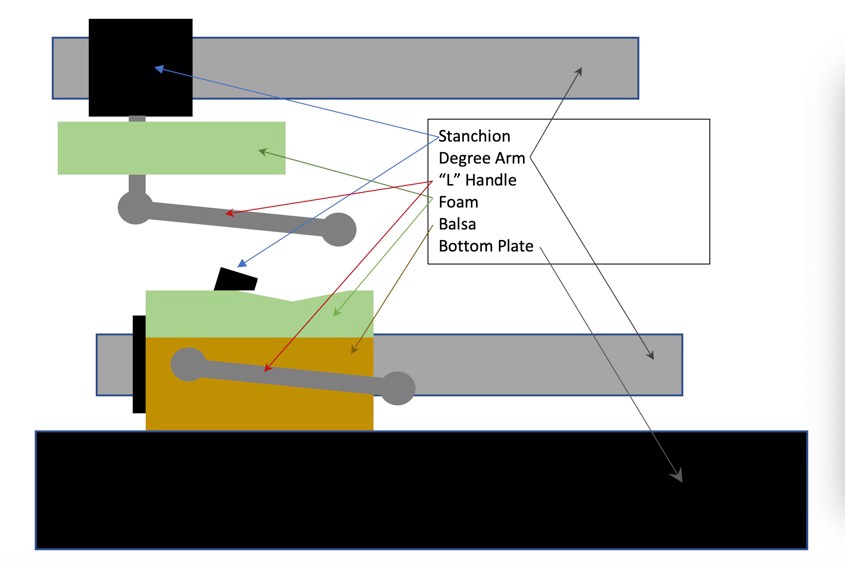
However, I’m working on getting some 1″ x 1.5″ or 1.5″ x 1.5″ closed cell foam blocks and running the “L” arm bolts through the foam, then into the stanchions – thus having the arms rest on the foam as they lean towards me. They can’t rotate because there would only be a thin section below the bolt and the the table, and at 1.5″ tall, the blocks would be at the perfect height to rest the arms on when changing grits or inspecting the blade.
I’ll probably make a couple different versions to try out to see what works best. If it does, I won’t shorten the bolt and I’ll post pics here. I’m thinking a block with a shallow “V” cut in it.
If the screw hole is too close to the bottom, I may buy some 3/8″ balsa for the bolt hole and glue the foam on top as the rest. Depending on the depth of the foam, I may also need to use a standoff from the stanchion to ensure access to the micro adjusters is retained.
Again, pics of the rest once I make it.
John
Here’s what I’m thinking. Looks like a Hobby Lobby run tomorrow – if they’re open that is!
-
This reply was modified 4 years, 4 months ago by
 John Harms. Reason: Added a drawing of what I'm thinking for a front arm rest
-
This reply was modified 4 years, 4 months ago by John Harms.
Attachments:
You must be logged in to access attached files.
1 user thanked author for this post.
03/22/2020 at 8:11 am #53800John,
Thanks for the detailed write-up. I would like to add comments as to why I chose the adjuster rod lengths and the L screw.
During Ed’s and my email exchange we chatted about longer adjusters. He included them with my kit and I gotta say, I really like the extra room to dial back the stanchion jam knob, fine tune with the longer bolt, then tighten the jam knob. Easy peasy and lots of room for my fingers.
When I started a year or so ago, I would cut the 12″ rod into four 3″ lengths. This size forced Gen3 owners to remove the blue plate and vise to install them. Even at the most open angle the rod would not fit. So, I tested 2.5″ rod lengths and they worked on all my kits. I have the older, larger L bracket on my angle bar. I got some feedback that the newer WE120/130 kits had moved to a smaller L bracket. I use the term mini-L bracket which angles down toward the square angle bar. With 2.5″ rods, the user could inadvertently adjust the ball joint down into the angle bar. MarcH loaned me a set of mini-L brackets to test different rod lengths. I found that a 2″ rod fixed the problem. The drawback, in my opinion, was that the outer adjuster knob and the inner jam knob were closer together. I was used to the 3″ rods on my kit.
When John and I spoke, he asked why I needed to know what type L bracket he had. I gave him the explanation above and I’m paraphrasing here but he said “I have big mitts, I’ll be careful and not screw the ball joint into the angle bar.” So, sent him the 2.5″ rods which add a 1/2″ separation to the knobs.
Though I haven’t done it yet, I could shorten the “L” arm bolts about an inch or so – as supplied, they are ~2.5″ long and don’t really need to be that long. For those that push the arms to the rear, that might be an option.
The choice of L arm screws came down to price. The shorter black zinc L screws are roughly $2.00 more each.
For the stainless kits, the shorter L arm screw is what I provide and it is the cheapest of the choices.
Ed K.
Attachments:
You must be logged in to access attached files.
1 user thanked author for this post.
10/17/2021 at 12:49 pm #57125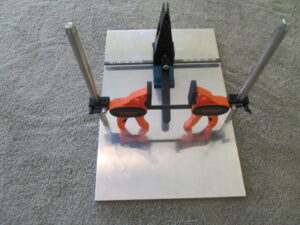
Recently saw a modification of a Wicked Edge pro by Modernflame over on the Candle Power website, (linked below) to steady long blades on a WE sharpener.
Decided I wanted something similar, so I designed from the same idea. I ordered an aluminum plate from Ebay, 12”x18”x 3/8 thick ”, sanded with 400/800/1000 wet/dry (wet), polished with Baso cleaner, weighs about 12 lbs ( took about 2 hours). If I was to start over I would increase the width from 12” to 14”-16” The stainless rods which hold up the clamp fixture are ½” thick, if I could have found 3/8” rods they would have been better for asthetic looks . The “Smallrig” connectors hold the Jorgensen “Easy Hold” clamp, the “smallrigs” are fairly cheap and work great making it easy to move the clamping device up/down or for removal. All the drill holes were done on a drill press. The Jorgensen clamp black rod needs to be cut down and drilled for a 12” wide plate. Took me an hour to find all the little stainless parts at my excellent local hardware store.
https://www.candlepowerforums.com/threads/wicked-edge-gen-3-pro-shortcomings-and-solutions.472849/
Parts list
Alumimum plate 3/8” 12”x 18” Ebay, , polished with 400 grit, 1000 grit wet/dry, polished with “Braso” all by hand. Wish I had a decent sander on hand and a motorized polishing wheel
https://www.ebay.com/itm/361523298614?ssPageName=STRK%3AMEBIDX%3AIT&_trksid=p2060353.m2749.l2649
(2) Stainless Steel Rod 14.9 mm x 305 mm stainless rod ( Ebay) , or “SmallRig” Aluminum Alloy Rods for DSLR Camera 15mm x 12” might be easier/look better to buy ( Ebay), 15mm is an odd size. These rods have a small reduced end with a screw thread, so once affixed to the plate with screws they are very stiff.
https://www.ebay.com/itm/112283105816?ssPageName=STRK%3AMEBIDX%3AIT&_trksid=p2060353.m2749.l2648
(2) “SmallRig” 15mm Rod Clamp Rail Connector, (Ebay), match the Smallrig size to metal rod size (Ebay) (cheapest). 15mmm is a bit oversized for this purpose but it does make this setup rigid. Even looked at medical bone fixation devices, interesting but too expensive. Compared to “Thor” optical clamps these are super cheap
https://www.ebay.com/itm/123792761602?ssPageName=STRK%3AMEBIDX%3AIT&_trksid=p2060353.m2749.l2649
(2) Jorgenson , “Easy Hold” clamps, smallest size at Lowes, cheap clamps compared to “Thor” optical clamps
Hex bolt ¼”, washers, to fit “Smallrigs”, locktite blue .
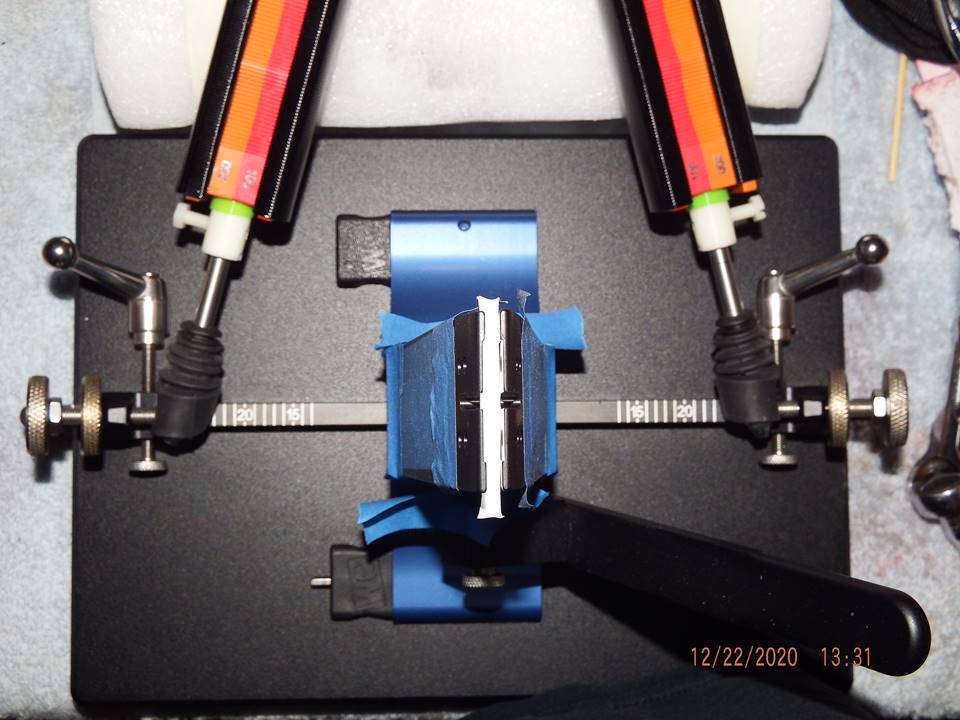
10/26/2021 at 5:39 am #57135For those of you who are using the micro-adjust “knurled knob” design as supplied by airscapes and whose knobs have a 5/8″ diameter hub, I have resurrected my document to print the 0-9 scale on adhesive-backed label stock. Simply cut each label out with a scissors and affix it to your hub. If you would like a set, I will gladly mail you one, free of charge, if you’ll simply send me your name and mailing address via PM.
For those who think this feature is simply window dressing, I assure you that you will learn to appreciate the greater degree of accuracy you will enjoy with each adjustment. For most angles we use, one turn is equal to a little over 0.3 degrees. Making a 0.70 degree adjustment is 2.33 turns, which will put you almost exactly spot on. Without some frame of reference, it is too easy to lose track of your adjustment. Not so when you are watching the numbers as you turn the knob.
 10/26/2021 at 9:53 am #57136
Those are not mine, those are Ed’s accessories.
10/26/2021 at 5:35 pm #57137Oops! Sorry. I thought you were Ed. Late night, old age, etc..
01/06/2022 at 4:57 pm #57472Is there a place where we can buy some plastic or metal alan knobs for the micro adjustments on W/E?
01/06/2022 at 6:10 pm #57473Micro Adjusters Kits with thumb wheel locks and spring loaded lock downs: https://knife.wickededgeusa.com/forums/topic/mods-lets-see-em/page/12/#post-51772.. The post that follows #51772 pictures a couple other adjuster setups with the metal parts. If you want to look into ordering a ready made setup you can message NotSharpEnuff to determine if he’s back up and running since he relocated.
If you are interested in a source to purchase the parts used to make these setups, check out: http://www.mcmaster.com
Marc
(MarcH's Rack-Its)1 user thanked author for this post.
01/06/2022 at 11:20 pm #57478Is there a place where we can buy some plastic or metal alan knobs for the micro adjustments on W/E?
Here’s a photo of my WE 130 with the stainless steel setup installed.
Attachments:
You must be logged in to access attached files.
01/07/2022 at 10:20 am #57481Micro Adjusters Kits with thumb wheel locks and spring loaded lock downs: https://knife.wickededgeusa.com/forums/topic/mods-lets-see-em/page/12/#post-51772.. The post that follows #51772 pictures a couple other adjuster setups with the metal parts. If you want to look into ordering a ready made setup you can message NotSharpEnuff to determine if he’s back up and running since he relocated. If you are interested in a source to purchase the parts used to make these setups, check out: http://www.mcmaster.com
I’m settled enough that I found all of my parts and pieces to make kits. I have 5 sets of ball joints cut and ready to add the threaded rod. The Gen3 uses a 2.5″ rod and the WE130 uses a 2″ rod.
If there is interest PM me and I’ll make the kit for you. I just ordered 20 stone stops and 12 strop covers from Airscapes and I have the protective boots on hand as well. I only have one set of SS knobs left but plenty of plastic ones on hand.
Ed K.
3 users thanked author for this post.
06/18/2022 at 1:32 am #57913Been a long time since I last posted, many changes noticed.
One question I need to ask, in this Micro Adjustment Kit, are the ball joints aftermarket (not Wicked Edge supplied)?
I guess I’m curious how the ball joint bolt (male thread) is so much longer than standard?
Is it purchased like that or has it been lengthened by the kit manufacturer or other? (NotSharpEnuff )
I thank anyone that can educate me here.
-
This reply was modified 2 years, 1 month ago by
 billabong.
06/18/2022 at 5:42 am #57915 -
This reply was modified 4 years, 4 months ago by
-
AuthorPosts

- You must be logged in to reply to this topic.