YouTube video shows drawing a burr on both sides between each stone
Recent › Forums › Main Forum › Techniques and Sharpening Strategies › Basic Techniques and Sharpening Strategies › YouTube video shows drawing a burr on both sides between each stone
- This topic has 15 replies, 10 voices, and was last updated 02/09/2021 at 5:27 pm by
 Richard.
-
AuthorPosts
-
01/05/2021 at 9:44 pm #55648
So this guy first puts down the WE by saying it is over priced but good quality. He forms a bur on each side between each grit stone. Is this necessary? To me it seems he would be taking much more metal off then need be. Whats your thoughts?
01/06/2021 at 4:05 am #55654So this guy first puts down the WE by saying it is over priced but good quality. He forms a bur on each side between each grit stone. Is this necessary? To me it seems he would be taking much more metal off then need be. Whats your thoughts?
I make sure that I get burrs on each grit also.
1 user thanked author for this post.
01/06/2021 at 9:30 am #55663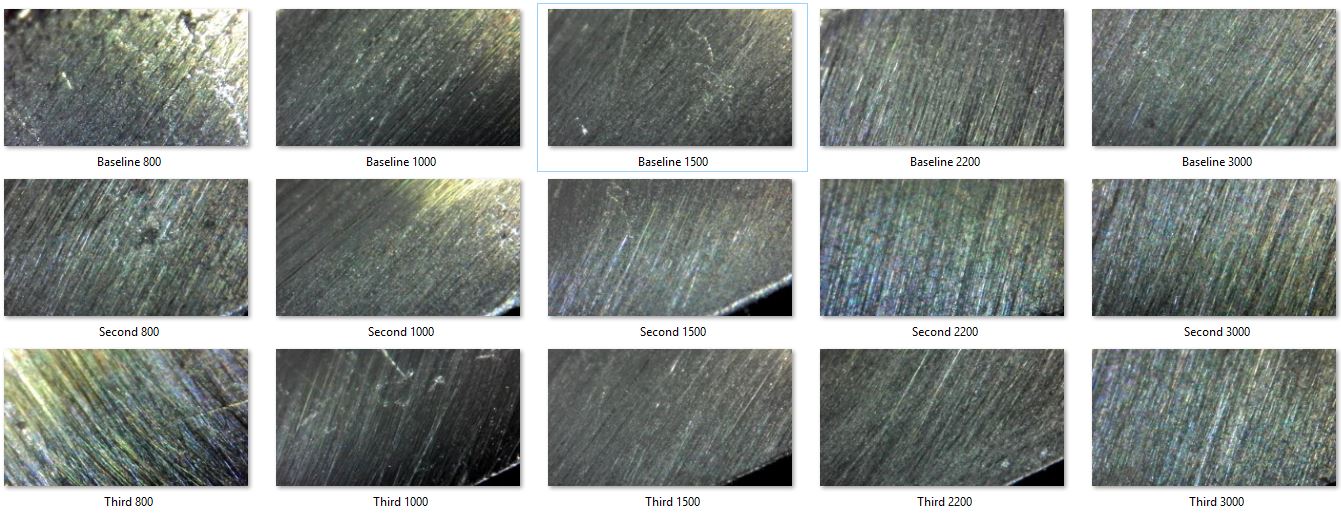
I don’t bother with checking for a burr after the first diamond paddle. I also don’t bother checking/tweaking the angle for each paddle change. I do check my results in process with my USB scope. It’s a big time saver. Tuning up a knife which was previously in the WEPS with the Angle Alignment Gauge takes less than 5 minutes. A new knife will get the 50/80 grit for less than 5 minutes to establish a new profile and full burr. Another 5 minutes and I am done stropping. I tape every knife to protect against rogue and annoying scratches to the face. I do mostly kitchen knives. Goods steels get 14 DPS, Decent steels get 17 DPS or 20 DPS is hard usage is in play. To me it all about the steel quality and projected use.
I do like to do science projects to approach the perfect edge though.
-
This reply was modified 3 years, 6 months ago by
Readheads.
-
This reply was modified 3 years, 6 months ago by
Attachments:
You must be logged in to access attached files.
1 user thanked author for this post.
01/06/2021 at 9:46 am #55669If you check and adjust if needed your angle with every grit change, then raising a bur on each side take only one light scrubbing pass on each side. I normally use a few scrubbing passes before the edge leading storks to remove previous scratches until I get to 800 then just enough to get a bur then edge leading..
1 user thanked author for this post.
01/06/2021 at 5:19 pm #55676Hmm, maybe I am leaving some sharpness on the table. I’ll have to try it.
Question: I zero out my angle cube on one side of the clamp on the bar (with the angle divots) and when I put it on the other side of the clamp the angle is off by 0.4 deg. I disassembled the bar and it is not bent. I tried to recal the cube and got the same result. Do you think this matters ? It seems to me that it would.
01/06/2021 at 5:32 pm #55677I zero on the blue part of the base in front of the handle, I normally remove the handle once the clamp is set.
1 user thanked author for this post.
01/06/2021 at 7:32 pm #55679 I don’t bother with checking for a burr after the first diamond paddle. I also don’t bother checking/tweaking the angle for each paddle change. I do check my results in process with my USB scope. It’s a big time saver. Tuning up a knife which was previously in the WEPS with the Angle Alignment Gauge takes less than 5 minutes. A new knife will get the 50/80 grit for less than 5 minutes to establish a new profile and full burr. Another 5 minutes and I am done stropping. I tape every knife to protect against rogue and annoying scratches to the face. I do mostly kitchen knives. Goods steels get 14 DPS, Decent steels get 17 DPS or 20 DPS is hard usage is in play. To me it all about the steel quality and projected use. I do like to do science projects to approach the perfect edge though. What does DPS mean?
01/06/2021 at 10:27 pm #55681DPS= Degrees per side
01/07/2021 at 3:17 am #55682I don’t use the burr method. I concentrate on forming the apex using the handheld microscope. Burrs look like a dull edge, but you can identify them by seeing if they move when you switch sides. Mainly, I’m looking for an apex that doesn’t reflect light. If I see reflected light, I swing the camera to the side to look for a crisp, straight line apex. If I see a slight indentation along the edge, I know I need to work the apex further down.
For example, if I see a fine line of reflected light along what should be the apex, I have to decide if it’s a burr or a section of edge that hasn’t been fully apexed. If it’s really thin and I’ve been working that part of the edge for a while, I may decide that it’s an edge that hasn’t been fully apexed but that it’s fine enough to let me finish the apexing with the next grit. If it’s a burr, you’re ready to move onto the next grit anyway. Experience will teach you these sublties.
1 user thanked author for this post.
01/07/2021 at 10:16 am #55687tcmeyer, which camera do you use and at what magnification? Sounds like you get a lot of value out of it, which I would like to try to replicate. Thank you
01/07/2021 at 11:27 am #55690I have several cameras, but I always come back to the Celestron 5MP. I posted a video on how I use it on Youtube, It’s a bit out of date but you might want to check it out. Once you learn to use it quickly and effectively and make it a part of your process, it becomes automatic and you’ll rely on it heavily. I never, never sharpen knives without it.
1 user thanked author for this post.
01/07/2021 at 7:06 pm #55694I just realized I didn’t answer about the magnification. I use the face of the clear plastic shroud as the fixed reference, which I place against the edge as I slide the camera longitudinally to inspect the edge. At that focal plane, the lens will focus at two different magnifications. On my 21″ wide screen monitor, the lower setting is about 50 – 55X. I don’t recall offhand what the higher magnification is, but I think it was something around 200X, which was too high, as the depth of field is too low and makes it difficult to keep in focus. Even at the lower magnification, I often have to tip the camera a bit to raise the focal point. This happens where the edge is curved. I set the focus for a straight section of edge, the use the “tipping” method as I move toward the blade’s tip.
02/07/2021 at 1:18 pm #55969What is the current good but not crazy expensive USB microscope, I saw this one linked in another post?
02/07/2021 at 1:23 pm #55971I’ve used this same one for years, now. Does everything I need it to do. I prefer it set to resolution 800 X 600 while working with high power magnification.
Marc
(MarcH's Rack-Its)02/07/2021 at 1:57 pm #55978I’ve used this same one for years, now. Does everything I need it to do. I prefer it set to resolution 800 X 600 while working with high power magnification.
Awesome, thanks, I have a 60x jewlers loupe I use for lots of stuff but it’s annoying having to put it right up against things and put my face against it every time I wanna look at something small, like knife edges.
-
This reply was modified 3 years, 6 months ago by
-
AuthorPosts
- You must be logged in to reply to this topic.