WE GO – Alignment Guide/Low Angle Adapter Dilemma
Recent › Forums › Main Forum › Techniques and Sharpening Strategies › Basic Techniques and Sharpening Strategies › WE GO – Alignment Guide/Low Angle Adapter Dilemma
- This topic has 18 replies, 5 voices, and was last updated 08/24/2020 at 5:31 pm by
 000Robert.
-
AuthorPosts
-
08/07/2020 at 5:19 pm #54769
I’ve used my new WE GO to sharpen a handful of knives in preparation for some of my more expensive knives. I also bought the advanced alignment guide for more repeatable results.
Today I came to the realization that I cannot achieve the factory angle (15-18 degrees) on many of my smaller knives.
It seems that I have encountered a catch 22 situation – I need to purchase the $75 low angle adapter (why isn’t this included or built into the design? Couldn’t the vise/clamp be thinner?). Once I do that, I will not be able to use the advanced alignment guide.
Overall I’ve been very impressed with the unit but it seems like I can only sharpen a subset of my knives – and once I buy the adapter I can no longer achieve repeatable mounting.
Appreciate any insight that anyone can provide on this. Am I missing something?
Thank you,
John
-
This topic was modified 3 years, 8 months ago by
John.
08/07/2020 at 7:53 pm #54771Welcome to the Wicked Edge Forum John.
The WEGO model is a compact portable model with no accessories. It’s made with the beginning or entry level sharpener with budget in mind. Below are the details of this model and what’s included, and what’s not.-
- Can sharpen blades up to 15” long
- Can clamp blades up to 1/4” thick with included vise screws (longer screws may be used to enable clamping of even thicker blades)
- Angle range: 15-30 degrees per side (30-60 degrees inclusive)
- Angle adjustment in 1 degree increments
- Sharpener’s angle markings are calibrated for knife’s edge at 5/8″ over top of vise
- Minimum knife height for stones to clear vise at lowest angle is 5/8″ over top of vise. Low Angle Adapter (sold separately) required to reach low angles on smaller knives
- Guide rod length: 8”
- Product weight: 4.2 LBS
- Packaged dimensions: 14” x 4.5” x 4”
Marc
(MarcH's Rack-Its)1 user thanked author for this post.
08/07/2020 at 8:27 pm #54775Thanks for the welcome Marc. I’m not sure that answered any of my questions. I was aware of the specifications before I bought the sharpener.
The model I purchased is not relevant as all of the more expensive models are also limited to 5/8” minimum height, all require the low angle adapter, and all render the alignment guide useless – as far as I can tell.
-
This reply was modified 3 years, 8 months ago by
08/07/2020 at 8:29 pm #54777Low Angle Adapter (sold separately) required to reach low angles on smaller knives
Every model W.E. even the most expensive ones have limitations and may require purchase of accessories to sharpen all the different style knives there are in the market place. Many of us modify and custom adapt our sharpeners, even well accessorized models, to enhance their sharpening abilities and characteristics.
Marc
(MarcH's Rack-Its)08/07/2020 at 8:32 pm #54778I’m not quite sure if you read my entire post – if you have, I’m surprised to see this type of response to a reasonable question.
How do you align knives in the same position repeatably with the low angle adapter that I acknowledged was sold separately in my initial post?
08/07/2020 at 8:35 pm #54779You get creative and make something like this:

Like I wrote: Many of us modify and custom adapt our sharpeners well accessorized models to enhance their sharpening abilities and characteristics.Marc
(MarcH's Rack-Its)Attachments:
You must be logged in to access attached files.
1 user thanked author for this post.
08/07/2020 at 8:43 pm #54782Thanks for the insight Marc – those are the kind of tips I was looking for. Not sure the first couple posts were worth it 🙂
Appreciate the “welcome”
1 user thanked author for this post.
08/07/2020 at 9:02 pm #54783The AAG is poorly designed. There is a lot of lower space on it that most people will never use unless they are sharpening a boomerang. It needs to go much higher. I have no idea what they were thinking of when they designed it. Hopefully they will fix that.
1 user thanked author for this post.
08/07/2020 at 9:15 pm #54784Agreed and thanks for the reply Robert. The intention of my post was to discuss limitations with the design and potential workarounds that others have come up with (obviously I’m not the first person to recognize them).
08/07/2020 at 9:30 pm #54785I innovate….try drilling two more holes in the AAG in the top corner, straight above the first pair. Then use it turned upside down, it still has the grids and the numbers. It’ll give you a usable position reference. If need be, to make it taller, try turning it 180º then drill two more holes and use it like that. It’ll work in any orientation as long as the grid is parallel and perpendicular to the jaw’s top and side. It’ll take two seconds to add the holes.
Just record the orientation you used for the AAG on your sharpening log. As long as you can get a couple reference points on the knife, such as tip or heel or handle or spine, you should be able to match the clamping postion.
Marc
(MarcH's Rack-Its)2 users thanked author for this post.
08/07/2020 at 10:14 pm #54786Agreed and thanks for the reply Robert. The intention of my post was to discuss limitations with the design and potential workarounds that others have come up with (obviously I’m not the first person to recognize them).
Yeah, I just didn’t want to say anything because I figured that I would get slapped around. 😊
But it’s an easy fix. I’m sure that they will get around to it when they get a chance.
1 user thanked author for this post.
08/07/2020 at 10:22 pm #54787I innovate….try drilling two more holes in the AAG in the top corner, straight above the first pair. Then use it turned upside down, it still has the grids and the numbers. It’ll give you a usable position reference. If need be, to make it taller, try turning it 180º then drill two more holes and use it like that. It’ll work in any orientation as long as the grid is parallel and perpendicular to the jaw’s top and side. It’ll take two seconds to add the holes. Just record the orientation you used for the AAG on your sharpening log. As long as you can get a couple reference points on the knife, such as tip or heel or handle or spine, you should be able to match the clamping postion.
That’s true. It wasn’t that big of a deal to me, so I never said anything. I just take a photo of it. But I was puzzled when I saw it the first time.
08/10/2020 at 7:07 am #54811John
The majority of the knives I have sharpened on my WE130 required the use of the LAA. My solution to this problem was to not use the Depth Key and to align the AAG as shown in the image below. It has worked extremely well for me over the last three years.
rummels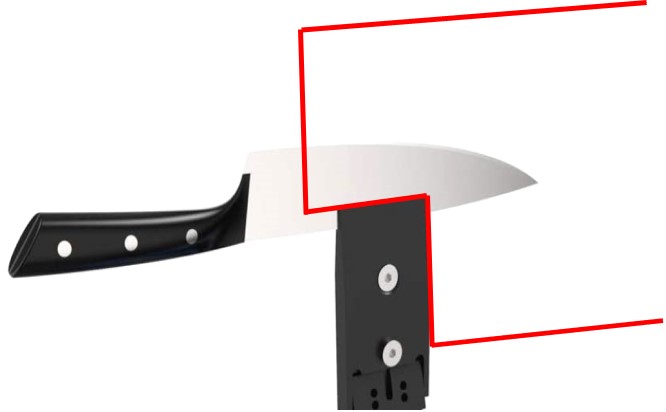
-
This reply was modified 3 years, 8 months ago by
rummels.
-
This reply was modified 3 years, 8 months ago by
Attachments:
You must be logged in to access attached files.
08/10/2020 at 7:57 am #54815That will work good enough to record the position. I might be able to balance it on there long enough to take a photo of it.
2 users thanked author for this post.
08/10/2020 at 4:53 pm #54816Because you are using a LAA, you can tighten its jaws just enough to hold the knife in place. Then position the AAG as I suggested, and move the knife forward or backward in the LAA until it is where you want it. This assumes you are protecting your blade with masking tape.
rummels2 users thanked author for this post.
-
This topic was modified 3 years, 8 months ago by
-
AuthorPosts
- You must be logged in to reply to this topic.