How I find the "Sweet Spot" (4 Parts)
Recent › Forums › Main Forum › Techniques and Sharpening Strategies › Basic Techniques and Sharpening Strategies › How I find the "Sweet Spot" (4 Parts)
- This topic has 35 replies, 15 voices, and was last updated 03/18/2021 at 7:50 pm by
 Marc H.
-
AuthorPosts
-
01/30/2018 at 2:55 pm #44904
How I find the sweet spot
(Part 1)
Gazillion, (Derek), one of our Forum newcomers purchased a couple “Chicago Cutlery” 8” Chef’s knives. He bought these inexpensive knives to gain experience sharpening them with his new Wicked Edge Gen 3 Pro. He was going about it methodically trying to learn how to find the “sweet spot.”
Derek sent me one of the knives with the request that I find the sweet spot to help him to learn how to do it by showing him how I do it.
I originally wrote the process out as I did it and emailed him my procedure with photos. After finishing, I asked his permission to post the steps to this Forum to try to help other new users having the same questions and experiences.
Here’s how I go about sharpening a new knife. By this I mean a knife that is new to my experience. One that I have never clamped in the WE vice and sharpened before.
I start by deciding how best to clamp it in the vice. This by itself can seem difficult if you haven’t done it much. Through experience with many different size and shape knives and repetition this will come easier. I follow some basic guidelines I’ve learned, through practice and experience and from reading on our forum and following what others did before me.
For kitchen type knives I consider their length and flexibility. If they’re fairly stiff and longer than 4 or 5 inches, I try to clamp them in the center of the blade so it’s roughly balanced how much knife length is fore and aft of the jaws. This way I’m balancing my rod angle work and keeping my reaching centered.
When it’s a wide stiff blade like this Chicago Cutlery Chef’s knife the blade is strong enough and thick enough to stay straight and not flex under sharpening pressure as I work the stones against the knife while sharpening it. If the blade was more flexible I would move it either further forward or further back in the jaws to minimize the blades flexibility. (For instance, a more flexible boning or fileting knife I’d move the handle closer to me and clamp the knife further forward towards it’s tip to hold the flexible tip more rigid.)
Also, by centering the knife in the jaws, the arc of rotation of the rod arms is basically equal to the tip and knife heel, I believe making the bevel angle more predictable and consistent. If I had clamped this large knife right in front of the handle with the full length of the stiff blade forward of the jaws, I would have to work with my hands out forward of the vice most of the time. In that position the torque on the tip or angle of rotation is greater being out so far. Working on a knife equally centered in front of and behind the jaws, keeps the sharpening job more balanced, easier to do and easier to see. Then I’m not reaching out too far forward or reaching too far back and close to me.
Due to this knife’s broad style I chose to clamp it with the bottom key holes. This knife is plenty wide to stick up above the jaw’s height in the lower key hole position. The higher up in the jaws a knife is clamped, that is, the higher the knife edge is above the jaws, the lower a bevel angle setting can be achieved. At the same time, a knife clamped up higher in the jaws will limit your ability to put a wider angle bevel on it. I used the lower key holes because: 1) the knife was wide enough to allow it, 2) the lower key holes allowed for the needed wider, more obtuse, bevel angle, (due to the relatively soft steel), 3) I wouldn’t have to reach up so high to work on the edge, and 4) if your rod arms aren’t long enough, you can’t work up high without the stones sliding up off the rod ends.
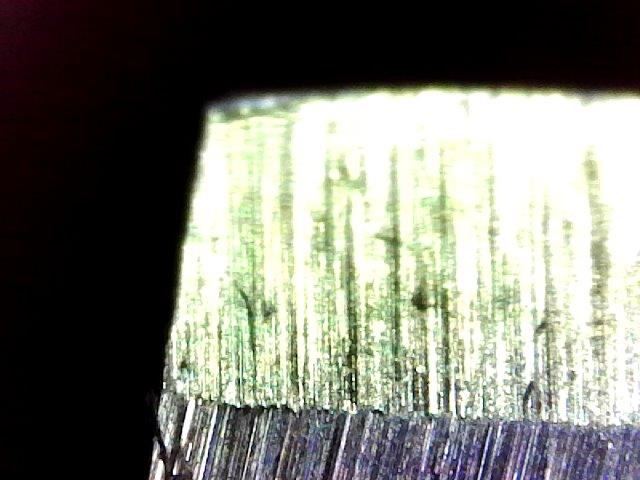
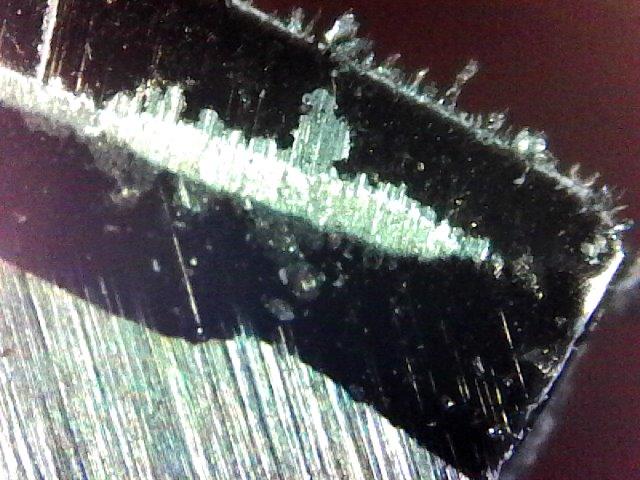
Next, with the knife positioned and clamped, I like to inspect and photograph, (with a USB Microscope), the knife’s bevel and edge grind to see what I’m dealing with. It gives me a good overview of the knife makers quality control. It allows me to familiarize myself to areas needing my attention possible due to damage or grind inconsistencies. Also, it gives me a sense of the quality of the steel by looking at the type of grind the manufacturer applied. I want to believe better knives have better grind jobs. That may be optimistic.
Here is a 200X USB Mic. Photo of the knife’s heel, (out-of-the-box):
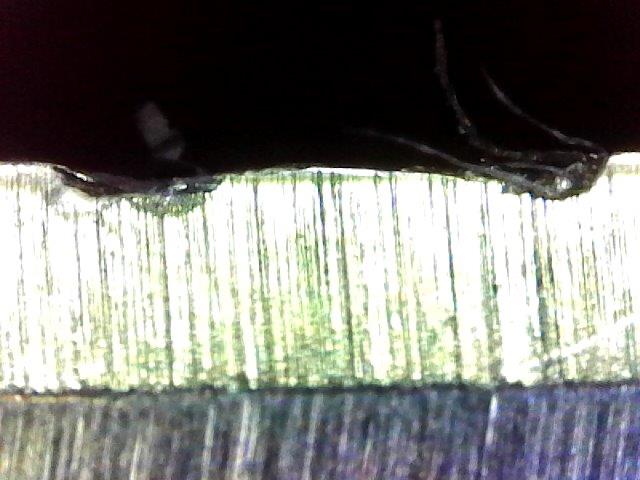
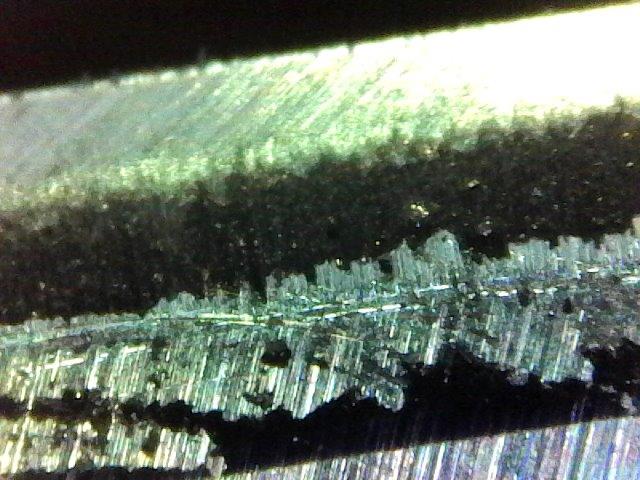
This is a damaged area or a defect I found just forward of the heel:
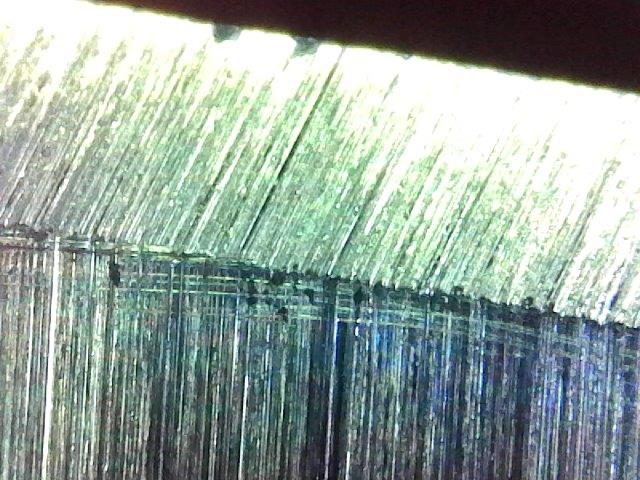
Here is another shot as we continue to scan forward on the bevel towards the tip:
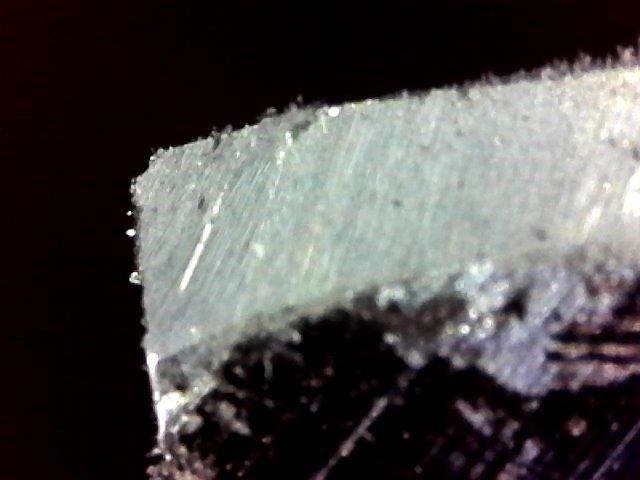
This is the knife tip. You can see it wasn’t properly ground or the tip has broken:
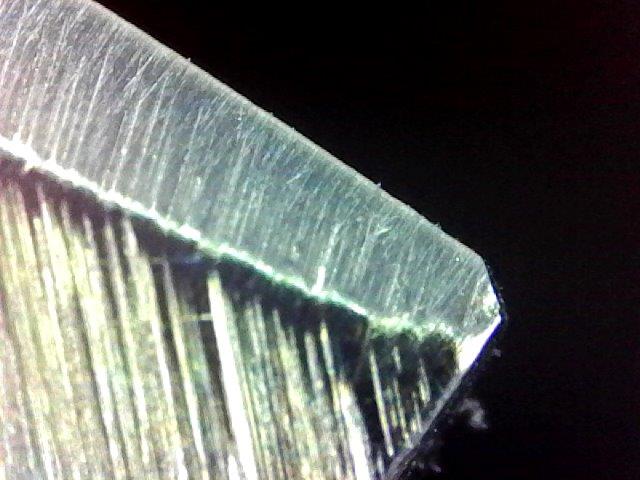
My overview is the knife is pretty good. It has very few flaws for such a large knife and the bevel is ground pretty consistent.
I’ll continue with the next post.
Marc
(MarcH's Rack-Its)Attachments:
You must be logged in to access attached files.
Total of 25 users thanked author for this post. Here are last 20 listed.
mr_k,
 Chefy,
  GJHM28,
 mikSom,
IXALU,
Wayne,
Tom,
 Modernflame,
 JWHB77,
 000Robert,
 T. Pollock,
Mike,
Joe Cooley,
prongATO,
Mike,
 Richard,
 Rodney,
Brewbear,
Chuck,
almost Rahman
01/30/2018 at 3:15 pm #44909How I find the sweet spot
(Part 2)
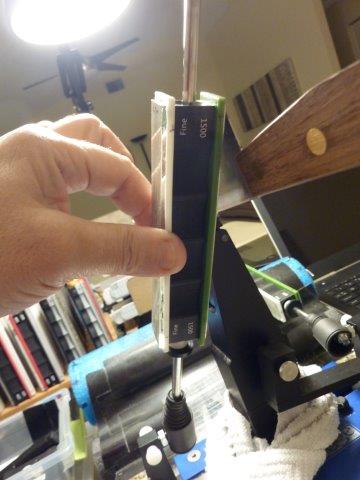
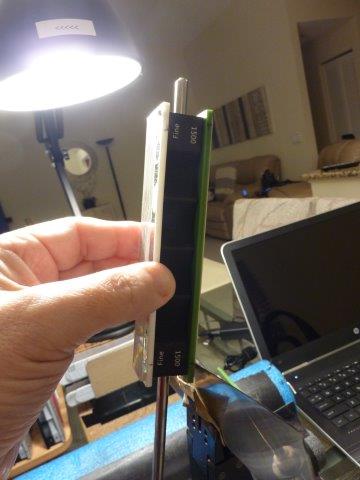
Next, I want to find the sweet spot. I like how I have it clamped, even to the vice jaws, fore and aft, so I’ll try to work with this position. (This is based on previous experience; I know a knife with this shape is clamped reasonable well, in this position.) I mark the bevel edge with a “Permanent Magnum Sharpie.” One side is enough to tell if you are on the right track. I put a high grit stone, “1500 grit” on the guide rod for the side I marked with sharpie. I set the rod angle to a very wide angle setting so the stone just rests against the knife’s bevel tip. Since this knife’s edge, even in this lower keyhole clamp position extends so high above the jaws, I did have to raise my “lower stone stops” up to keep the upper end of the diamond stone above the knife bevel. This will prevent scratches to the knife’s side as I sharpen the knife. (Applying blue painters tape is also a good way to protect the knife’s sides).
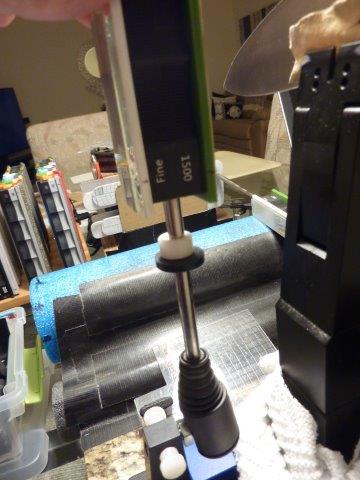
Here are pictures of the lower stone stop so you can see what I use.
Resting on the stop:
Lower stone stop with stone held up above it:
I’m using my extra-long rod arms for this wide knife to make sure the rod arms are long enough to stick up above the diamond stone when it’s even with the bevel height. Here’s a picture of the long guide rods tip:
With the knife marked with the sharpie I use the 1500 grit diamond stone and gently run it up and down across the bevel, with a very light scrubbing stroke, to remove the black sharpie ink. My first attempts were removing the ink well in the center of the flat portion of the knife. This doesn’t really mean anything here. It will always line up right on the mid bevel. The tip is the most difficult to align. When I started to find the sweet spot with the knife still level the ink was removed below the top of the bevel, lower down the side of the bevel. This tells me to move the tip down lower to get into the area that the ink was removed by the stone. I loosened the vice and rotated the tip down while keeping the knife heel resting on the one forward key pin. I locked the knife tight then reapplied the ink and retried this position. One try later I was where I could work with the position. Up to this point I’m not even using the AAG.
Here is that mid bevel shot: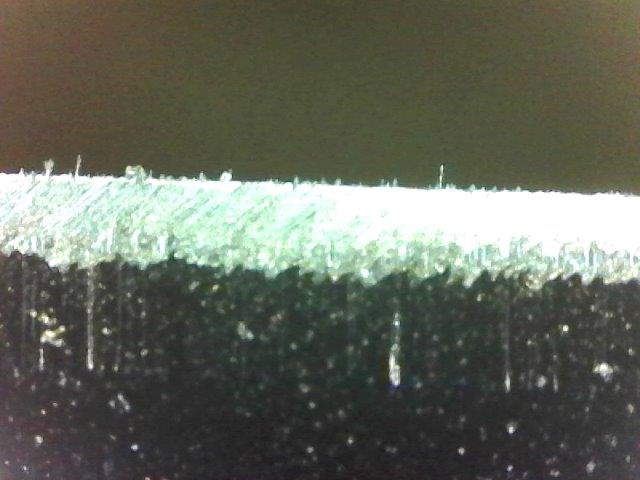
I will continue the posts with Part 3.
Marc
(MarcH's Rack-Its)Attachments:
You must be logged in to access attached files.
01/30/2018 at 3:54 pm #44914How I find the sweet spot
(Part 3)
Here is that bevel shot, first attempt with the knife mounted level:
The scrubbing stroke removed the black ink on the tip below the knife edge, in this current clamping position. In order to remove the ink from the top of the bevel, (i.e., the knife edge), I need to tilt the knife tip down, or rotate the knife down while the spine continues to rest on the forward key pin. This will move the knife edge into the position where the diamond stone’s scratch pattern can remove the ink.Here is a picture after the adjustment. You can see the before and after bevels:
Here is the tip in good position, tilted down to be in the “sweet spot:
This looks pretty good. It’s at the top of the bevel which is good because as we remove steel sharpening this knife the bevel goes lower down the knife.
Here is the heel in sweet spot position: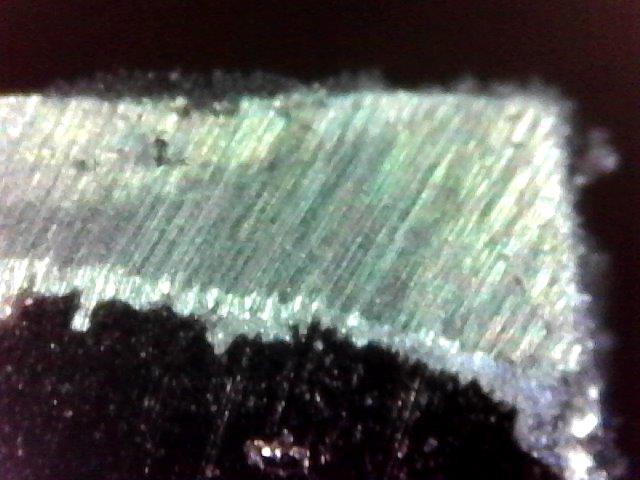
Finding the “sweet spot” is a balancing act. Sometimes you have to quit and leave well enough alone.
You can’t always get every where along the bevel just perfect. Sometimes the ink is removed a little below the knife tip’s bevel. I prefer a clamping position where the ink is removed from just at or below the bevel. As you sharpen the knife you remove steel while the grind pattern grows down lower on the blade.
Sometimes with the mid points, and the heel in good position only the tip maybe slightly low. I would rather remove more steel from the tip then the knife’s heel because with this style knife, a “chef’s knife” you do chopping and use a rocking motion or sliding motion. For these cutting motions it’s more important to have the heel of the knife flat on the cutting board and further forward on the knife at the same time, still flat on the board. The tip of a knife for this style knife see’s relatively little use and it doesn’t contact the board at the same time when the belly and heel are flat on the cutting board.
At this point I decided I could work with this position. Remember next time this knife is sharpened, any little bit of steel we’ll remove to profile this knife to conform to the fixed angle sharpening of our Wicked Edge Device, this first time, will not need to be removed, again. The knife the next time should line right up with maybe only a little tiny adjustment needed.
I’ll need to continue with a 4th post.
Marc
(MarcH's Rack-Its)Attachments:
You must be logged in to access attached files.
16 users thanked author for this post.
GJHM28, 000Robert,  Hillbilly Armory,
 Mickey,
 wickededge,
 sksharp,
David
01/30/2018 at 4:00 pm #44919How to find the “Sweet Spot” part 4
Here’s the Advanced Alignment Guide. It’s up to you to log these dimensions or coordinates in a manner that makes the most sense to you so it is repeatable. Here’s a picture of the mounted knife with the “Advanced Alignment Guide”, (AAG) in place:

I would record:
1) bottom Key Holes
2) tip at middle of “L” on the “6” Line
3) jaw tops are 1/4 space above (5) line, and parallel
4) tip of the upper right corner of AAG crosses right on bevel
5) Black Vertical between (G) and (H) crosses red horizontal (3) on bevelWith 5 points I don’t think you have to worry about getting it lined up again to sharpen or touch up this knife.
I hope this will be helpful to those of you working on finding the “Sweet Spot”.
PS: any critique, corrections or constructive criticism is always accepted from my forum compadres, (though not always graciously, LOL)
Marc
(MarcH's Rack-Its)Attachments:
You must be logged in to access attached files.
Total of 24 users thanked author for this post. Here are last 20 listed.
GJHM28, CSB,
000Robert, Nicko,
Brian,
Brent Morris,
wickededge, DeeR
01/30/2018 at 4:27 pm #4492101/30/2018 at 5:33 pm #44923This was obviously a lot of work to put together, but will be a valuable thread to point people back to when this topic comes up over and over again. Great work Marc!
8 users thanked author for this post.
01/31/2018 at 5:04 pm #44954MarcH, I think that’s the best explanation (with examples) of how one man determines the best position for any one knife! The application of your information suggests to me that you are not only considering an even bevel but retaining the bevel the way it was originally sharpened even if the angle may change down the length of the edge. With some knives this may be by design, but may also be due to the grind of the knife. With your method you could even the bevel the length of the blade even if the width of the blade changes down the length.
Good Stuff my friend! Thanks
2 users thanked author for this post.
02/03/2018 at 3:22 pm #4500702/03/2018 at 9:47 pm #4501802/04/2018 at 1:48 pm #45033Hi there super new to the wicked edge !! Just received my GO.
I am wondering if the same steps are required if you are trying to set up a brand new bevel? As in a new angle to sharpen at ?? Maybe I just have myself confused
1 user thanked author for this post.
02/04/2018 at 3:00 pm #45034After you follow these steps your knife is clamped it the optimal position to best apply any angle bevel you choose. The sweet spot is a clamping position that orients your knife in the WE Jaws so the abrasive stones will reach the knife edge all along the knife with the best efficiency and the least amount of wasted metal. That being said if you choose a very shallow or acute angle setting you will be removing a lot of metal.
Marc
(MarcH's Rack-Its)4 users thanked author for this post.
02/04/2018 at 7:28 pm #45037After you follow these steps your knife is clamped it the optimal position to best apply any angle bevel you choose. The sweet spot is a clamping position that orients your knife in the WE Jaws so the abrasive stones will reach the knife edge all along the knife with the best efficiency and the least amount of wasted metal. That being said if you choose a very shallow or acute angle setting you will be removing a lot of metal.
<p style=”text-align: left;”>Thanks Marc! That’s what I thought I was interpreting ! Well now to practice and get the hang of finding the sweet spot on my knives and go from there ! I appreciate it ! Will be following this guide step by step to try and get the best out of my system and get the best practice in!</p>
3 users thanked author for this post.
02/06/2018 at 9:12 pm #45060Feel like I need to post as I am very pleased with my results ! Followed this step by step to get my super cheap C-tire knife clmaped in the “sweet spot” .
Well after finding the sweet spot it took me no time at all to dial in this knife and put the best edge it’s ever seen on it !
Thank you so much for your guide it helps tremendously
5 users thanked author for this post.
02/20/2018 at 3:03 am #45198FWIW, I use an AAG which I made in early discussions with Clay about the design. Mine doesn’t use the key pins to locate the AAG; I use the top and back of the jaws as a reference point. I set the ninety-degree notch as the locator. The knife is mounted in one of three ways: high key, low key or the bottom of the jaw opening. I interpolate between the lines to 1/10th of a division. On my AAG, the graduations are each 1 centimeter apart. An example of a coordinate might be G.2 and 4.6, where the tip is 2mm beyond the “G” line and 6mm below the “4” line.
I like the notch as the reference point since I can hold it up to the blade whenever I feel the need to check the position of the blade. No need to use the pins. This also allows me to mount blades down to the bottom of the jaws, where the key pins couldn’t go and still get a reading.
One interesting tid-bit: When I sharpened my newly-completed skinner (See it at “Knife Making as a Hobby), the very short radius of the cutting edge profile proved to be a challenge when trying to remount the blade at the same location. Each time I remounted the blade in the vise, I’d see differences in the bevels near the tip.
7 users thanked author for this post.
02/20/2018 at 11:23 am #45202Could someone please define “sweet spot”? is it ?
- Position where you take off the minimum amount of material following the existing grind?
- Position where when done the bevel is of a constant width ?
- Position where when done the area where most of the cutting is done is of a constant angle.
- Something else
Thanks,
Richard
-
AuthorPosts
- You must be logged in to reply to this topic.