Blade alignment in the clamp: sweet spot & constant bevel angle/width
Recent › Forums › Main Forum › Techniques and Sharpening Strategies › Advanced Techniques and Sharpening Strategies › Blade alignment in the clamp: sweet spot & constant bevel angle/width
Tagged: Sweet Spot Theory
- This topic has 89 replies, 11 voices, and was last updated 01/11/2018 at 12:42 pm by
graphite.
-
AuthorPosts
-
12/20/2017 at 11:13 am #43257
In previous threads there have been in-depth discussions which conclude that—for a straight-edged blade—the straight edge can be oriented at any angle in the clamp jaws and the sharpening stones would still grind a constant bevel angle. In other words, this straight blade edge does not have to be parallel to the clamp jaws; it can be angled relative to the top of the jaws and still sharpen at a constant bevel angle/width.
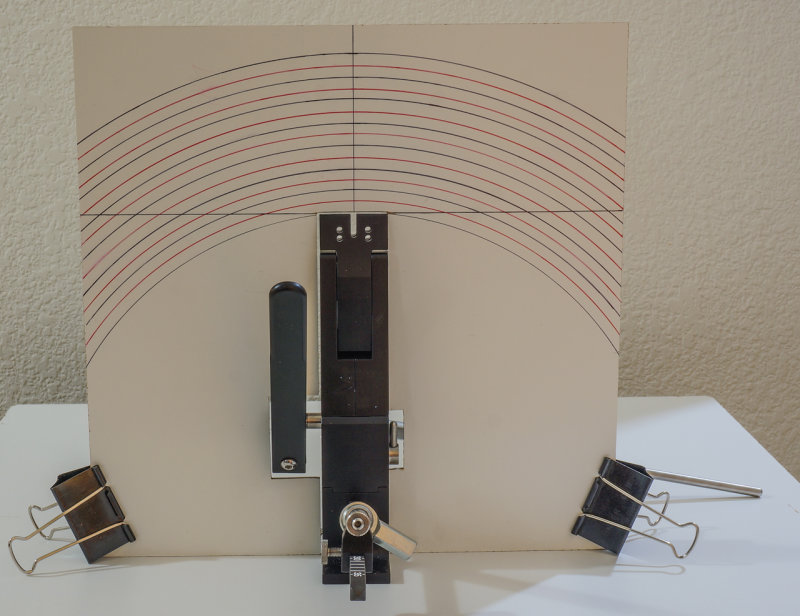
Separate but related, previous threads have also discussed that due to the WE sharpening rod/stone being mounted to a fixed pivot point at one end, when sharpening curved blades you want the curved edge of the blade (when mounted in the clamp jaws) to be aligned to a constant-radius circle traced out by the stone/rod. This circle is drawn on the plane that bisects the blade edge’s centerline (see photo of a Circle Contour Jig I made, below).
Back to the first point about straight blades, it’s not like a blade that is ever-so-slightly curved will result in huge differences in the bevel width/angle. It gets worse incrementally, and as the blade becomes more severely curved, the bevel mismatch becomes larger.
So, how much curve is too much?
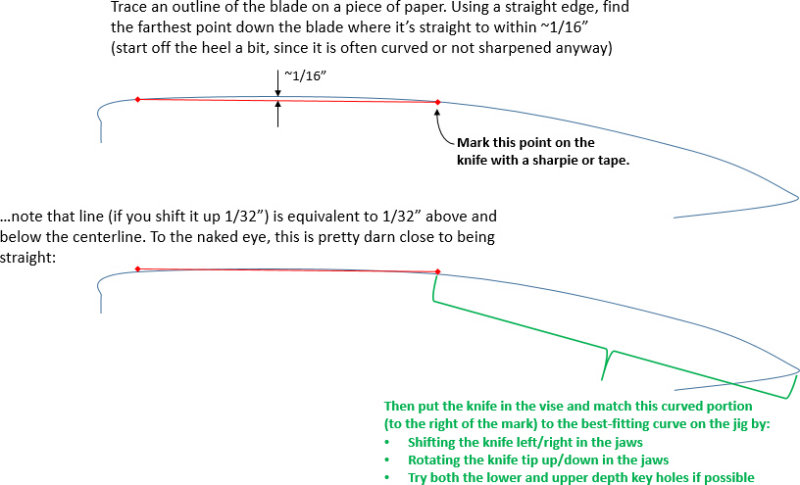
One way to measure how much a curve in a blade deviates from being perfectly straight is to trace an outline of the blade’s edge on paper, then use a straight edge with one end planted just off the heel in the traced outline, and pivot the straight edge to different points farther down the blade toward the tip, and measure how far the straight edge is from the high point in the traced curve.
I don’t know the answer to “how much curve is too much” but let’s say, for the sake of argument, that a 1/16″ curvature is “close enough to straight” that all the assumptions related to straight-edge blades and the tilt angle in the vise still holds. In other words, there may (after sharpening) be some small difference in the bevel width that you could measure with a 200x microscope, but to the naked eye the bevel looks uniform across this mild curve.
See the drawing below:
But what about 1/8″ of curvature instead of 1/16″? Will that result in a bevel that looks the same everywhere along the edge to the naked eye, or is that too much?
The reason it’s important to nail down “how much curvature is too much” is because the larger the length of the “approximately straight” portion of the blade edge, the more of the knife blade you can ignore how it is positioned/angled in the clamp, and you can just focus on aligning the remaining curved portion to the best-fit circle contour.
Or in other words, the smaller the length of the knife that has to be considered curved, the easier it will be to find a matching circle contour for the curved part of the knife.
Before I go too much farther down this road, do you guys agree or disagree with what I’ve described above, which I’ve summarized below:
- A very slight curve is approximately the same as a straight edge, as far as being able to clamp it without regard for the angle of the edge.
- The open question is, how much curve is too much to approximate it as straight. But 1/16″ deviation seems like a reasonable assumption to start with.
- With the above approximation for straightness, many knives can be divided into two segments for aligning it in the WE clamp: a straight part from the heel to point “x” along the edge, and a curved part from point x to the tip. The approximately straight part can be clamped at any angle, allowing you to focus just on matching the curved part to the circle contour jig’s semi-circles regardless of the angle of the straight part of the knife.
For knives with too much curve to be represented by a single straight segment approximation and a single curved segment, you’d try to get the portion of the blade that is most heavily used to align as closely as possible with one of the circle contours. Or alternatively, you could move/sharpen the knife at several different positions and blend them.
10 users thanked author for this post.
12/20/2017 at 12:34 pm #43258I’ve never put that much thought into the theory aspect of finding the sweet spot on a knife (I’ve always been more concerned with actually doing it on the knife in hand), but this seems correct and the tool you’ve constructed could allow for a very fast way to find the sweet spot. If it works I could envision Clay producing them with the same materials as the advanced alignment guide. Only the end user can really determine how much deviation from perfectly straight is acceptable for their application, but 1/16″ seems good to me as well.
2 users thanked author for this post.
12/20/2017 at 1:43 pm #43260Thanks Organic, and before a couple days ago, I had never put much thought into the theory aspect of it either. But once I put a few different knives in the clamp with this circle contour jig in place, and tried to figure out how to use the jig, it occurred to me that if the assumptions about straight edges also hold for “nearly straight” portions, and you could divide most knives into 2 segments ( a nearly straight portion and a curved portion), this jig could actually be pretty useful in reducing the trial and error of positioning the knife in the clamp.
Of course, the real test is to actually sharpen some knives based on use of this jig. I still need to do that, but wanted to see if the theory made sense beforehand. No point ruining an edge if it doesn’t make sense in theory.
2 users thanked author for this post.
12/20/2017 at 3:49 pm #43269Is it possible to get a copy of the jig you made?
12/20/2017 at 5:47 pm #43273Is it possible to get a copy of the jig you made?
Hi Doug, if you are asking if I have a digital file of the dimensions and cutouts, no, I just used scrap wood and winged it. The main piece of whiteboard is about 12″ wide and 13″ tall (but you could certainly make it smaller, or larger, if you wanted).
I used a sliding miter saw to cut the basic rectangular shape and also to cut most of the longer dimension of the clamp cut-out so that it would be very straight. I used a band saw for the clamp lever and tension lever cutouts, but a jig saw or various types of hand saws would work too. The circles were drawn with a beam compass (which I already had, but look through google images for beam compass and I’m sure there’s a way to make a DIY beam compass), and each black semi-circle is approx. 1/2″ longer in radius than the previous one. The red semi-circles are roughly between the black ones.
The semi-circles are just a guide. There’s no magic in the particular location or spacing I picked. A 1/8″ spacing would probably be even better.
The cut-outs for the (lower part of the) clamp are specific to the field and sport pro model. Note that the base on the F&S is different from other models and is oriented 90 degrees rotated from the other models with a base. So your cutouts would be a bit different for other models. There might be a way to make a universal cutout to fit all current models.
5 users thanked author for this post.
12/20/2017 at 6:32 pm #43274This is a great post! You describe, I think, an accurate way of finding the sweet spot (or multiple sweet spots if you want to re-clamp the knife).
Basically, this is also what I do to find the sweet spot, only without the tools. (And in addition I usually don’t re-clamp a knife more than once and I put the backs of knives often on the pins – all to increase repeatability).
I usually clamp a knife, then use a stone (or more accurately, my finger on a rod) to see what would “overall” be the best position and then re-clamp the knife to this position. It’s a lot less advanced than your method with tools, but it’s easy and in practice it works out quite well.
Molecule Polishing: my blog about sharpening with the Wicked Edge
4 users thanked author for this post.
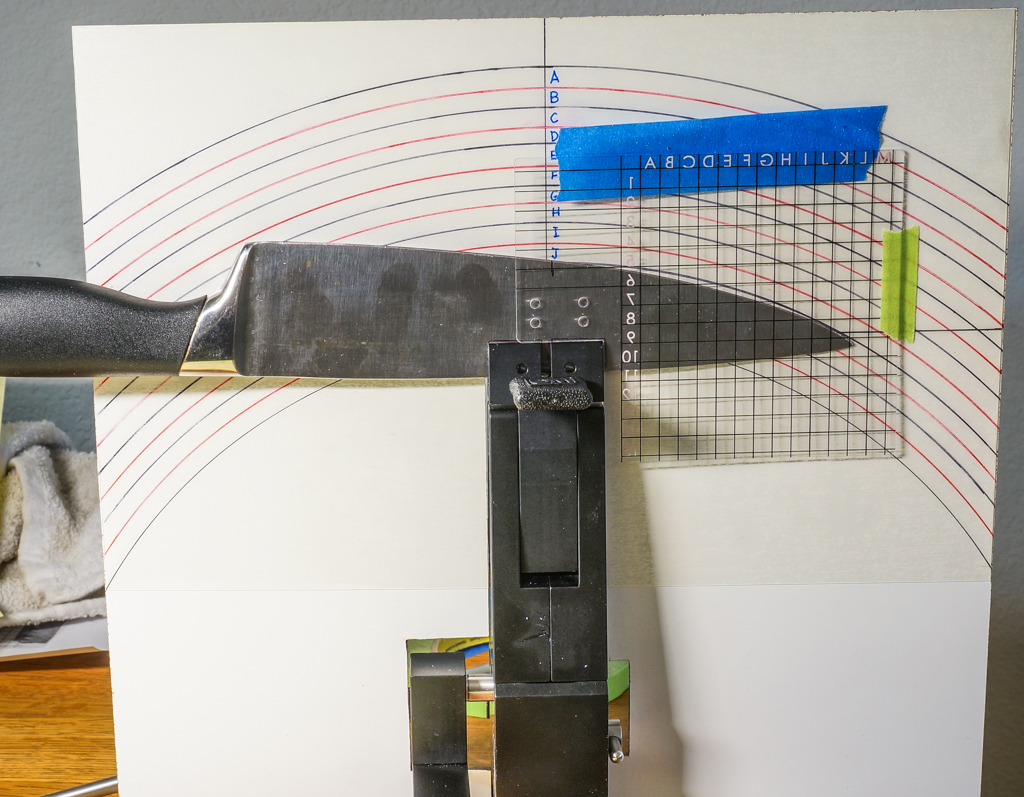
12/20/2017 at 6:38 pm #43275Here are a few photos of the circle contour jig in use. First is a Wusthof chef’s knife. The black line demarcation between the relatively straight and curves parts is hard to see but it’s roughly in the “5” box of the alignment grid. This knife aligned well with the circular contours, even going beyond the black mark:
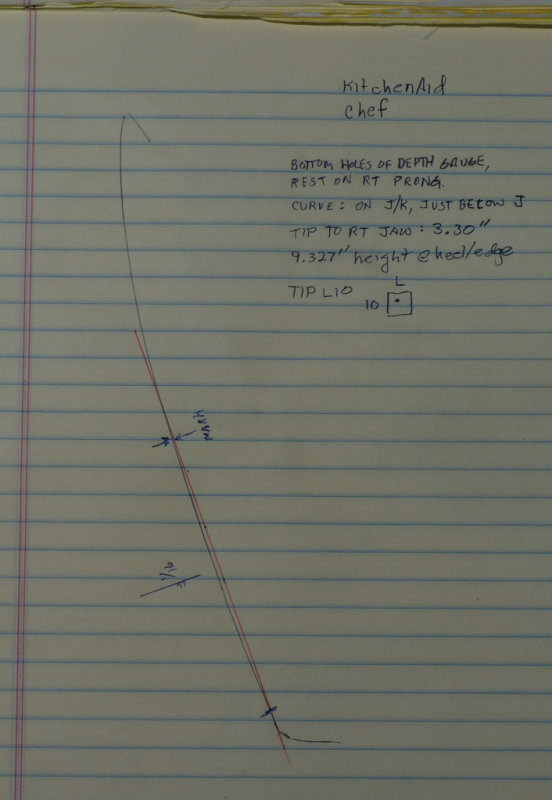
Next is a KitchenAid chef’s knife. First, here’s the traced outline of the blade onto a piece of paper so I could find where to draw the demarcation (black) mark on the knife before putting it in the clamp:
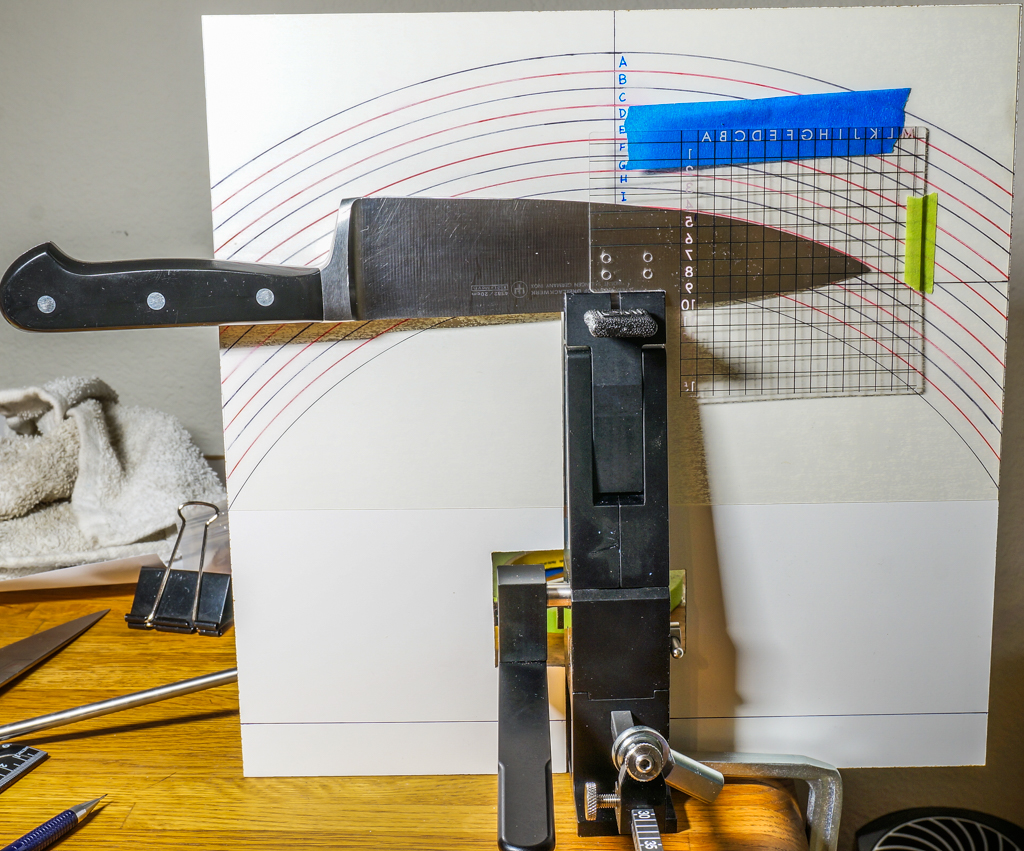
and here’s the knife in the clamp, in the location where I got the closest match between the circles and the knife’s curve to the right of the black mark (note this one did’t conform as well as the Wusthof, but still pretty close:

And here’s the same knife but with the alignment grid added. Note that I’m setting it on the top of the clamp jaws and up against the right edge of the clamp (rather than using the depth key to hold it). You need to take a small rat-tail file and cut a small relief in the corner of the cutout on the alignment guide since the clamp corner radius was different than the radius cutout of the plastic alignment guide).
7 users thanked author for this post.
12/21/2017 at 9:34 am #43305Man, that is super cool. I’m really excited to hear your thoughts once you’ve given it a go and sharpened a knife with this method. It could be a game changer.
2 users thanked author for this post.
12/21/2017 at 11:18 am #43306What would be the best way to test this out? I’m open to suggestions on whether people will need to see microscope measurements of bevels to believe it works, or whether just naked-eye will be good enough, or something else. Most of my expendable knives (the KitchenAid knife set) are starting with uneven bevels so they’ll be hard to judge unless I do some reprofiling.
It’d be better if someone who actually knew what they were doing (as far as WE usage experience) could cobble together a similar jig and test it out, so that we remove my WE inexperience from the equation.
I’m still reluctant to sharpen my good knives, but I guess I’ll have to get beyond that at some point soon. I also need to find some dedicated place to mount my F&S, since (and maybe this is just me) I’ve noticed in the several different places I’ve mounted my F&S, the motion and control of the stones feels completely different depending on the height it’s mounted at and whether I’m standing or seated. Standing gives a better view for keeping the stone faces flat on the edge, but seated is way more comfortable and the motion of the stones feels more natural. I’ve also tried sitting at the tip end versus the handle end, and even though sitting on the tip end gives a somewhat better view of the edge and especially the tip, for some reason it seems more prone to accidental injury if you lose focus. Any advice on mounting height, stand vs sit, and tip vs handle end? I’d consider safety the most important factor, and over time you can probably adapt to just about any position.
2 users thanked author for this post.
12/21/2017 at 11:49 am #43307What would be the best way to test this out? I’m open to suggestions on whether people will need to see microscope measurements of bevels to believe it works, or whether just naked-eye will be good enough, or something else.
I’d start with a cheap, thrift store knife, maybe a chefs knife, and I’d measure the bevel widths before and after as well as you can, or just take a photo of the before and after from the same distance so you can compare what has changed. For the initial evaluation, just eyeballing it would work. If you get good results, then we can figure out how to drill down a little more to fine tune it.
-Clay
1 user thanked author for this post.
12/21/2017 at 11:50 am #43308@graphite what is the radius of the smallest circle?
-Clay
12/21/2017 at 12:05 pm #43310I always mount the knife with the handle facing me because I feel that it is the most natural way and, like you, it makes me a bit nervous having the blade pointed right at me. If you’re looking for the most versatile mounting option, Josh of Razor Edge Knives has his older style WE mounted on a panavise. This allows him to rotate the whole setup so he can get a good view of the knife any time he wants. Here’s a video where you can see his setup.
3 users thanked author for this post.
12/21/2017 at 12:05 pm #43311@graphite what is the radius of the smallest circle?
Smallest is 7.0″ and largest is 10.5″
2 users thanked author for this post.
12/21/2017 at 1:20 pm #43314@graphite – I’ve attempted to duplicate what you’ve done as a PDF. Please have a look and let me know if I’ve got it right: Sweet-Spot-Guide-1
The idea is to print it, maybe tape it to the vise while mounting the knife to test out how the blades line up with the circles and then use a marker to see if the stones are hitting the same elevation of the bevel along the whole length i.e. equidistant from either the edge or shoulder at the tip, belly and straightish section.Edited with new file.
-Clay
Attachments:
You must be logged in to access attached files.
12/21/2017 at 1:43 pm #43316What would be the best way to test this out?
I’d start, like Clay, wth naked eyeballing. Next step would be a microscope 50x where you can actually measure the edges if you take pics. And then maybe higher enlargements
Molecule Polishing: my blog about sharpening with the Wicked Edge
-
AuthorPosts
- You must be logged in to reply to this topic.