Polishing an Elmax blade
Recent › Forums › Main Forum › Techniques and Sharpening Strategies › Polishing an Elmax blade
- This topic has 31 replies, 10 voices, and was last updated 08/31/2015 at 6:42 am by
Mr.Wizard.
-
AuthorPosts
-
04/15/2015 at 9:55 pm #25261
Im still new to this system so I think I might be missing something.
With the Wicked Edge I have been able to put a nice polish and every blade I have sharpened so far, even mirrored a few. However, I have a Microtech with an Elmax blade I want to mirror polish. I am using the Wicked Edge pro pack II. What I have found is that this steel, while easy to sharpen, especially with the Wicked Edge, is truning out to be a bastard to polish. The pro pack II jumps from the 1000 grit diamond stone to the micro fine ceramics 1.4/.6 micron. I just cant seem to get the scratch pattern from the 1000 grit out of there. So far I have done some stainless steels, and carbon blades, VG10, and havent had any issues, but this Elmax is just not wanting to go easy on me. :side: I am now wondering should I use some 1500 and 2000 grit sandpaper to “fill” in the gap from the 1k grit diamon stone to the ceramics untill I pick up the superfine 1200/1600 ceramics, or just keep working the micro ceramics? Or, is this just bad technique on my part? Thanks folks.04/15/2015 at 10:45 pm #25262I advise patience before adding more to your system – do a few more knives and then come back to it. By then, your stones should be much more broken in, especially your finer diamonds and it will be easier to clean up their scratches.
-Clay
04/15/2015 at 11:51 pm #25263I advise patience before adding more to your system – do a few more knives and then come back to it.
That’s great wisdom and a critical thing to think about at the beginning. After about a dozen WE sharpenings I attempted to mirror finish CTS-XHP and was disgusted at my results both aesthetically and functionally. Truth is, I was blinded from the obvious fact that although it’s a superior tool for sharpening, it’s still a tool and not a machine. Therefore, in order to get the results I wanted, I knew I had to slow down and try to understand every facet of the overall system as its operator. Success would eventually be in tow. I’m definitely still learning and definitely getting better. My advice, as tempting as it is after seeing all those awesome photos of high-end folders with supreme blade steels mirror polished, don’t fly too close to the sun just yet. Best case scenario – thinking about nothing other than a mirrored edge that you expect will be a direct byproduct of a set sharpening progression will leave you constantly frustrated at your results. Worst case scenario – coming down on the edge and cutting yourself because you were moving too fast, were too frustrated, etc. Imho get to know your particular unit (don’t even go there, gib 😉 ) and it’s unique break-in process. It’s a beautiful thing.
Back to the Elmax! I know ZT had issues with it early on. Something about messing up the heat treatment during the grinding phase perhaps? However, I’m not too sure about Microtech. We do know that Elmax has pretty a pretty substantial amount of Chromium in the mix, so it should take a polish quite nicely. I think Elmax has something like 18 points of Cr in regards to the the total mass% of the alloy. Anyway, I’m definitely not an expert on steel(s)…
I really hope Josh will jump in and comment at some point. I’m pretty sure the ZT he recently mirrored and shared with us on video is Elmax… S35VN?… Anyway, even if it’s not Elmax, I can pretty much guarantee he’s sharpened multiple knives with the same steel and has some insightful takeaways for you!
04/16/2015 at 10:28 am #25269Thank you both, Mr. Allison, and KinfeKnerd for the advice. I think I will back off on this blade for a bit and get a few other knives in, then come back to it.
KnifeKnerd, I truly like the analogy of machine and tool. For me at least this sinks in my thick skull. lol. I will go back and work a few other blades to work on refining my process with this, as well as insuring that the higher grit stones are broken in.Now, its off to the bed. lol.
04/16/2015 at 2:23 pm #25270I suggest lapping your micro fine ceramics. That will help them a lot. My polishing changed dramatically after I did that. Also…if you’re going to get anything extra…get the 14/10 strops. They will help tremendously on getting you to a mirror polish
Sent from my iPhone using Tapatalk


 04/17/2015 at 1:19 am #25271
I have had good success using different grades of fine grit sandpapers. Auto body shops are a great resource and allow you to add to your arsenal and learn more about what works an why in an inexpensive way.
Aloha,
Cliff04/17/2015 at 12:07 pm #25274I don’t like to contradict anybody on this forum, as I’ve been proven wrong more than once. However, I recently lapped my micro-fines and had disastrous results. I used a 1200-grit diamond plate and where they had earlier performed exactly as expected, now they performed more like the 1200-grit – at least that’s the way the scratch lines appeared.
Fortunately, I was able to restore them to finer grits by re-lapping them on diamond film. Unfortunately, they aren’t exactly back to where they were, so they’ve been relegated to the back shelf of my stone progression. An additional concern is whether they will continue to produce the same grit finish over time – or have I removed the bullet-proof factory finish?
An interesting tidbit on the re-lapping exercise… Using film on a glass or granite plate left areas of the faces untouched. Apparently there were high and low spots which I hadn’t gotten completely flat. It was obvious that I was going to use an awful lot of time, energy and diamond film to complete the re-lapping process. So I took a small swatch of film and “sanded” the surface with my thumb and index finger, just like you would to sand a scratch out on your truck’s fender. Worked fine. Microns of flatness is overkill. Hell, a couple of thousandths is overkill. We don’t lap here for precision, we do it to restore the surface. A variation in stone thickness of 0.010″ will produce an angle change of about 0.1 degree.
My experience coincides with other reports in this forum, but it’s possible that lapping with a much finer grit diamond substrate may produce different results.
And dat’s da troot.
04/17/2015 at 5:16 pm #25276Just my experience so TIFWIW. After the 1000s I only have the 1200/1600 ceramics along with the 5/3.5 strops and kangaroo strops that I have 1/0.5 CBN spray on. I haven’t polished any of my own blades in awhile as I prefer a toothier edge, and I’ve never lapped my ceramics, just occasionally rub them together.
I have somewhere between 175-200 knives on my stones (I think I need to finally break down and get some new 100/200s) so I have a very very fine finish coming off the 1000 grit. Something I have noticed especially when doing a wider bevel is that even if I use the angle cube on the ceramics to match the angle I’ve been sharpening at, when I match the angle exactly, the ceramics seem to only hit the shoulder portion (upper part of the bevel). It gets very sharp, but only a strip along the shoulder gets polished. I’ve found that in the end, I usually have to widen the angle by about 2 complete turns of the micro adjust to hit the rest of the bevel. Doing this, I’ve been able to achieve better results with my setup. It’s also something to take notice of if you drop your angle 2 degrees to strop and the goal is an extreme polish.
With my setup, the key is spending some quality time on the ceramics making sure the entire bevel is getting attention. I’m sure if I had the 14/10 strops and the micro fine ceramics I could get even better results, but in the end I have to hold the knife under light at a certain angle to see any scratches and they’re very very faint.
So patience and technique are the keys along with figuring out the little tricks and paying attention to little details such as if you’re hitting the entire bevel. Here is one of the recent knives I’ve done with my setup so I know much better results are possible.
 04/17/2015 at 6:10 pm #25277
An additional concern is whether they will continue to produce the same grit finish over time – or have I removed the bullet-proof factory finish?
Tom,
Isn’t exposing new, fresh grit one of the beauties of lapping? Or is this not the case with ceramics? It seems knife sharpeners across the board have conflicting opinions on whether or not ceramics should be taken off of the lapping list altogether. I lapped a Shapton 3000 grit ceramic on 120-400 grit automotive sandpaper a while back, and, although it took FOREVER, the owner of the stone was/is extremely happy with the performance.
Also, based on what others have said, I’m under the impression that the grit level of the abrasive used for lapping doesn’t alter the grit level of stone itself. I didn’t completely understand this at first (I honestly still don’t understand entirely). Someone then explained to me that it’s actually the surface area being altered as the coarser abrasive leaves peaks and valleys, but the grit level remains the same. For example, if the peaks and valleys reduce the surface area to 1/2 of what it was originally, the grit on the peaks remains the same but it will now take twice as long to do the same amount of work/produce the same results it would if the surface area was unaltered… Or is this totally and utterly wrong?
Grrrrrrr :angry:
^ that frustration isn’t directed at you, it’s ceramics that annoy me. ^
Again… one of the reasons why I’m loving lapping films.
04/17/2015 at 6:40 pm #25279The micro-fine ceramics are very hard. When they come out of the kiln, the grits are sintered and look very flat under magnification. Lapping them with a diamond plate, which is even harder will texture the surface to somewhat resemble the grit size of the diamonds. Because the stone will be lapped in multiple directions, the area of the peaks may be smaller and that will actually increase the space between them, meaning you’ll slightly get smaller, deeper and more widely spaced scratches from the stones than you had before lapping. Lapping with higher grit diamonds will make for a finer texture with smaller peaks. Eventually the peaks will wear off but it takes time.
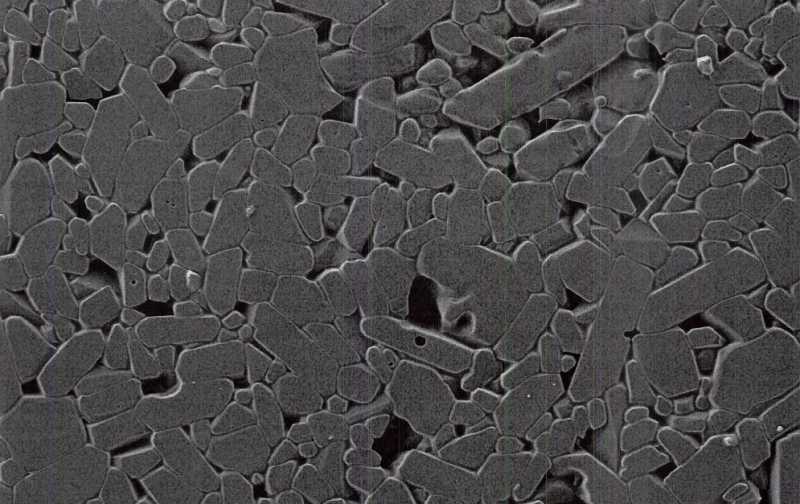
Here’s a picture of the micro-fine stone at 1200x:
You can see that the particles are very flat so you can imagine how that surface will change as you rub diamonds across it.
*A note on the stones themselves – They are made from aluminum oxide particles that have been sintered at very high heat. The original particles in the micro-fines are in the range of 2.4um-48um for the coarse stones and 1.4um-25.2um for the fine stones. After sintering, the particles are fused and flattened into the form you see in the image above. Calculating the actual grit for these stones is very challenging which is why the manufacturer uses a metric called Roughness Average or RA. They converted their RA numbers to microns for us though it’s not extremely precise and is based mostly on the size of the scratches they leave. We’re in the middle of a project with Los Alamos National Labs to improve our sharpness testing machine design and tighten up our experimental methodology. Part of the project will be examining edges under their SEM. One of the things we’ll be looking at are the scratches from the micro-fines in an attempt to precisely quantify them.
Attachments:-Clay
04/17/2015 at 6:53 pm #25281Here’s a picture of the micro-fine stone at 1200x:
Clay, thank you for the pic! I was actually just thinking how nice it’d be to have an image or two to look at. I’d be super awesome to see pics of a ceramic stone after lapping with a handful of different grits. Under high magnification obviously… But that goes without saying :side:
04/18/2015 at 3:58 am #25295Thanks folks! awsome knives. Also great shot, and info about the ceramics!
An update. This is knid of long, sorry. I went back to some other knives and really took my time with the 800 and 1K stones, working slow and watching the “scratch patteren”. Dont know if that is the right term or not. I found I need to pratice. I decied that on the last blade (AUS8) I was working to add in the ceramics, 1.4/0.6. Using the 1.4 ceramics I noticted that while one side was getting from shoulder to edge, the other was only hitting a small, band for lack of a better word, between the shoulder and the edge. I went back to the 1K diamond stone insuring even scratch patteren, then tried it again paying closer attenion to what I was doing. Same thing happened. Again I went back to the 1K stone. This time around I placed the that ceramic on the other side, to insure that I was not just doing something funky with my left hand for it to do that. Well it did the same on the right. Intresting. I drew a grid on each stone with a #2 pencil, and the rubbed them together to see what happened to the grid. This link is to a photobucket. I have not yet figuered out how to post pics that are not huge, so I hope you folks will forgive me.
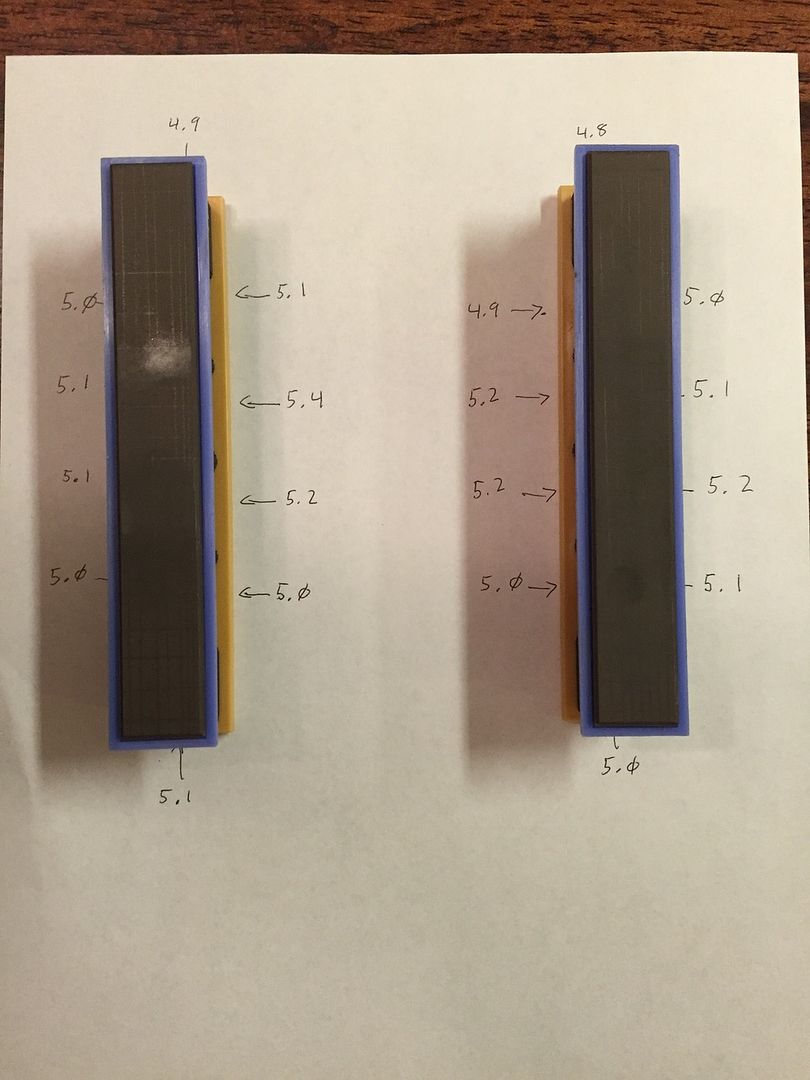
measurements are in mm, sorry it was just easier at the time.


After sitting these one on top of the other I noticed they would not sit flat. I broke out digital caliper from my reloading area. Yep I’m one of those goofballs always grabbing up brass off the range when Im done. :whistle:
On a flat surface one of the blocks espically can has both horizontal, and lateral play. A fancy way to say that it will rock back and forth, as well as side to side, instead of sitting flat.
So do I rub these together to try and flatten them out, how do I fix this?
As for getting a mirror polish, I still have some pratice to do, and some breaking in on the 1K stone as well. For the time being the Elmax balde is sitting to the side, as I got side tracked with this.
Also, please folks, dont think for a second that I am knocking the Wicked Edge for this. I am loving this set up, and chose it over replaceing my water stones. Long, heart breaking story short, they got busted. I have other diamond plates, and oil stones, but this freaking “system, tool?” what ever you want to call it is amazing! I used my wife’s junk knife drawer,(at least thats what I call it) for most of my pratice knives.Thanks again folks!
P.S. My wife is now scared of the junk knife drawer.04/18/2015 at 12:29 pm #25297My opinion is to let the stones alone. I don’t think the lack of flatness is causing your problem. I use up to six levels of grits finer than ceramics with film on glass and since they’re home-made, there’s some variability in their thickness. This means I use the SWATs (VSTA’s) with each step all the way from 400 grit, up to 0.1 micron. Occasionally, I’ll see the same thing – suddenly there’s a new facet appearing on the bevel. The cause is usually that one of my micro-adjusts has come loose and is moving on me. I’ve had them move as much as two full turns. If the new facet is down on the shoulder, I can usually go back a step and fix it. If the new facet is up on the apex, it usually means having to go back several steps to fix it. This problem is more obvious because the WEPS lets us work at a level of flatness not normally seen with other systems. I can normally see errors of 0.2 degrees – sometimes even 0.1 degree.
I’m a fanatic user of the SWAT system and I still check each step with the handheld microscope. Any angular error is seen immediately if you’re looking for it.
04/19/2015 at 3:03 am #25303I agree that the lack of flatness is proably not the main cause of the problem. All part of the learning process when learning something new, or a new way of doing things. Drawing the grid on the stones and measuering, well to be honest, it was a distraction that caught my attention and I found intresting so thought I’d share. ADD, it’s a gift and a curse. lmao. I’v had the adjust knobs come lose on me a couple of times, so have started checking them as I go. I am not familiar with SWATs. If you dont mind, could you point me to an info source?
I normally use a plain old magnifying glass as I go, which is an endless source of amusment for my wife. Picture if you will one long haired goofball with an eye patch, (no, its not for fashion, lol) and a magnifying glass at his work bench. Like a wacked out planters peanut guy. 😆 As for Elamx, so far I love using this steel, and sharpening hasnt been as big a pain as I thought it would be. Though this is just my personal thoughts.04/19/2015 at 3:19 am #25304I am not familiar with SWATs. If you dont mind, could you point me to an info source?
Kyle’s thread with step-by-step instructions:
https://knife.wickededgeusa.com/forum/10-advanced-techniques-and-sharpening-strategies/13478-vsta-instructions#22007Dan’s video explanation:
-
AuthorPosts

- You must be logged in to reply to this topic.