How Would You Attack This Blade?
Recent › Forums › Main Forum › Techniques and Sharpening Strategies › How Would You Attack This Blade?
- This topic has 14 replies, 4 voices, and was last updated 06/05/2020 at 6:00 pm by
 Marc H (Wicked Edge Expert Corner).
-
AuthorPosts
-
01/27/2020 at 12:03 pm #53325
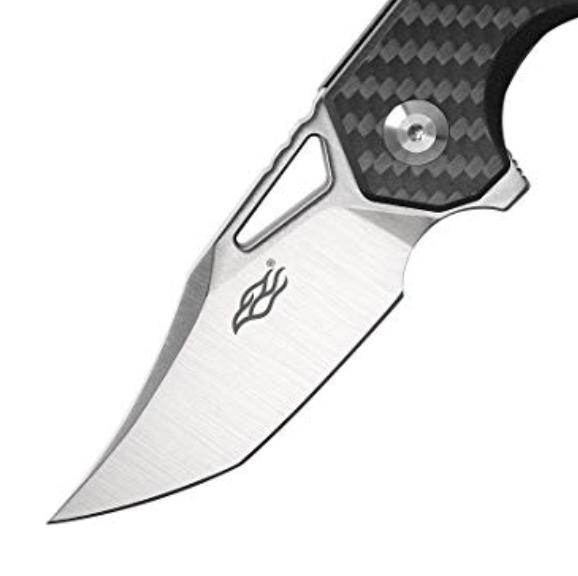
I just got this Ganzo FH61 and I’m wondering just how I’m going to sharpen it. I’m not real concerned about maintaining the exact apex of the “curve” of the belly, so I’m thinking about just mounting it up like it had a rounded belly. My strokes will follow the edge like usual, which may end up rounding over that belly apex.
Attachments:
You must be logged in to access attached files.
01/27/2020 at 3:02 pm #53328That’s a nice looking knife, especially at an inexpensive price point. The combination of these different edge profiles and angles adds to the interesting quality of this EDC knife. IMO, to ignore the edge break and round it over as if it was a long continuous belly takes away from the character, interest and function of this knife.
Without holding it is my hands and physically trying to clamp this knife myself, I can only guess and suggest that I would try to clamp it in a manner that would allow me to sharpen the heel most blade portion alone, as a single blade. Then I’d reclamp the knife, if necessary, treating the tip or tanto-similar portion again as if it was a separate knife. This would hopefully allow me to maintain and accentuate this edge profile break.
The large incorporated recasso or sharpening choil should eliminate sharpening difficulties at the edge’s heel portion. As for where and how I’d clamp this knife with it’s squared spine integral thumb hole, without having it, holding it, and trying it, it’s difficult to exactly say. On a first attempt, I’d try to clamp it across the flattened spine portion around the integral thumb hole. The upper blade sides just below the spine would be my second choice clamp position to try.
Marc
(MarcH's Rack-Its)01/28/2020 at 8:55 am #53342Thanks for the help. You’re right as usual and I should do everything I can to maintain that blade shape. Actually, my normal procedure is to sharpen in sections anyways, so that might work to this blade’s advantage. As you said, clamping will be a concern, as there are a lot of surfaces there. It really is a beautiful D2 blade and at a price that will reduce some of the anxiety I will have with my first strokes.
01/28/2020 at 9:49 am #53343My sharpening advice here is the same as I would share with you.
Marc
(MarcH's Rack-Its)01/31/2020 at 3:37 am #53366I go with the principle of keeping the factory blade shape.
I would try to clamp the blade with the vise on the “thumbhole” area, with the “belly” of the forward section mounted high and relatively horizontal, with the straight heel section at about 30 degrees on a rising slope. From here, you can work both sections independently. Take care to not round over the point of convergence between the two section.
-
This reply was modified 5 years, 6 months ago by
 tcmeyer.
01/31/2020 at 7:51 am #53368Good advice. I def going to attempt to keep that factory edge shape. I guess that’s what attracted me to the knife in the first place, so you’re both right…I should keep it. Thanks.
03/05/2020 at 2:59 pm #53651Who love this guy F7551 from Ganzo? I heard about it for a long time, but tried it to use onle few weeks ago Bought it here as usual https://www.amazon.com/stores/node/16154740011?_encoding=UTF8&field-lbr_brands_browse-bin=Firebird&ref_=w_bl_hsx_s_s
It all depends on the steel used for the blade. Personally, I prefer the Hogue Doug Ritter in M390 or Griptillian in M4 or Hinderer xm-18 in M390 or TRM Neutron but I carry a CRK most days.
03/05/2020 at 3:47 pm #53652After looking at the FH61 for a while, I couldn’t resist and bought one from Amazon, $25, the blue-gray one. Mostly because of the D2 steel, which is what I use to make knives. You can’t buy much D2 for$25.
First observation? The only knife that ever drew blood on opening. My fault of course, as the knife is too short for my mitts and my ring finger got hit by the tip when I pulled on the flipper lever. It must have been wrapped over the top of the blade. Didn’t know until I looked over at my mouse and saw it was rolling around in a red puddle. No problem.
The warranty sheet said it was “laser sharpened.” Sorry, but not so. Under the ‘scope, it looks like any other belt-sharpened factory knife. That said, it is really sharp.
I’m gonna give it to my brother-in-law, who has trouble opening his Delica, due to weakness caused by RA.
03/05/2020 at 4:07 pm #53653Nice gift. They do come pretty sharp, although I’ve been sharpening them right out of the box. You’re a much better judge of D2 than I am, for sure, however from all I’ve read, this D2 is good stuff. That’s one of the reasons I started buying Ganzo knives. Add the bearings and I couldn’t resist.
03/10/2020 at 3:00 am #53696Of course, I couldn’t leave well enough alone and sharpened the Firebird knife over the weekend. I tried to use the mounting position I proposed above, but found that it’d only work if I disassembled the knife. The thick G10 scales get in the way of stoning the heels section.
So I did it in two sections: one with the heel section mounted horizontally (normal position) and secondly, with the blade tilted so that the forward section was horizontal. The factory angles were pretty variable, suggesting that it was the work of a hand-operated sharpening station. Generally though, I’d say it was about 18 dps, so that’s what I went with.
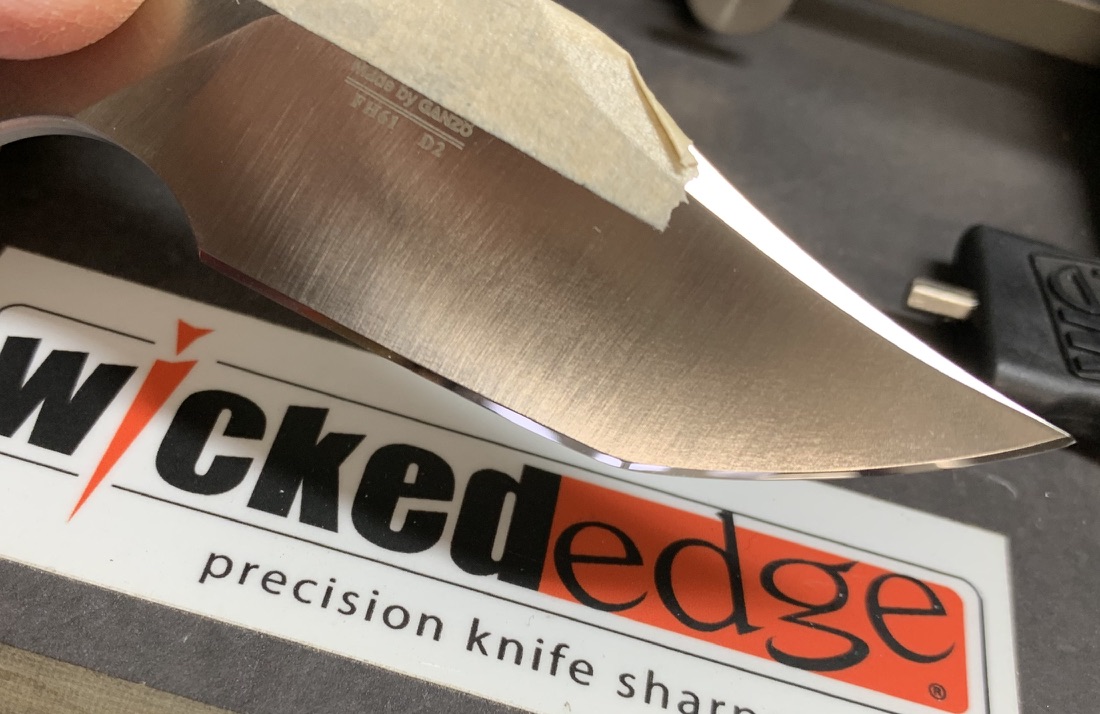
I started at 800-grit and went through 1000, 1500, 2200, 3000, then 6, 3 and 1.5 micron DLF. The micro photos below were taken I think at 3000 grit.
Each section was stoned using a great deal of care not to roll the stones around the corner apex, as I wanted to retain the double-edge look. It worked out very well and the edge at the corner apex being every bit as sharp as the rest of the edge(s).
I didn’t take the time to set up my light box or to change to my close-up lenses, the the full-size photo is less than impressive.

Here’s a micro of the corner. The opposite side is almost exactly like this view:

The point of the exercise was to demonstrate how the factory edge could be retained. That having been proven, the knife is now substantially sharper than “as delivered.” And downright scary. Mostly because of the compact nature of the beast. If you have a secure grip on the knife when you open it, your fingers are going to be wrapped around the scales, and therefor exposed to a lot of very sharp points and edges. You not only must be aware of the knife’s two edges, but you must also be aware of the clipped-point tip, which is sharp enough and shaped so that it can bite you both ways.
1 user thanked author for this post.
03/10/2020 at 8:50 am #53697Looks awesome! Just what I needed to see. I have yet to do mine, but I was hoping to be able to mount once and sharpen in two sections. I guess I’ll have to mount twice, one for each section. Thank you for taking the time to post this. It really is a nice looking blade. For me, the knife is a good fit in the hand and deploys very smoothly.
03/11/2020 at 3:58 am #53699I’ve been thinking about replacing the scales with something less bulky-looking. I’ve got lots of handle material stashed away, including a lot of Honduran Rosewood. When and if I ever do it, I’ll be sure to post it. Gonna lose the pocket clip for sure.
03/14/2020 at 8:15 pm #5371803/15/2020 at 2:06 am #53721Looks really good, NorCalQ!
06/05/2020 at 6:00 pm #54358JayGrin, I can’t speak for that particular knife. I can share, in general, you don’t have to position and clamp a knife so it always rests down on both pins or even just one of the pins of the depth key. The depth key is simply used as a positioning guide. What matters is simply that the knife is held securely. Sometimes I make use, allowing contact on only one pin of the key as I rotate the blade tip end up or down from a more horizontal position to better achieve a “sweet spot” clamping position.
Even if you need to raise the knife so it’s held just by the very tips of the vise jaws, this is fine. All that matters is that the knife is stable, steady and secure. The alignment guide, in particular, the wider, “Wicked Edge Advanced Alignment Guide” can still be utilized to record a clamping position even when the knife isn’t resting in contact with the depth key pins against the knife spine. The guide can be used first to record the tip position of the clamped knife. Then the guide can be flipped around to record a clamping position relative to the knife handle.
For your particular knife I’d attempt to clamp it on the very narrow flat appearing spine grind. Sometimes it’s helpful to use an aide to help the jaws better position and hold the knife. I usually use a small rectangular piece of dry real leather chamois cloth, (the kind that’s used fo drying cars). I’ve used cardboard matchbook covers, blue painter’s tape, foil tape, foam weather stripping material or foam tape, for example, when I needed to create a wedge shaped spacer to help hold the knife vertical to clamp it on the tapered ground knife sides. Anything you can adapt to help make the knife flat and parallel in the vise jaws. Use your ingenuity. Again, as long as the knife is held securely, rigid and stable is all that matters.
Marc
(MarcH's Rack-Its)2 users thanked author for this post.
-
This reply was modified 5 years, 6 months ago by
-
AuthorPosts
- You must be logged in to reply to this topic.

