Stock stone/strop progression (Lots of Pics!!)
Recent › Forums › Main Forum › Techniques and Sharpening Strategies › Stock stone/strop progression (Lots of Pics!!)
- This topic has 104 replies, 12 voices, and was last updated 04/09/2012 at 6:00 am by
 Josh.
Josh.
-
AuthorPosts
-
03/16/2012 at 1:24 am #2038
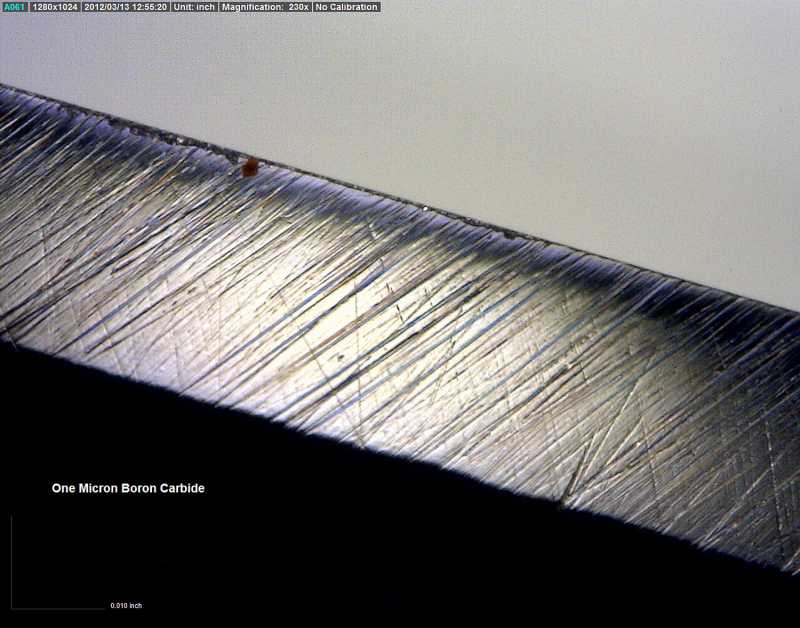
The next step was the 1 micron boron carbide on top grain cow leather:
1 Micron Boron Carbide Top Grain Cow Leather
Here the burnishing and polishing seem pretty clear. All the fine little ridges are flattened out, reducing the light scattering and allowing us to see the deep scratches. I put on a polarizing filter because so much light was now reflecting back into the lens. In retrospect, I wish I’d done a step at this point with clean, top grain cow leather. Maybe even before the split grain horse butt leather. I’m taking notes for a future progression as these questions come up.
I’ve got some emails and calls to answer, but I’ll come back and continue once I can break free.
Attachments:-Clay
03/16/2012 at 1:36 am #2039Great work Clay! It looks that leather strops do much better polishing than stones, although particle size is about the same. But I am interested, if this polishing is transfered to cutting performance also. Do you plan to perform any cutting tests after different stone/strop progressions?
I think that’s a great next step. Most likely, I’d try to divide the cutting tests into at least two categories; push-cut and slice.
-Clay
03/16/2012 at 1:52 am #2040However, sometimes I find it hard to identify the effects of the stropping compounds. How, for example, can we see in the Global knife pictures the differences between the effects of the 1 micron compound and the .25 micron compound (other than more burnishing, due to the fact that you did more stropping movements)?
Also, when on the Global knife, you go up again in micron sizes (after the .125 micron), the edge looks more refined after the 3.5 and 5 micron pastes than after the .125 micron compound. Does this mean the abrasive effect of the 3.5 and 5 micron pastes is minimal? Or something else?
This is where the progression is flawed because I used the horse butt leather for the .25/.125 and cow leather for the 5/3.5 strops. I wish now I’d used the cow leather for both! I think the biggest difference we’re seeing is in the leather itself. Clearly I’m going to have to repeat some of this using the same leather (ideally from the same lot) to do the entire progression. One thing that seems easy enough to see is the increasingly larger scratches as I descended back down the ladder from 3.5> 5> 10> 14.
-Clay
03/16/2012 at 3:18 am #2045wow! that is one beautiful edge! I just don’t understand how you got such a nice edge with minimal effort!!!! (i.e. 20 strokes per side all the way up to 1600!) It must have to do with the steel… how hard were you pushing on the passes? Also, how many passes did you do with each grit strop? Thanks for this Clay!!!
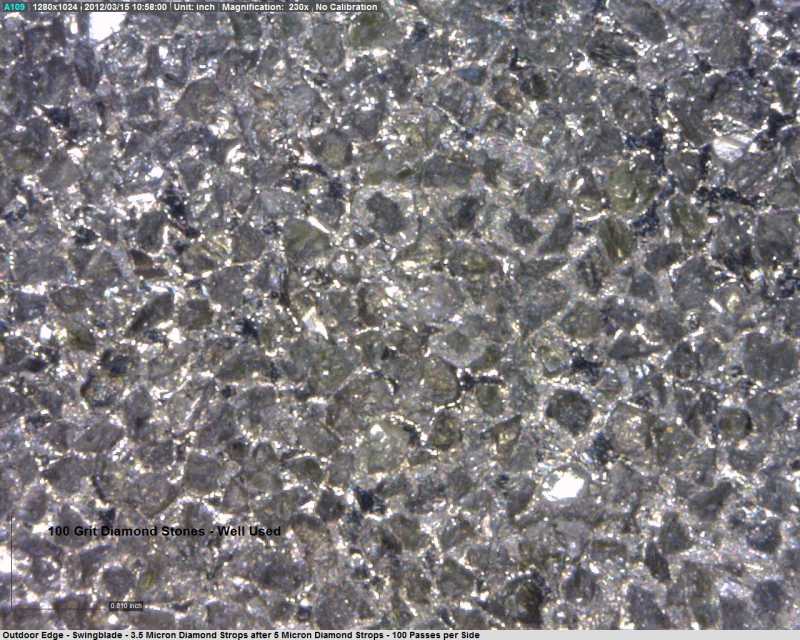
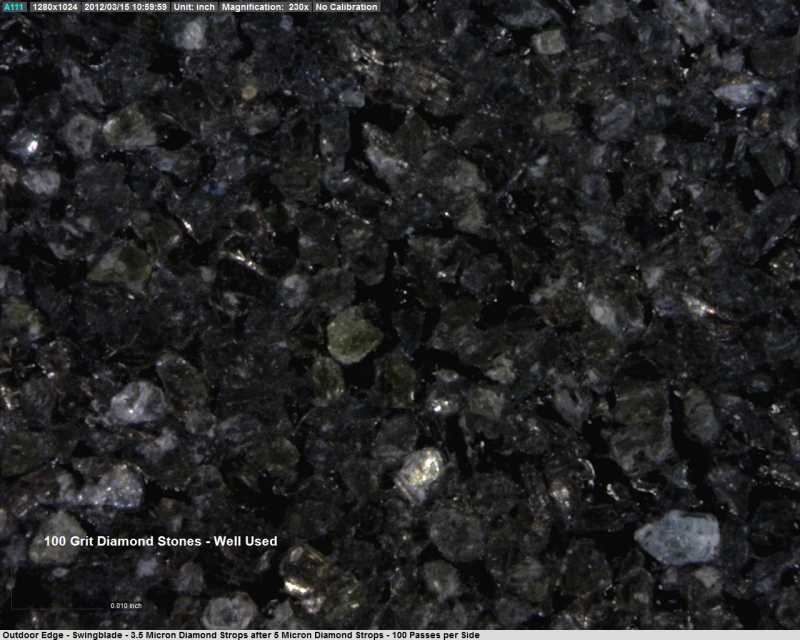
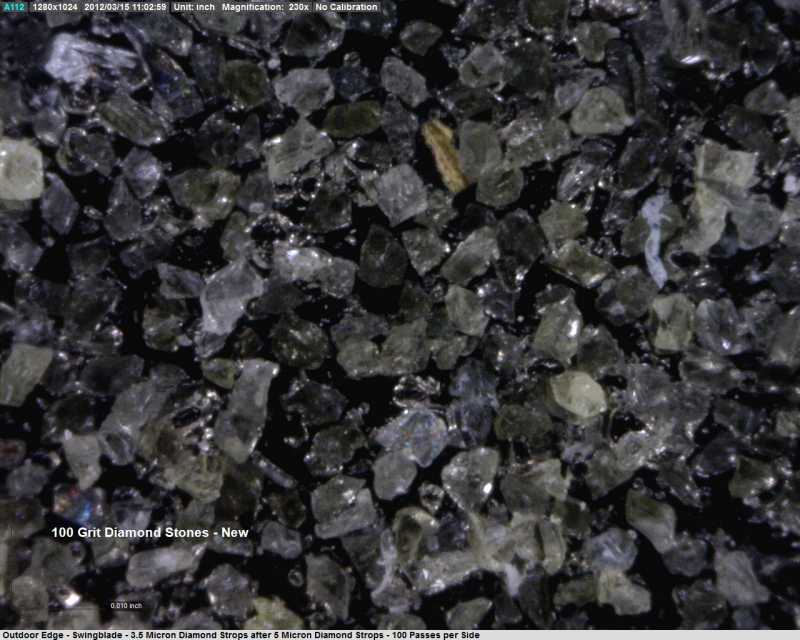
Here are some pictures of my 100 grit stones compared with some new 100 grit stones:
Used 100 Grit – Not polarized
Used 100 Grit – Polarized
New 100 Grit – Not polarized
New 100 Grit – Polarized
On the new stones, what you’re seeing are all the diamonds that have yet to be knocked of. Until those are gone, you won’t even be able to see the layer below. All the extra diamonds dig much deeper scratches and the edge you get is significantly more toothy until the stones are broken in. The same is true with all the diamond stones. I think that’s why I was able to move from grit to grit so quickly and end up with such a nice result. Another progression to do: New 100 grit> Old 100 grit> New 200 grit> Old 200 grit> New 400 grit> Old 400 grit etc…!
Attachments:-Clay
03/16/2012 at 4:47 am #2049Very clear, Clay. Thanks!
I guess I’ll do some experiments myself using the WEPS strops, that feel very smooth. They are clearly top grain leather. Are they cow leather?
Molecule Polishing: my blog about sharpening with the Wicked Edge
03/16/2012 at 4:57 am #2050Very clear, Clay. Thanks!
I guess I’ll do some experiments myself using the WEPS strops, that feel very smooth. They are clearly top grain leather. Are they cow leather?
They are cow leather. I’d love to see your results once you get some experiments done.
-Clay
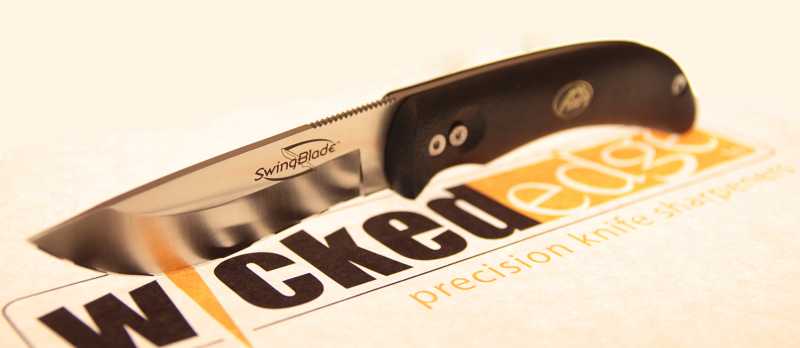
03/16/2012 at 6:54 am #2053Here is the Swingblade in all it’s glory:
Next I need to capture the edge polish…
Attachments:-Clay
03/16/2012 at 10:06 am #2056Great pictures, Clay! And those knives must be wickedly sharp…
Could you elaborate a bit on what you think we actually see for the mortals among us?
What do we see in the initial pictures of the Global boning knife after the top grain horse but and after the split grain horse butt leather? What is the main difference? (And did the split grain leather actually cause some scratches by itself in later pictures?)
In most of the stropping photographs I see the burnishing, flattening of the ridges, I guess due to the “stiction†of the leather.
However, sometimes I find it hard to identify the effects of the stropping compounds. How, for example, can we see in the Global knife pictures the differences between the effects of the 1 micron compound and the .25 micron compound (other than more burnishing, due to the fact that you did more stropping movements)?
Also, when on the Global knife, you go up again in micron sizes (after the .125 micron), the edge looks more refined after the 3.5 and 5 micron pastes than after the .125 micron compound. Does this mean the abrasive effect of the 3.5 and 5 micron pastes is minimal? Or something else?
Good questions Mark.
I want to do a lot more experimenting w/ the split grain leather vs. top grain leather. My sense is that, while the split grain will hold more compound, it will also hold more contamination, especially airborne silica. I also believe that the split grain leather won’t burnish the metal. I’m regretting introducing the horse butt leather into the progression, because it seems to have a lot more abrasive texture of its own, both on the smooth and split sides.
I think the change is pretty clear when moving up the first progression; the transition from the 10k Choseras to the clean, top grain leather shows improvement – the edge has been slightly burnished and is shinier but there are no new scratches:
10k Chosera
Clean Top Grain Horse Butt Leather after 10k Chosera
After next using the clean, split grain leather, you can see that there are new scratches:
Clean Split Grain Horse Butt Leather
The edge seems to have picked up some polish at this step too, but the polish seems to be a result of micro-abrasion and not burnishing. Since the split grain horse butt made new scratches and had been stored in a plastic bag since I got it in, there are two possibilities that I can see: 1) the horse butt leather, especially the split side is abrasive by itself 2) there was some kind of contaminant on the leather before it came in to the shop.[/quote]
Clay, I think your paddles are OK – It looks to me like you still exposed some scratches rather than contaminate. I can’t copy the pictures to draw circles, but if you look at the clean top leather, you can see hints of the scratches that the split leather exposes more – I think this is because the texture of the split leather gets into the grooves and cleans them out more!
03/16/2012 at 12:16 pm #2059Tom,
I see some of what you’re describing, the exposure of underlying scratches in that sequence, but in examining the progression several times, I can see clear, new scratches being made each time I use the split grain leather. The reason I went to a high polish, then backwards and forwards again was to be sure that I wasn’t missing hidden scratches. You can see that after the second ascending cycle to .125 CBN, the bevel was clearing up pretty well. It got better and better as I dropped down through .25, .5, and 1. By the time I dropped back down to 1 micron, there are hardly any visible scratches on the bevel. From there, the 3.5 makes a clear pattern of scratches. Then I swept back the other way with the 5 micron and so on. At each iteration, the newer, bigger scratches are visible over the previous, smaller scratches. When I reascended, the same thing happened in reverse. By the time I hit 1 micron again, the edge looked great, hardly any scratches at all. As I passed on up through .5, .25 and .125, I picked up more and more scratches that are obviously new. Something to note here is that the resolution on my microscope is such that each pixel is 1.72 microns wide, so seeing scratches much below 1 micron is pretty much out. That indicates that the new scratches laid on by the finer strops (split grain) are not a result of the intended abrasive, but of some contaminant or abrasive quality of the leather. Since we saw something similar with the split grain leather that had no abrasive applied, it seems fairly clear that there is something up with the split grain horse butt I’m using. I’d like to repeat the experiment with top grain cow leather through the whole cycle.-Clay
03/16/2012 at 12:50 pm #2060What a fascinating thread! I should have joined in much sooner. The quality of the micrographs are stunningly clear.
So a couple of points.
There is a relationship between the edge of the edge and the scratch patterns on the bevels so it is useful to evaluate these scratches, but ultimately it is how these scratches intersect with the edge of the edge. And as Tom has pointed out in previous work, these scratches intersecting the edge of the edge are often points of failure, either chipping during sharpening or during blade usage.
I feel like we are seeing two primary effects – a sort of contmination AND a revealing of underlying scratch patterns from coarser grits.
The latter is more straightforward, so I’ll discuss it first. When a finer compound / stone/ plate is used, the predominant effect is the elimination of the more superficial scratches first, leaving the larger ones remaining, with enhanced contrast from it’s surroundings which have become ‘shinier’ due to a higher finish.
Now this is a critical point. The deeper scratches from the previus grit should be eliminated at this time, not allowed to remain as artifacts for yet the next fioner grit, which will have a more difficult time eliminating these deeper scratches. This is the ideal approach. It does have it’s drawbacks, however in that this usually will require that you keep on sharpening even past the point of getting a sharp edge. More labor and time, but for these levels of study, pretty mandatory.
In some of the photographs, scratches appear but it becomes more challenging to discern scratches being revealed vs new scratches being created. You can see some deeper scratches remaining through a couple of grits. ALL scratches should be removed so that the only scratches present are all in one direction and of the same depth – that of the stone / abrasive being used. This is a lot more work.
Then any new scratches can more clearly be attributed to the new abrasive surface and the chances of hidden scratches significantly reduced or eliminated. With finer jumps in grit size this further eliminates these ‘rogue wave’ scratches.
So next is grit contamination. There are several sources possible and more than one may be present. There is the compound itself. It may be poorly formulated with contaminants or poor quality control or contaminated from ‘user error’. Then it may become contaminated from airborne contaminants. For cosarse grits this is pretty unimportant, but it isn’t at all unusual to have airborne particles several microns or tens of microns in size floating around. For this reason, stropping surfaces should be in their own individual baggies and ideally even cross contamination between two abrasive surfaces on a paddle minimized. Then there is metal contamination. Burrs from a previous sharpening can easily cause hugh scratches, either embedding themselves in leather or other strop or be floating around in stone slurries.
Then there is the substrate itself. Balsa does have some abrasive properties. So do papers, both of which can have particles embedded in it, typically clay particles from the water used in the manufacturing process of paper for instance or from particulates the tree is exposed to in its life as a tree.
Leather naturally has abrasive content itself. These silicates aren’t particularly hard but are hard enough to scratch metal. And random in size over a range as it is a natiural product. This is why leather is an abrasive surface and along with it’s draw is used to refine edges. One of the finest leathers that still has a good deal of draw to it is Kangaroo leather. For coarser compounds, you won’t notice the extra refinement, but as one decends into the submicron particles, these errant scratches and so forth become more apparent as a problem and show up as random scratches, which I believe is some of what I am seeing. I am quite comfortable in firmly stating that both my products (eg the 0.125 micron CBN, etc) and the Hand American products are some of the cleanest stuff you can buy, so I strongly suspect other sources of contamination.
In addition to the Kangaroo leather which provides an extremely smooth substrate, I also carry another product which is available for the WEPS platform – Nanocloth.
What does Nanocloth do? NOTHING. Why would you want something that does nothing? To precisely address this problem.
If you strop an edge on nanocloth, NOTHING happens. No metal swarf appears at all. It has NO effect on your edge or as close to no effect as anything I’ve seen. BUT, if you spray, in the extreme, some 25 nanometer (0.025 micron) polycrystalline diamond on it – a very light coating, what you get when you use it as a strop is deposits of fine metal swarf.
The effect of using this nanocloth is a ‘pure’ compound effect. NOT a mixture of compound plus substrate effect.
So for instance, in the picture when the 0.125 micron CBN was being used and a number of errant deep scratches were produced, if nanocloth was used instead of leather, I would be quite surprised to see the introduction of all those errant scratches. Similarly so for some of the coarser compounds preceding it.
When you critically evaluate edges, it is so helpful to have a repeatable pure substrate to separate the effects of compounds from the underlying substrate.
And then there are scratch patterns from natural stones, which are a whole different ballgame, but that’s something for another thread.
It is a real treat to see such serious discussion of sharpening techniques and strategies among such knowledgable members. I hope that I can conribute to this on the forum in some small way.
In addition to Tom’s work, I really have to give a big thumbs up to Clay for designing a device that allows so many variables of sharpening to be eliminated that confuse and confound many ‘freehand sharpeners’, giving, in addition to being an excellent sharpening device, a device that allows the serious sharpener to explore the limits of techniques in such a profoundly clear manner. Combined with these micrograph, this platform represents an exciting level of sharpening research that I am quite proud to be able to be a part of.
—
Ken03/16/2012 at 1:07 pm #2061Ken,
Thank you so much for your input! I too really appreciate an owner of his business who gets involved in the furthering of his products… rock on Clay! And I also want to thank everyone else who has contributed (especially Tom)… all the info posted has been very helpful.
So Ken, where would one get this “kangaroo leather” for the WEPS paddles? And what about the nanocloth? I am very interested in looking into that… please post a website if Clay is good w/ it =) Thanks
03/16/2012 at 1:19 pm #2063Ken,
Thank you so much for your input! I too really appreciate an owner of his business who gets involved in the furthering of his products… rock on Clay! And I also want to thank everyone else who has contributed (especially Tom)… all the info posted has been very helpful.
So Ken, where would one get this “kangaroo leather” for the WEPS paddles? And what about the nanocloth? I am very interested in looking into that… please post a website if Clay is good w/ it =) Thanks
For now, you can contact me directly – (ksskss at earthlink dot net). In time, if Clay likes it, you can get it from him directly.
—
Ken03/16/2012 at 1:53 pm #2064Ken,
Thank you so much for your input! I too really appreciate an owner of his business who gets involved in the furthering of his products… rock on Clay! And I also want to thank everyone else who has contributed (especially Tom)… all the info posted has been very helpful.
So Ken, where would one get this “kangaroo leather” for the WEPS paddles? And what about the nanocloth? I am very interested in looking into that… please post a website if Clay is good w/ it =) Thanks
For now, you can contact me directly – (ksskss at earthlink dot net). In time, if Clay likes it, you can get it from him directly.
—
Ken[/quote]You’d have to send me some samples :cheer:
-Clay
03/16/2012 at 2:11 pm #2065Nice input Ken, thanks for joining in! With this particular study, I wasn’t really concerned with the edge, just the surface of the bevel so we could identify the effects of each strop. I need a higher magnification scope to see the effects below 1 micron, so I’ve got one on order. Hopefully that make a nice improvement in our visualization of what we’re doing. For the next study, I want to eliminate more variables. I’d like to stick with the stock Wicked Edge line-up through the .5 micron top grain cow leather strops. From there, I think it would be very instructive to go to the nano-cloth with the finer abrasives. BTW, in the last progression, poor quality compounds were never a question, I only get mine from the best sources 🙂
-Clay
03/17/2012 at 10:51 am #2084I’ll send you some samples in the next box I send out to you – very soon 🙂 Both nanocloth and Kangaroo.
I’ll be pleased to watch the results you get.
It’s a real treat to see you striving to push the limits of your device with your own product evaluations. Kudos to you!
And of course, my compliments to your good taste in compounds 🙂
—
Ken -
AuthorPosts
- You must be logged in to reply to this topic.