Stock stone/strop progression (Lots of Pics!!)
Recent › Forums › Main Forum › Techniques and Sharpening Strategies › Stock stone/strop progression (Lots of Pics!!)
- This topic has 104 replies, 12 voices, and was last updated 04/09/2012 at 6:00 am by
 Josh.
Josh.
-
AuthorPosts
-
02/21/2012 at 11:36 am #1713
Hey guys, quick question… I can’t seem to find any info to this effect… when going through the process of sharpening a straight razor I have found that the jump between the 1k stock diamond to the 14m pasted strops is too large… after 500 strokes per side w/ the 14m strop it has not removed any of the scratches. Which leads me to my question, what is the logical progression if I am sticking with all stock stones/strops (i.e. no chosera/shapton stones)? I just ordered the 1200/1600 ceramic stones as an “in-between” before I go to the 14m strops. Any suggestions or should I be good?
According to the grit chart in the sticky, it would actually be a step back going from the 1k to the 14m pasted strop (as the 1k is supposed to be 7m).
Thanks for your help!
———————————————————————————————————–
** Updated **
I compiled this as a reference for those of you who are interested in the progression photos but not all the discussion in between. I left my original OP above so you can see the problem I was having.
Tom’s series (pg. 1 – scroll down)
Tom from Jende industries does a series of photos trying to re-create the problem I was having (which he does successfully). In this series he jumps between the 1k stock diamond stones to the 14m WE pasted strops. He found that the jump between the 1k stock diamond stones to the 14m strops is too large of a leap. After 600-800 passes/side, and after adjusting the angle to where he was only hitting the very edge of the edge w/ the strops, he finally made some progress.
Clay’s Series (pg. 2-6)
Pg. 3 – Clay does a series of photos going from the 10k chosera stones polishing all the way down to .125m on CBN strops (final photo post # 2025). Pg. 4 – After having a nice mirror polish on the edge, he backs out to the 3.5m pasted strops to check out the scratch pattern left by that paste, and then goes even further out to the 5m pasted strops, which were really effective. On Pg. 6 Clay goes to the following progression: 10>14>10>5>3.5>1>.5>.25>1 microns. He did this while changing directions with each different grit so you could really see what each grit is doing… This was an excellent series!
Clay’s Series (pg. 7-9)
Here clay conducts an edge progression with all stock stones on Aus 8 steel, starting with 100 grit and going all the way up. He actually re-starts the progression in post #2059 (pg. 8) after taking a little detour (i.e. jumping straight from the 600 grit stock to the 14m paste). He re-starts it with the 600 grit and, on Pg. 9, goes up through the stock ceramics (1200/1600) and then jumps to the 14m pasted strops from there. He goes all the way down to the 3.5m pasted strops. This does seem like much softer steel then we are used to, however (keep this in mind).
Another one of Clay’s series (different thread) – You can check out this other thread started by Mark76, in which Clay shows photos of an edge at 510x while playing around with lapping films, strops, and paste vs. spray. Excellent info! See what happens to your edge w/ each subsequent grit!
Stone Comparison (pg. 11) – new stones vs. broke in stones
A picture (by Holymolar) similar to Clay’s microscope setup on how to consistently recapture the same exact spot on an edge when sharpening (Pg. 14, post # 2185).
My Series =) (pg. 16, post # 2409) – I progressed up from the 5k/10k choseras all the way to .5m Hand American sprayed leather strops. I post my observations here.
02/22/2012 at 11:34 pm #1722Here it is again! 😉
Straight razor and knife sharpening are completely different mentalities, although the same principles apply.
The default answer to any straight razor related issues is “you’re using too much pressure” 🙂 Pressure is a key component – you really need to go very lightly to keep the depth of the scratches shallow and consistent -especially at the higher grits. With pressure, you can also actually flex the edge of the edge very easily, and miss abrading it altogether.
However, I see 2 more possible reasons popping out at me before the pressure issue. The first is that the 14 micron paste is actually a little coarser than the the 1K diamond WEPS, so you are probably seeing the effects of the almost same size scratches. Secondly, the paste abrades differently than the plates – the plates are way more aggressive. But after 500+ strokes, you shouldn’t have that issue with the paste.
The 1200/1600 WEPS ceramics will serve as a good in-between, but you might not need to go all the way back to 14 micron afterward (1K Japanese standard is 14~16 microns). I would suggest starting at the 5 micron or even 3.5 after the 1600 WEPS Ceramic. As you can see from the microscope pictures, the ceramics leave a very good, clean edge to work from.
One thing you may want to try on the WEPS 1K Diamond is to sweep in the opposite direction that you use the diamond paste strops on. This will give you a very clear indication of what’s happening with your scratches when you switch to the leather paddles. The 1200 WEPS sweeping picture in this thread’s OP shows a good example of contrasting scratches, which exposed underlying deeper scratches: here’s a shameless link [/url] to the blog post. 😆
The general rule of thumb on straights is that 8K, or 2 microns is the minimum level of refinement for a decent shave. However, I personally feel that you should at least get to the 1 micron or 15K level for a more comfortable and smoother shave.
02/23/2012 at 10:44 am #1735Thanks Tom… I responded in your other thread 🙂 I had just wanted to open it up to anyone else who may have been wondering and have the same question.
03/10/2012 at 11:37 pm #1873Josh – I just did the WEPS paste progression after the WEPS 1K diamond. Very interesting, and I think I know what is happening.
Pictures coming soon!
03/11/2012 at 2:01 pm #1874thanks Tom! I can’t wait! I just ordered the 5k/10k Chosera stones… hoping it won’t be too big of a jump from the 1600 ceramics as long as I take the time to work the edge out. let me know how it goes!
03/11/2012 at 11:15 pm #1876A few disclaimers before I begin, since what you are about to see is not indicative of my best work, or what can be accomplished with the WEPS pastes. I simply set out to document the WEPS pastes for Josh in order to give a comparison to what he was experiencing. It was not intentional to get these results – should anyone think I would purposely sabotage the experiment for my own gains. 👿 Quite honestly it was surprising to witness the unfolding drama firsthand, and I think it opens up a huge area for discussion and learning. I know I am completely baffled by what I saw.
So buckle up and get ready for an amazing show!
A quick refresher – Josh (Razoredgeknives) experienced “no change” in scratches after many hundreds of strokes when transferring from the 1K WEPS diamonds to the 14micron Diamond paste on leather. Possible reasons offered were that the 14 micron and 1K diamonds would leave roughly the same scratches, as well as the old standby for anything razor related “too much pressure”.
Well – we were completely wrong…
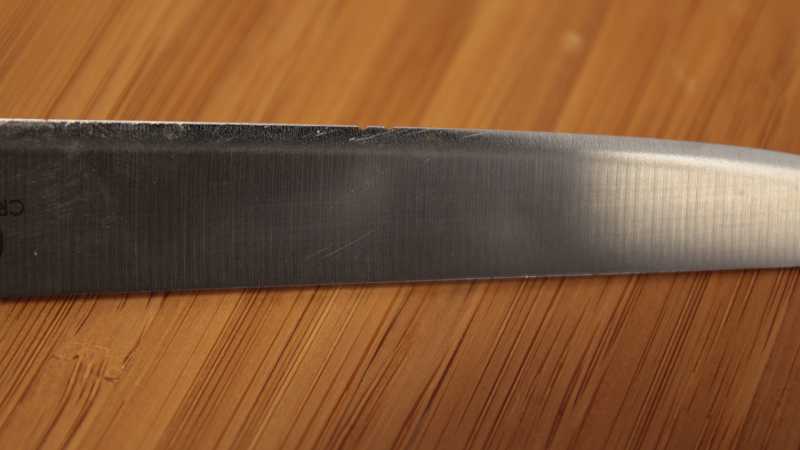
Before we begin, here is a reference knife that Clay Sharpened for the competition we had last year – excuse the focus, I was much less skilled with my Veho at the time 😳

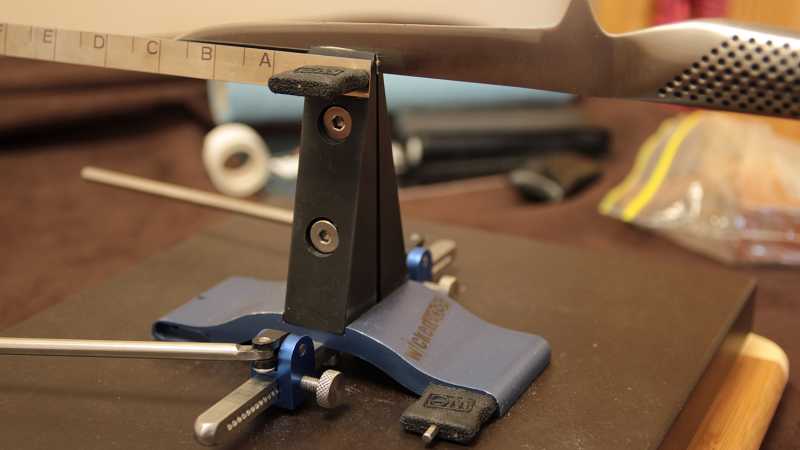
First, the 1K WEPS diamond – this is a newly sharpened knife @ 18.5 degrees. It was preceded by the WEPS 200, 400 and 600 Diamond Plates. I jumped to the 1K WEPS Diamond, skipping the 800.

Then I pasted up my 14 and 10 micron paddles. and did about 200 stropping strokes – note that I did use edge leading in the 1K picture, so on the 14 micron, I would need to end with the scratches going in the other direction.

Yeah…. Josh is right there is no real change except there is an awful lot of polishing (Note how the lighting goes to that black and white contrast instead of the red/blue on the 1K WEPS.)
So I did a couple hundred more, with pressure.

Yeah…. Then I added more paste and more pressure with a couple hundred more strokes….

Now were are getting somewhere, but still not quite there..
At This point, I think this completely reproduced what Josh was experiencing. To get the knife sharp in this lifetime, I changed the angle to 19 degrees, and the 2d picture below finally shows some scratches going in the “right” direction.

I needed to move along, so I hit the 10 micron paddles next at 19 degrees.

The edge of the edge is polished quite nicely, and this knife is getting sharper.

AT this point, the 19 degree edge is shaping up and the 5 micron paste makes it quite polished.

And finally, the 3.5 micron:

I spent 4 hours discussing this last night with friends on Skype… Again, if you look at Clay’s finished competition knife, the pastes are certainly amazing in his hands. Given more time, I would eventually have gotten that same finish.
I’m floored that there is such a difference in the cutting power of the diamond plates vs. pastes. Also, how do we explain the obvious difference in scratch size? This also gives rise to the importance of the Ceramics and Water stone options before hitting the pastes.
It’s not necessarily bad, just revealing, and I hope to discuss and explore this a lot more with you guys.
03/12/2012 at 4:32 am #1881WOW!!!!!! That is exactly the problem I was having… glad it wasn’t just me! That is VERY revealing! Thanks for doing this Tom! I haven’t had the money yet to pick up a Veho =).
What I find so interesting is that the scratches from the 14m pasted strop are probably 1/10th of those from the 1k stock diamond stones… this is wild, because the stock stones are rated at 7m! I know I have seen it somewhere, but can you post a link to the thread (you wrote I believe) on how the bonding agents and abrasives play into the micron rating?
Now… I actually picked up some of the 1200/1600 ceramics but still seemed to have that problem… do you think they should actually eliminate the problem? Maybe I wasn’t using enough pressure on the strops, because as you said, I was going with the “lighter is better” approach.
Thanks bro… I’ll have to skype into your next open call =)
03/13/2012 at 7:13 am #1892
This is extremely surprising! Man, this may give new insights into stropping, but for now I find it quite astonishing.
Since you have had a long Skype call on this already, you may have some hypotheses already about what is going on. I can think of only two things that are happening. One is that the diamonds from the paste disappear almost completely in the leather of the strops. And the other is that there is something “wrong” with the stropping compound. Did you already ask the supplier of the paste what they think is going on?
I think this cries out for a repeat experiment with balsa strops (assuming that is the hardest strop there is, I am not sure). Perhaps that would shine some more light. Now I happen to have some balsa strops and 5/3.5 diamond paste… as well as a bursitis :angry: . But as soon as I’ve recovered I will do that experiment.
Something else that struck me was the influence of an angle change of only 1 degree. At 19 degrees you are really polishing the edge of the edge and not the rest of the edge (so it seems) anymore. I thought that leather, especially with some pressure applied, would be pliable enough to also polish material around the area where it is targeted at directly. But apparently the leather is quite stiff.
This is really interesting stuff! Very interested in other people’s experiences and theories!
Molecule Polishing: my blog about sharpening with the Wicked Edge
03/13/2012 at 9:07 am #1901Tom, this is fascinating! The effect of leather on the steel is something that I’m working with Sandia National labs on right now. One thing I think I see in your photos (perhaps because I want to see it 😛 ) is that, as you begin with the strops, the ridges from the stones are flattening out. The more you strop, the flatter they are becoming, long before you begin to see scratches from the diamonds embedded in the strops. I believe this is a burnishing effect produced by the “stiction” of the leather. The surface of the metal is being smeared around, pushing the metal from the peaks into the valleys. An interesting experiment would be to go back to the 800/1000 diamond stones or the ceramics, and then try stropping without any paste at all. I suspect you’ll get a similar polishing effect. It would also be interesting to do some cutting tests at each phase.
-Clay
03/13/2012 at 9:20 pm #1903Josh, I’m glad this “helped” 😆
Some comments about what I saw, now that I’ve had some time to reflect a little.
First, the thought did cross my mind around picture 2c that the paste was not up to spec – but that was immediately cast aside for three reasons: 1) this is Wicked Edge; and 2) I’ve seen what Clay can do with the pastes (that’s why I put the reference picture).
What was immediately apparent was the whole “polishing of the grooves” that was happening with the paste. Again, note just how “White” the picture of the 14 micron paste is compared to the 1K Diamond. If my scratches wee going the the same direction as the stropping motions, I would end up with very cleanly polished scratches, which would make the edge seem to jump in refinement despite the overall depth of the scratches.
The big question to me is why the scratches are so different in size.
Clay, There is definitely smoothing over of the high points of the grooves. The overall lack of speed is probably due to the lack of density of the paste – it’s just a thin smear, and the fact that a lot of the paste actually comes off onto the bevel of the knife (especially as more pressure is exerted). When I added more paste, the abrasion speed picked up a bit.
We all know that leather is quite textured – (if you don’t already know, read this[/url]) B) My first thoughts are that the abrasive is getting “hidden” by the peaks of the leather, causing more shallow scratches. Pressure would still make them cut deeper, though, so that is kind of out.
In theory, the 14 micron should be more aggressive since the whole abrasive particle is exposed, as opposed to a fraction of the abrasive being embedded in the binding of the diamond plate. But this theory looks proven wrong in this case.
03/13/2012 at 10:52 pm #1905Well, this begs the question ” How do I handle straight razors with this knowledge?” If you put too much pressure on them, the edge will flex away from the strop… not enough and you won’t polish out all the deeper scratches, so what to do? Should I just move the rod arms out 1 degree and then use more pressure?
I thought the 14m paste was supposed to leave 14m wide scratches in whatever it is abrading… so why are the 14m scratches so much smaller than the 7m scratches left by the diamond plate? Your’s and Clay’s expertise is much appreciated!!!
– Josh
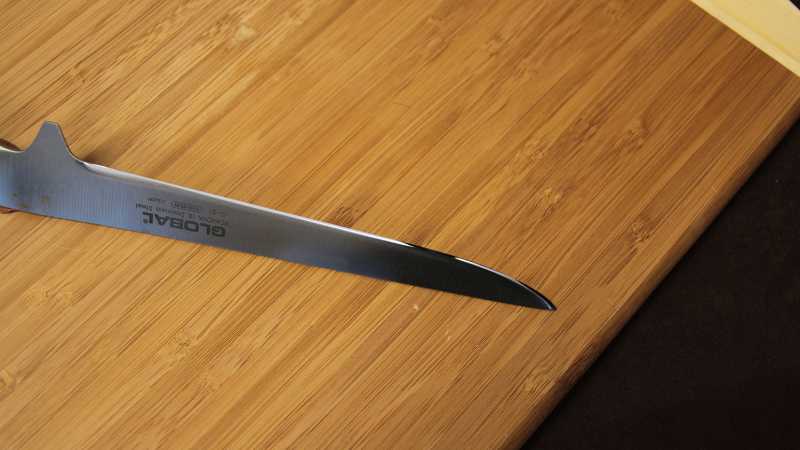
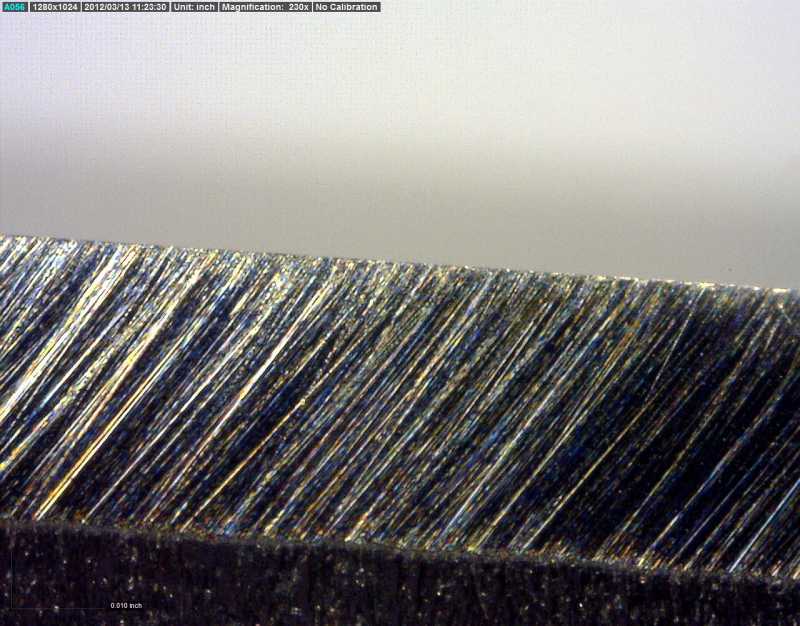
03/14/2012 at 8:13 am #1912Have I got a progression for you guys! I don’t know that it proves or disproves anything, but it was a blast to do and will give us all a lot to talk about. Krystina Muller from Sharper than New sent in a Global boning knife that a customer of hers had sent in. It had originally been sent to Sur la Table for sharpening which was done on a Chef’s Choice machine (I don’t know the model.) Here are some before pictures, on by regular SLR and the other by microscope:
And for the finished product:
Next I’ll start the progression images.
Attachments:-Clay
03/14/2012 at 8:19 am #1914I decided to use the Chosera stones to remake the edge. My goal in doing so was to have as highly refined an edge as I could get (and my Shaptons are at home) because I wanted to take the edge to a super polish and then step backward with the strops so we could see the individual scratches from each grit really well. I set the angle at 15° per side and began sharpening the knife with the 400 grit Chosera, progressing through each grit all the way to the 10k Chosera. I didn’t stop to photo each grit, waiting instead until I got all the way through. Here is the knife edge at 10k:
Attachments:-Clay
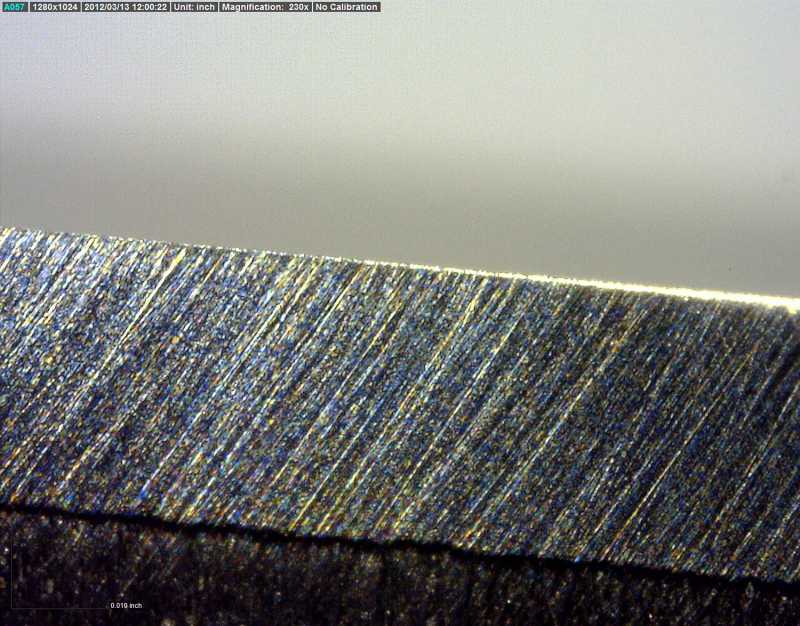
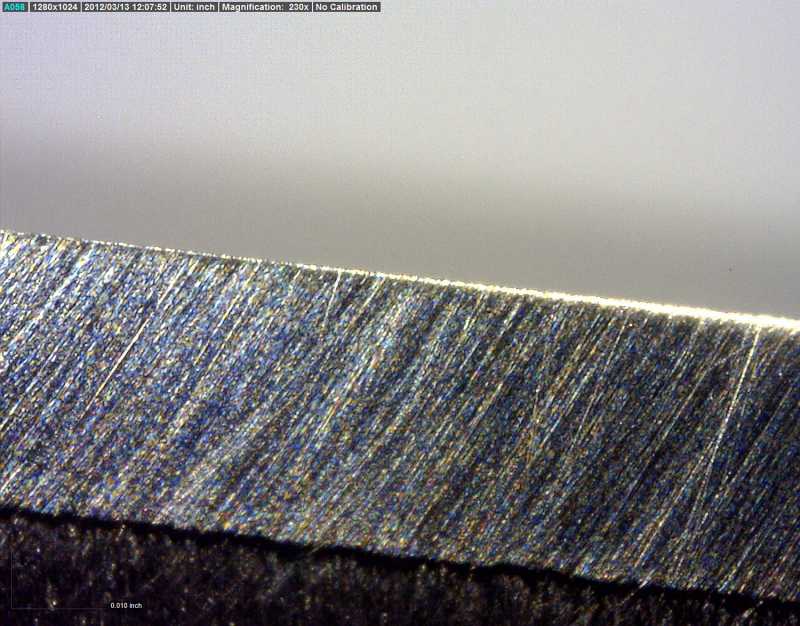
03/14/2012 at 8:31 am #1917Next I wanted to see what the effect of plain leather would be so I used some horse butt strops, top grain out, moistened with distilled water:
I decided to look at split grain leather too, so I used a set of strops, also horse butt, but the split grain side:
Interesting…
-Clay
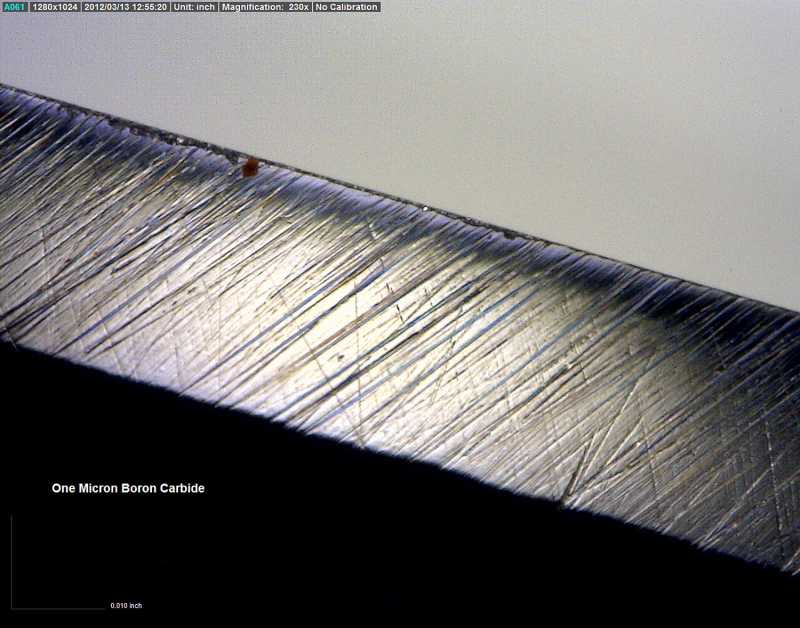
03/14/2012 at 8:34 am #1919Things got even more interesting at the next phase. I wanted to use a more gentle abrasive so I could get to the super polish more quickly, so I chose 1 micron boron carbide from Hand American for the next phase:
You can see the flattening of the ridges. The polish came up quickly and I had to put a polarizing filter on the scope.
Attachments:-Clay
-
AuthorPosts
- You must be logged in to reply to this topic.