Stock stone/strop progression (Lots of Pics!!)
Recent › Forums › Main Forum › Techniques and Sharpening Strategies › Stock stone/strop progression (Lots of Pics!!)
- This topic has 104 replies, 12 voices, and was last updated 04/09/2012 at 6:00 am by
 Josh.
Josh.
-
AuthorPosts
-
03/14/2012 at 9:29 am #1955
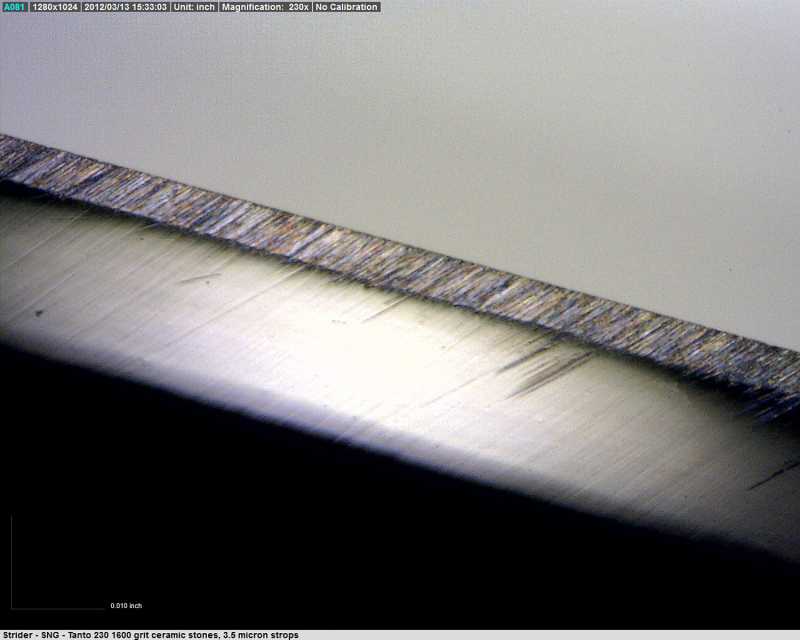
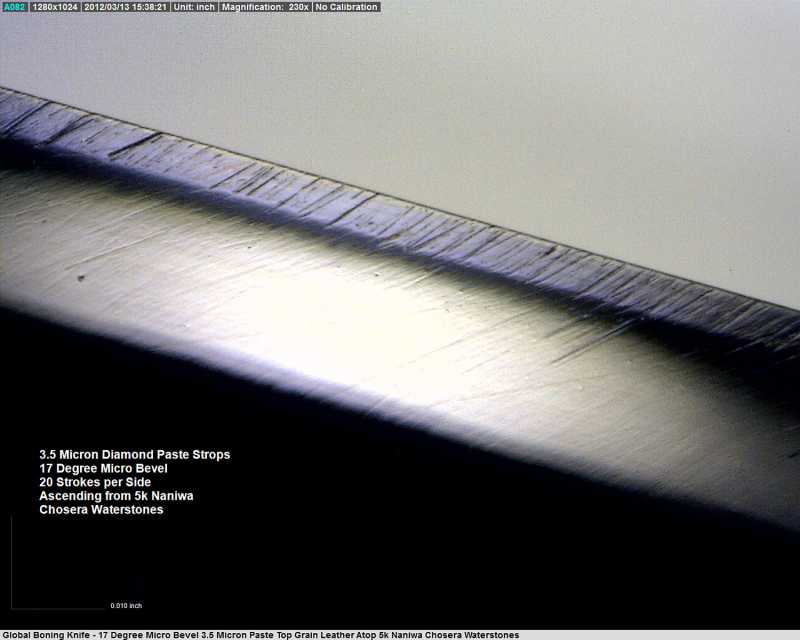
Finally I put a 17° micro bevel on the blade with the 5k Chosera stones. This knife is going to get used, ostensibly for deboning meat, so a slightly toothy, slightly wider micro bevel will be just the thing:
and then I did about 20 strokes per side with the 3.5 micron strops to put a final touch on the edge. I hope Krystina’s customer likes it:
I’d love to hear everyone’s thoughts.
-Clay
03/14/2012 at 9:32 am #1956More evidence of what Tom often describes: starting with the 1 micron boron nitride phase, a small dot becomes visible in the middle of the blade about 2/3 of the bevel from the edge. As I continued to polish the bevel, this dot becomes more and more visible, incrementally revealed with each progressive grit. Each step is essentially pealing back the layers of light scattering so we can see the dot better. The same is true of scratches and that is why we suddenly see scratches as we get into the higher grits.
-Clay
03/14/2012 at 9:44 am #1957On the next knife I do, I’ll use the stock diamond stones and ceramics before proceeding to the strops.
-Clay
03/14/2012 at 10:45 am #1961Excellent, Excellent, Excellent!!!!!! Thank you Clay!:woohoo: :woohoo: :woohoo: :woohoo:
It almost looks as if the .25 and .125 cause more damage, when in reality, they expose everything underneath.
One thing we need to be careful of is all the crisscrossing. I think this is the most difficult type of scratches to remove, and again, at the .25 and especially the .125 levels, it makes everything look “bad”.
One thing Clay or I have not really mentioned is just how sharp these knives really are despite their ugliness under the scope. Sharp is a given.
03/14/2012 at 11:01 am #1962WHOA Clay! That reveals tons of info I don’t think we ever would have had without looking at the edge on a micron level! That’s wild how the 1 micron diamond paste seemed to polish better than even the .125 CBN spray! That may very well cut out a lot of time on the end polishing of edges for some of us =)I still don’t understand how the 14m paste still seemed to be more refined/higher polished than the 10k chosera (form looking at the pics), that is weird! So I have a few questions…
1. How did you get the microscope to the same position each time!? lol, with the stand?
2. How many strokes did you do on average per side on each grit?
3. Could you explain a little more about the different types of leather grains? (i.e. full, top, and split grain)… I actually purchased this and re-stropped my paddles with the rough side out… what kind of effect do you think this will have? I noticed that the WE strops are smooth side out, but everything I’ve read on forums seems to imply that the rough side should be facing out so it will hold the stropping compound better… what are your thoughts?Here are a few pics of the leather in the link above… it is supposed to just be cowhide tooling leather… what do you think?


On the next knife I do, I’ll use the stock diamond stones and ceramics before proceeding to the strops.
that is what i’m REALLY interested in… basically b/c that’s what I have is stock everything at this point (althoug my 5k/10k chosera’s are coming in tomorrow! lol)… What does the jump from the 1600 ceramic to pasted strops look like? VERY interested to find out!!
Hey, thanks for spending all the time doing this for us… It means a lot that the owner of WE would take the time to do this for his customers. I also know how much time this probably took… Thanks again!!!
03/14/2012 at 11:06 am #1963Excellent, Excellent, Excellent!!!!!! Thank you Clay!:woohoo: :woohoo: :woohoo: :woohoo:
It almost looks as if the .25 and .125 cause more damage, when in reality, they expose everything underneath.
One thing we need to be careful of is all the crisscrossing. I think this is the most difficult type of scratches to remove, and again, at the .25 and especially the .125 levels, it makes everything look “bad”.
One thing Clay or I have not really mentioned is just how sharp these knives really are despite their ugliness under the scope. Sharp is a given.
So you think that’s what it is Tom? Just the finer micron grit revealing deeper scratches that were already there? Could it not be some cross-contamination or something? I think one thing you could do to be able and tell would be to go to plain leather at that specific stage and see if it clears out the valley that may have had metal pushed into it… what do you think?
03/14/2012 at 12:35 pm #1964The stock progression is definitely next. For the microscope positioning, I leave the scope in the stand. Then I tape photo paper to the bottom of the stand to add some extra light via reflection. I trace the knife’s outline on the paper so I can get it back in the same position every time. As far as smooth/rough on the leather, I like the smooth side out. I did experiment with both styles in this progression and feel that my results with the smooth surface were better. My sense is that the smooth surface, especially when the surface is tacky as with the paste, is able to create enough ‘stiction’ to draw the metal across surface of the bevel, smoothing the peaks and filling the valleys. So far, it’s just a theory, but one I’m working on with some great scientists at the lab. For the time spent, it was about 5 hours total between all the steps and documentation. There were a bunch of calls and emails in the middle of it, so maybe it was a little bit less. All in all, time well spent! I loved doing it and sharing it. As with everyone else on this forum, I love doing little bits here and there to continue learning. There are so many great people here that have taught me a lot! I’m excited to continue exploring this fun world of sharpening with everyone here.
-Clay
03/14/2012 at 12:42 pm #1965Clay did you sharpen the ‘tang’ (curve up). If not I am curious to know ;-).
03/14/2012 at 3:51 pm #1966Josh – Clay’s progression of pictures shows both cross contamination and revealing scratches.
For example, this 10 micron to 5 micron picture shows 3 distinctly larger scratches in the middle of the edge, which is cross contamination.
But if you watch the .25 to .125 progression, you see a greater contrast of the previous scratches with each finer grit.
The scratches on the left of the .125 could be cross contamination or revelation due to their size. At this point, it’s hard to tell.
A little off topic, but cross contamination of strops is the major reason why I personally prefer to progress as far as possible on stones, even though the polishing power of the pastes and sprays on leather is proving to be much less invasive.
03/14/2012 at 11:33 pm #1967Josh – Clay’s progression of pictures shows both cross contamination and revealing scratches.
For example, this 10 micron to 5 micron picture shows 3 distinctly larger scratches in the middle of the edge, which is cross contamination.
But if you watch the .25 to .125 progression, you see a greater contrast of the previous scratches with each finer grit.
The scratches on the left of the .125 could be cross contamination or revelation due to their size. At this point, it’s hard to tell.
A little off topic, but cross contamination of strops is the major reason why I personally prefer to progress as far as possible on stones, even though the polishing power of the pastes and sprays on leather is proving to be much less invasive.
I agree about contamination between the 10 and 5 micron samples though probably not crossing from one strop to the next, I’m pretty fastidious about the way I handle and store them. Environmental contamination is more likely – those strops traveled with me to the ECCK Show and could have easily picked up some metal filings or a stray diamond in all the melee which is a show environment. Another possible source of contamination is airborne silica – it sounds far fetched but is a reality, more or less so depending on locality.
The .25 and .125 strops were brand new when I started the progression, so contamination there is probably not a factor. One big difference is that I used the split grain side of the leather which seems a lot rougher on the metal. The metal surface was nearly totally smooth when I worked back up to the .25 and .125 grits and the different reference points like the little hole/black dot make it easy to see the new scratches. At this point, I’m inclined to believe that the scratches that appeared with the second pass with the finer grits are a result of the split grain leather. On the first pass with the plain split grain leather, more scratches appeared as well.
-Clay
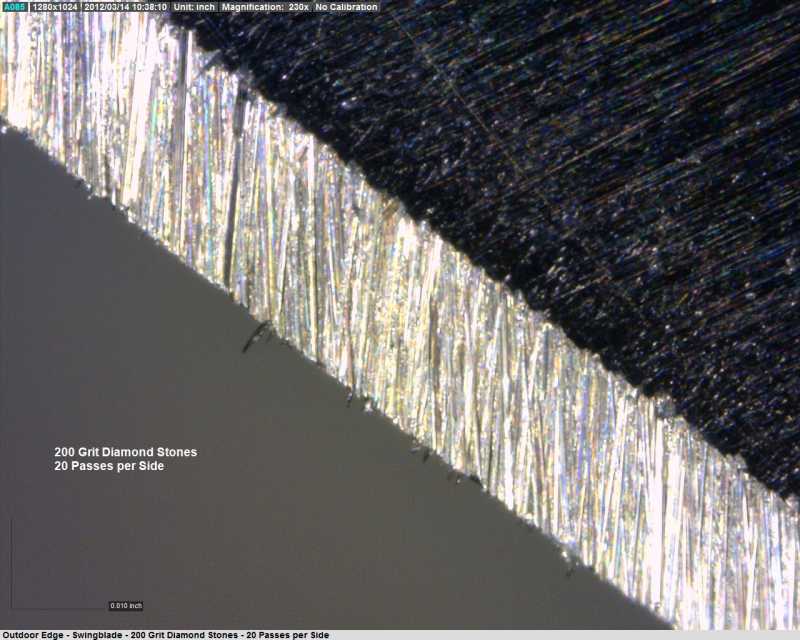
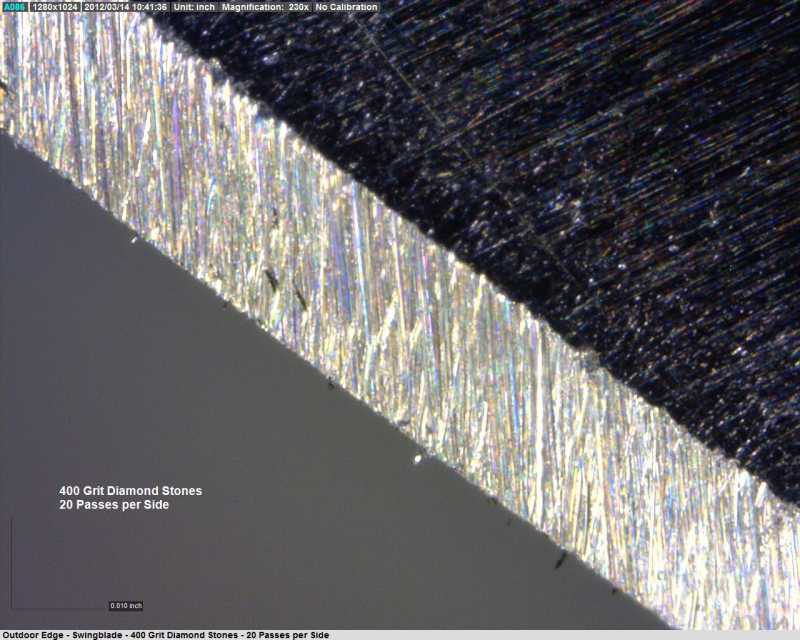
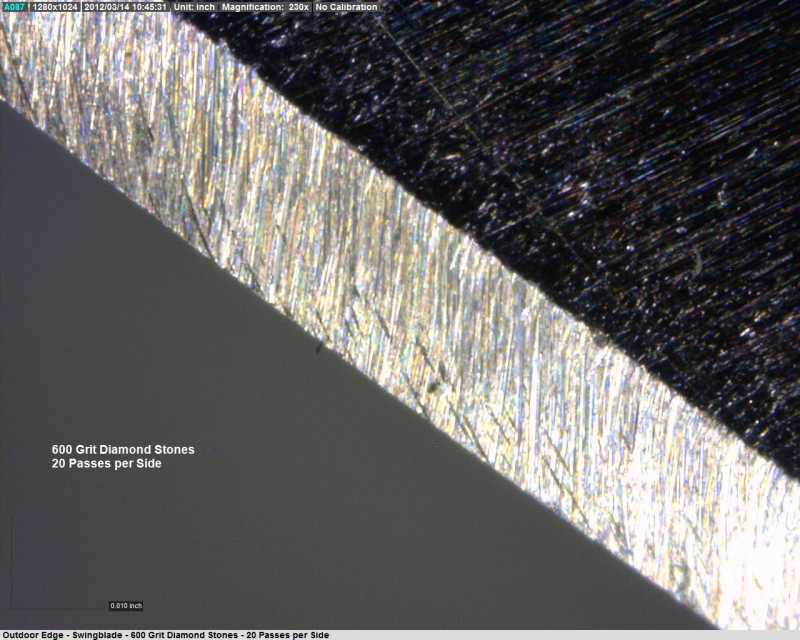
03/15/2012 at 3:56 am #1973Lots more fun being had here today! A customer sent in an Outdoor Edge, Swingblade AUS-8 steel for sharpening. This was a great knife to sharpen for our progression because the softer steel made the work go very quickly and showed up the grit scratches easily. I used the stock Wicked Edge stones for this sharpening progression:
Just 20 passes per side at 20° per side was all it took to re-profile the edge
Attachments:-Clay
03/15/2012 at 3:57 am #1974On the 600 grit stones I made a few errant strokes which showed up immediately.
-Clay
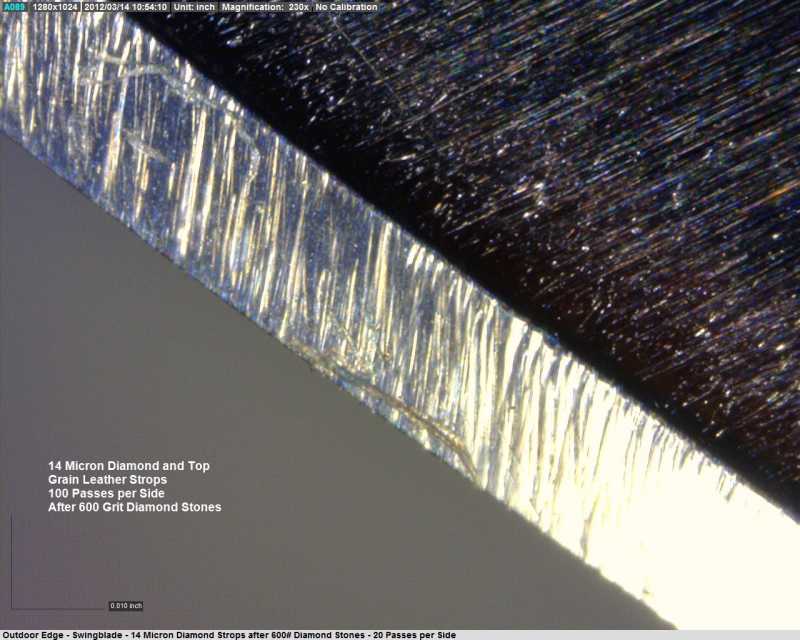
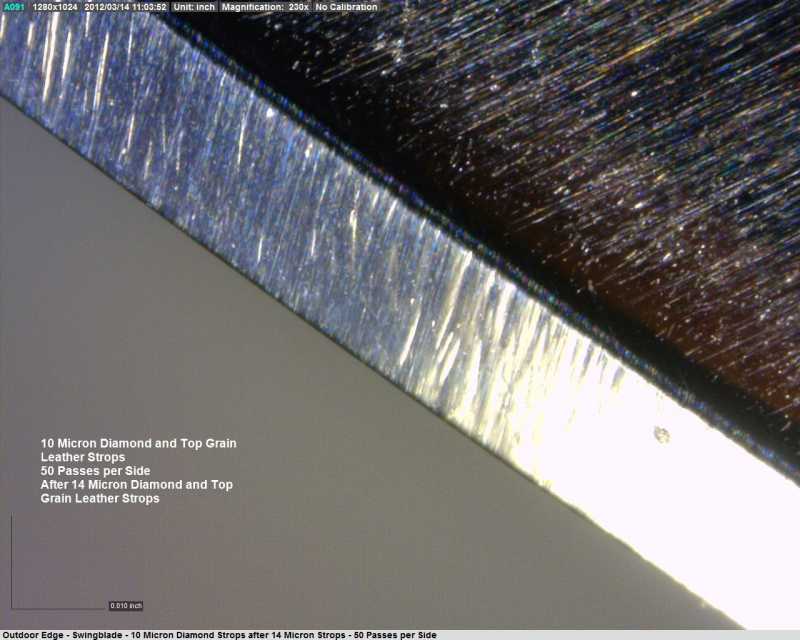
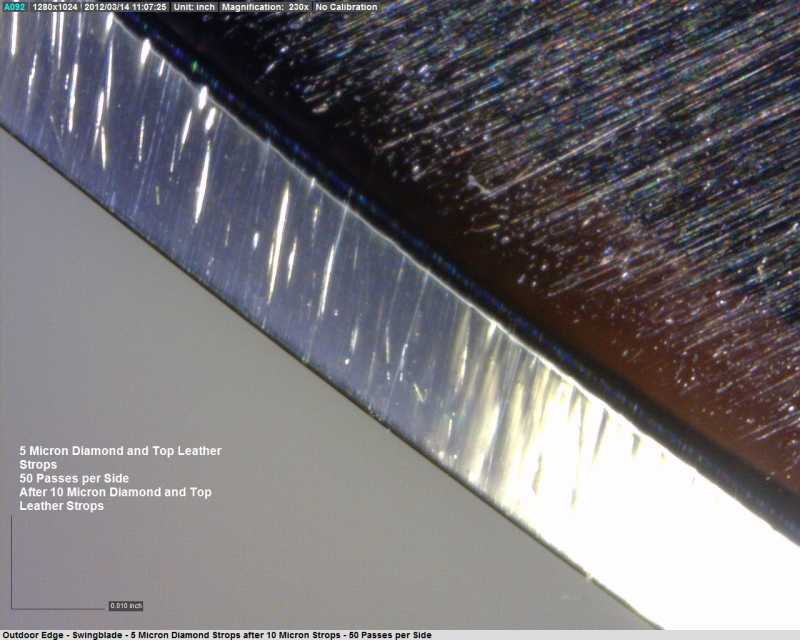
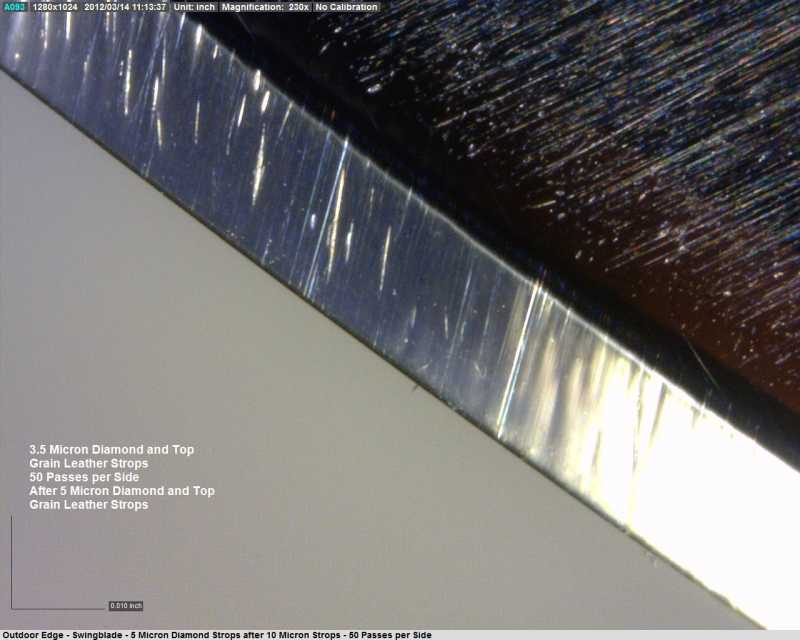
03/15/2012 at 4:08 am #1981At this point, I took a detour to examine a technique a customer had been telling me about and had written about in Blade Forums. He has been jumping straight from the 600 grit diamond stones to the 14 micron strops. I followed that path for a while with the following progression: 600#> 14µ> 10µ> 5µ> 3.5µ
I started with just 20 passes per side on the 14µ strops
An additional 80 passes per side
An additional 100 passes per side
10µ strops – 50 passes per side
5µ strops – 50 passes per side
3.5µ – 50 passes per side
Attachments:-Clay
03/15/2012 at 4:09 am #1982when you get to the higher levels, are you going to be alternating stroke directions?
03/15/2012 at 4:14 am #1983it must be because it is a softer steel…. because even after the 1k stones and going to the 14m paste, i did around 800 strokes per side and could still see the scratches left from the 1k with the naked eye…
-
AuthorPosts
- You must be logged in to reply to this topic.