Stock stone/strop progression (Lots of Pics!!)
Recent › Forums › Main Forum › Techniques and Sharpening Strategies › Stock stone/strop progression (Lots of Pics!!)
- This topic has 104 replies, 12 voices, and was last updated 04/09/2012 at 6:00 am by
 Josh.
Josh.
-
AuthorPosts
-
03/15/2012 at 4:30 am #1984
when you get to the higher levels, are you going to be alternating stroke directions?
In the next phase, I dropped back to the 600 grit stones and then progress up through the 800, 1000, 1200 and 1600 grit stones before using the strops again.
-Clay
03/15/2012 at 5:41 am #1985when you get to the higher levels, are you going to be alternating stroke directions?
In the next phase, I dropped back to the 600 grit stones and then progress up through the 800, 1000, 1200 and 1600 grit stones before using the strops again.[/quote]
Sweet! I can’t wait to see the results… so when you refer to “split grain” leather, what are you talking about? just the smooth side out? from what I have read, split grain is much harder than the full grain, is this true?
03/15/2012 at 8:17 am #1988After my little detour around stropping straight from the 600 grit stones, I wanted to get back on track, so I went back to the 600 grit diamond stones for 20 strokes per side:
Next were the 800 grit diamond stones, also 20 strokes per side:
And finally the 1000 grit diamond stones, also 20 strokes per side:
Attachments:-Clay
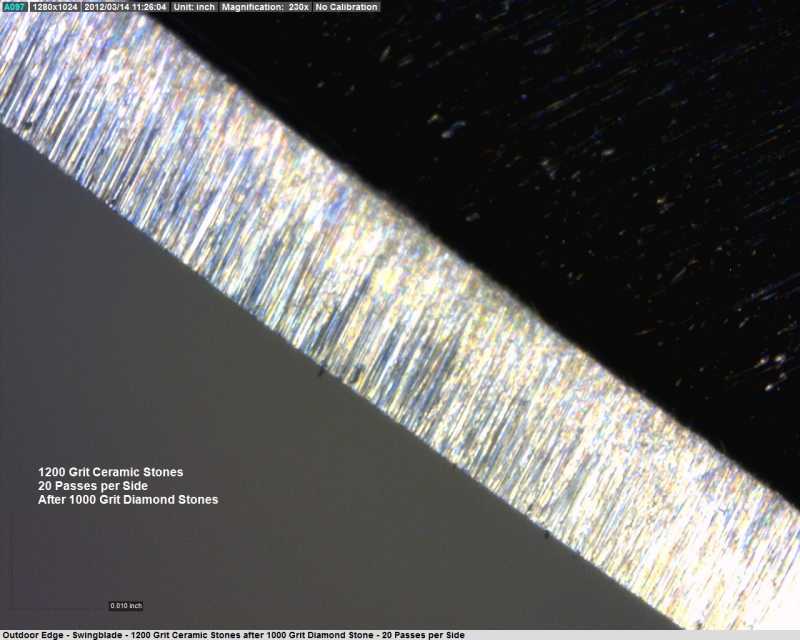
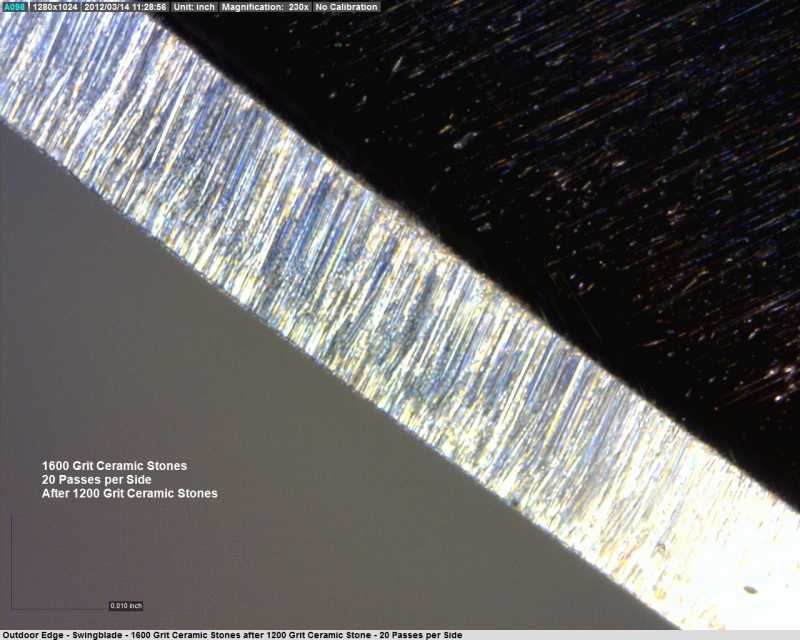
03/15/2012 at 8:26 am #1992Now the ceramics:
20 Passes with the 1200 grit.
20 Passes with the 1600 grit.
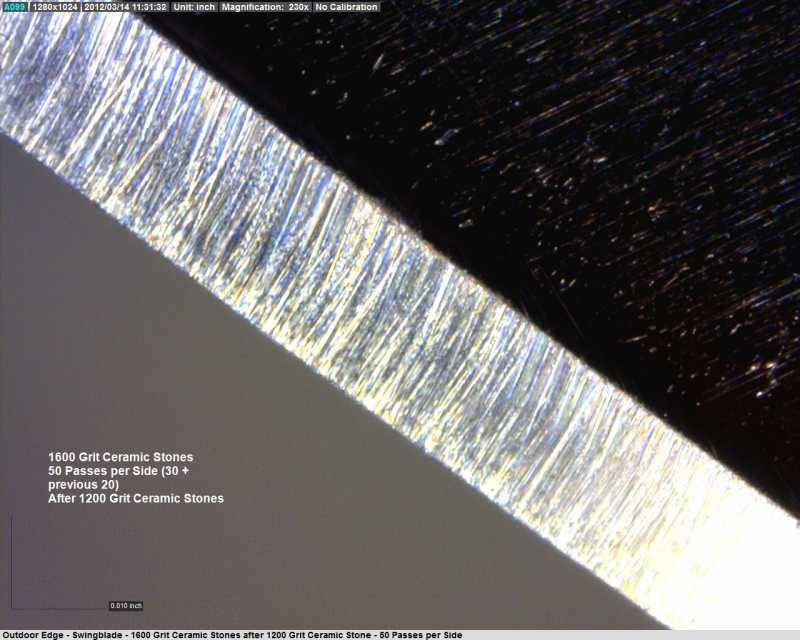
I wasn’t satisfied with the 20 passes so I did another 30 for a total of 50 per side:
I liked the way this looked much better.
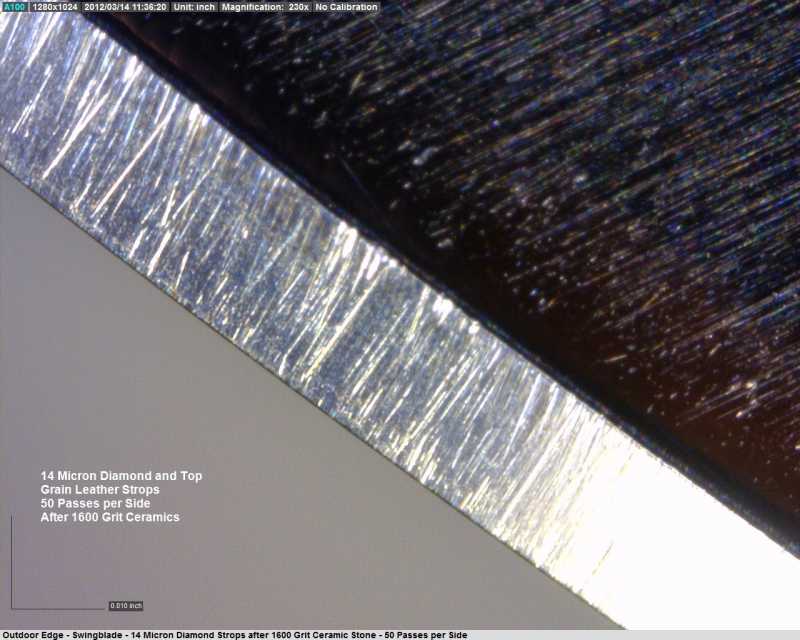
Next came the strops.
Attachments:-Clay
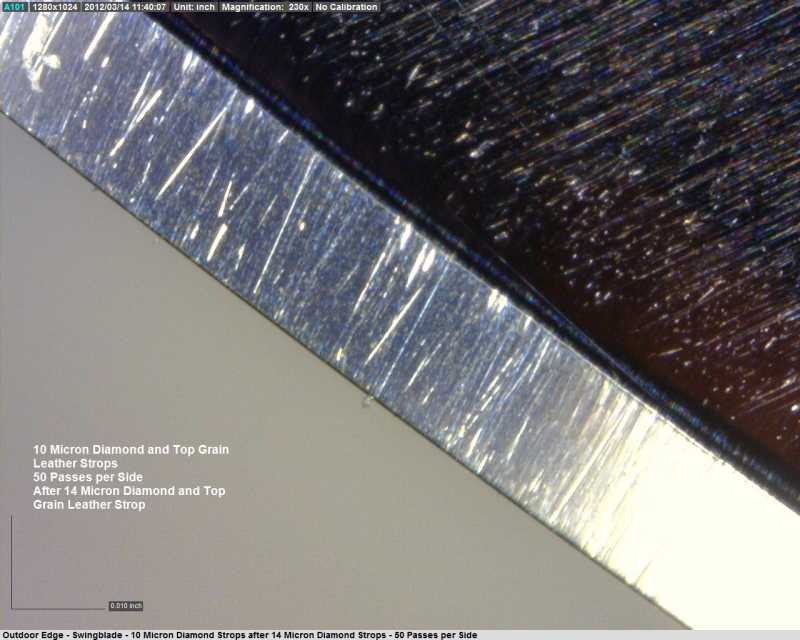
03/15/2012 at 8:28 am #1996Finally back to the strops, starting with the 14 micron:
Then the 10 micron:
5 micron:
And finally the 3.5 micron:
Attachments:-Clay
03/15/2012 at 9:34 am #2001:ohmy: UMMMMMM….WOW!
03/15/2012 at 10:14 am #2002wow! that is one beautiful edge! I just don’t understand how you got such a nice edge with minimal effort!!!! (i.e. 20 strokes per side all the way up to 1600!) It must have to do with the steel… how hard were you pushing on the passes? Also, how many passes did you do with each grit strop? Thanks for this Clay!!!
03/15/2012 at 10:15 am #2003AWESOME, Clay!
it must be because it is a softer steel…. because even after the 1k stones and going to the 14m paste, i did around 800 strokes per side and could still see the scratches left from the 1k with the naked eye…
I think the alternating strokes makes it much more difficult, where it looks like Clay is doing all the same paddle motions here, so the polishing of the grooves (which still takes a few hundred strokes) happens with greater ease.
It seems that the ceramics make a difference when progressing past the diamond 1K paddles.
We also enter intot he world of the different types of edges here – which are all varying degrees of toothiness with various types of polished grooves.
03/15/2012 at 10:27 am #2005AWESOME, Clay!
it must be because it is a softer steel…. because even after the 1k stones and going to the 14m paste, i did around 800 strokes per side and could still see the scratches left from the 1k with the naked eye…
I think the alternating strokes makes it much more difficult, where it looks like Clay is doing all the same paddle motions here, so the polishing of the grooves (which still takes a few hundred strokes) happens with greater ease.
It seems that the ceramics make a difference when progressing past the diamond 1K paddles.
We also enter intot he world of the different types of edges here – which are all varying degrees of toothiness with various types of polished grooves.
03/15/2012 at 11:28 am #2007wow! that is one beautiful edge! I just don’t understand how you got such a nice edge with minimal effort!!!! (i.e. 20 strokes per side all the way up to 1600!) It must have to do with the steel… how hard were you pushing on the passes? Also, how many passes did you do with each grit strop? Thanks for this Clay!!!
Tomorrow I’ll post pictures of my stones vs. new stones so you can see what a difference having the stones really broken in makes. After the 1600 ceramics, I did 50 strokes per side on all but the 3.5 micron strops, with which I did 100 strokes per side. When I detoured straight from the 600 grit stones to the strops, I did 200 strokes per side with the 14 micron strops and then 50 strokes per side each with the rest.
-Clay
03/15/2012 at 1:03 pm #2020when you get to the higher levels, are you going to be alternating stroke directions?
In the next phase, I dropped back to the 600 grit stones and then progress up through the 800, 1000, 1200 and 1600 grit stones before using the strops again.[/quote]
Sweet! I can’t wait to see the results… so when you refer to “split grain” leather, what are you talking about? just the smooth side out? from what I have read, split grain is much harder than the full grain, is this true?[/quote]
By split grain I just mean that the rough side is up. In true technical terms, split grain leather has been separated from the top grain, or smooth side. For the “split grain” horse butt, I’ve just been using the rough side out which amounts to the same thing in terms of texture.
-Clay
03/15/2012 at 10:57 pm #2027Great pictures, Clay! And those knives must be wickedly sharp…
Could you elaborate a bit on what you think we actually see for the mortals among us?
What do we see in the initial pictures of the Global boning knife after the top grain horse but and after the split grain horse butt leather? What is the main difference? (And did the split grain leather actually cause some scratches by itself in later pictures?)
In most of the stropping photographs I see the burnishing, flattening of the ridges, I guess due to the “stiction†of the leather.
However, sometimes I find it hard to identify the effects of the stropping compounds. How, for example, can we see in the Global knife pictures the differences between the effects of the 1 micron compound and the .25 micron compound (other than more burnishing, due to the fact that you did more stropping movements)?
Also, when on the Global knife, you go up again in micron sizes (after the .125 micron), the edge looks more refined after the 3.5 and 5 micron pastes than after the .125 micron compound. Does this mean the abrasive effect of the 3.5 and 5 micron pastes is minimal? Or something else?
Molecule Polishing: my blog about sharpening with the Wicked Edge
03/16/2012 at 1:12 am #2031I wonder if that would explain the problem I’m having… Ok, I just got my 5k/10k chosera’s in last night! They are SWEET! So I hit a straight razor up starting on the 1200/1600 ceramics and then went straight to the choseras… after that I went to the 5m/3.5 pasted strops, 1m/.5m hand american sprays, .25 paste, and then .125m CBN spray (hand american). With each switch I alternated sweeping strokes so I could make sure I got rid of the scratches before, which took about 300-400 passes per side with each different grit.
With each change of grit I used a bright flashlight to hit the edge and could see the scratch pattern change w/ the naked eye… once in a while I would use my 60x-100x microscope (from radio shack)to verify that I had indeed erased all the prior scratches (although I’m sure it’s not good as the 400x that you guys have) and to verify that the scratches went all the way to the edge. I also used an angle cube when transitioning from the ceramics to the chosers along with a marker to ensure I reached all the way to the edge.
Now, I was using the split grain out on the 14/10, & 5/3.5. It actually looked like a step back when I went to the 1m spray (on the factory leather strops). I just don’t understand why It’s not a true mirror finish… I should be able to get it to where you can’t see the scratches on the edge with the naked eye… now given, It was under a bright light at the perfect angle, but still. It also seemed to phase in and out of passing the HHT. Not sure what’s going on but I am definitely going to have to get a USB microscope… Any input is much appreciated.
03/16/2012 at 1:20 am #2035Great pictures, Clay! And those knives must be wickedly sharp…
Could you elaborate a bit on what you think we actually see for the mortals among us?
What do we see in the initial pictures of the Global boning knife after the top grain horse but and after the split grain horse butt leather? What is the main difference? (And did the split grain leather actually cause some scratches by itself in later pictures?)
In most of the stropping photographs I see the burnishing, flattening of the ridges, I guess due to the “stiction†of the leather.
However, sometimes I find it hard to identify the effects of the stropping compounds. How, for example, can we see in the Global knife pictures the differences between the effects of the 1 micron compound and the .25 micron compound (other than more burnishing, due to the fact that you did more stropping movements)?
Also, when on the Global knife, you go up again in micron sizes (after the .125 micron), the edge looks more refined after the 3.5 and 5 micron pastes than after the .125 micron compound. Does this mean the abrasive effect of the 3.5 and 5 micron pastes is minimal? Or something else?
Good questions Mark.
I want to do a lot more experimenting w/ the split grain leather vs. top grain leather. My sense is that, while the split grain will hold more compound, it will also hold more contamination, especially airborne silica. I also believe that the split grain leather won’t burnish the metal. I’m regretting introducing the horse butt leather into the progression, because it seems to have a lot more abrasive texture of its own, both on the smooth and split sides.
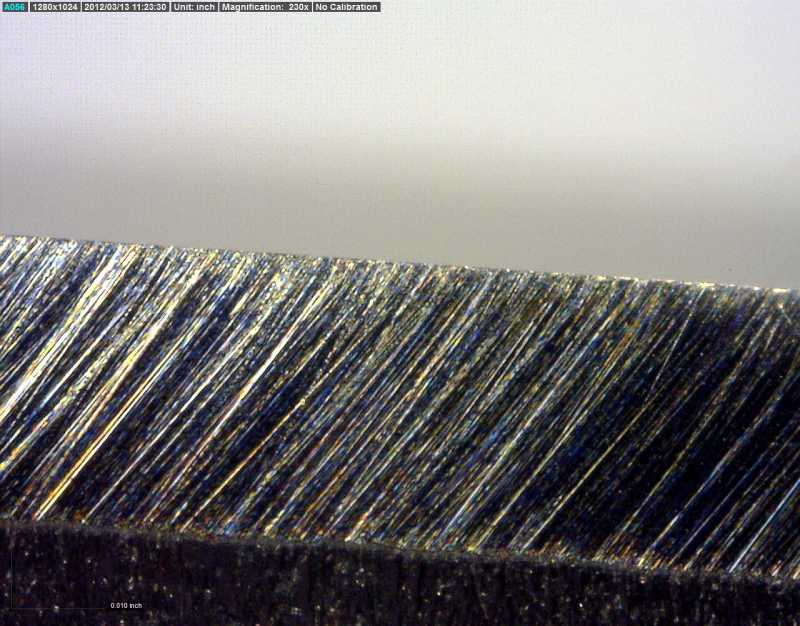
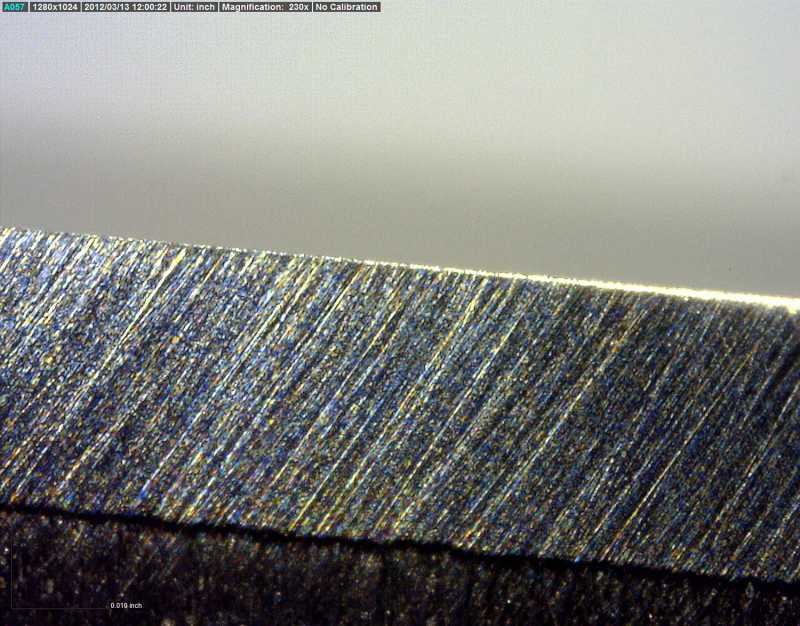
I think the change is pretty clear when moving up the first progression; the transition from the 10k Choseras to the clean, top grain leather shows improvement – the edge has been slightly burnished and is shinier but there are no new scratches:
10k Chosera
Clean Top Grain Horse Butt Leather after 10k Chosera
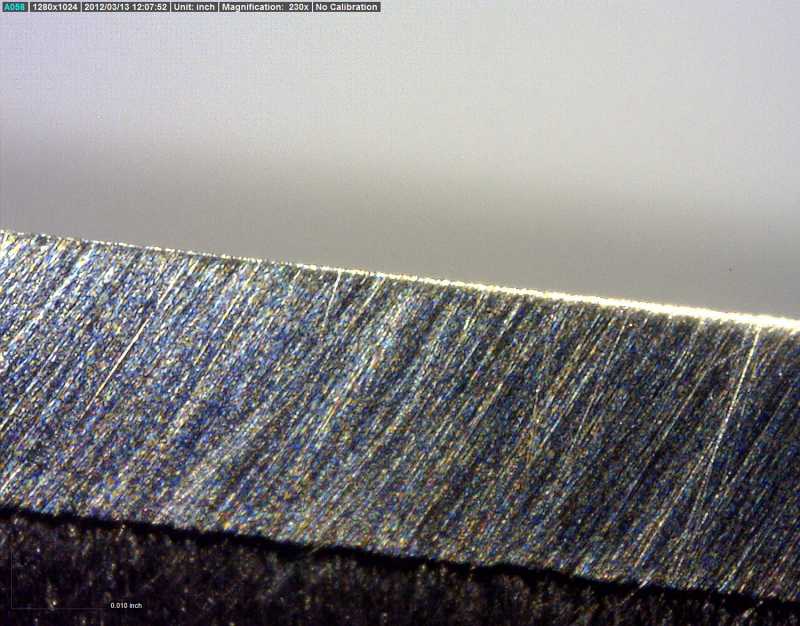
After next using the clean, split grain leather, you can see that there are new scratches:
Clean Split Grain Horse Butt Leather
The edge seems to have picked up some polish at this step too, but the polish seems to be a result of micro-abrasion and not burnishing. Since the split grain horse butt made new scratches and had been stored in a plastic bag since I got it in, there are two possibilities that I can see: 1) the horse butt leather, especially the split side is abrasive by itself 2) there was some kind of contaminant on the leather before it came in to the shop.
Attachments:-Clay
03/16/2012 at 1:23 am #2036Great work Clay! It looks that leather strops do much better polishing than stones, although particle size is about the same. But I am interested, if this polishing is transfered to cutting performance also. Do you plan to perform any cutting tests after different stone/strop progressions?
-
AuthorPosts
- You must be logged in to reply to this topic.