Removing burr and unequal sharp sides
Recent › Forums › Main Forum › Techniques and Sharpening Strategies › Advanced Techniques and Sharpening Strategies › Removing burr and unequal sharp sides
- This topic has 45 replies, 11 voices, and was last updated 07/30/2015 at 5:31 am by
 Zamfir.
-
AuthorPosts
-
01/10/2015 at 6:00 am #22576
Ackkkk, an edge worm! :ohmy:
01/10/2015 at 12:29 pm #22605Here’s a burr I happened to catch just as it was separating from the edge…
Very nice. What had taken place just before this? Was this burr coming off as the result of normal sharpening strokes or something else?
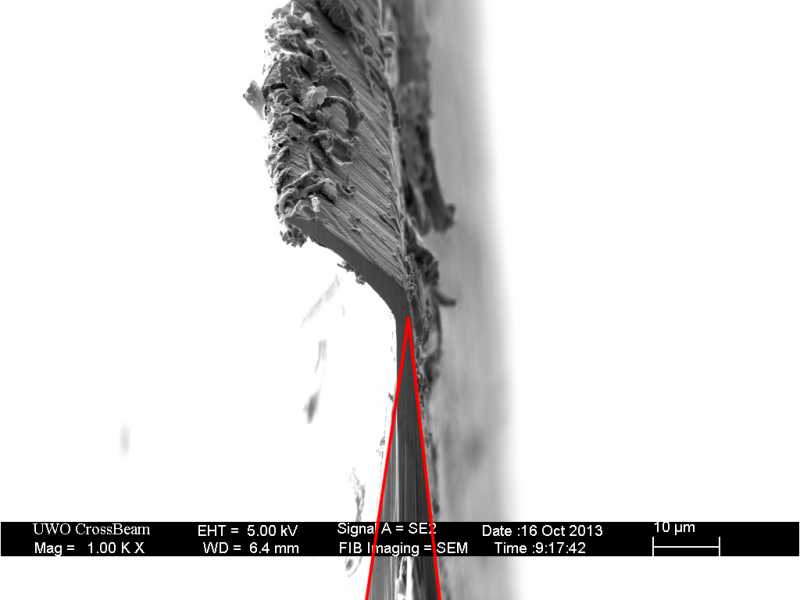
01/12/2015 at 10:03 pm #22632Here’s another great picture of a burr, not really a foil or wire like in Tom’s photo, but it shows how the overhanging metal can easily be pushed from side to side until it weakens and peels off like in Tom’s photo:

The photo is from the Science of Sharp blog[/url]. There are some other great photos of burrs on the page.
-Clay
01/13/2015 at 12:11 am #22638Another great image from scienceofsharp! That one is a perfect example of what I meant when I said a burr is any metal that remains past the target geometry. In that image I suppose the target geometry is something like this:
It’s also a good example of why at least with some burrs ripping it off with wood doesn’t work so well; it’s not going to leave behind a pristine and level edge.
Attachments:01/13/2015 at 1:57 am #22642Another great image from scienceofsharp! That one is a perfect example of what I meant when I said a burr is any metal that remains past the target geometry. In that image I suppose the target geometry is something like this:
It’s also a good example of why at least with some burrs ripping it off with wood doesn’t work so well; it’s not going to leave behind a pristine and level edge.
Yeah what I think me and Ziggy are talking about more are images like Tom’s where it has been been bent back and forth so much it is so weak and falling or about to fall off that dragging it through wood helps remove it. But in situations like this image I don’t really see how it would help, this is where I am curious what Bluntcut’s method looks like under an SEM.
01/13/2015 at 2:59 am #22643Indeed. I think there is probably quite a large difference in effect with that between the two types or stages of burr.
Is Bluntcut’s method to scrape or fold it to one side, then grind into it on the next pass?
01/13/2015 at 3:22 am #22645Yeah what I think me and Ziggy are talking about more are images like Tom’s where it has been been bent back and forth so much it is so weak and falling or about to fall off that dragging it through wood helps remove it. But in situations like this image I don’t really see how it would help, this is where I am curious what Bluntcut’s method looks like under an SEM.
Most definitely used then things are bad , weak, or early staged.
Even then, you can see by eye where some sticks, some doesn’t.For me, the real objective is when coarse grits no longer easily make a visible burr, that’s when I mention rock bottom.
MW, correct, from that stage on, its a different burr.
At that point, I’m then starting to smooth the edge out as well.By the time I’m not using wood, I’m making a burr anywhere from 400 to 800, depending on metal quality.
For me, in later stages after wood, the burr is minimal and can be almost pushed off, that’s when I like the felt.
At the end, even felt and boron.Its not unlike abused bread knives, when you can really see the bent metal in the scallops and popping on the backside.
Aggressive action at first, softening as you go on till the flakes stop forming in the scallops when you do the backside.
Its almost as if the scallop itself is one big burr until you get to solid metal, sometimes surprising on how long it takes to get there.01/14/2015 at 2:40 am #22665I can see how something like this would be removed w/ felt/soft wood>
I am eagerly waiting Todd’s conclusions about burr minimization techniques to create the strongest edge!
 01/14/2015 at 2:42 am #22666
Indeed. I think there is probably quite a large difference in effect with that between the two types or stages of burr.
Is Bluntcut’s method to scrape or fold it to one side, then grind into it on the next pass?
Yes… watch his video in that link when you get time. I am leaning toward agreement w/ Cliff Stamp on this one though, that that will make weak/fractured metal at the very apex.
01/14/2015 at 6:38 am #22670Thanks. I did watch most of that video but I didn’t read the rest of the thread. I wanted to make sure that that is the method people were referring to.
01/14/2015 at 11:10 am #22671Thanks. I did watch most of that video but I didn’t read the rest of the thread. I wanted to make sure that that is the method people were referring to.
Which video you talking about?
01/14/2015 at 3:19 pm #22672And although I have not done this myself, please check out this thread… interesting technique used by Bluntcut and others.
http://www.bladeforums.com/forums/showthread.php/1249588-Invincible-wire-edge-!!
07/26/2015 at 7:13 pm #26072hmm, i thought that with alternating strokes the burr comes off automatically
07/26/2015 at 8:44 pm #26076For the most part, I think you’re correct. If there’s any burr left, it’s very, very small.
07/28/2015 at 8:26 pm #26091I have had good luck removing the burr and leaving a nice edge
using the carbide cutter from Sharpens Best. The burr often keeps
jumping from side to side, but several passes going side to side will
eventually clip it off. It is a nice portable little tool, and if a burr pops
up during use, you can clip it off again.As others have mentioned, it is easy to end up with a burr even when
you are alternating strokes on both sides. I have observed that the
wider the bevel is the easier it is for the stones to ride up and miss
the cutting edge due to one reason or another. As mentioned in my
original blog, I have been totally excited with the results of the dual
bevel procedure. Putting on a the very thin second bevel during
the last steps has the stones working a very narrow bevel, thus
making a correct precise cut at the edge every stroke. I have had
much less problem with burrs, shiny spots, catchy spots, etc.,
when finishing up on a tiny second bevel.Don’t know anything about burr theory, but hopefully this is a
couple of practical mechanical details that help.Carbide Cutter Reference: http://www.sharpensbest.com
-
AuthorPosts
- You must be logged in to reply to this topic.