Removing burr and unequal sharp sides
Recent › Forums › Main Forum › Techniques and Sharpening Strategies › Advanced Techniques and Sharpening Strategies › Removing burr and unequal sharp sides
- This topic has 45 replies, 11 voices, and was last updated 07/30/2015 at 5:31 am by
 Zamfir.
-
AuthorPosts
-
01/04/2015 at 3:40 pm #22422
Sharpeners with far more experience than I have use some variation of this method so it would be foolish to suggest that it has no value. Nevertheless it seems prone to misuse. If the burr is firmly attached to the apex it seems unlikely that it will come away cleanly leaving an even surface behind. If it is not firmly attached would it not come away in the process of refining the edge? When do you find that deburring on wood to the extent that “you see the metal come off and build up in the V of the wood” produces a better edge than “chasing” the burr or other methods?
Have you seen micrographs that show the result of deburring on wood?
You must have missed the part where I said:
“After around 600 or 800, I switch to the hard felt block for any fine burr removal, if its there at all.
Its online, just look up hard felt blocks. Just the right softness/hardness for higher grits and fine burrs.
Again, loop it if you’re not sure.I find on weird metal that is not cooperating, I’ll sharpen on a particular stone, and deburr, and then give a few more passes with the same stone.”
This is a process usually where I’m reprofiling, which with the condition of the knives of average customers, is a constant.
Also, the type of wood is soft with give. If the burr is firmly attached, more passes with a stone or belt and a lighter touch.
As for it being the best process, better than others, never inferred it.
Its one method that works for me in the right situations and speeds things up, especially when dealing with volume and not collectable cutlery.
And when dealing with fatigued metal, you see the metal rip off.Micrographs?, you got to be kidding me.
I’m talking about initial stages, not final.No offense Mr. Wizard, but it seems to me you’re more interested in arguing about it then discussing it.
01/04/2015 at 3:46 pm #22423One thing i realized is all these Burr thoughts have popped up while sharpening cheapo kitchen knives.
Bingo!
If you try it, not a hard wood.
Free paint stirrers, soft.01/04/2015 at 7:05 pm #22431You must have missed the part where I said:
I guess I did miss that, or more accurately failed to internalize what I read. Thank you for repeating your explanation for me.
Its one method that works for me in the right situations and speeds things up, especially when dealing with volume and not collectable cutlery.
What benefit do you observe in removing the burr in this fashion before moving on to a finer abrasive. Does the next abrasive work faster? Produce a better edge? How exactly does it speed things up compared to leaving out that step?
Micrographs?, you got to be kidding me.
I’m talking about initial stages, not final.No offense Mr. Wizard, but it seems to me you’re more interested in arguing about it then discussing it.
No I am not kidding. Micrographs can be highly informative for many processes at many levels. I am quite curious as to the specific effect of deburring on wood, felt, cork, etc. on the metal that remains. I know of no other way to examine that in detail.
I mean no offense either. Is not a (civil) argument a synonym for discussion? “argument 2. a discussion involving differing points of view; debate:” I realize that at least with my lack of eloquence the written word does not well confer nuance of attitude. The questions I ask are sincere. I have no belligerent intent; to the contrary I respect the members of this forum and hope to learn from all of you. I am sorry if I gave you cause to see it any other way.
01/06/2015 at 11:00 pm #22487What benefit do you observe in removing the burr in this fashion before moving on to a finer abrasive. Does the next abrasive work faster? Produce a better edge? How exactly does it speed things up compared to leaving out that step?
I think there may be a misunderstanding… I have also adopted Ziggy’s method of burr removal, but only use it when belt sharpening. This is because you can’t really minimize/remove a burr simply with a belt… it has to be stropped off on a felt/leather belt. I find that when I do this, i can keep switching back and forth and flipping the burr until eventually it is removed, or I can flip it enough times until where it is weak enough and will actually come off in the painters stick (which is balsa, I believe). I haven’t used this method when sharpening on my Wicked Edge.
I have seen enough microscopic pictures of an edge, pre and post stropped, to believe that light stropping at the proper angle will indeed remove any existing burrs (if not too big). Although I don’t have the proof at this moment.
Lastly, although not an end all be all, 18 generation master blade smith Murray Carter (I’m sure you’ve heard of him) also advocates using wood to remove a burr as shown in his video on sharpening a straight razor:
01/06/2015 at 11:02 pm #22488And although I have not done this myself, please check out this thread… interesting technique used by Bluntcut and others.
http://www.bladeforums.com/forums/showthread.php/1249588-Invincible-wire-edge-!!
01/06/2015 at 11:35 pm #22490The video bluntcut linked was one I watched early on that lead me to be not so dainty with my burr removal efforts. The guy is fun to watch do his thing.
I’m really looking forward to examination under a scope to see what scraping wood down a burr does initially and on following grits. My thought, which could be wrong, is wood shouldn’t do anything to the edge I should worry about… its wood right?
As a force of habit, I run my pine block down the blade a few quick times in between paddles changes and never really see a burr get going enough to mention which is what I want. The idea of metal bending back n forth getting soft like a paper clip before it breaks kinda drives me nuts! :blink:
01/07/2015 at 2:59 am #22496As Josh said, I mainly use it on belts, but have used it on WEPS as well … when called for.
And, important to note, the wood is soft .. you might be right Josh, Balsa most likely, I like the cheapo sticks as they give quickly.
I find it, as well as the hard felt cube, stops the problem of shifting the burr side to side.
PITA knives, a paper wheel actually will curl the wire off 🙂PLEASE NOTE!!!!! With those blocks, knife in hand or in vice … BE CAREFUL!!!!
Especially when knife in hand, block in other … my bad habit … easy to get overzealous with too much pressure as the tip passes through. Do it with the block held down, and lightly, its meant for the final stages.That’s the thing, there are all sorts of methods and means to the end, soft wood is just one, and also applicable to the “right” metals or sharpening results.
One great use for wood .. saving time.
I am not talking about critical precision specs on a Sebanza.
I’m talking more primarily from a business aspect, like when you have 30 blades to do, all a variety of metals (good and OMG this sucks!)
It’s got to get done, and you’re gonna batch them.
AND, they look like all re-profiles and you know some the metal is fatigued, you just don’t know yet how bad.In the primary stages, each knife reacts different say on a belt.
You see it, feel it, hear it.
The wood not only helps knock off the burr, but also lets you know how good the metal is in your hand, allowing you to have an idea of what it will take to get to the end product.For me, if fatigued, I’ll notice it in how the metal flakes off, not shears off. I go back to re-profile and wood till I hit paydirt and see the difference and feel it.
Once the batch is at the re-profiled and mostly deburred stage, I have a base level and idea of what I’m in for and a plan of attack.
Then sharpen accordingly on WEPS or whatever you like.01/07/2015 at 8:57 am #22508Thank you both. I am starting to get a much better idea of how you are using this. I have never sharpened on a belt grinder so likely I have no appreciation for the issues involved. I also am not sharpening a bunch of knives at once or in a hurry so it makes sense that time saving approaches are of somewhat less interest to me. I asked the questions I did because I had not found deburring on wood or cork to improve my edges (sometimes it made them worse) but I see now that my application may be more in error than my technique.
01/07/2015 at 10:27 am #22511I’m sorry, but I haven’t been following this thread and am maybe off topic, but I don’t think so.
On another thread, I mentioned that there was an article in Fine Woodworking’s Oct issue where the author teaches about sharpening your woodworking tools (e.g.: hand plane blades) on a hardwood blocks loaded with diamond paste. He then describes how to deburr the edge by running it through end grain on the same block – also loaded with paste.
As Arte Johnson would say…. “Verrry Interestink.”
01/07/2015 at 10:45 am #22512I’m sorry, but I haven’t been following this thread and am maybe off topic, but I don’t think so.
On another thread, I mentioned that there was an article in Fine Woodworking’s Oct issue where the author teaches about sharpening your woodworking tools (e.g.: hand plane blades) on a hardwood blocks loaded with diamond paste. He then describes how to deburr the edge by running it through end grain on the same block – also loaded with paste.
As Arte Johnson would say…. “Verrry Interestink.”
Tc,
I like to use the felt block on finer, end stage burrs.
Very useful to the weps imho.
And I drop 1 micron Boron on the block.
You can feel the slide and hangup if the there are rough spots.On end grain, think cutting boards.
Whats the best type?
Butcher block … why?
All other boards are cross grain, butcher, end grain.
Imagine a brush and squeeze the bristles together …. end grain.
It gives.Thus soft wood and hard felt … they give.
01/09/2015 at 9:19 pm #22554So now I am starting to see in my head this..
you sharpen to a burr to make sure the apex is there. Now you have a fatigued piece of metal on the edge. There are many ways to remove it. If you start to make another accidentally or do not remove the burr properly as you sharpen with the finer grits you can just end up aligning this burr nice and straight and it will be sharp as heck..But weak. Some people will refer to this as a “wire edge” you make some cuts and it folds over easily. (The same can happen if you make a weak steels apex with too low of a sharpening angle.)
The edge will deform to easily and roll.Does anyone have a good microscope or loope picture of a “wire edge” vs a properly apexed edge at the same angle?
Does this make sense or do I have it wrong?
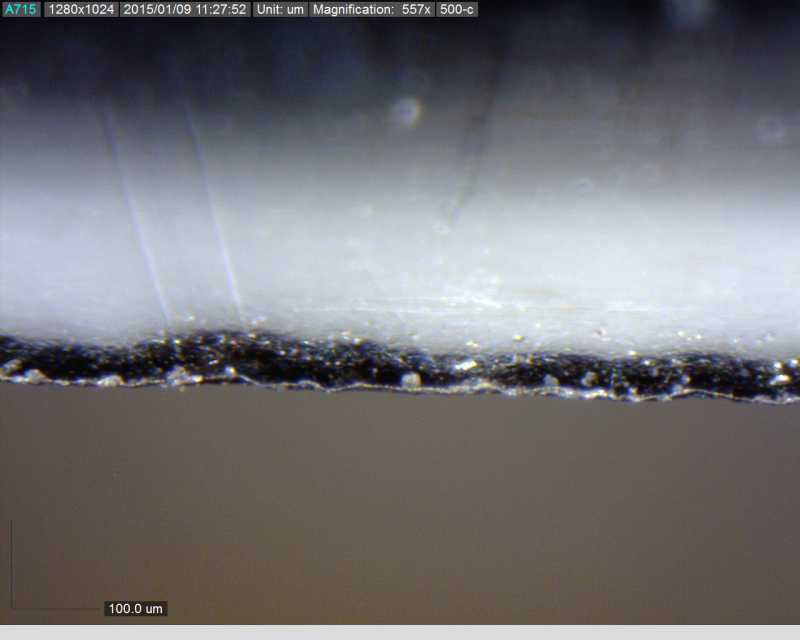
01/09/2015 at 10:36 pm #22556Here’s a picture of a wire edge I just created:
Wire Edge at 500x
It’s taken at around 30 degrees off of vertical which is where I was best able to image the burr. At other angles the reflection was a problem. It’s also not done on the best sample because this one had been highly polished and is somewhat convex, so the backside, which we’re looking at isn’t as crisp as it could be. When I get back from Shot Show, I’ll prepare a better sample with a cross section we can examine as well.
This is really more of a classic burr that is pushed to one side by me only sharpening one side of the sample with 100 grit diamond plates.
Attachments:-Clay
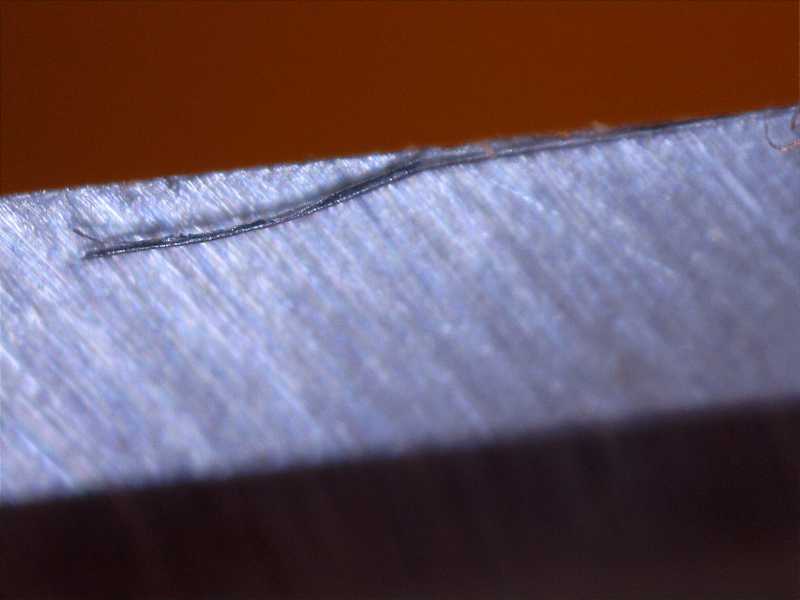
01/10/2015 at 2:30 am #22565Here’s a burr I happened to catch just as it was separating from the edge…
Attachments:01/10/2015 at 5:11 am #22573Ok..this is EXACTLY where I wanted this topic to go! Freggin awesome pictures guys.
01/10/2015 at 5:41 am #22575Here’s a burr I happened to catch just as it was separating from the edge..
Great photo! I like over at the very right side of the image where it is still fully attached. I can see easily missing that on a casual check with a lower power loupe etc…
Maybe its overkill, maybe its not needed all the time, maybe Im ripping micro-serrations along the apex… When I get a scope images will tell me more. Until then Ill keep wiping the blade down with my pine block in between every few grits. Its working and gives me some assurance that a “micro-burr” isnt hiding on me waiting to fold over forst time I use it.. 😉
-
AuthorPosts
- You must be logged in to reply to this topic.