Play in arms/stones
Recent › Forums › Main Forum › Sharpener and Accessory Maintenance › Play in arms/stones
- This topic has 13 replies, 4 voices, and was last updated 12/11/2020 at 3:28 pm by
 tcmeyer.
-
AuthorPosts
-
12/07/2020 at 7:40 pm #55378
Hi All –
First off if this is in the wrong sub forum please move it appropriately.
I received my new WE130 over the weekend. I am wondering what an acceptable level of play is in the ball joints combined with the slop in the paddles. I can get up to half a degree of variance due to movement of the arm/ball joint and the oversized holes in the paddles. I had read that play used to be an issue but was under the impression that it had been eliminated. Is half a degree what can be expected with a new system? Thank you in advance!
12/07/2020 at 8:08 pm #55379ColbyL, welcome to the W.E. forum. Sorry your having concerns.
Did you purchase your “new” WE130 directly from Wicked Edge?
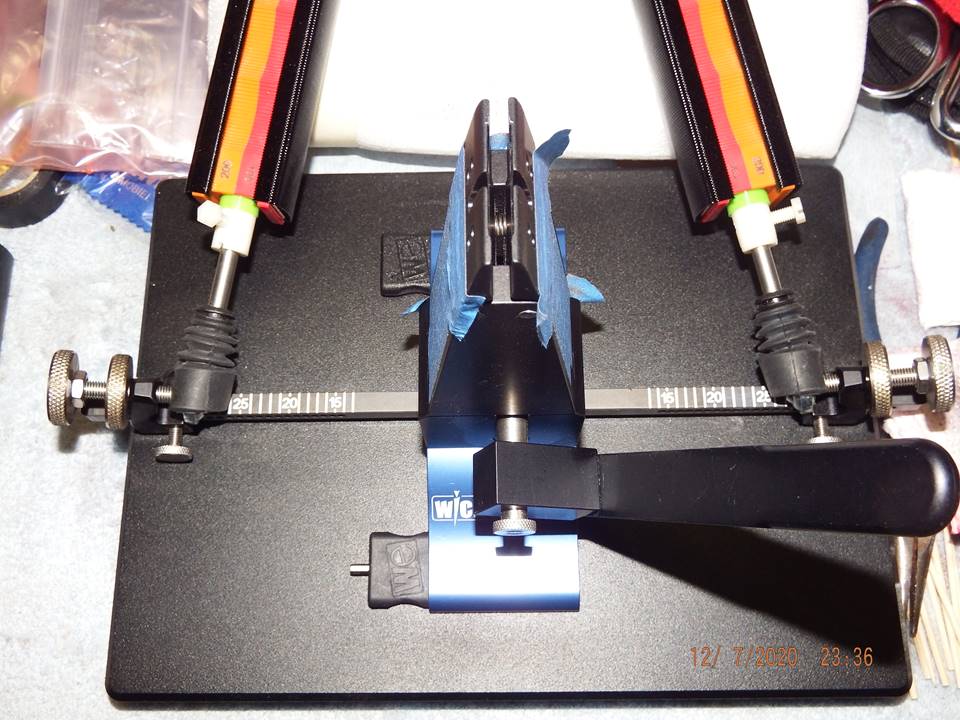
Could you post a photo or two of your setup showing us an end bracket in place on the square bar with the ball end and guide rod screwed in like you would use it. Also, a photo showing any one of your sharpening stones would be helpful.
Marc
(MarcH's Rack-Its)12/07/2020 at 8:51 pm #55380Thank you for the reply Marc. I did purchase directly from Wicked Edge. I bought the WE130 and some extra stones. I think this picture should get you everything requested. Let me know if you need another angle.
Edit: Here is a link of a video showing the play at the joint. https://imgur.com/a/tHTmG02
-
This reply was modified 3 years, 4 months ago by
ColbyL.
Attachments:
You must be logged in to access attached files.
1 user thanked author for this post.
12/07/2020 at 11:39 pm #55386You posted the video while I was posting….then I caught it.
That ball isn’t right. It should be tight and only rotate, not wobble. Are both balls bad? W.E. will replace that with a phone call.
The paddles should have no slop or at least minimum slop on the guide rods. They should be so tight that they make a woosh-like sound while sharpening a knife as the stones slide up and down the guide rods.
Marc
(MarcH's Rack-Its)1 user thanked author for this post.
12/08/2020 at 12:05 am #55390Welcome to the Forum! My stones have a tiny bit of slop on the guide rods but I don’t think that it’s enough to worry about. But those ball joints are bad.
12/08/2020 at 9:00 am #55399OK thank you Robert and Marc, I thought that seemed like a lot of movement in those joints. They are both equally bad. I will call support and discuss with them.
Regarding the stones on the arms. Here is a video, with audio, of the movement I am getting on those. Its roughly the same on both arms with all the stones.
12/08/2020 at 9:15 am #55400The stone on the arm is hard to tell, for me. In your video the way you have the rod arm clamped, the rod arm appears to be moving along with the stone moving. I can’t distinguish one movement from the other. Also, the camera is moving and contributing to the appeared motion.
I checked a stone on a guide rod today. While holding the rod solid and stationary as I moved the stone that I slid on the rod, it hardly moved sideways, at all. There was very little slop or play.
I find it very unusual that you have two defective ball ends. W.E. has a very good track record with the quality control and precision in their parts. Maybe W.E. was sent a badly manufactured batch of ball ends. They need to check their on-hand parts for defects. They will make bad parts right with out any issues. Just call customer service.
Marc
(MarcH's Rack-Its)12/08/2020 at 11:31 am #55402To add one more thing. The guide rods only need to be hand tightened into the ball end sockets. If they become a little loose, maybe backing out a thread or so while you’re sharpening, it won’t effect the angle settings any. I usually just check the rods regularly as I change grits by spinning the rod to check and tighten them if needed. If it bothers you, that it can work loose, you can apply a drop or two of “blue” Locktite thread locker. The blue type holds well without being permanent.
Be careful, if you choose to grab the guide rod with a pliers or vise grips to twist it in tight. This tightening process can torque the ball end and stretch or warp and deform that ball housing. That portion of the ball end assembly that wraps around and holds the balls stable. That tightening attempt can increase the gap and introduce play you wouldn’t normally experience.
Marc
(MarcH's Rack-Its)12/08/2020 at 12:26 pm #55404OK thank you Robert and Marc, I thought that seemed like a lot of movement in those joints. They are both equally bad. I will call support and discuss with them. Regarding the stones on the arms. Here is a video, with audio, of the movement I am getting on those. Its roughly the same on both arms with all the stones. <iframe id=”imgur-embed-iframe-pub-a-7Z2JL2e” class=”imgur-embed-iframe-pub imgur-embed-iframe-pub-a-7Z2JL2e-true-540″ style=”height: 500px; width: 540px; margin: 10px 0px; padding: 0px;” src=”https://imgur.com/a/7Z2JL2e/embed?pub=true&ref=https%3A%2F%2Fknife.wickededgeusa.com%2Fforums%2Ftopic%2Fplay-in-arms-stones%2F%23post-55399&w=540″ scrolling=”no” allowfullscreen=”allowfullscreen”></iframe> <script async=”” src=”//s.imgur.com/min/embed.js” charset=”utf-8″></script>
What is the OD of your guide rods? They should measure 0.254″
12/08/2020 at 12:47 pm #55405My arms are .253 according to my calipers so I think I am within spec there. I called Wicked Edge and they are sending me new joints (impressive customer service as I had heard).
I am interested in seeing the new joints. The ones I have now seem a little worse for the wear. There are some gouges in the face of one of them almost like they had been used and not treated nicely. The supplied alignment guide also looked like it had seen better days with most of the markings partially worn off.
Marc – Thank you for the tip on threaded the rods into the joints. Mine were already installed and I hadn’t touched them but I will keep this in mind when the new ones come. I have used teflon tape in place of locktite in the past for things like this with decent success.
1 user thanked author for this post.
12/08/2020 at 1:25 pm #55408My arms are .253 according to my calipers so I think I am within spec there. I called Wicked Edge and they are sending me new joints (impressive customer service as I had heard). I am interested in seeing the new joints. The ones I have now seem a little worse for the wear. There are some gouges in the face of one of them almost like they had been used and not treated nicely. The supplied alignment guide also looked like it had seen better days with most of the markings partially worn off. Marc – Thank you for the tip on threaded the rods into the joints. Mine were already installed and I hadn’t touched them but I will keep this in mind when the new ones come. I have used teflon tape in place of locktite in the past for things like this with decent success.
I love my Stainless Steel Micro-adjusters and accessories that I bought from the guys here in the forum. They give you a lot more adjustability than the standard micro-adjusters. He has some plastic knob ones that are less expensive. The stone covers work great also and ball joint cups and stone stops. Below is a recent photo of my WE130 with the accessories on it.
Attachments:
You must be logged in to access attached files.
2 users thanked author for this post.
12/09/2020 at 7:40 am #55420Wow Robert those are some nice add ons! I will keep those in mind as I go down the rabbit hole… For now I am planning on cutting the fingers off some disposable gloves and put them over the ball joints. I am curious about your stones. Are those covers on them? I am trying to figure out the best way to store mine and was considering putting each on in a ziplock bag and then getting a little box to hold them all.
12/09/2020 at 3:20 pm #55423Wow Robert those are some nice add ons! I will keep those in mind as I go down the rabbit hole… For now I am planning on cutting the fingers off some disposable gloves and put them over the ball joints. I am curious about your stones. Are those covers on them? I am trying to figure out the best way to store mine and was considering putting each on in a ziplock bag and then getting a little box to hold them all.
Yep. In the link I gave they are called strop covers. But they fit the stones also. The accessories are worth every penny if you asked me. But I don’t call it a rabbit hole – I call it a gold mine. LOL!
Before I could buy the accessories, I also cut fingers from nitrile gloves to cover the ball joints. I used rubber grommets for stone stops as well. And as you can see in the photo, I tape up my vise to try to keep out as much of the steel shavings and stuff as much as I can.
12/11/2020 at 3:28 pm #55435Rods that measure .253 ought to be snug enough in the handles to work well. Some years ago, the rods were measured at about .246 and I thought that was too loose, so I modified my handles by installing bronze bushings a each end. Eventually, I even made my own handles out of various materials, including G10, maple hardwood and ABS, but I wasn’t able to hold the tolerances I wanted. All of the handles varied enough in side-to-side distance from the center of the bore, as well as in parallelism. I needed to use the Variable Stone Thickness Adapter to account for the variability.
Wicked Edge made some improvements with the rollout of the Gen 3 Pro and about the same time I switched to rods made from .257 steel. There’s still some “sloppiness” in the rod-to-handle fit, but good technique will account for the “system” slop and produce good results. For me, that means always setting my angles with the stone set in the same place and with the same amount of pressure applied at the same place.
Here’s my technique summarized:
- When setting the angle, always place the face of the stone against the blade directly above the center of the vise with one inch of stone face extended above the edge. With the fingers of your opposite hand, reach around the vise and pull the bottom of the stone toward the vise with a nominal amount of pressure. Imagine the weight of a pound of butter. That’s about how much force to use. Do it every time you set an angle.
- I always grasp the handles in the same way – with my thumb nestled in the second finger-groove up from the bottom. My index finger is nestled in the same opposing groove and the middle finger is in the bottom groove. The ring finger and pinkie are always closed against my palm. This technique will reduce the percentage of time your fingers will be above the edge. Besides benefiting from consistency, you’ve reduced the chances of springing any leaks. You can further increase the safety factor by using edge-leading strokes, since following through on your stroke will not put your pinkies above the edge.
Try to keep the pressure you apply constant. Applying more pressure at any point will tend to deflect the rod/handle/ball joint system and change the angle. What’s more, the angle will change throughout the stroke, resulting in a convex grind and a sloppy looking bevel facet. I use the “pound of butter” concept to judge my pressure.
Even with the best techniques, you’ll find that the actual angles change from the top of your stroke to the bottom, simply because of the lever principle. At any time in the stroke, the pressure applied is distributed between the point of contact at the edge and the ball joint. The further the pressure point is from the edge, the lower the percentage of the total pressure applied will be felt at the edge. Consistency is the key.
If your technique is such that your pressure point goes above the edge, the pressure applied will tip the scales, as the slop in the handle will go from one direction to the other. Prove this to yourself by putting your angle gage on a handle. then move the handle up slowly. When the pressure point rises above the edge, the angle will jump by anywhere from one to three degrees. You can usually hear a “klunk” when this happens. Learn to listen for this, as it’s a warning that you’re doing something wrong.
You can reduce this effect by “following through”, just as you would when swiping past the tip of the blade to prevent rollover. Rather than just applying a simple one direction force, use your grasp of the handle to prevent the handle from rocking as it moves over the edge.
-
This reply was modified 3 years, 4 months ago by
-
AuthorPosts
- You must be logged in to reply to this topic.