Dealing with paddles of different thicknesses ???
Recent › Forums › Main Forum › Techniques and Sharpening Strategies › Basic Techniques and Sharpening Strategies › Dealing with paddles of different thicknesses ???
- This topic has 6 replies, 3 voices, and was last updated 12/30/2021 at 10:04 am by
 tcmeyer.
-
AuthorPosts
-
12/27/2021 at 11:26 am #57391
Happy Holidays!
This thread provides some paddle thickness measurements and observations on the effects on the shenogi. It also asks for feedback how everyone deals with the below described observations to allow the WE to get a “close-to-perfect” edge / shenogi.
The observations come from sharpening a single bevel Japanese knife at 14.0 degrees on the one side which leaves a 8 mm shenogi. This is far larger then a folder so it really highlights what a difference a slightly thicker paddle means to the actual sharpening angle.
I’m attaching a single pic taken from a cell phone as the shenogi is too wide to readily demonstrate the observations on a scope. Please note that this is a knife still in the sharpening stage and the edge needs a lot more work. The plan is to make it shine, eventually, and NOT ever put on a micro bevel. But, I’m pausing the sharpening as I investigate the second shenogi or what could be called a second bevel (which is NOT the desired effect).
I’m a few weeks into my new WE Gen 3 with a lot of grits etc, have now sharpened a couple dozen knives and have moved on to some high quality knives. I’ve done a number of them extremely well, but am noticing that some of the paddles are of different thickness. The observation came to light (pun intended – use of USB scope – often – “go slow and study”) when I was cleaning up an Isikawa Bunka, White #2- SINGLE BEVEL.
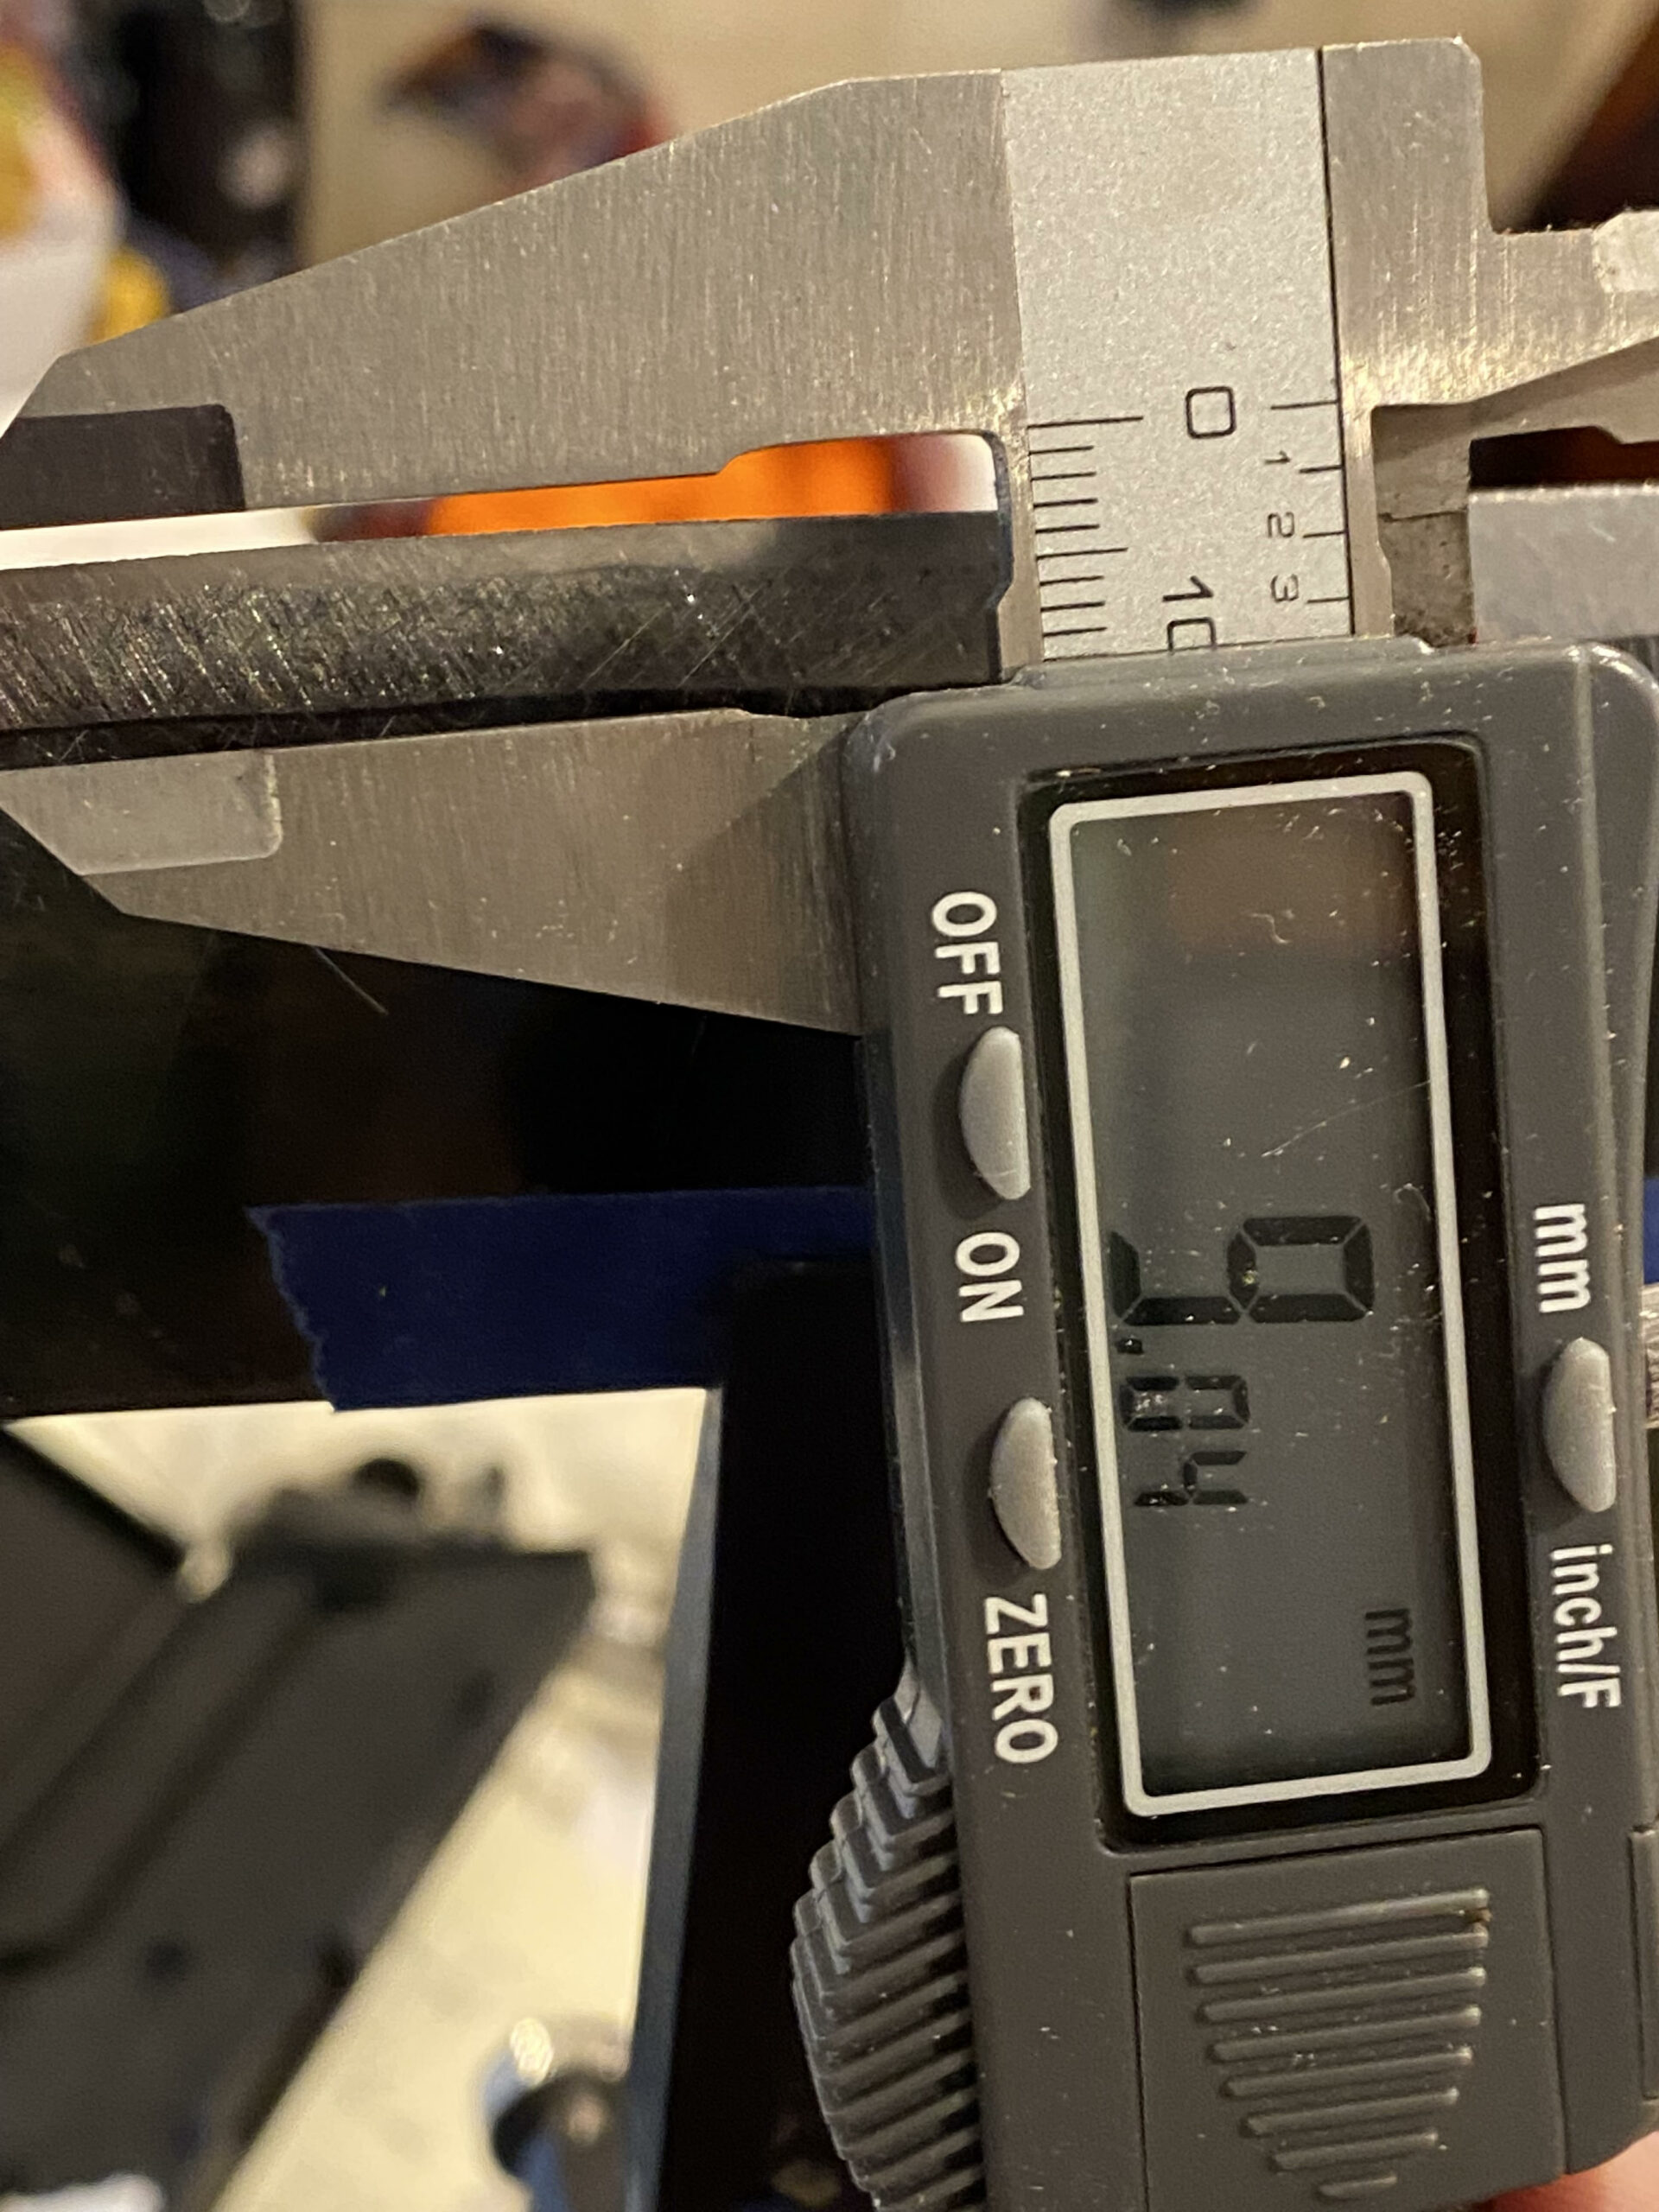
Without listing every paddle thickness measurement, and noting that some paddles have more strokes at more pressure then others at this time, I can confidently say most paddles have at least 12 knives on them and should be at least mostly broken in (I think ???) except for the 50/80’s which have three knives, but A LOT ( hours and hours) of strokes. The thickness of the paddles varies from a lowest reading of 29.8m mm to a largest reading of 30.78mm. Measurements were takes on the left side, center, and right side of each paddle along it’s “sliding” axis – aka along the length of each paddle.
Most interesting to observe is that the 50/80’s, which are newest and have the outlier thicknesses of 30,78 – 30.65 depending on where the reading was taken. Bizarrely enough, one paddle had the center reading at 30.73 while each end was 30.78 while the other paddle has the center at 30.7 with each end measuring 30.65. I used a “cheap” Pittsburg (Harbor Freight brand) digital caliper but know and verified it reads identical to my Draper (medium+ quality) dial caliper and “wiggled” the caliper to find the tightest smallest) reading without “squeezing too hard”. Each of the 100-3000 grits measured “substantially” lower at 29.85 to 30.3 mm thicknesses.
Is this paddle thickness enough to change the angle the substrate hits the edge? It seems so.
Once again, I had been sharpening a micro-bevel on whetstones for “ease of sharpening” prior to getting the WE, and decided t o get rid of that micro-bevel and restore a beautiful straight edge on the Shinogi. What a PAIN (topic already discussed in another thread – sort of)! I THINK I’m committed to never putting on a micro-bevel again unless I want it to be a permanent solution…
Back on topic, I had to break out the 50/80 and spend too many hours grinding away until I hit the Apex. that last 1/4 mm seemed to take forever… I was using the Low angle adapter, 14.0 degrees on the one side, sharpening only the one side while feeling for a burr and using the scope to observe the edge and any Sharipe markings left, verifying the angle every so often etc. After finally getting very close to the Apex, I moved to the 100/200 etc. confirming my micro-adjust jam nuts were still secure. It was late and I was tired. I decided to quickly get up to 800 “just to see” and after 25 or so passes with each grit, I observed a strange phenomenon. The total Shenogi is about 9mm, but, I observed about 3mm (easily visible with the naked eye) “at the Apex” had clearly a smoother / shinier appearance.
So the question is, how does everyone deal with this? In this case, I am ONLY using WE diamond paddles. I’ve been told to check the angle every time and adjust with the micro-adjustment knob to get a precise angle. This seems a PITA.
Is my technique in play? I’m trying to hold the paddle in the same position every stroke (1/4 up from the bottom), but KNOW in fact I have been sometimes holding further up as when grinding away in the lower grits one can easily feel and hear when the diamonds are really grinding (pulling off metal) vs. when they seem to be more running along the surface. Does this make sense? I’m describing both the resistance and sound made as I do an edge-leading stroke.
Another avenue to investigate is: Are the paddles/rods loose-tolerance such that a slight variation of holding position (resulting “angle of attack” for lack of a better term) results in enough of a change of paddle angle on the blade to visibly affect the surface finish? I measured the bore of each paddle as best possible, and it wasn’t particularly easy getting the calipers in perfectly parallel to the bore and “squeezing” and aligning just enough to feel the widest reading without “digging in to” the plastic bore, but think I did a reasonable job. The results were measured bores of 6.65 mm up to 6.83 (measured each paddle at both ends). Most were 6.71 – 6.75 mm. Note ONE of the 50/80’s were an outlier at 6.81 / 6.83 and ONE 1500/2200 was a low outlier at 6.65/6.87. The rest were 6.72-6.75.mm.
I tend to believe that I still have technique and consistency of “angle of pressure” to master, but wonder if the system is accurate, but just not “super accurate” given how paddles wear over time and / or just have thickness tolerances that must be dealt with. There is clearly enough of a gap between the inside bore of the paddles and the outside diameter of the rods to allow sliding, but is there too much? There are clearly different bore diameters, but does this matter for this level of work? Is it only when we havea large shenogi that this matters?
I hypothesize that the break in of stones matters A LOT. I also hypothesize that the 50/80’s are indeed thicker, and may always be so, but that is to be determined as they break in and the “tall” diamonds continue to get knocked off.
One thought I have is to check the angle on each paddle ( or thickness of the paddle) once, then note somehow if any single paddle leaves a more acute or obtuse sheniogi. This seems like an approach that lets me do it once and not have to re-check angles every time. But, this will change, perhaps, as the paddles continue to break in. Or, I could, if I find an outlier paddle, should I send the outlier back to WE in exchange for a more “center of allowable tolerances one? If this were an industrial / professional use-case, I would absolutely do the latter as quality control / quality audit, incoming inspection parts rejection but realize the thickness will change as the paddles wear in and the surface diamonds break off.
Does anyone or does WE publish a spec on acceptable ( what I hypothesize to be paddle bore and / or thickness tolerances)?
In conclusion, I’m looking to understand how everyone deals with this. Do we really just need to measure the thickness or angle every time? Do we do so only for “newer” paddles until they are broken in and demonstrate acceptable sharpening results? Do we just scrub away and observe the edges and then, if there is an issue we adjust the angle?
Share your thoughts and experiences!
-Henry
-
This topic was modified 2 years, 4 months ago by
Henry.
-
This topic was modified 2 years, 4 months ago by
Attachments:
You must be logged in to access attached files.
12/27/2021 at 1:20 pm #57395Henry,
TMI
You are making yourself crazy worrying about too many details. The precision you’re seeking, it seems to me from reading your post, is way more than needed. We’re just sharpening knives. We’re not polishing jet engine turbofan blades.
There is some tolerance or slop between the stones and the guide rods. The W.E. guide rods were re-engineered to a larger diameter and the paddles were resized and remolded with a new plastic material a couple years ago. This did make a big improvement and a tighter fit with less slop. But there still is some tolerance. You don’t want it too tight, or it doesn’t slide easily with almost no pressure.
The stone thickness doesn’t matter. It is easily accommodated for making micro-angle measurements and adjustments with each and every grit or stone change. This is the easy way to deal with it. All your investigations and precision measurements are looking for a harder, more complicated solution. Yes, micro-adjustments are a PITA. It can be tedious and time consuming. Especially with non-magnetic mediums. But it’s not hard to do and it does make a difference in the precision of your results.
Finger placement and consistency in hand-hold position and pressure is important. Where you apply pressure affects the bevel and the polish. You observed the results with your USB scope. Learn to use it to your advantage. Move your finger applied pressure to direct your effort where you need it. I prefer to hold the stones in the center. I always work with plastic safety shields to protect the digits as they cross over the knife edges.
Remember the W.E. is just a benchtop hand tool. It is operated by us with the human factor. It seems to me the precision you seek is that of an automated machining tool. Inexpensive technology like USB micro-scopes, high resolution digital protractors and digital micrometers allow those of us with it, to indulge our OCD and perfectionist tendencies. Enjoy using the W.E. for what it is. Accessorize and modify it if you choose. Learn to work with it. It’s really a pretty good setup.
As always, no disrespect implied.
Marc
(MarcH's Rack-Its)12/27/2021 at 2:28 pm #57396Very Interesting observations:
I discovered with the help of a sharpie that I needed to sharpen now at 13.8 deg to best hit the full 50/80 grit scratch pattern shenogi s that’s what I did.
After re-calibrating and chasing the Apex using the 100/200 grit stone, I started getting a better shinogi, but had a devil of a time chasing the apex for about 1 1/2″ of knife blade. I was very careful to have gentle pressure, not enough to visibly bend (or move) the blade yet enough to feel and hear the diamonds working. After ~ 25 minutes of the 100 with multiple checks and still a hair away from the apex, the knife still easily pull cut paper (left in the jig to run test). I flipped the stone, colored the shinogi in a green sharpie, and did the exact same scrubbing using gentle pressure and careful of hand placement consistency on the paddle.
I observed that the angle had changed on the shenogi yet I was still measuring 13.8 deg with the angle cube (supporting it’s height on the rod by pinching the rod below the paddle to not influence the angle by bending the rod). I was now scrubbing the top 1/3 of the shenogi and not really touching the bottom 1/3!
This is perplex and confusing. The same paddle.. I guess that perhaps one side glue may be thicker than the other or the 100 and 200 grits have different diamond stone thicknesses?
Here are a few photos:
- Forget the file names of “5 minutes” (it’s from a starting time 20 + minutes into 100 grit scrubbing. Note the Apex is still missed, but what the photos do not show is the edge easily slices paper. The phots clearly shows I’ve removed metal on the top 1/3 of the shenogi.
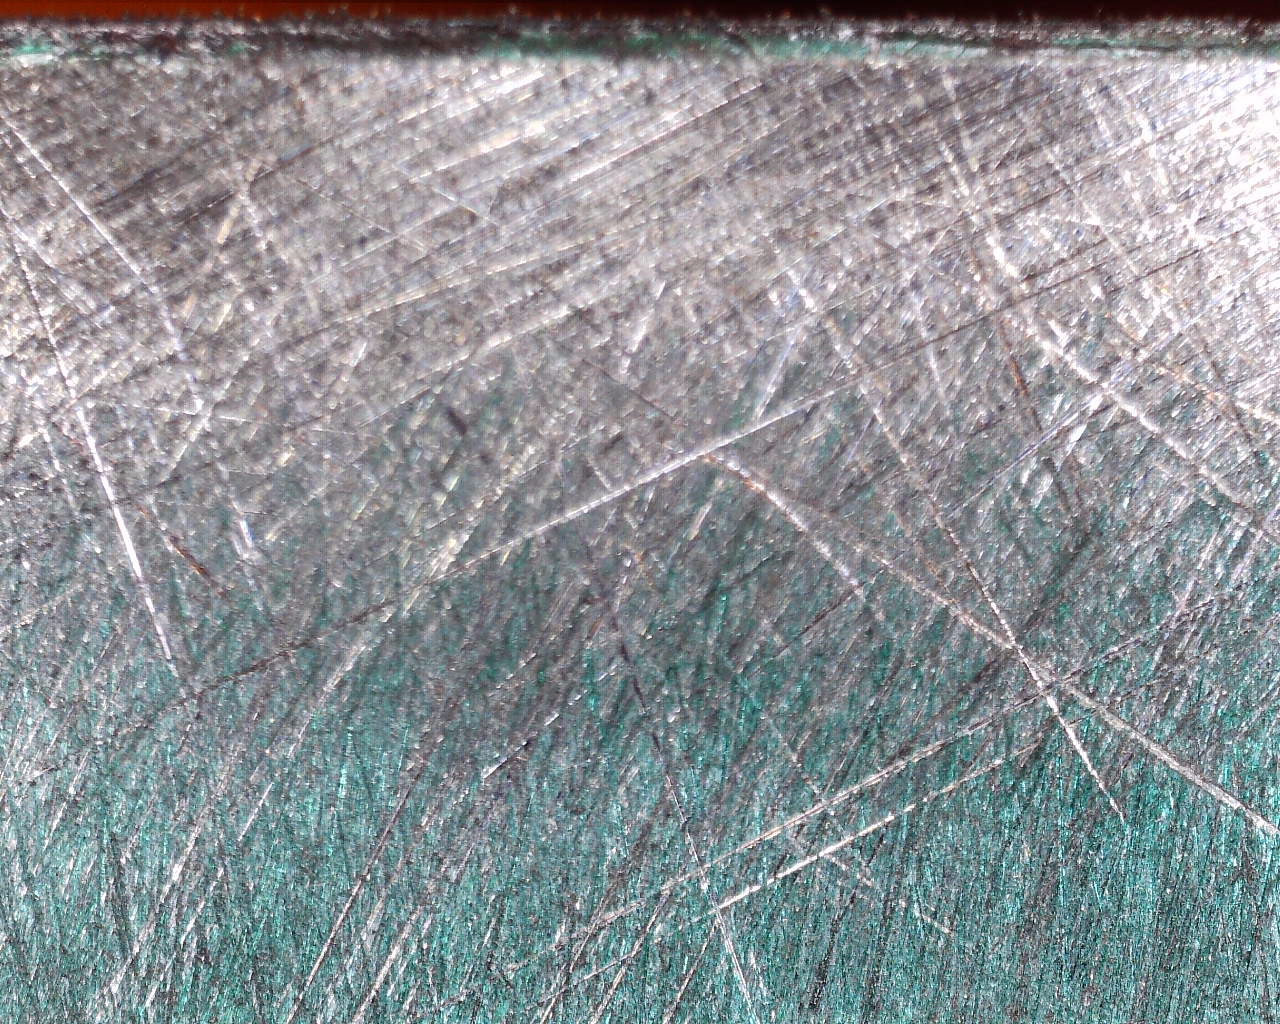
2. These show the same moment in time but the rest of the blade (will not fit, even on low power, into a single photo. One is of the bottom of the shenogi and the other is at the top (kind of a duplicate of the above pic, but I’m trying to “blend” the 2 together.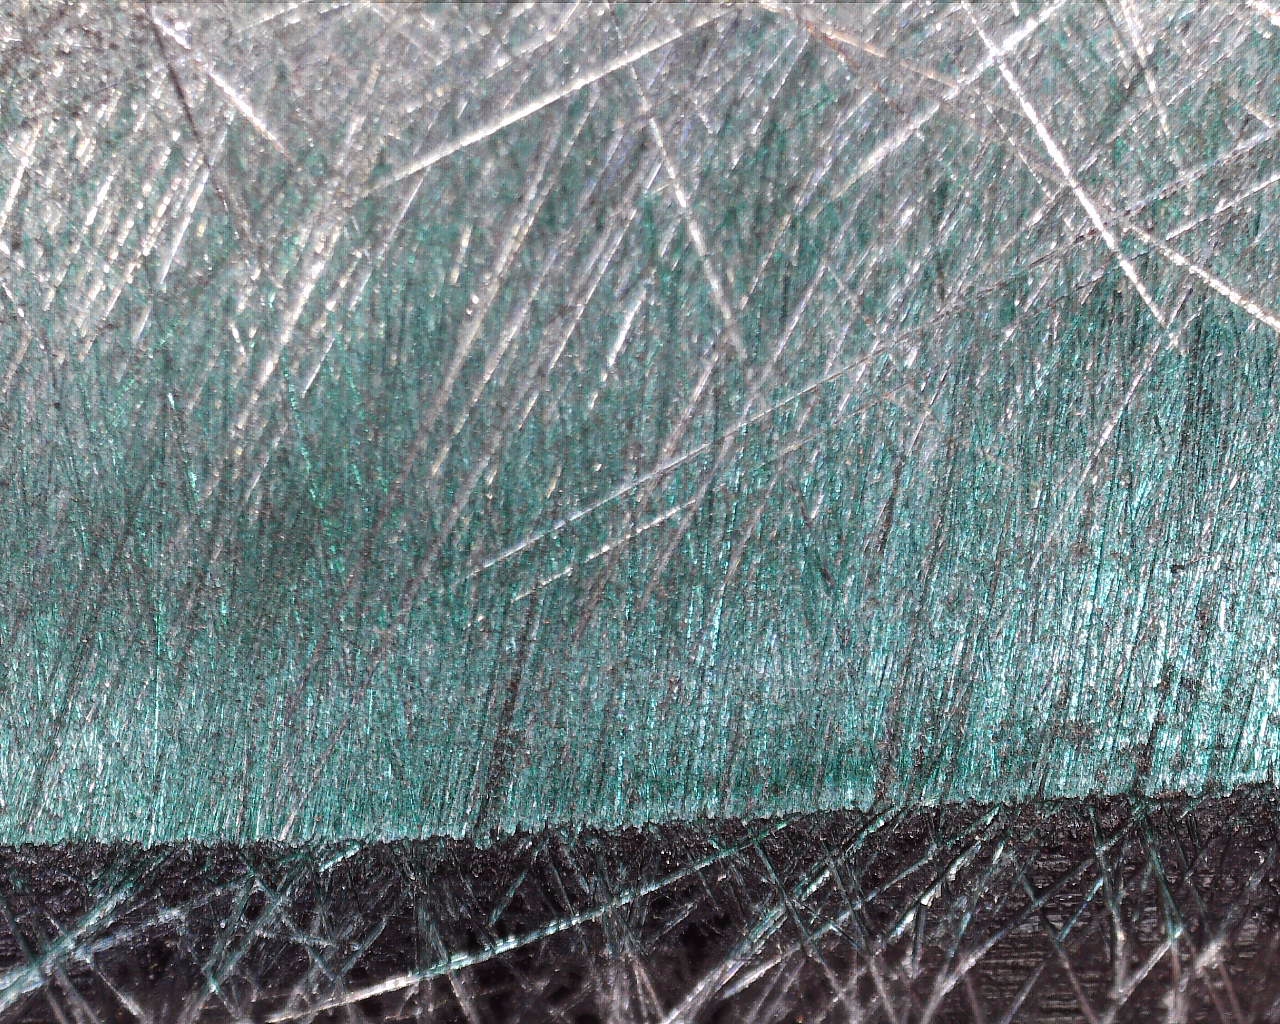
Note now the green “fades” in on the bottom 1/3.
I guess the only thing to do is micro-adjust the 200 side of the paddle to remove all green.
I’m still not at the Apex as observed by the green on the blade edge. I must assume it’s sharp from prior sharpening with the micro-bevel???
To be continued. I may just drop the angle of the 200 by an ever slight amount and 200 out the green. This will eventually leave me with a nice shiny shenogi and if I repeat this process it may eventually create a semi-convex shenogi (albeit ever so slight). I’m tired of scrubbing chasing that last 1/25’th (guess) of a mm of the apex and just may live with needing a concaving or micro-bevel at this time. It’ll create a future nightmare or at least a lot more thought and work to flat-sharpen if I do so. Or, I suck it up, back down to the 100 and scrub away till the apex is finally reached on the last 1 1/2′ of blade that currently apparently still has some micro-bevel left on it.
The reason for this post, consistent with the subject line, is it seems that even within the same paddle, both sides appear to be at enough height differences from the inside bore (on that side) of the paddle to make enough of a difference to show when sharpening a knife with a quite wide shenogi.
To be continued I’m pretty sure.
Attachments:
You must be logged in to access attached files.
12/27/2021 at 2:40 pm #57405LOL,
Yes I’m getting a bit OCD, and yes my career is involves nanometer level precision. I get this is a knife sharpener and on a hobby budget. But I’m going crazy chasing that apex / flat shenogi on this blade!
My take away is to suck it up and micro-adjust on every sharpening medium (as long as it matters – aka in the case of a large flat bevel). I have NOT seen this on more reasonable bevels that are 1-3 mm in length!
Mark, Thank you as always!
I may still keep this post going as a journal of learning for other crazy enthusiasts chasing as much as they can from the tool.
-Henry
12/27/2021 at 4:53 pm #57406Henry, your post #57396 above, with all the close-up USB photos makes it hard to figure out your issue. As forum participant 000Robert has previously posted multiple times, “a picture is worth a thousand words”. If you could include a wide-view photo of the entire knife clamped in your Gen 3 Pro it would be very helpful. Your sharing the issues you’re dealing with, with lot of words. Without us being able to see or understand the actual sharpening situation is difficult to comprehend. We can’t help you fix what we can’t see or understand. All that you’re sharing are closeups of random scratches. That doesn’t really show us anything. Please help us put it in context.
Marc
(MarcH's Rack-Its)12/27/2021 at 6:46 pm #57407Hi Mark et Al.
unfortunately the setup is put away so I can’t take a cell phone shot. And yea… the pix are too close up to make sense of this without my secret decoder ring interpreting my writing; as I wrote:
2. These show the same moment in time but the rest of the blade (will not fit, even on low power, into a single photo. One is of the bottom of the shenogi and the other is at the top (kind of a duplicate of the above pic, but I’m trying to “blend” the 2 together.
So basically I’m showing the top and bottom 1/2 of the shenogi, at the same place on the blade, demonstrating how on the same setting, same paddle, opposite abrasive side, I’m seeing a different sharpening angle. I’m only scrubbing the top ( edge) portion of the shenogi and missing the bottom 1/2 completely when switched the paddle over to the 200 grit side.
This demonstrates that each paddle side has a different enough thickness or distance from inside face of the bore to the outside of the abrasive ti affect the sharpening angle.
I ultimately used the micro-adjust on most paddle sides to dial in the same angle and called it a day.
I do realize I’m writing heavily and doing a deep dive into how this jig operates.
The conclusion I’ve drawn is that using the micro-adjust is mandatory to maintain the same sharpening angle, and it’s at least noticible when sharpening a bevel that’s long (8 mm ish in this case).
Perhaps I may find time next weekend to re-wright this more succinctly and clearly and maybe an admin will post a stickie “Evidence of why we need to use the micro adjusting knobs for wide bevels”. But , it sure would have been helpful if I had taken a wider angle view of this with my cell. Dope!
The learning curve continues as I’m developing my competency and skills while learning the nuances of this jig. Yes it’s an art, and yes the results of a sharp edge can be accomplished many ways, and as you said above, and I paraphrase, “It’s a knife for God’s sake, it’s not a semiconductor Lithograph machine nor a vascular surgical robot.
I’m enjoying the journey and look forward to mastering this contraption some day.
Thanks again Mark for putting on effort to help and guide.
12/30/2021 at 10:04 am #57441Paddle thickness varies from grit to grit simply because the height of the diamond matrix changes with the size of the diamond particles. Yes there is some variability due to manufacturing tolerances, but usually the differences are minor.
Generally, as the grit goes up, the thickness goes down. Assuming there’s been no change in the microadjust settings, this moves the scratch pattern closer to the apex. Clay calls this a “happy accident” as it works to our advantage. If I remember correctly, it would require a change of 0.010″ between the rod bore and the stone face to produce a 0.1 degree change over the length of the stone face. From my experience, it takes a lot of experience before you’ll recognize such small angle changes from stone to stone.
Any situation where you do not trust the angle settings requires that you measure and adjust with each stone change. If you are truly compelled to pick nits, then I suggest you measure the stone thickness from one end to the other. Where one face is not parallel to the other, the angle will change when you turn the paddle from one face to the next. You’ll get different angle readings from one side to the other. In these cases (I’ve it twice in ten years) you need to remove the platens and their tape and remount them to the paddle, taking care to seat the platens fully in their pockets.
Geometrically, a 14 degree angle producing a 9 mm wide bevel suggests that the blade is about 2 mm thick, given that this is a single bevel knife. I once put a single bevel on a cleaver and the resulting bevel was quite a bit wider than 9 mm.
2 users thanked author for this post.
-
This topic was modified 2 years, 4 months ago by
-
AuthorPosts
- You must be logged in to reply to this topic.