Asymmetrical Bevels. New Owner
Recent › Forums › Main Forum › Techniques and Sharpening Strategies › Basic Techniques and Sharpening Strategies › Asymmetrical Bevels. New Owner
- This topic has 18 replies, 8 voices, and was last updated 01/23/2015 at 7:04 pm by
Pat.
-
AuthorPosts
-
11/16/2014 at 11:56 pm #21266
All,
I just received my WE PP2 w/case 2 weeks ago.
I have noticed if the angle is the same on left
and right collars the bevels are not equal on a finished knife.Example. I set the angle cube on the granite base and zero.
I set the knife in the vise, I use 800 grit stones with the angle cube.
The angle set is 17 on the collar/rail and match 17 degrees on
the micro adjustments. I work from 100 -> 1000 grits.On a finished knife the right bevel is always bigger then the left
bevel. (looking down in knife locked in vise. I don’t know if it’s
1 or 2 or 3 degrees stronger. (15 degrees, even
when the collar are set to 17).How do I calibrate the collars/angles to the correct center of the vise?
I have noticed this on every knife I have sharpened, I have not tried
anything to compensate for the larger bevel since I don’t want to ruin
this awesome piece of equipment.Joe
11/17/2014 at 12:49 am #21267Joe,
I honestly think this often the case with the majority of knives that leave the factory. Keep in mind that at the end of the day there’s someone standing in front of a grinder and simply eyeballing the edge being created. In short, unless that person has a a precise way (like the WEPS!!) of accurately setting a bevel that’s equal on both sides, chances are the bevel will be off… Sometimes waaaaaay off.
I reprofile all my knives. After positioning the blade and setting whatever angle I want the bevels to be using the angle cube, I color the edge with a Sharpy and do 10-15 alternating strokes using the 100 grit diamonds. At this point I STOP and carefully observe both sides to see what’s happening as the stones make their passes. This is where the truth comes out, so to speak 😉 The majority of the time I’ll notice a lot of Sharpy is gone on one side and still pretty heavy on the other side. That tells me the side that’s still heavily painted needs to be picked on for a minute. At this point you’re essentially creating new planes so that the edge is in fact centered between both sides of the spine.
So, I guess my point is, if you really want those bevels to be super awesome and accurate, you’ve got to make that happen yourself. Thankfully the Wicked Edge makes it possible. But, I totally understand you being apprehensive about reprofiling.
Here’s my advice – Be willing so ruin some knives. Not on purpose, but in the process of learning how to recreate an edge. I bought cheap kitchen to practice on and busted out some old pocket knives I’ve had since I was a kid. I didn’t really care what happened to them in the end. The important thing to me was learning how to do what should’ve be done in the first place, which is having even bevels on a knife. And one of the cool things about the WEPS is that once you recreate an edge, you then document it in your logbook making touch-ups a breeze.
Hope this helps!
11/17/2014 at 12:51 am #21268Check out this video of Mr. Clay Allison sharpening a Benchmade 940. It’ll help!
11/17/2014 at 1:18 am #21270Thanks for a quick reply.
Yes, I have watched every wicked edge youtube video by clay including this one multiple times.
I used my old M9 bayonet and kaybar for test subjects along with my spec ops.
The diamonds were flying off as noted in the manual/videos for stone break in period.
After 5 knives the diamond flying was reduced. I stepped up to my S&W knifes
for post break in sharpening. I didn’t notice until a knife or two ago the bevel
problem. Now I will need to regroup and start over with profiling until the
bevels are equal.Joe
11/17/2014 at 1:38 am #21271Then perhaps it’s quite possibly related to a greater amount of force being applied to the right when you’re starting off with lower grits.
Being right handed, I quickly noticed the direction of my grind lines on the left were more accurate from heal to tip, and the grind lines on the right more obtuse from heal to tip. This revealed that the bottom of the stone wasn’t extending to the tip of the blade. I also noticed it took more work to remove the previous grit on the left as I worked through the progression. It’s definitely challenging to sync up your hands in order to get a consistent scratch pattern on both sides of the blade.
11/17/2014 at 3:30 am #21277I betcha this is where you are getting the difference in bevels. How you have your blade clamped in the vice makes a big difference.
If you are just trying to follow the same bevel that is on the knife to start with just use the sharpie trick and ignore angles.
People keep saying you have to be willing to ruin a knife. I guess if you are a collector and such maybe but if it is a knife you are going to use? You would have to mess up about a hundred times trying to re-profile the edge of the same knife before you ruin it. I think somone said here when you re-profile a knife fully you end up loosing like 0.5mm of blade width.. Really unless you are going nuts with your lower grit stones you can make many many mistakes and recover from them nicely. There are a lot of cheap nice knives out there to practice on besides..but you really gotta work at ruining one in my mind.
I do agree though, most of the knives from the manufacturers are not done perfectly like we can get them on the Wicked Edge. Lots..not even close.
11/17/2014 at 4:14 am #21279Yup, my Spyderco Delica came with a 17 deg. bevel on the left and 24 on the right. I made a small correction with each sharpening until I had it to 20 dps.
If the bevels are different enough to catch your eye and bother you, then it’s time to work just the one side until it’s the same. However, you must be certain that the angles are in fact the same – easy enough to check with your AngleCube. Also, be careful not to cause a problem at the tip, where excessive stoning can really make the bevels different. If the original bevels look OK at the tip, try not to work all the way to the tip.
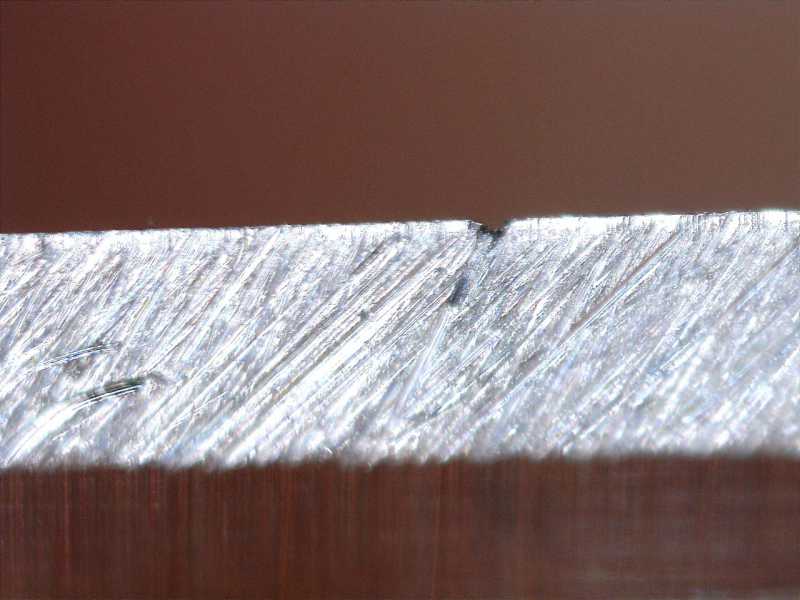
I don’t recommend using the 100/200s at the start. I actually use my 1000’s when doing the Sharpy thing. There is less chance of accidentally scratching the finished sides of the knife. I only go lower than 400 if I’m removing a lot of material and there’s little chance of hitting the apex. The low grits can rip big holes in your edge, requiring A LOT of work with the 400s to remove it. Here’s an example of a 200 grit chip on a Chicago Cutlery chef’s knife:
Attachments:11/17/2014 at 5:57 am #21280Look at that chip! Wow… This explains a lot.
Sorry for the confusion when I said use the Sharpie with the 100s. I mean I do use the Sharpie at this stage but only after see what’s going on with the 1000s. Then I repaint it he bevel and begin with my 100s… Which you’re saying isn’t recommend?…I understand, in part, due to the amount of material bring removed so violently, and due to the amount of work needed using the 400s, but wouldn’t you have to put in even more work starting out with the 400s in order for them to do what you know the 100s will do in less time?
Thanks in advance, good sir?
11/17/2014 at 12:04 pm #21284I don’t use the 100/200s at all unless I know they won’t come close to what I’m hoping will be my final apex. If you are reprofiling a blade or need to remove a lot of steel, certainly the 400’s won’t do the job. For instance, in the case of the pictured chip, 400s are going to take all night. I would file the edge flat, using a 400 or 600 stone, taking it down to the bottom of the worst chip. This is all steel that has to be removed anyway and this is a fast way to set a target for my new apex. Now I have a blunt edge to work with, and I can use the 200s to re-establish the bevels and bring them back close to the centerline of that flat edge. They’re unlikely to pop a big chip without a fine (read fragile) edge to fail. When I’m close to the centerline, I’ll switch to the 400s to reform and refine the apex.
Another case for the coarser grits might be where you are changing a bevel on a rather large blade to a significantly lower angle. Here you could use the 200s as you work at the shoulders, until you get near the apex.
Yes, I put a lot of miles on my 400s. My first set lasted right about three years (I’m a hobbyist) and I may have exacerbated the wear by trying (unsuccessfully) to repair a chipped ceramic blade. Maybe I’m just paranoid about the coarse grits because of a couple of bad chips. Others here on the forum seem to feel quite comfortable using them freely. You should make your own rules and take our input for what it is – advise.
11/18/2014 at 1:32 am #21294Zamfir,
In short we all have 2 options for mounting the knife.
— option 1
— Mount the knife and let the knife move with the clamp.
– using the video of clay with the benchmade 940 (knifeknerd attached in the thread).— option 2
— Mount the knife with blade against left jaw.
– using the picture tcmeyer attached in the thread tcmeyer commented
https://knife.wickededgeusa.com/forum/9-basic-techniques-and-sharpening-strategies/13088-why-are-my-blades-tilted-in-the-clamp?start=10
– finding the offset using the angle cube. then using math to compensate for the jaw angle.I think option 1 would be better for now, however I will need to check the finished bevel
to see if the edge has a extreme offset from the blade.Joe
Attachments:11/18/2014 at 2:02 am #21295If option 2 doesn’t seem to make sense, here’s a video that pretty much breaks it down visually Thanks to Josh from Razor Edge Knives!
01/23/2015 at 6:02 am #22825Joe,
as you are now a two month two week owner you are now probably more savvy than I am. I became aware of this problem early on, and have been applying a lot of thought to working around it. Now that the as yet unnamed WEPS 3 has been mooted (Huzzah!) I’ll put in my two penn’orth. The left jaw of the WEPS 2 vice is fixed and vertical, as will be any blade clamped to it. So, when the right jaw is tightened the blade will be clamped with its centre line canted to the left. The cant will be half of the included angle of the BLADE of the knife. In the case of my Japanese knives this is typically 4 degrees, so half is 2 degrees. So, if I want to apply an angle of, say, 19 degrees to either side of my knife I need to apply a sharpening angle of 17 degrees to the left side and 21 degrees to the right side of the knife. This is as good as we are ever going to achieve with the WEPS 2, with both edges of the blade being sharpened at 19 degrees. However, unless you are a sharpening god like Clay or Benton you will never be able to apply exactly the same left-right and up-down forces to each side of the edge. You will inevitably apply more pressure to the wider, flatter right side of the blade, with the results which everyone is reporting now.
So, bring on the as yet unnamed WEPS 3. Its free floating jaws will eliminate all these problems and let us concentrate on achieving the best possible edges without compromise. From what I’ve seen in today’s newsletter we shall still be restricted to two pivot points for the shoulder of the blade, which tinkled a couple of bells in my head, but everyone ought to buy the upgrade.
As I have said, I was trying to think up a modification which would achieve this aim. I’m now applying my spare time to greasing myself up to swim the Atlantic to get the first one of these. It really will be that good, believe me!
All the best,
Gerald.01/23/2015 at 7:37 am #22830Edit: Double Entry
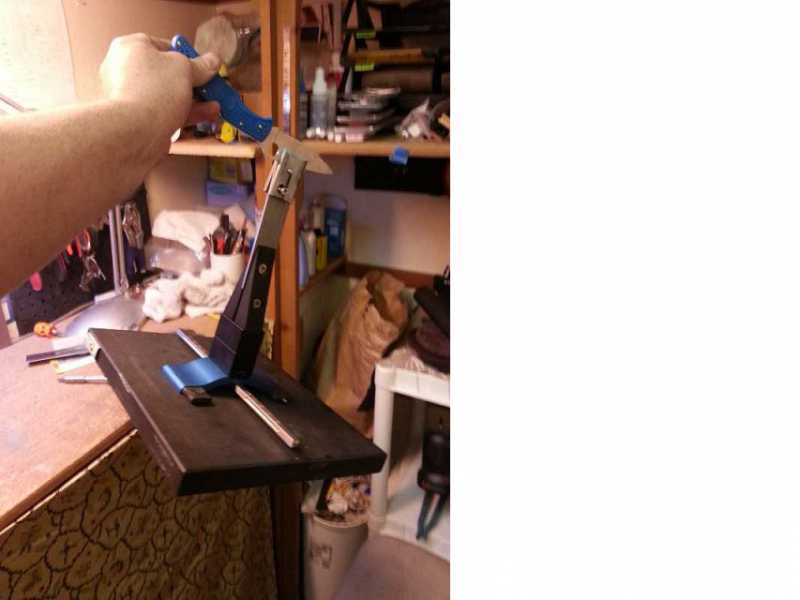
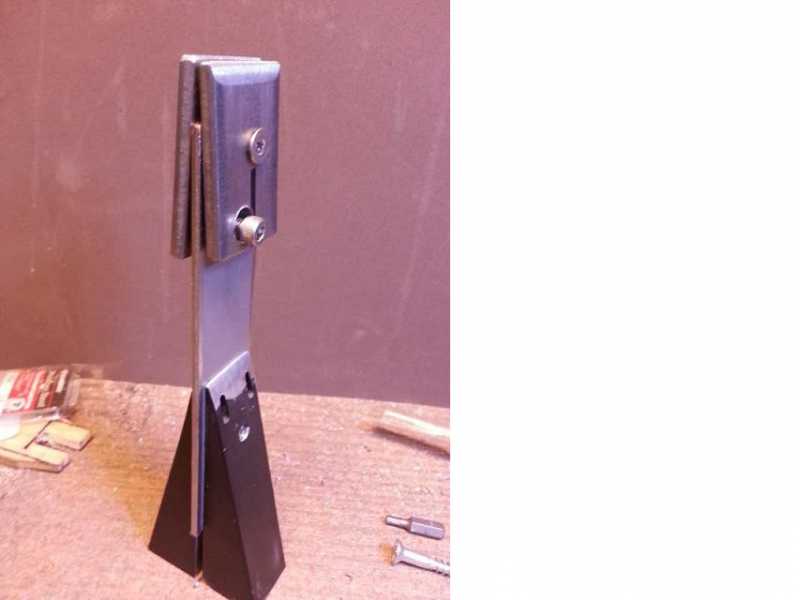
01/23/2015 at 7:38 am #22834Aloha everyone, I wasn’t going to post until construction was finished but I’ve been tinkering with my own version of a low angle adapter for FFG that grips like a hungry pit bull and won’t let go.
This is my mock up(phase 1). The clamp arms need tapered, center support will get round lightly at the top, screws all need shortened, the finish & painted to match.
Basic theory of operation: top screw is the pivot, bottom screws push thru, applying pressure on the opposite side.
As a proof of concept it rocks and I’m happy. So happy I’ve been using it full time and haven’t bothered making it pretty yet. 🙂
Attachments:01/23/2015 at 7:53 am #22835Lookin good cliff!
-
AuthorPosts
- You must be logged in to reply to this topic.