The advanced alignment guide: what am I doing wrong?
Recent › Forums › Main Forum › Techniques and Sharpening Strategies › Basic Techniques and Sharpening Strategies › The advanced alignment guide: what am I doing wrong?
- This topic has 17 replies, 5 voices, and was last updated 12/09/2018 at 7:35 pm by
 Marc H.
-
AuthorPosts
-
11/25/2018 at 7:43 am #48197
One of the special attributes about this system is the ability to repeat results.
To further that end, I purchased an advanced alignment guide. I’ve had it for a period of time and don’t know if they have been changed, but I’m really puzzled about using it properly.
There is so much play in the holes cut in the plastic guide as they rest on the pins. Also, the pins them self have some play where they insert into the vice. Additionally, the pictures show the alignment guide being vertical when in actuality, it sort of flops to follow the angle of the vice head.
In order to find, say I7, are we supposed to hold the guide with one hand while adjusting the knife and locking the cam with the other?
Are you guys using them?
What am I missing…?
1 user thanked author for this post.
11/25/2018 at 8:45 am #48201Like your guide, mine behaves similarly. It does hang on the depth key pins and feels sloppy, when the vice is open. I’d found when I apply a little lever locking action to tighten the vice it holds the knife snuggly, but not yet locked, and the depth key more snuggly, so by pushing it in it also holds the AAG guide in an orientation with the vice and jaws I can work with. I do have to move the guide to get the grid lines aligned with the side and top of the jawline so it is level and perpendicular. This orientation or position in relation to the vice is what I always use to get repeated positions. Then with the guide in that aligned position I then place my attention on the knives orientation. Yes it is a bit of a juggling act. By slightly loosening the lever I can move or slide the knife. Then I re-snug the knife and the depth key to hold the card tight. I’m able to rotate and hold pressure on the lever with my right hand and press the depth key in ,with the thumb of my right hand at the same time. I’m holding, sliding, rotating the position of the knife with my left hand. Just a little lever pressure makes it a lot easier.
Since you’ve been using the WEPS for a while, and you know the system allows repeatability. You may want to employ the same old method you have been using, to start with. I’m guessing the older steel ruler alignment guide. Get your knife in position via your old method and clamp it. Then change out the alignment guide ruler stick for the new one, while the knife is clamped. The key should hold the AAG more snuggly with the vice locked. If it still is floppy, with the knife still clamped in the same previously used sharpening position, while pressing in the depth key to hold the new AAG in a vertical and perpendicular alignment with the vice, look for two or three points of intersection between the grid lines and the knife blade. Record these. If you still have trouble with the AAG slipping, use a spot of tape or double stick tape to secure it’s orientation to give you a reading you can repeat.
Marc
(MarcH's Rack-Its)3 users thanked author for this post.
11/25/2018 at 8:51 am #48202I agree that the alignment guide could be improved upon. In addition to the issues you have encountered, I have found that larger knives sometimes extend beyond the measurable range of the grid. I typically hold the grid and pin tightly in place with one hand and the knife in the other while lining everything up. I then stabilize the knife with the hand that is holding the pin and alignment guide while I clamp the blade with the other hand (gen. 3 clamp). I imagine that it could be quite a bit more cumbersome with the screw clamp.
With the current incarnation of the gauge it is up to the user to ensure consistency of placement. I would like to see WE make the gauge larger and devise a hands free method for attaching it to the clamping system that is solid (without significant play) and precise. I think those two modifications would greatly enhance the user experience and utility of the tool. Unfortunately, that would probably increase the cost as well.
3 users thanked author for this post.
12/02/2018 at 10:16 pm #48413I have only used the advanced alignment guide maybe 3 times and the blue one that comes with the system maybe 10 times and both are almost useless now. The blue one broke in half and the advanced alignment guide has lost almost all the backing so I can’t read the letters or numbers anymore from putting it in and out of the slot in the case. I hot glued the blue one back together but I’m not sure either will last past another knife or two. I was on the wicked edge site to buy another one and decided to get on the forum, glad to see I’m not the only one having problems with it. At $8 a pop plus shipping I think I’ll wait to see if they redesign it. Maybe not put the numbers and letters on a thin sheet of plastic that peels when you look at it too long. If they were etched on it like the picture on the site shows , I think it would be a great product. From what I’ve seen I’m sure Clay will work it out.
2 users thanked author for this post.
12/02/2018 at 10:41 pm #48414I’m sure if you contact Wicked Edge customer service they would like to hear your feedback. I believe you must have an AAG from a badly printed batch. I’m sure they will gladly replace it for you.
I agree the thin narrow ruler type (standard) alignment guide lacks the integrity seen in the original thin steel earlier model alignment guide. I’m thinking the see-through plastic was an attempt to make a better product though it lacks resilience.
Marc
(MarcH's Rack-Its)1 user thanked author for this post.
12/02/2018 at 10:47 pm #48415I had no idea the older models were metal, that seams perfect. Any idea why they moved to plastic? Cost I assume. I may try to find a small thin metal ruler or something similar and drill holes in it.
1 user thanked author for this post.
12/02/2018 at 11:04 pm #48416My guess is they were thinking you could better see the knives position when the see-through thin plastic ruler overlapped the knives behind it, like seen with the taller Advanced Alignment Guide, (AAG).
Marc
(MarcH's Rack-Its)1 user thanked author for this post.
12/02/2018 at 11:22 pm #48417That makes sense , but as far as the blue one goes , it may as well be metal because it definitely isn’t see through. I found a few metal 1/2 in wide by 6in long metal rulers on amazon for around $5, may try one of those. <!–more–>
12/02/2018 at 11:39 pm #48418That makes sense , but as far as the blue one goes , it may as well be metal
Are you sure the blue isn’t a peel off plastic backing? Mine came with a blue peel off backing.
Marc
(MarcH's Rack-Its)12/02/2018 at 11:50 pm #48419I had no idea that blue stuff was supposed to come off , I just assumed it was peeling off like my AAG was. With that said , it did break in half in less than 2 weeks so I’m sure I would have eventually figured it out if I could use it anymore.
1 user thanked author for this post.
12/02/2018 at 11:57 pm #48420I’m sure they’ll replace them both. It’s just an inconvenience. If you make your own metal one try to drill holes so it fits the depth key pins snuggly to stands out straight, horizontally so does flop or hang down.
Marc
(MarcH's Rack-Its)12/03/2018 at 12:07 am #48421Also if you make your own alignment guide from a long metal ruler….If you sharpen larger kitchen type knives that get center clamped with knife portions both forward and behind the jaw center-line, you may want to place holes in the center of the ruler so it can give you position markers on both sides of the vice jaws.
Marc
(MarcH's Rack-Its)12/03/2018 at 12:37 am #48422That’s a good idea, thanks.
1 user thanked author for this post.
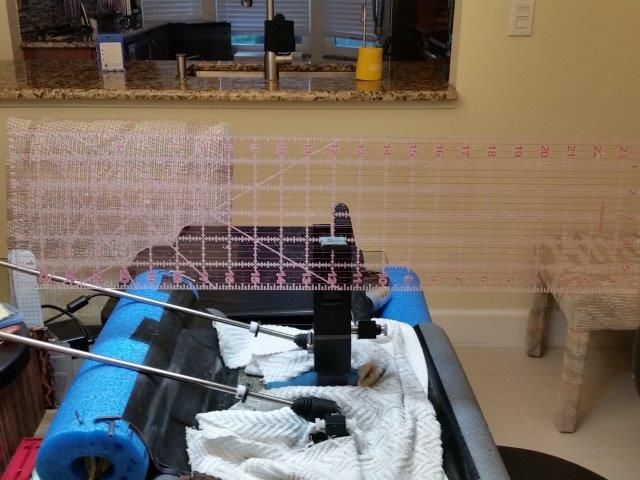
12/05/2018 at 12:52 pm #48425I made a custom modded Advanced Alignment Guide “on steroids”: Here’s what I started with.
I used the depth key to mark my desired hole positions. I used a 1/8″ drill and enlarged the holes ever so slightly to maintain a very tight fit on the depth key prongs. It stays in place! I used this long/wide ruler to allow me to record positions of knives mounted tilted in the vice and to align very long, wide and large blades. I may cut it shorter after I use it for a while if I find it’s length is excessive.
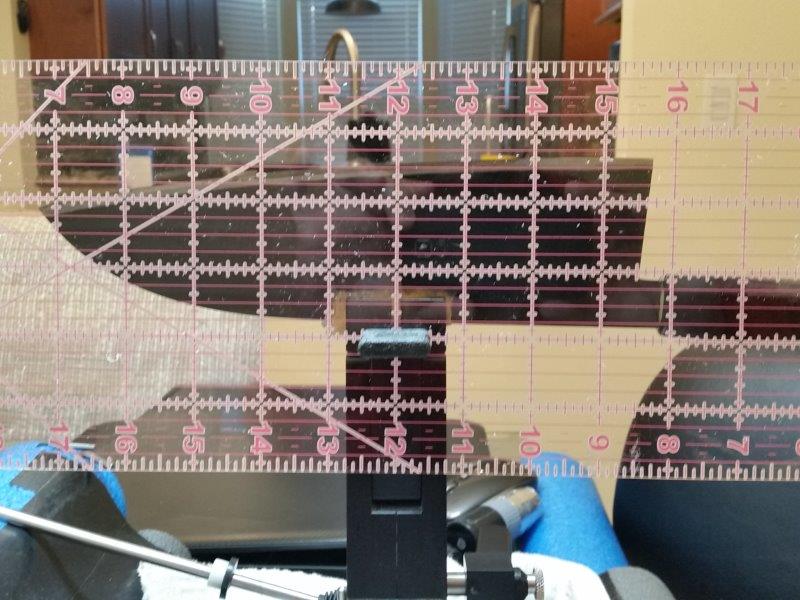
Here’s without a knife in the vice:
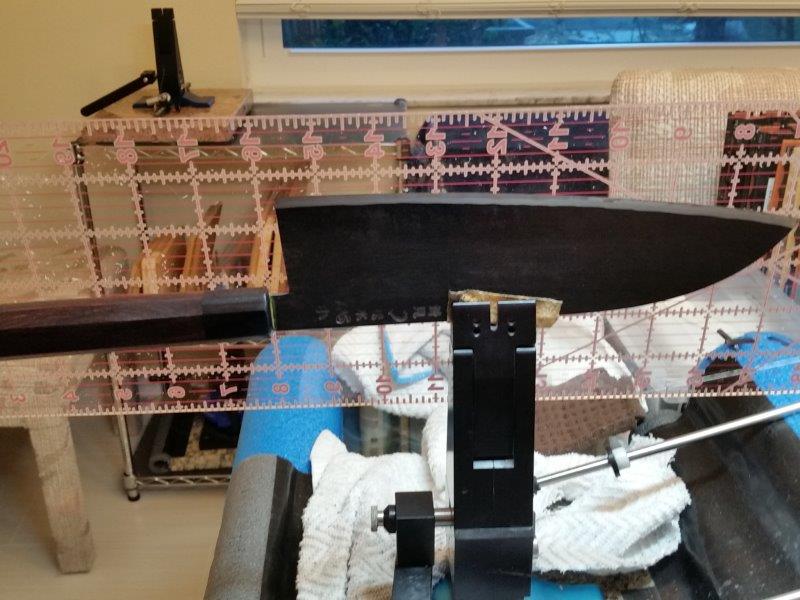
Here’s with a clamped Large Chef’s Knife:
Here’s the backside view of the clamped knife:
Marc
(MarcH's Rack-Its)Attachments:
You must be logged in to access attached files.
4 users thanked author for this post.
12/07/2018 at 1:15 pm #48440My guess is they were thinking you could better see the knives position when the see-through thin plastic ruler overlapped the knives behind it, like seen with the taller Advanced Alignment Guide, (AAG).
That was exactly our intention.
-Clay
1 user thanked author for this post.
-
AuthorPosts
- You must be logged in to reply to this topic.