Sneak Peak
Recent › Forums › Main Forum › Product Announcements › Sneak Peak
- This topic has 95 replies, 18 voices, and was last updated 08/09/2013 at 7:36 pm by
Tim Tritt.
-
AuthorPosts
-
05/01/2013 at 2:19 am #11255
Did you mean the bottom screw? I found, and Ken also commented, about its length being unneccessarily long. Perhaps there will be a shorter one in the production version, or the option to use a shorter screw when required by the desired angle.
I just tried a Forshner legging knife, 7/8 wide 5″ long and the best I could get without the extension was 14.8 degrees. Using the same settings with the extension I was able to get 9.6 on one side but couldn’t clear the top screw on the other. I had to back it off to 10.3 to clear everything. I have a chinese cleaver at 2 5/8 wide that I am going to try later.
05/01/2013 at 9:13 am #11258No, for some reason I was hitting the width adjustment screw. The blade is very thin (1/16) so the threads of the screw stick out about 1/8. I cleared the bottom screw just fine. Probably because it was tighter to grip the thin blade.
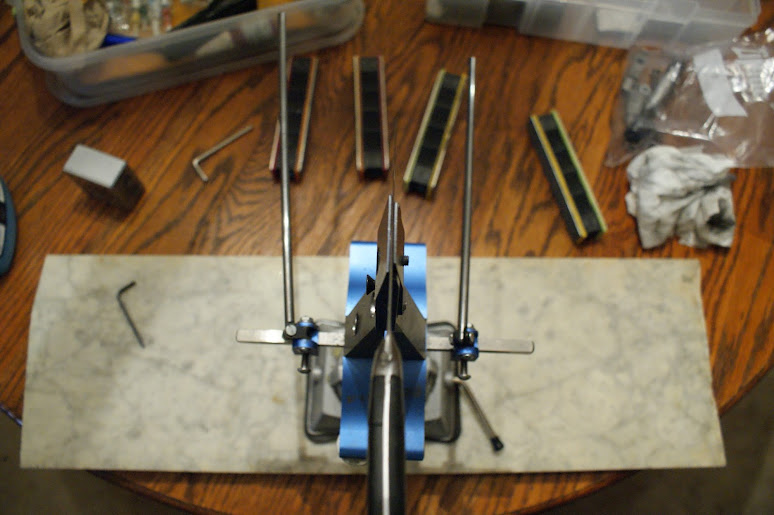
05/01/2013 at 9:54 am #11259Well, I promised some pictures, so here we go.
First the way the unit fits on the main vise. Everything lines up well and it is a very secure fit
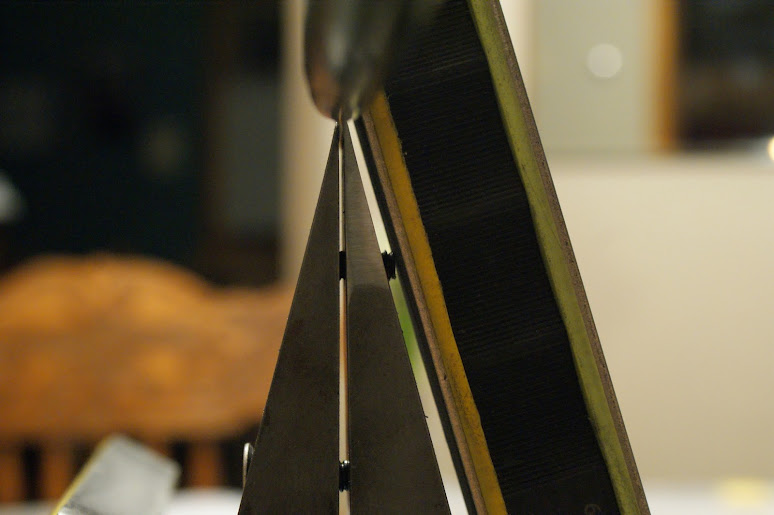
Next is the angle cube reading. This is as low as I could go with theis littl knife..
As it turned out, it as lower than I could go. You will notice that the left and right side got abraded quite differently at the same angle setting. Unfortunately I usually look at the right side for a given number of strokes, then stop and look for symmetry etc. I did not know until it was a bit late that the left side was getting hit like it did. Remember, this was with 100 grit and scrubbing strokes. I should have felt it, but did not. The solution was to raise the tip of the blade. I ended up going through the diamonds to 1K and the 4 ceramic levels. The knife is very sharp, though I am not confident it will stay that way for very long… not the greatest teel the Chinese stuff.I will try a bigger knife in the near future and I will report back with achievable angles and some more photos of the results.


 05/01/2013 at 11:00 am #11261
Update…
I just set one of my Spyderco Mules into the extension. The edge directly above the midle of the clamp was 7/8″ high. I was able to set 9.4 degrees on the left side, limited by the lower tension screw. With a shorter screw I am sure I could have hit the same 8.2 degrees that I got on the right side. I was using a business card as a feeler gauge between the stone and the upper edge of the extension’s jaw on the right. Just a little drag and I called it good. I wouldn’t want to be grinding off any more of the jaws…
Of course the left side never got close to the vise… it was hitting the screw, so I did the same thing with the business card between the tension screw and the stone. The above were the numbers that I saw.Phil
05/02/2013 at 5:51 am #11269Had good results with mine! As stated, fit and finish are superb. I could get down to around 8* on one side but only 13-14* on the other side… I need to play around with more knives, as the one I sharpened was a ffg kitchen knife that I didn’t tape…. Felt very secure though!
Anyway, I’ll post some pictures hopefully tonight with suggestions.
05/02/2013 at 5:57 am #11270The Mule is FFG… I could not get it clamped up so that it would not move…actually move, without using some chamois.
Had good results with mine! As stated, fit and finish are superb. I could get down to around 8* on one side but only 13-14* on the other side… I need to play around with more knives, as the one I sharpened was a ffg kitchen knife that I didn’t tape…. Felt very secure though!
Anyway, I’ll post some pictures hopefully tonight with suggestions.
05/02/2013 at 12:34 pm #11272I kind of feel like I am talking to myself here… but I volunteered to test, and that I am doing.
I clamped up an old clever that was laying around here just to see what kind of angles I could get. The edge of the cleaver was 2 3/8 ” above the center of the clamp. This cleaver is wider (taller?) at the tip end than at the handle end. If I was going to sharpen it I would have tilted it to try to get the edge as close to parallel to the base as possible. For this test I only wanted to see what the lowest angle achievable would be.I was able to get to 6.2 degrees on the left side before interference with the lower screw stopped me. Again I used a business card as a gauge to tell when to stop. The right side got all of the way down to 4.6 degrees. This time interference with the top screw was the limit.
There was a couple of problems that would keep these angles from being practical in use. First is the stone wobble after it is in excess of 50% off of the end of the rod (which it was when I took the shot showing the angle cube below), but more important, if I tried to make a complete sweep of the blade, the handle would come completely off of the end of the rod by the tim I got 80% of the way to the tip of the cleaver.
I think that longer rods would be mandatory to take full advantage of the new low angle extension accessory.
BTW, Clay, have you had time to play with the new extension? What have you seen?
Just curious.Phil

 05/02/2013 at 1:34 pm #11273
Ok so I finally got these pics uploaded! Please excuse the poor photos (had bad lighting)
So I started out with the edge mounted even to the base, with the edge being approximatley .5″ off of the top of the vise.

As you can see in the below photo, I do have rod arms that are 2″ longer than the stock rods and they worked beautifully! I would suggest 3″-4″ though for optimal performance… I noticed that I had a 1/3 degree change if I took the paddle all the way to where the bottom of the stone was hitting the edge on this knife (i.e. the paddle was approximately 30% off of the rods).

For some reason, I was able to go lower on the left side than the right… I am thinking this is because this cheap kitchen knife was FFG and I didn’t use anything to keep it centered like I normally do… it did lock up solid once I tweaked down on the vise though. I was able to get 7.65* on the left side before I hit anything with the stone. I believe the limiting factor here was the vise tip itself, due to the thickness of the top of the vise (which it has to be to maintain strength – more on this below)

I was only able to go to 11.65* on the right side before the stone hit the screw… I could have definitely gone lower without this getting in the way!

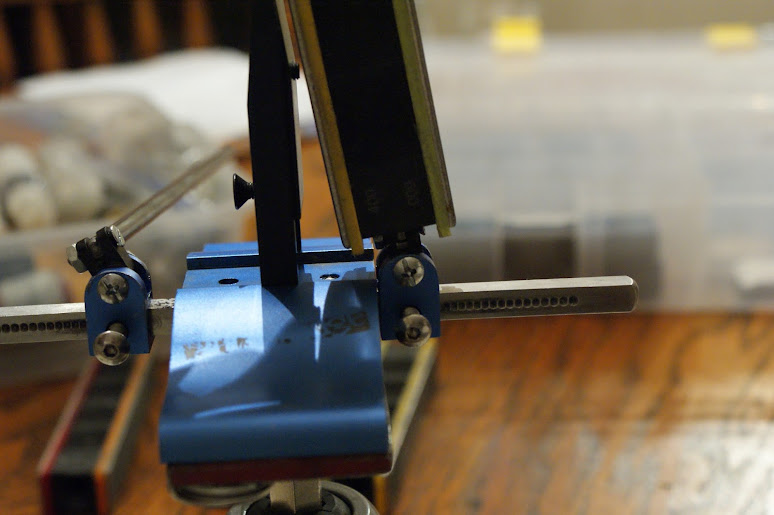
In the below photo you can see how the screws can definitely get in the way… I would suggest setting the screw heads in the vise if possible, much like on the original vise, and having 1-3 different sizes to come w/ the kit (would be super cheap to add in)
 05/02/2013 at 1:38 pm #11274
Alright, continuing on…
So I also wanted to mount this knife identically into my regular vise to see how low I could go…

Could get down to about 13.9*. Could have gone a little lower, but I need 1-2 different sizes of screws so it doesn’t get in the way.


Alright, so on to my final idea! =)
05/02/2013 at 1:47 pm #11275So Clay, this is just a though I want to throw out there… see what you guys think… I could be way off base! lol.
Couldn’t we do something like just make a single new modded vise? This way you wouldn’t have to make a special vise just for low angles, and have special rod arms for low angles, etc? It would look something like this…

There would have to be some work done, but not too much… This is what would have to be done the way I see it… 1. It would have to be made out of a harder metal, preferably hardened steel. This would allow for MUCH greater strength, allowing for a thinner tip and overall vise. 2. You would just leave the base the thickness that it is, but make it solid and drill/tap a hole for a threaded screw – i.e. the same screw that is currently holds the vise in. 3. Drill a hole up through the center of the base and you should be up and running! The limiting factor only then is the actual blue base itself, but by my calculations, you could see 10* AT THE VISE TIP ITSELF easily.
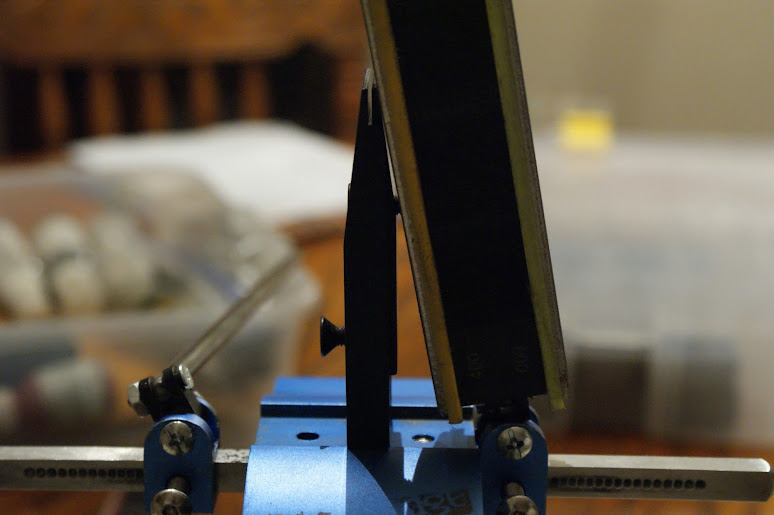
Check out the thinness of my clamp vs the extension… would make a nice difference I would imagine.

As you can see, the existing screws would be small enough to thread nicely into the “new” vise.

I was just wondering if this would be less than having to mess with all of the other stuff… It may be more, but not much and totally worth it. I know I would just replace my existing vise with the new one and leave it that way if so. I will post updates to sharpening w/ the extension in the near future!!
05/02/2013 at 11:16 pm #11276I kind of feel like I am talking to myself here…
Almost 1400 views in a week… I think there’s an interest! 🙂
Couldn’t we do something like just make a single new modded vise?
Interesting idea!
05/02/2013 at 11:38 pm #11278I kind of feel like I am talking to myself here…
Almost 1400 views in a week… I think there’s an interest! :)[/quote]
You are correct…but not much dialog. No matter really, just an observation.
05/03/2013 at 12:28 am #11280I kind of feel like I am talking to myself here… but I volunteered to test, and that I am doing.
I clamped up an old clever that was laying around here just to see what kind of angles I could get. The edge of the cleaver was 2 3/8 ” above the center of the clamp. This cleaver is wider (taller?) at the tip end than at the handle end. If I was going to sharpen it I would have tilted it to try to get the edge as close to parallel to the base as possible. For this test I only wanted to see what the lowest angle achievable would be.I was able to get to 6.2 degrees on the left side before interference with the lower screw stopped me. Again I used a business card as a gauge to tell when to stop. The right side got all of the way down to 4.6 degrees. This time interference with the top screw was the limit.
There was a couple of problems that would keep these angles from being practical in use. First is the stone wobble after it is in excess of 50% off of the end of the rod (which it was when I took the shot showing the angle cube below), but more important, if I tried to make a complete sweep of the blade, the handle would come completely off of the end of the rod by the tim I got 80% of the way to the tip of the cleaver.
I think that longer rods would be mandatory to take full advantage of the new low angle extension accessory.
BTW, Clay, have you had time to play with the new extension? What have you seen?
Just curious.Phil
Hey Phil,
Thank you for all your comments and feedback so far. I’ve been reading along, listening to what people come up with but holding off comment because I haven’t wanted to bias the conversation and chance missing something really important that you guys pick up on.
I have found a similar situation with flat ground blades leaning to the side and giving different angles, even more so than with the regular clamp, due, I believe, to the gap built into the top of the jaws that provides the ledge for the knife to rest on. I’ve also found the screws to get in the way of super low angles. I like the suggestion for including extra screws for different knife thicknesses. I also agree that the guide rods need to be at least 3″ longer to mitigate wobbling on the handles.
-Clay
05/03/2013 at 12:36 am #11281Couldn’t we do something like just make a single new modded vise? This way you wouldn’t have to make a special vise just for low angles, and have special rod arms for low angles, etc?
I think the same way. It should also requires longer base rods to achieve bigger sharpening angles, but system will be less complicated and probably more foolproof.
05/03/2013 at 2:38 am #11284Clay Said:
I have found a similar situation with flat ground blades leaning to the side and giving different angles, even more so than with the regular clamp, due, I believe, to the gap built into the top of the jaws that provides the ledge for the knife to rest on.
I have been thinking about the shelf that you mention. I think it has a definite benefit, but also some liabilities. Im sure that the depth key with two positions, or the option to not use it at all was likely concieved to address these liabilities. The single setting cannot be optimal for every blade, though it does give a depth that can be used for repeatability if the blade is shaped and dimensioned to allow its use.. For certain situations, such as the cleaver that I was playing with, it may not allow enough of the jaws to be available to angle a given blade enough to level it relative to the base, and still grip the blade sufficiently. Of course, with narrower blades, it is too deep to use at all. The scribing of the jaws, as in the current vise, can be used to work around this.
The FFG blade thing was interesting for me. Even with the blade clamped tight, I could move the edge back and forth substantially with pressure from the stones. Abit of chamois solved that nicely, not a big deal for me, as I already routinely use the same process for FFG blades in the stock jaws.
It is hard to design so that all eventualities are covered perfectly. I find that the current design, with longer rods, would cover the most common situations pretty well. Even in the days when I worked as a Systems Safety guy in Aerospace, some potential issues were either so improbable, or so expensive to fix, or both, that we just documented them, threw a caution in the procedures, or by a switch or valve, and flew it…
🙂 -
AuthorPosts
- You must be logged in to reply to this topic.