Sharpening a Serrated Edge
Recent › Forums › Main Forum › Techniques and Sharpening Strategies › Sharpening a Serrated Edge
- This topic has 18 replies, 5 voices, and was last updated 10/25/2014 at 3:16 am by
 Josh.
Josh.
-
AuthorPosts
-
08/27/2014 at 12:36 am #20104
I bought my WEPS just over 2 months ago, so I’m fairly new to sharpening knives as a hobby. I’ve broken in my stones and I’m producing some incredible edges. However, my serrated edges are being neglected. I want to learn how to sharpen them, but I wanted to get a professional’s or another hobbist’s opinion(s) first before I spend any money. I’ve looked on YouTube and seen people sharpening with stone wheels, polishing wheels, coned files and electric sharpeners. I really don’t know what the best way is. Any one have any inputs on the best way to sharpen a serrated edge? Additionally, does anyone know if a polishing wheel will take off the black powder coating off of the knife?
08/27/2014 at 2:05 am #20106You mentioned stone wheels… that was probably the system I threw together because I was in the exact same dilema you were in, except for I was running a sharpening business and needed a way that was accurate and efficient at sharpening serrated edges. Finally I figured it out!
Wicked Edge doesn’t have anything yet, but Clay assures us that it is in the works. But as with anything, it takes time to put out a quality product that has a patent applied for on it.
The only thing you have to be worried about with powered systems is the heat… so keep that in mind.
If you are using the Razor Sharp shaper wheel w/ polishing compound then yes, it should remove any paint you have on your edge. However, if you let it walk up the side of your blade, it will scuff it, but it will not remove the paint to the bare metal without a lot of effort.
08/27/2014 at 3:18 am #20108Thanks Josh. I’m pretty sure you’re right about the stone wheels video. I saw that video on YouTube…that was pretty ingenious. I remember that wicked edge is supposed to be coming out with something for serrated edges, but I have some blades that desperately need attention. What’s your take on coned files? I have many blades that have a black coating and don’t want that to come off. I know for certain I’d mess up a few blades (mostly the paint) before I’d get the hang of it.
08/27/2014 at 4:05 am #20109therealsmif? As in Snuffy Smif and the Real McCoys??
08/27/2014 at 4:51 am #20110Thanks Josh. I’m pretty sure you’re right about the stone wheels video. I saw that video on YouTube…that was pretty ingenious. I remember that wicked edge is supposed to be coming out with something for serrated edges, but I have some blades that desperately need attention. What’s your take on coned files? I have many blades that have a black coating and don’t want that to come off. I know for certain I’d mess up a few blades (mostly the paint) before I’d get the hang of it.
IMO coned files will really only work well if 1. you do it properly and 2. you follow it up by stropping with a buffing compound. If you want to do it cheaply then you could go w/ cone files and Razor Sharp’s shaper wheel for buffing… quick, easy, and hair popping sharp!
As far as the black coating… what are you meaning here? the serrated portion should not be coated black unless you applied an aftermarket finish. You shouldn’t have any trouble staying in the serrations and avoiding the black coating on the main blade as long as you keep your angle semi-close. it’s not rocket science. 😉
08/27/2014 at 5:29 pm #20111My bad Josh. I reread the last part of what you said, “it will not remove the paint to the bare metal without a lot of effort.” In my mind, I read that it WILL remove the paint. That was what I was questioning and what I was worried about. Guess I’ll just have the play around with it. Thanks again, Josh. Sorry for the confusion.
08/27/2014 at 5:38 pm #20112therealsmif? As in Snuffy Smif and the Real McCoys??
Haha…I actually got the nickname “Smiff” from Smith at work and it just kind of evolved into a username.
08/27/2014 at 8:58 pm #20113For those too young to remember, Smif was a mispronunciation of the name Snuffy Smith, a hillbilly cartoon character dating from back in the ’30’s thru the 50’s. Snuffy Smith and Barney Google were the main characters. Further info at http://en.wikipedia.org/wiki/Barney_Google_and_Snuffy_Smith
09/27/2014 at 11:28 am #20481I really like a partially serrated edge for my EDC. The serrations are there just for cutting rope or wire or such.
On my old Gatco I had a triangle ceramic “rod” and that got me thinking…yes it hurt.
Has anyone tried to glue a triangle rod to a WE paddle? like a replacement rod for that spyderco crock stick thinngy. I never worried about any kind a crazy edge on the serrations but when they got jacked up it was nice to be able to fix them. It would be way easier on a paddle for the WE.
Anyone tried this yet?
10/01/2014 at 3:40 am #20532Ok, So since no one answered this and I have a lot of serrated stuff I am going to try this.
I ordered a set of blank WE paddles. I ordered a spyderco triangle medium and a fine ceramic replacement sharpening triangle rod. I have some round sharpening ceramic sticks. I will hot glue one of each of these on a side of the blank paddle. Since serrations are typically on one side I will only need one of each. Then I should be able to sharpen wider oval serrations and the narrow serrations..lots of times I see a combination of both on a serration. Even with the triangle sticks I should be able to adjust the pattern by laying over or by making a scooping motion while sharpening. I am not trying to get a mirror or hair whittling edge on the serration portion of my knives..just want to fix them up and get them productive as possible and looking good again. I will report back how well this method works.
10/01/2014 at 5:00 am #20535Well to be specific, it has been tried (not sure where the post is on it though, would have to do some digging)… I think it was Curtis and Clay that were playing around with it. But one of the issues, of course, will be that your base pivot ball joint will have to be able to slide parallel to the edge so that the stone is always exactly 90 degrees to your edge so it fits in each serration properly… understand? 😉 not trying to burst your experiments… I would love to hear how they turn out! But the most efficient way I have found to date is done with radius’d 1/4″ wheels (both gritted and plain paper that has compound on it). this will give a hair popping, push cutting edge on serratoins that couldn’t even hardly cut cardboard and were all but destroyed before… but I do this for a business and need something that will be next to perfect and not take a ton of time. Keep us posted!
10/01/2014 at 5:15 am #20537Ahh I get that. Did not think about the parallel sliding thing. I guess it is not much of a deal if the serrations are just an inch section of the blade. But if much more than that it would get wierd.. I guess you would have to slide the dang blade back.
10/01/2014 at 11:31 am #20542I started down this path a while back but then was sidetracked by so many other jobs I’ve started.
If you know a cabinetmaker or a friend with a woodshop, he’ll probably have a router and dovetail bits. Here’s how I was going to do it:
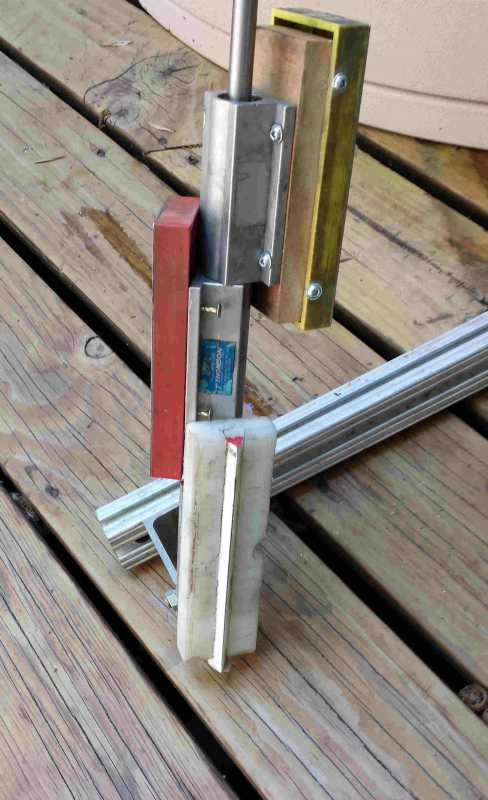
Pick a handle material, maybe plastic or something solid. For the hell of it, try making the block 3″ long, 1-1/2″ square. I could even make one out hardwood. Have your friend rout a dovetail slot down the center along one side. The depth doesn’t have to be more than about 1/4″, if that. If the width and depth work out OK, you should be able to slide your triangle into position without even providing a clamp feature. Snug fit. Actually, Ive done this and my brother has also done it, so this should be a no-brainer. The Spyderco Triangles are 1/2″ across the flats and typical dovetail bits are 1/2″ wide at the bottom of the slot. Since the Triangles are 60 degrees, have radiused corners and since dovetail bits are like 14 degrees, the stick should slide right in. See the photo at the bottom where my brother adapted one to his homemade WE system.
You need to forget about a handle/holder that slides up and down on a pivoting rod. This setup requires that the stone stay perpendicular to the knife and the rod moves with the stone.
Along the back of the stone-holder drill a 1/4″ thru hole, running parallel to the stone. Into this hole, press a length of 1/4″ metal rod; steel, aluminum, whatever. Now you’ve got your stone and guide in you sweaty little hands.
Now get creative and install a rail that runs parallel to the knife in such a way that you can adjust its height and distance from the vise. Maybe it’s a length of the same 1/4″ rod material, supported at each end by some adjustable mount. Make the top of the rail smooth and slippery.
The premise here is that you have the stone with its guide rod as a tool, loose and in you sharpening hand. You keep the stone perpendicular to the serrated edge, with the 1/4″ rod always touching the rail. As you move along the edge, you also slide the rod along the rail. The length of the rod depends on the length of stroke you want and how high you’ve mounted the rail. So there are some constraints.
The rail position sets the sharpening angle. For setup, you can hold a straight-edge against the knife edge and the rail and set your AngleCube to it.
I think the rail won’t have to be real robust, so a simple two-piece link holding a cross-rail might work.
Frankly, I haven’t pursued this because I think the Spryderco sticks are too blunt to reach into most of the better serrated knives. Good luck.
Attachments:10/03/2014 at 7:52 am #20586But the most efficient way I have found to date is done with radius’d 1/4″ wheels (both gritted and plain paper that has compound on it). this will give a hair popping, push cutting edge on serratoins that couldn’t even hardly cut cardboard and were all but destroyed before… but I do this for a business and need something that will be next to perfect and not take a ton of time. Keep us posted!
+1 on the 1/4″ wheels.
Another way to skin the cat fast, Sisal Wheels and Rogues, and lately, stacked fine red scotchbrite pads.
I’m surprised how much they conform to the scallops and take away the notorious weak metal on bread knives.
Also good for the oddball Cold Steel serrations and ginsu types.
Plus, they clean the knives perfectly with the right sheen … kitchen knives.
On a black knife, it’ll take the paint off.
But they do wear fast, gotta give to get I suppose.(Josh, if you haven’t tried them, do 😉 )
But be careful handling, it catches quicker than cloth so no doozing or day dreaming.
Like Josh, I’m talking more for business, especially when they are all chipped up in the scallop, but works great used lightly to make a bur and knock it down.
10/25/2014 at 12:37 am #21006Everyone and their dog just has to have their own dang serration pattern.
Now I need to figure out how to sharpen this one.
I had thought maybe I could get a piece of balsa and rub it hard on the edge of a serration to create the same pattern on the balsa. then I could grit it up and sharpen and keep the same serration pattern. No go..balsa to springy.
I am betting I am going to have to break down some day and get a wheel for these kinds of things. But I keep scheming in my head to figure out a way to get er done on the WE. If I could just figure out a good medium I could drag across the serrations to make the shape..then grit it. Then mount a small linear slide to a WE arm with slide locks..yeah.. :S
Ohh…while talking about serrations.. How do you guys do gut hooks?
Attachments: -
AuthorPosts
- You must be logged in to reply to this topic.