My first week with the WEPS
Recent › Forums › Main Forum › Techniques and Sharpening Strategies › My first week with the WEPS
- This topic has 93 replies, 12 voices, and was last updated 08/18/2014 at 11:31 pm by
 Josh.
Josh.
-
AuthorPosts
-
07/30/2014 at 9:49 pm #19641
What I’d like to do is mount a knife in the vise sometime this week, start with the 50 grit stone and set it to an arbitrary angle such as 20 degrees. Then I’m going to record what each angle reads as I move up through the stones. No actual sharpening, just checking the angles on the stones. I’ll post my findings, and see what you guys think. Just by looking at them, the plates on the 800/1000 grit stones look thinner than the rest so what you’re saying makes sense.
I mark my stones on each end. One is 1A/1B and the other is 2A/2B. Each time I sharpen I rotate them end to end and left side to right side to make sure the whole stone is getting used. I picked this tip up off the forum here. I’ll note which stone yielded which reading in my findings. It looks like even if I wanted to use the swat jigs, I’d have to upgrade the arms and sigh, that’s another $200 invested.
Before you do what you suggest above I would take a caliper, as Tom suggested, and make sure that your stones are mounted parallel to each other… otherwise your readings with the angle cube will be off.
Also, when it comes to the SWAT Clay has confirmed that they are designed to work with the old arms or the new… so you don’t have to make a $200 investment to do that =)
If you want to check them out I can send you mine to borrow so you can see if you like them or not… just let me know via pm, I won’t miss them too much =)[/quote]
Thanks for the kind gesture, Josh! But like in Tom’s detailed post showing how the SWATs are used, without the micro adjustment with the old arms, will they be as accurate?[/quote]
absolutely!! just flip your base bar around… I did this anyway on the old arms and ground off all the markings. This way I solely used the angle cube and I had all the micro adjustment I could ever want! =)
07/30/2014 at 9:58 pm #19644What I’d like to do is mount a knife in the vise sometime this week, start with the 50 grit stone and set it to an arbitrary angle such as 20 degrees. Then I’m going to record what each angle reads as I move up through the stones. No actual sharpening, just checking the angles on the stones. I’ll post my findings, and see what you guys think. Just by looking at them, the plates on the 800/1000 grit stones look thinner than the rest so what you’re saying makes sense.
I mark my stones on each end. One is 1A/1B and the other is 2A/2B. Each time I sharpen I rotate them end to end and left side to right side to make sure the whole stone is getting used. I picked this tip up off the forum here. I’ll note which stone yielded which reading in my findings. It looks like even if I wanted to use the swat jigs, I’d have to upgrade the arms and sigh, that’s another $200 invested.
Before you do what you suggest above I would take a caliper, as Tom suggested, and make sure that your stones are mounted parallel to each other… otherwise your readings with the angle cube will be off.
Also, when it comes to the SWAT Clay has confirmed that they are designed to work with the old arms or the new… so you don’t have to make a $200 investment to do that =)
If you want to check them out I can send you mine to borrow so you can see if you like them or not… just let me know via pm, I won’t miss them too much =)[/quote]
Thanks for the kind gesture, Josh! But like in Tom’s detailed post showing how the SWATs are used, without the micro adjustment with the old arms, will they be as accurate?[/quote]
absolutely!! just flip your base bar around… I did this anyway on the old arms and ground off all the markings. This way I solely used the angle cube and I had all the micro adjustment I could ever want! =)[/quote]
Oh ok, that’s what I was thinking. I forgot that you don’t have to loosen the main screw with the new arms, just use the micro screw for something like this. I already have my base bar turned backwards. I think that’s the first prerequisite to OCDness when using this system is to turn the bar backwards and get an angle cube. 🙂
Sent you a PM, Josh. I got an error after I hit send so let me know if you didn’t get it.
07/30/2014 at 11:09 pm #19649I got one from you and sent you two back… send me an email razoredgeknives at gmail.com, i lost your email
07/31/2014 at 11:36 am #19659I want to make it clear, that when using the VSTA’s, I only use the AngleCube to set the initial angle. After that I just sit back and watch the scratch pattern fall almost exactly where they’re supposed to.
Next knife, I’ll follow the same VSTA sequence, but will measure the stone angles to record variability.
If you’re going to use the VSTA’s with the base rod mounts (w/o microadjusts), I would agree with Josh – turn the angle bar around. But I’d suggest changing the locking screws to a flat point and use some kind of Allen wrench. If you don’t make these changes, the pointed set screw will jump to the nearest detent pocket and throw off your setting accuracy big-time. If the locking screw isn’t pretty flat, tightening it against the bar might also throw off your position. I really like the quick-release lever design.
07/31/2014 at 5:37 pm #19660I want to make it clear, that when using the VSTA’s, I only use the AngleCube to set the initial angle. After that I just sit back and watch the scratch pattern fall almost exactly where they’re supposed to.
Next knife, I’ll follow the same VSTA sequence, but will measure the stone angles to record variability.
If you’re going to use the VSTA’s with the base rod mounts (w/o microadjusts), I would agree with Josh – turn the angle bar around. But I’d suggest changing the locking screws to a flat point and use some kind of Allen wrench. If you don’t make these changes, the pointed set screw will jump to the nearest detent pocket and throw off your setting accuracy big-time. If the locking screw isn’t pretty flat, tightening it against the bar might also throw off your position. I really like the quick-release lever design.
Could you tell me the threads of the original screws? I’d like to find some replacements that are flat and also maybe allen head for better tightening. What is the quick-release lever design? Similar to a QR design on rifle scope rings?
07/31/2014 at 8:59 pm #19664The threads on the clamping screws are 10-32.
I bought my hardware from McMaster.com:
I used the 6522K28 Type 303 Stainless Steel Adjustable Handle, 10-32 Thread, 1-3/16″ L Stud, 1-9/16″ L Handle.
As a thumbwheel for rapid turning, I used their 6479K52 Phenolic Fluted-rim Knob, 10-32 Threaded Insert, 7/8″ Diameter
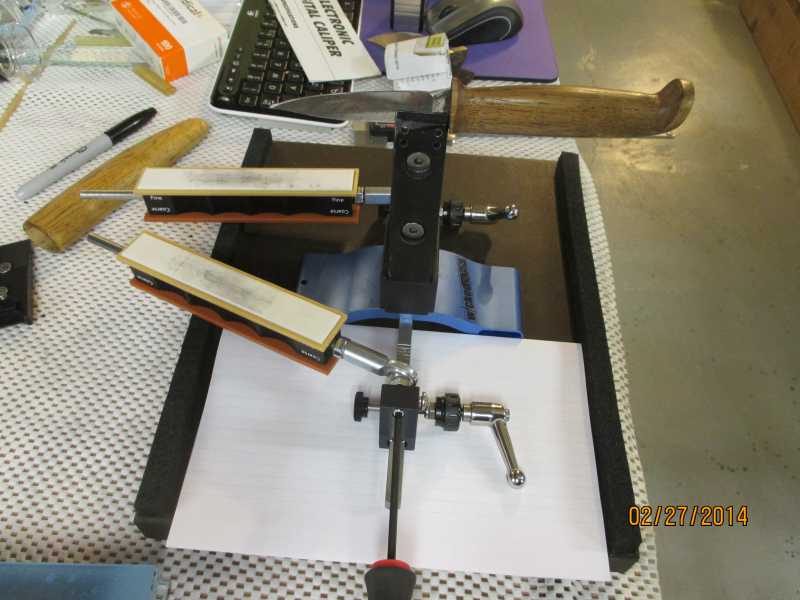
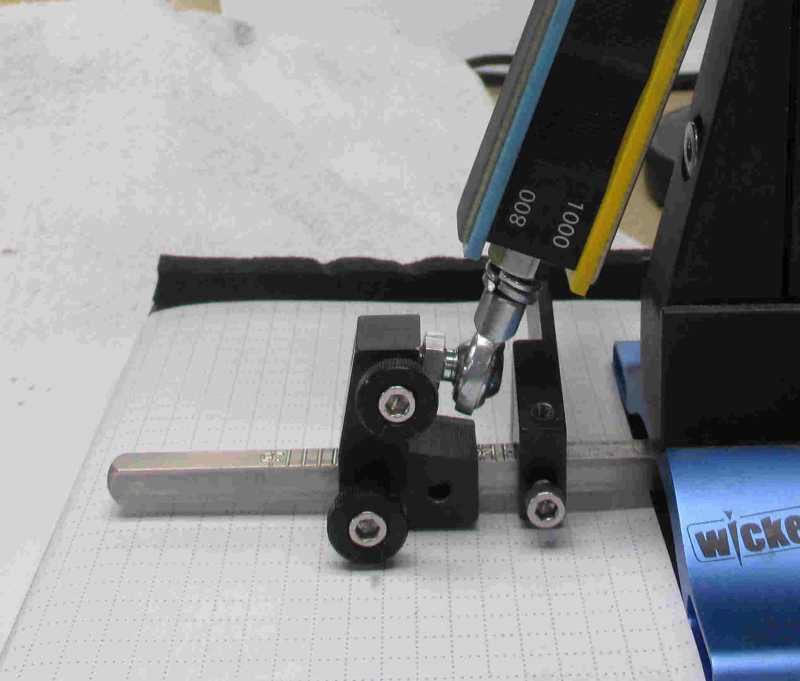
The knobs were a little too big in diameter, so I ground them down on a sanding belt until they turned easily. I locked them into place on the long screw with 10-32 nuts. You might be able to find a better knob – this was the only one I could find in 10-32 and I had to drill/tap the hole all the way thru for it to work. Ask Voodoodaddy for his solution. It looks better than mine. Here’s a photo of my setup.
By the way, the 10-32 threads weren’t cut deep enough on my microadjust mounting blocks and one of mine has already stripped out, forcing me to drill and tap a new hole. See the photo below, where I installed the original parts for clarity. I had noticed all along that the screws seemed really loose.
If you don’t want to drill and tap (this aluminum stuff is really tuff to tap), take it easy on the locking force.
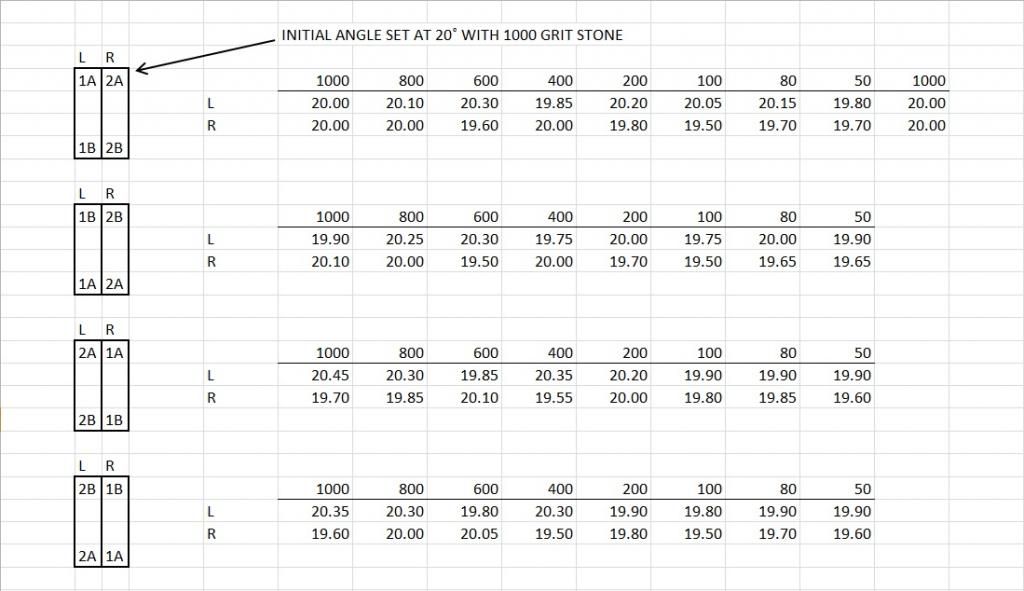
Attachments:08/01/2014 at 11:34 pm #19673I don’t have access currently to my digital caliper and probably can’t get to it for another couple weeks, but I spent a decent amount of time measuring the angles of my diamonds based on an initial exact 20.00 degree angle set with the 1000 grit stone as I’d think since the stones are supposed to get thinner and give you slightly more obtuse angles as you progress, you’d want to set your angle with your highest grit diamond rather than your first stone if you wanted to finish with a true 20.00 degree edge.
As I mentioned, I mark my stones end to end 1A, 1B and 2A, 2B and I rotate their orientation up, down, left, and right each time I use them. So basically I set the initial angle with a knife in the vise at 20 degrees in one orientation and went from there. The cube was lifted and rested back on the knife a minimum of 5 times for consistency. Based on my results, for the most part, it’s true that the angles widen as the stones progress as typically the 50/80s had the most acute angles relative to the original 20 degrees with an outlier in the 400-600 range that would go back to a more acute angle in my testing.
What I found most surprising is not just the variation in some stones when simply flipping them end to end, but swapping them from the left side to the right side. I’d appreciate others’ input, but I’d assume this is due to inconsistencies in the diameter of the rods and the boring of the holes (maybe not 100% parallel to the stone?). All stones were placed in the same position on the blade, held flat to the stone with no rocking in either direction. To me, this makes as good a case for checking angles between grits or using the SWAT jigs as any, though like I said, I’ve gotten some nice edges just going 100 to 1000 grit not checking angles between grits, but you’re not OCD if you’re going that quickly. 🙂 Has anyone noticed better edges when they started using the SWAT jigs?
Something else I noticed is that the angle cube will give more acute readings by usually at least 0.3 degrees or so if you put the cube at the base of the stone rather than flush with the top edge where the stone contacts the blade. I always make sure to put mine in the same spot.
 08/01/2014 at 11:56 pm #19674
I guess it could be the bored hole in the middle that could be off… but I think it is probably rather the glue underneath the stones not being consistent =)
08/02/2014 at 12:06 am #19675I guess it could be the bored hole in the middle that could be off… but I think it is probably rather the glue underneath the stones not being consistent =)
Hmm didn’t think of that, and didn’t know they used glue. Maybe a case for double sided tape then? 🙂
08/02/2014 at 9:48 am #19677I’ve been told here on this forum – and rightfully so – that an accuracy of a half of a degree will give you everything you need. I was developing glass blocks for film and my design happened to use tight tolerances where errors of about 0.1 – 0.2 degree are readily apparent, so that’s why I’ve been talking in those terms. Maybe all this discussion has sent people down the path of “tenth of a degree” measurements when it’s simply not appropriate.
The principle of having the stones reduce in thickness and therefor have their angle increase slightly is probably not written in stone. According to Clay, this was a “happy accident” and I don’t know that it has become a design parameter. Clearly, stones made by third parties don’t do this and the VSTA is provided to adapt to these variables.
I now use the “FastEdge” permanent double-face tape on my glass blocks and I haven’t seen any variation in thickness, but after the first few checks, I haven’t been looking. While putzing in my shop tonight I took a couple of pieces of UHMW polyethylene (which nothing seems to stick to) and bonded them together with a piece of the double-face tape, measuring the total thickness with and without the tape and there was almost no difference – maybe two or three thou. So that stuff’s pretty thin and incredibly strong. It took a lot of force – pounding the point of a boning knife between the pieces with a mallet – to get them apart.
Something else I noticed is that the angle cube will give more acute readings by usually at least 0.3 degrees or so if you put the cube at the base of the stone rather than flush with the top edge where the stone contacts the blade. I always make sure to put mine in the same spot
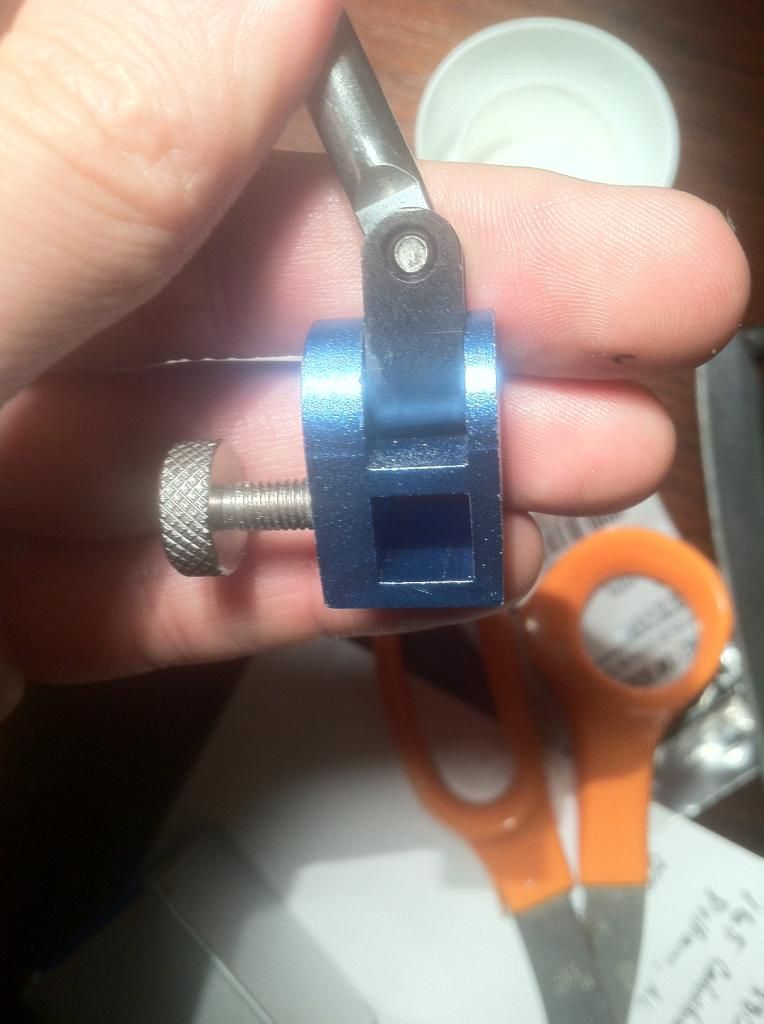
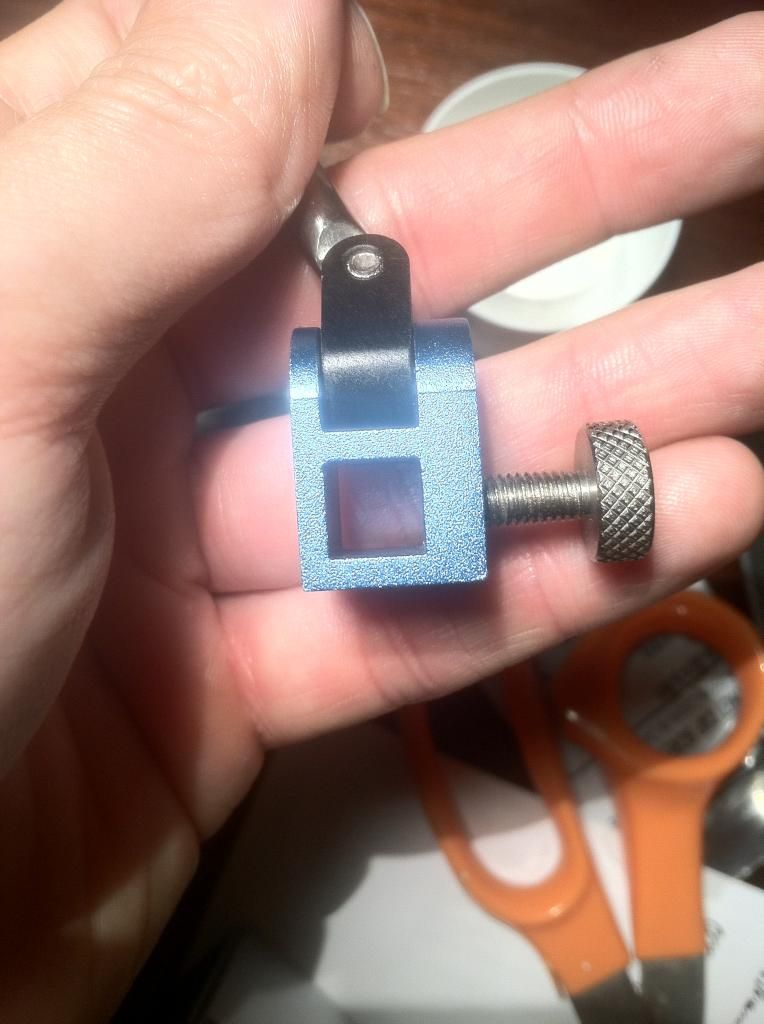
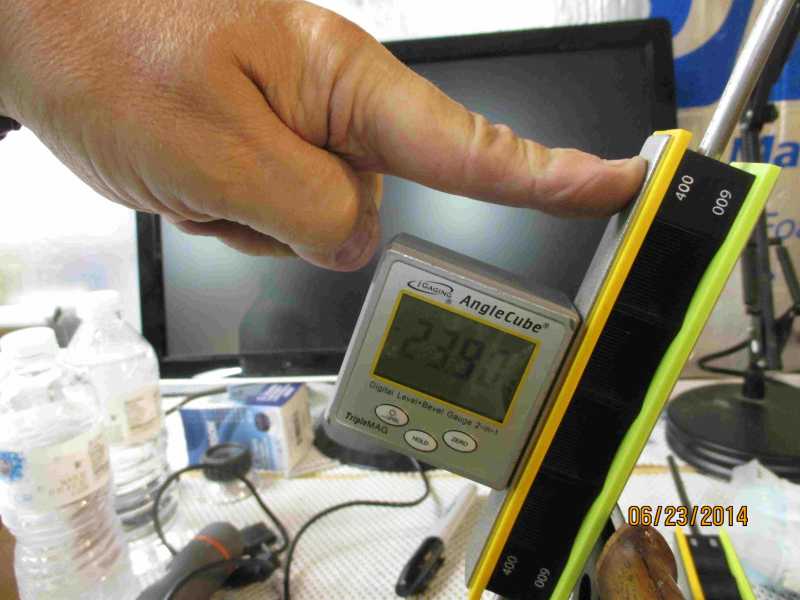
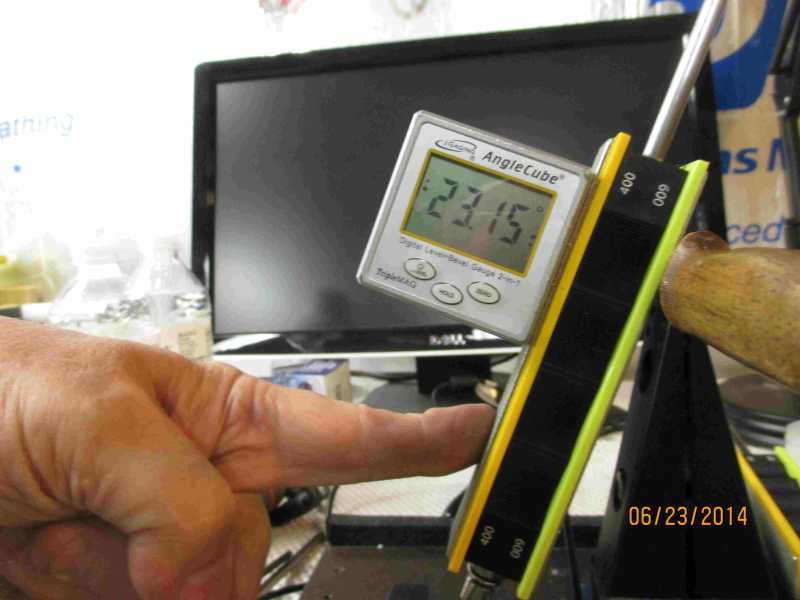
I think that getting different angle readings at the top and bottom of a stone while laying against the knife blade just doesn’t seem right. The given is that plane of the surface of the stone is flat and straight. If it doesn’t move, the angle should be the same all along its face. Chances are, the angular error is a result of where you apply pressure. I’ve shown that there is enough “slop” in the bores to produce way more than 0.3 degrees of change simply by where you press on the stone. See the two photos below:
So far, the only case I’ve heard of of a bore not being parallel to the face of the stone was a problem with the way the stone was mounted and it was me. The bores are molded-in and the accuracy of modern injection molding processes is really quite good. The one shop I’m familiar with molds to six sigma standard. I’d have to see real proof of a problem before I’d point to it. The bores are loose to ensure ease of use and to reduce the potential of contamination with metal dust or dirt.
From a few of the blocks I’ve measured, the bores are molded at about 0.262 diameter. With a 0.250″ rod diameter, this means that there is a lot of potential for angular error, but probably not so much as to cause trouble in the sharpening process. I think that you’re trying to measure with a level of precision that’s just too high for the equipment.
Attachments:08/04/2014 at 7:10 pm #19698Tom, you seem to come from an engineering background also, and you’re correct just as I stated earlier that I think some of us look for too much precision from equipment that isn’t equipped for such. I’ll probably end up with the new arms eventually anyway as I just like the design of those better, but as stated before, I’ve gotten great edges with not checking any angles other than the angle I start with and if I choose to lower my angle to strop. I’ll get a chance to try out the SWAT jigs this week with the old arms so I’ll be sure to post what I find. I think the key is more in keeping a consistent hold on the stones with consistent strokes which fortunately I’ve been able to do and has led to wonderful edges as I’ve been able to get as sharp of edges as my very sharpest edge I ever attained with the EP to 0.5 micron.
I picked up some 10-32 socket cap screws this weekend to replace the thumbscrews on the arms and it seems the threads are too coarse so maybe these were changed at some point?
As always, I appreciate you guys’ help. I love this system and am constantly finding an excuse to sit in front of it and sharpen or just tinker with it. Sharpening is truly enjoyable to me again, and thanks Clay for a great system.
08/05/2014 at 1:57 am #19708try M5 size screws (metric)… i replaced mine also and believe that was the size.
08/05/2014 at 7:06 am #19724Hey Clay! Is Josh right? Are they actually tapped for 5mm metric?? That would explain why my 10-32’s pulled out.
Also, the double-face tape I’m using is not “FastEdge” but “FastTape”. Gee, I hope that’s right…
08/05/2014 at 7:15 am #19725Hey Clay! Is Josh right? Are they actually tapped for 5mm metric?? That would explain why my 10-32’s pulled out.
Also, the double-face tape I’m using is not “FastEdge” but “FastTape”. Gee, I hope that’s right…
whatever I used (m5 if I remember correctly) was the right one, because I have been using it for about 1.5 years before I upgraded to the pp2 and it never pulled out. the nut and bolt place said it didn’t seem to be a perfect fit for anything though and that it was “weird” lol.
08/05/2014 at 7:39 am #19726Ok I tried the swat jigs on my old style arms briefly. I could only get the right hand one on the bar as the one on the left wouldn’t go past the 30 degree mark. I briefly tried the process with just the right stone. I feel like these are suited better for the ball joint arms with micro adjustments unless I’m just doing it wrong. I tried pinching the stone like Tom describes in his post but there is enough wiggle in the joint plus slight movement from the stone bore/rod interface that it was difficult for me to tell any variance between one stone to the next. Unless I’m doing it wrong, for me it’d be faster to put the cube on between grits.
Speaking of wiggle in the joint, I assume my joints purchased a couple months ago are the new Gen 2 arms with the tighter universal joint as described at oldawan? I’ve read about in the past having to put in the washers and all that. Josh has let me in on a machine screw mod for these joints that sound like it works well. Just to be sure, do these look like the new Gen 2 arms? I don’t know just by looking at them if you can tell or if the first gen arms had a lot of daylight on either side of the joint.
Not that there’s a ton of wiggle, but I feel like with the swat jig it’d be much easier to only have to fiddle with the micro adjust screw.
-
AuthorPosts


- You must be logged in to reply to this topic.