My first week with the WEPS
Recent › Forums › Main Forum › Techniques and Sharpening Strategies › My first week with the WEPS
- This topic has 93 replies, 12 voices, and was last updated 08/18/2014 at 11:31 pm by
 Josh.
Josh.
-
AuthorPosts
-
06/22/2014 at 3:41 pm #19222
Here is one vote for the thumb in the second notch. I find I get the best control and consistency with this position.
06/22/2014 at 5:10 pm #19224Hello U, interesting name,
What makes the sharpest edges is being consistent. The stones have play in them from top to bottom as pointed out by curtis to me long ago. Just passing along the knowledge. If holding the stones at the top makes it easier to repeat the same stroke as the previous grit then by all means use it. Whats more important Is experience, because the more you use this system the better tuned your abilities will become in regards to apexing the edge and refining it. There will be times in the future where holding the stones in different positions will yield different results that are wanted. Have fun and take your time.Could just bullet point each of your sentences…. concise, precise….
I use my thumb in the second indentation down. I found that position to give me the most consistency and it seems to be the least “stressful” for the repetitive motion… I’m able to do more for longer…
Also, from an accident 40 years ago, my left little finger is numb and I don’t always know where it is or what it’s doing. I found with thumb in the top notch or lower than the second, my pinkies had a tendency to lift off the platen just a little.
That “little” means a lot when it’s flying numb within fractions of an inch of a wicked edge.
So, it’s second down for me.
I’m looking forward to gaining enough experience to explore “the future where holding the stones in different positions will yield different results that are wanted.”
And I also agree that we all “Have fun and take your time.“~~~~
For Now,Gib
Φ
"Everyday edge for the bevel headed"
"Things work out best for those who make the best out of the way things work out."
06/23/2014 at 6:33 pm #19226Lol the first forum that has tried to decipher my name. Yes you are correct. University of Alabama mechanical engineering alumnus. 🙂
And yes, I’m OCD too, and always looking for ways to improve/modify existing systems.It could be a combination of the stones breaking in also, but I did a cheap folder last night to 1k grit making sure to have my thumbs in the second indent plus pinkies on board, and it was definitely my sharpest edge yet on the WEPS. It’s taken some getting used to because I started out with my thumbs higher and still feel a little more control that way, but the habit is getting broken slowly and I think I can feel the consistency with the new grip.
My question now is on 8-9″ boning knives with very upswept tips in the final inch. How do you find the sweet spot with these? I feel like if I move the blade too far back then I have a bunch of handle coming out the back end that isn’t stable when sharpening. Maybe we could use a hole in the base for blade support on the front side of the vise too. 😉 But if I put the tip where it’s able to be held by the support, I’ll get a very thin and even bevel along the straight portion of the edge, then as the tip sweeps up it gets much much wider and takes a fair amount of grinding to get all sharpie removed. I sometimes find myself reclamping to clean up the tip and make sure it’s apexed.
I’m also interested what different results can be had by different grips.
06/23/2014 at 7:28 pm #19228I think the general principle in finding the sweet spot for a belly curve is to imagine it as a circular arc. A line going thru the center point of that arc should fall on the pivot point for your slide rods. This should provide the best average conical sweep along the belly, resulting in an angle and bevel width which are most consistent.
Bevel width, however, is also a function of blade thickness. My experience says that some knives (thicker than boning knives) are ground incorrectly and are too thick at the belly, resulting in a bevel which is too wide there. In cases like these, you may want to shift the blade back to trade angle for a more even bevel width. No doubt we’ll get some other ideas here.
06/23/2014 at 7:32 pm #19229I think the general principle in finding the sweet spot for a belly curve is to imagine it as a circular arc. A line going thru the center point of that arc should fall on the pivot point for your slide rods. This should provide the best average conical sweep along the belly, resulting in an angle and bevel width which are most consistent.
Bevel width, however, is also a function of blade thickness. My experience says that some knives (thicker than boning knives) are ground incorrectly and are too thick at the belly, resulting in a bevel which is too wide there. In cases like these, you may want to shift the blade back to trade angle for a more even bevel width. No doubt we’ll get some other ideas here.
there’s an easy way to test… watch how Joe uses the mic (you can also do it with a caliper). You can measure the consistency of the main grind along the entire length of your blade and see if it gets thicker near the tip.
06/23/2014 at 7:56 pm #19230I think the general principle in finding the sweet spot for a belly curve is to imagine it as a circular arc. A line going thru the center point of that arc should fall on the pivot point for your slide rods. This should provide the best average conical sweep along the belly, resulting in an angle and bevel width which are most consistent.
Yup, that’s the basic trick.
Molecule Polishing: my blog about sharpening with the Wicked Edge
06/23/2014 at 8:27 pm #19231Something you might find informative from the wiki
A thread on modifications
http://www.wickededgeusa.com/forum/13-product-announcements/12675-thin-blade-support
06/23/2014 at 9:04 pm #19232And the circle TC wrote about is featured a couple of times here:
http://moleculepolishing.wordpress.com/2013/03/12/angle-changes-on-the-wicked-edge-revised/Molecule Polishing: my blog about sharpening with the Wicked Edge
06/24/2014 at 6:28 am #19233That rear support he came up with is really nice, I think. Anyone with any experience with it?
06/24/2014 at 8:23 pm #19234Here’s a post
May find some more doing a search on “will chan mods”
06/24/2014 at 9:14 pm #19235Here’s the main thread by Will aka Voodoodaddy:
Molecule Polishing: my blog about sharpening with the Wicked Edge
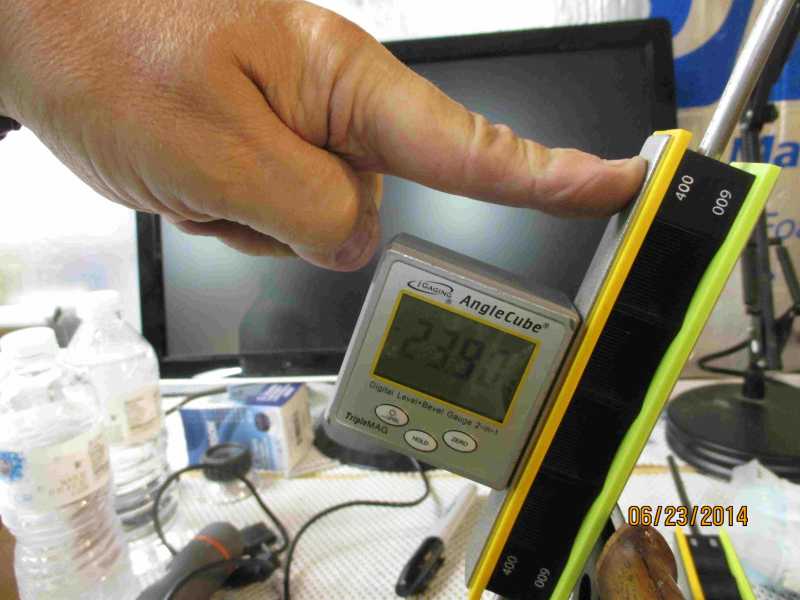
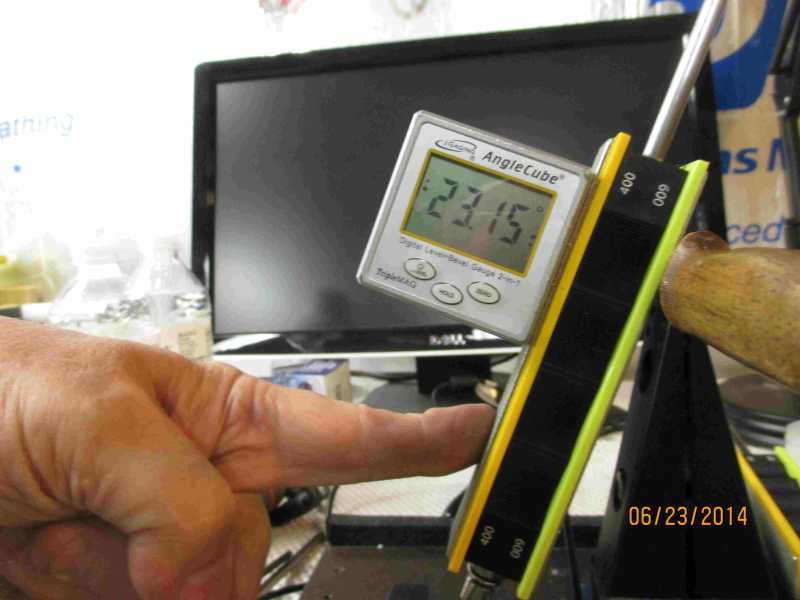
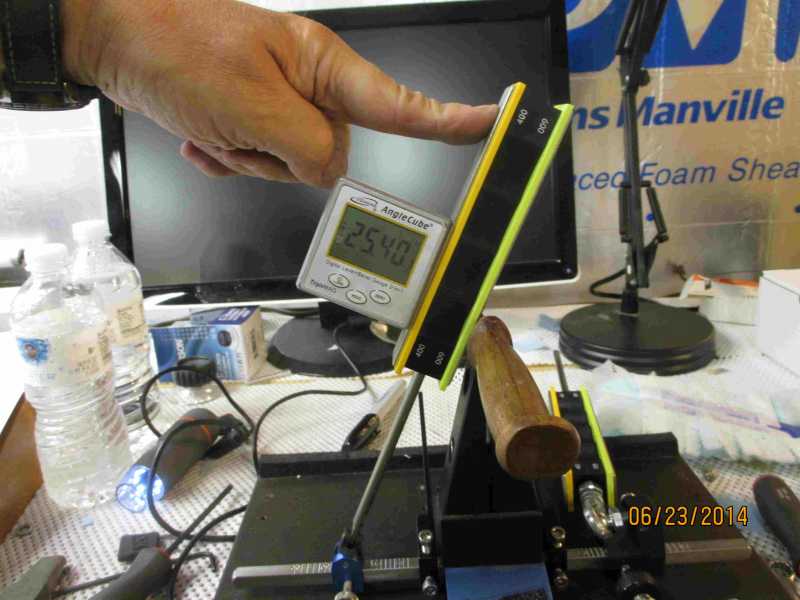
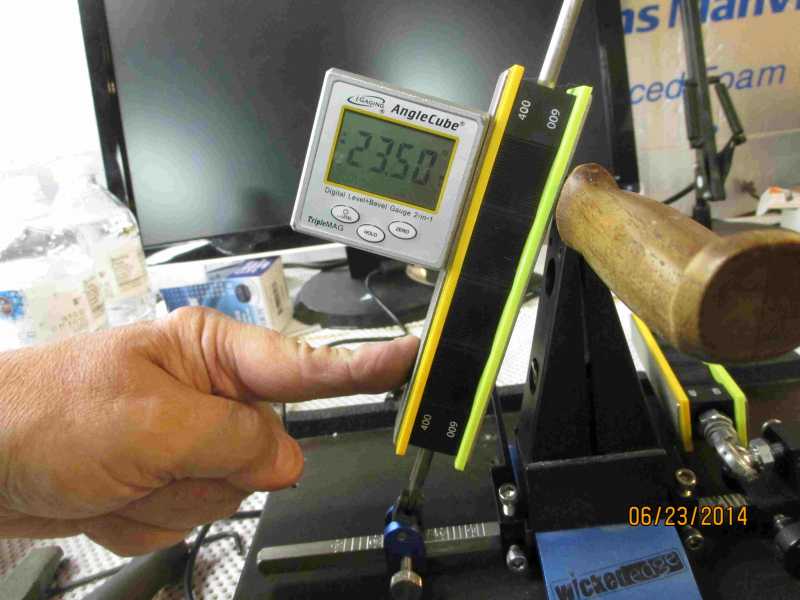
06/25/2014 at 5:00 am #19241On page two of this thread, I tried to make my point about taking a low grip to keep the stones from tipping as you pass over the edge. I had checked the amount of “slop” in my handles quite a while back, but didn’t think my stones were “as delivered.” I had scrubbed the bores with a .243 bronze bore brush and thought maybe I’d contributed to the slop.
But I recently received a new set of 400/600 diamond stones and set about checking their inherent slop. Surprisingly, the amount of slop was the same, and alarmingly large. Here are some photos I took to demonstrate the results. You’ll see that I applied pressure (not all that much) above and below the fulcrum of the edge.
The first two photos are of my Pro Pack 2 assembly. I have replaced the rods with longer versions, but the rods are exactly the same diameter as those supplied by WE, at 0.250″. The stones have never been used up to this point. See the AngleCube readings; about three quarters of a degree.
The second pair of photos are of one of my original PP1 assemblies, which have rods measuring 0.236″ in diameter. Would you believe one point nine degrees?
Admittedly, the angles shown are probably exaggerated by the focused points of applied force, but as you can infer, the amount of inherent slop (let’s call it looseness) could easily negate the amount of effort we put into making micro-adjustments, unless you concentrate on perfecting your technique with an eye toward avoiding any “rocking” motion.
It also occurs to me that if you change from an “up and away” stroke to a “down and away” stroke, you could easily be altering your bevel angle without knowing it. Gee, and that accounts for a number of times when it seemed I simply wasn’t making progress.
06/25/2014 at 4:13 pm #19242Yeah Tom I notice the same thing… It is really only noticeable though when I am sharpening a wide bevel and change from edge trailing to reversing direction and going to edge leading. currently you have to alter your technique when you do this to account for the slop. It would be nice to reduce this play somewhat, but I don’t know if it can be completely eliminated without a lot of extra work on Wicked Edge’s part. And it’s not a huge deal since we all get some beautiful and perfect edges with the existing arms and paddles.
06/25/2014 at 7:30 pm #19243We could include bushings in all the handles but it would drive the cost up significantly. One option I’ve toyed with is going with just a singe handle set and making it so the stones are easily swapped. Then we could include the bushings but we’d lose some of the speed and convenience of switching stones that having multiple, double-sided handles offers.
-Clay
06/25/2014 at 8:41 pm #19244We could include bushings in all the handles but it would drive the cost up significantly. One option I’ve toyed with is going with just a singe handle set and making it so the stones are easily swapped. Then we could include the bushings but we’d lose some of the speed and convenience of switching stones that having multiple, double-sided handles offers.
yeah, i see the trade off. What do you mean “singe” handle? got any pics for reference? why would it work in a singe handle and not a regular paddle?
thanks for the input clay!
-
AuthorPosts
- You must be logged in to reply to this topic.