Looking for a new microscope
Recent › Forums › Main Forum › Sharpener and Accessory Maintenance › Looking for a new microscope
- This topic has 17 replies, 6 voices, and was last updated 04/13/2018 at 9:07 pm by
 NickedEdge.
-
AuthorPosts
-
12/15/2017 at 9:53 pm #43093
Unfortunately, both of my microscopes don’t work anymore on 200x (or even 500x) enlargement. Only still one works at 50x enlargement, but I use my loupe/60x enlargement microscope for that. This is hand-held, so a bit more flexible in inspecting edges,
I use these microscope images mainly for pics on the forum and on my blog, and not for free-hand examination of edges.
What I’m looking for is, almost in this order, the following:
- 200x enlargement is a must, larger would be very appreciated (unless it goes at the cost of item 2)
- As large a depth of focus as possible
- The ability to show bumps and ridges also in non-optimal (particular sunny, but also dark) conditions. I know some microscopes differ hugely in this.
- Software that allows you measure the width of scratches and (is this possible?) also the depth. Stackware that allows you to stack images to improve DOF is also appreciated.
I have a 19080×1024 monitor.
If I’ve forgotten anything, please feel free to add.
What would you recommend, both regarding the criteria and the microscopes that satisfy these criteria?
Molecule Polishing: my blog about sharpening with the Wicked Edge
12/15/2017 at 11:00 pm #43094I’m also slowly researching them as well, my starting point is the model Graphite bought. My current task is identifying what features I would see as necessary and if they come in other models.
That is the Dino-Lite Edge AM4815ZT
12/16/2017 at 11:46 am #43116Hi Mark, I think you mean Depth of Field rather than depth of focus (see: https://www.videomaker.com/article/d2/13086-the-difference-between-depth-of-field-and-depth-of-focus they define the practical aspects of these terms like this: “In common English, Depth of Field is what the photographer is interested in; it is what is in acceptable focus in front of the lens. Depth of Focus is what only a technician is interested in; it is what is in focus behind the rear lens element which the film or image sensor “sees.” ”
At 200x, the DOF is going to be very small (a fraction of a mm) no matter which microscope you’d choose. You can do focus stacking (where you have a 3rd-party software package combine multiple images that are incrementally focused at deeper depths). Or some of the Dino-Lite models have built-in “EDOF” (extended depth of field). Dino-lite has videos on how that works and what it does for the image.
While you’re looking at Dino-Lite videos, some models also have a polarizer function (to reduce reflections from reflective objects) and an extended dynamic range function. They have videos showing how those work. I’ve found them to be useful for photos of knives and stones.
I didn’t find anything besides some of the Dino-Lite line of microscopes that have these functions. They charge quite a premium for them, but when there aren’t any other choices, I guess they can charge what they want.
One nice thing I just tried out with my Dino-Lite is that they have an Android app (no cost) where you can plug the microscope directly into your Android smartphone and get a live display on your smartphone screen, and you can take still images and video. That will probably be more convenient that having to have a laptop computer near your sharpening rig if you want to look at the knife edges and scratch patterns while sharpening.
The DinoCapture software that you install on a Windows PC has more features (including measurements) than the Android viewing software.
I don’t think there’s a way to get accurate depth measurements (especially minuscule things like the depth of scratches), but with the EDOF models you can get ballpark figures as shown in this video: https://www.youtube.com/watch?v=cje-m6Ib_PY
I’m not sure what you mean re: dual axis microscopes.
Dino-lite also has a model (for more money of course) that allows you to control which of the built-in LEDs are lit up. I can definitely see where that would be useful, since it would give you more “knobs” to adjust as you try to minimize overexposed areas while you are simultaneously displaying something that is exposed with just the right lighting (for example, in 200x photos of diamond stones).
2 users thanked author for this post.
12/16/2017 at 2:27 pm #43117I’m also slowly researching them as well, my starting point is the model Graphite bought. My current task is identifying what features I would see as necessary and if they come in other models.
This one’s the bomb!
Marc
(MarcH's Rack-Its)12/16/2017 at 7:19 pm #43126In all seriousness, for the beginner just starting to use a USB Microscope these two are good entry level devices:
Carson eFlex and the Plugable 2.0
Marc
(MarcH's Rack-Its)1 user thanked author for this post.
12/17/2017 at 7:57 am #43151Graphite, maybe you can answer this question. When I use my USB Microscopes with high power I have physical contact between the lens shroud and the knife steel then focus to sharpness. Why do I see in some Dino-lite USB Microscope videos, on high power they’re illustration is a microscope mounted in a stand shooting down on the viewed object from some distance away, not in direct contact. Why the difference in the focus length?
Marc
(MarcH's Rack-Its)12/17/2017 at 8:16 am #43152Marc, re: “Why do I see in some Dino-lite USB Microscope videos, on high power they’re illustration is a microscope mounted in a stand shooting down on the viewed object from some distance away, not in direct contact. Why the difference in the focus length?”
They have specialized models with longer working distances (they have an “L” in the last few letters in the part number). But the trade-off is that those models also have lower maximum magnification. For example, compare the model 4515ZT (which has “regular” working distance, where you’d be right on top of the sample at max magnification, and a 15x-220x magnification range) to the model 4515ZTL, with longer “working distance” but also a lower 5x-140x magnification range.
In some cases you may not have the ability to get right down on the sample, so the “L” models would be necessary.
They also have “F” models with even longer working distances.
12/17/2017 at 8:40 am #43153Thanks, I figured you could enlighten me.
I use the microscope, handheld, and place it right on the steel; direct contact. This contact pressure allows me to steady the scope to obtain a focused image. It would be more difficult and time consuming to use if I had to set-up a stand off to the side that held the scope and requires re-focusing as it was used. Then the stand would need to be moved to the opposite side to see the other side of the knife. It would become a hobby of knife photography, not knife sharpening.
Marc
(MarcH's Rack-Its)12/17/2017 at 9:04 am #43154Marc, that makes sense re: handheld and direct contact with a mounted knife. What magnification can you focus at with direct contact?
More generally, what magnification do you find as most useful when using your scope during the sharpening process? Maybe a lower one for checking burr formation and a higher one for monitoring scratch pattern?
Some of the Dino models come with different snap-on end caps, of different heights and different materials (e.g. some are clear, others are translucent, and there’s also a black one). Since they have different heights, the magnification where they achieve focus when in contact with the sample is different.
For example on the model I got, they have a longer cap that focuses at ~30x when in direct contact, and another cap that will focus at either ~210x or 55x when in direct contact, and other caps that focus at either 65x or 175x in direct contact.
I suppose eventually these end caps might get cut up from sliding across knife edges, but you can buy replacements. Dino seems to sell quite a number of different end caps for different applications, but I don’t suppose the different USB microscope makers have standardized on how the caps attach so you probably can’t use Dino caps on other microscopes.
12/17/2017 at 9:27 am #43155Thanks guys for your replies.
Am I correct in assuming that 200x provides in practice still a workable DoF (yes, I meant Depth of Field) and that a 500x microscope provides too small a DoF?
And I cannot find your initial topic on your microscope back, Graphite, do you have a pointer for me? And do you happen to have any pictures taken with the EDoF and the EDR functions?
I also made a remark about double-axis angle-meters. but I’ll replace that by another topic.
Molecule Polishing: my blog about sharpening with the Wicked Edge
12/17/2017 at 10:25 am #43156I have purchased 5 or 6 different scopes over the last several years. I think the most I spent was still <$100. I continue to use the first model I ever purchased and it’s my favorite still; Plugable 2.0. It is described as 60x up to 250X. I have no way or desire to really prove or disprove the magnification.
I prefer to use it set at high power. Others, in particular, TCMeyer, says he works with low power. The lower power gives a broader wider view with less detail. Whereas, high power gives me a pretty detailed but small field of view. I usually spot check along the knife edge at 5 or 6 positions and the tip, then switch around to the opposite knife side, and repeat. I hold the scope’s plastic shroud flat on the knife bevel then focus the outer ring to obtain a sharply focused image. I then applied masking tape over the focus knob to hold it in place. Then as I move along the blade I keep the USB scope steady with light physical contact against the side of the blade. If the image is slightly out of focus I can sharpen up the image by ever so slightly rocking the shroud up/down or side/to side against the knife. Over time and with experience I have set the focus ring to the position that best allows for the use of this method. I have adjusted the LED light brightness to a level I found works best for almost every situation.
From the recommendation of TCMeyer I purchase a silicone slippery tape that I have applied to the scopes plastic shroud to allow it to more easily slide along the knife’s blade. The thickness of the tape was allowed for to get proper focus of the knife’s bevel as the scope rests on the knife. Also I clean off the scopes edge and the tape where it contacts the steel to limit any possible scratches by sharpening debris.
I almost always view the knife’s bevel from the side. Once in a while I will view straight down on the knife edge. I have learned through time and experience how the scratch pattern appears when I have apexed the edge. That is when I have the bevel angle carried straight and evenly from the knife’s shoulder to the knife’s edge. This allows me to sharpen a knife without the need to create a large burr detectable by finger touch. It may save some blade metal over the life of the knife.
By visually monitoring the scratch pattern I am able to see exactly how finger placement, position and pressure on the plastic paddles affects how the stones abrade the steel. It has removed a lot of the guess work and stroke counting from the sharpening process. I use the scope strictly qualitatively. That is just to monitor the quality of my work. I only looking for the presence or absence of scratches and their consistency and direction. I don’t use it quantitatively, that is to measure scratches or scratch length or depth.
I work with a moderate powered small laptop, always on, with the scope software open and on. Before I start sharpening, using Windows OS, I create a folder tree for the sharpening process for the knife I’m working on, in the drive placement of my preference. This allows me to assign photos to their designated grit folder for future reference, as I take the photos along the grit progression. For example the folder tree will be titled by knife with recognizable description:
Main folder: (e.g., Shun Santoku 7″ VG-10), inside this folder I create and save a “Note pad” or “word pad” doc. with descriptive clamping position settings, bevel angle, key depth setting, and any other more descriptive information needed to replicate the edge.
Also in the main folder I’ll have photo, jpeg, folders labeled: (before sharpening- (initial inspection USB Mscope shots)), (100 grit D), (200 grit D), (400 grit D), (600 grit D), (8oo grit D), (1000 grit D), (1500 grit D), (4µ strop), then (2µ strop).
As I follow this process I designate through the USB Microscope software to save the jpegs to their proper labeled folder according to where I am in the progression. This allows me to keep everything sorted so I can tell by the photos taken during visual inspection during the sharpening process just when I first observed a situation needing attention. Of course the folder tree is specific for each specific knife depending on the process and stones used; diamond, Shaptons, diamond lapping film, strops, whatever. It took a little getting use to the organizing but now I have “template folder trees” of my three most common progressions, to copy and paste to speed up the organization process.
I do not take a photo every step-of-the-way along the sharpening process. I mostly visually inspect my work, in-real-time, like watching a TV. I do snap photos by depressing the scopes shoot button at various positions along the knife’s blade, heel and tip, several times during each grits progress to document the changes and save the results of a finished scratch pattern ready to move on to the next grit.
Marc
(MarcH's Rack-Its)3 users thanked author for this post.
12/17/2017 at 10:42 pm #43173Thanks guys for your replies. Am I correct in assuming that 200x provides in practice still a workable DoF (yes, I meant Depth of Field) and that a 500x microscope provides too small a DoF?
>>I’ve never used a 500x USB scope. Many of the less costly ones just digitally expand to get to that. Whether 200x is workable depends what you’d be using it for. 200x + EDOF is definitely workable, but the very shallow DOF of a single-focus 200x image is pretty limited in what will be in focus. Depending on what you’re doing, e.g. maybe you only need the apex of the edge in focus but not necessarily the full bevel or the body of the knife, it will work for that.
And I cannot find your initial topic on your microscope back, Graphite, do you have a pointer for me? And do you happen to have any pictures taken with the EDoF and the EDR functions? I also made a remark about double-axis angle-meters. but I’ll replace that by another topic.
>>I’m not sure what you mean re: my topic on my microscope. The only thread I started was to show some photos. On EDOF and EDR, the dino videos will give a fuller picture of what it does (i’ve not had my scope very long so I’ve only messed with it a little). On EDR, many digital cameras have a similar function as EDR, where they take a higher and lower exposure photo at the same time and digitally merge them in hopes of getting a better exposed photo. It’s probably less valuable than EDOF since you can manually adjust exposure on many of the dino models, which gets the same effect. But I think if you get an EDOF model, EDR comes with it. Not available separately I don’t think. On EDOF, say you were at 200x looking at a knife edge, and due to the shallow DOF you can only get part of the bevel in focus. With EDOF you first set focus at a high spot, and enable EDOF which then snaps anywhere from to to I think 6 is the max for my model, of successively deeper focus and then digitally merges them together into a single image that shows that full range in focus.
12/18/2017 at 1:55 am #43174My 5MP Celestron only does approximately 50X and 157X, using the face of the clear plastic shroud as the focal plane. My first USB ‘scope was supposed to do 800X, but I never got more than about 400X when in hand-held mode, and it really wasn’t workable then, as the DOF was so short it drove me nuts trying to get a clear image. This is still a problem with my Celestron at 157X. My main use for a ‘scope is to slide along the edge, checking for damage or a fine apex. At the higher magnification, you can’t really do that, as the point of focus jumps around way too much, so for 99.8% of my usage, it’s at 50X and works just fine.
Am I wrong, or is EDOF capability really only usable in image capture mode and not in real-time video? So you have to take a series of images of the same position, then process those images to extract one composite image? Doesn’t sound workable in hand-held mode. Or is it?
I use the higher magnification only when I really need to examine the very edge for roughness – probably only when I want something better than HHT2. Even then, I’ll immediately roll it back down to 50X as soon as I’ve seen what I want. I’d avoid magnifications higher than 200X, unless I intended to use it frequently with the ‘scope mounted on a solid stand with a fine focus adjustment that doesn’t disturb the ‘scope’s internal setting.
1 user thanked author for this post.
12/18/2017 at 7:03 am #43179Mark76: Here’s a photo at 165x of a pencil lead sharpened with a knife (no EDOF, no EDR):
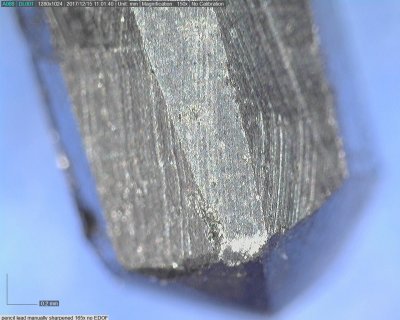
Note that only the highest spot is in focus. And here’s the same still image with EDR:

Next, I did EDOF at 4 focus levels. Here’s the sequence of images with a focus that moves down in depth:
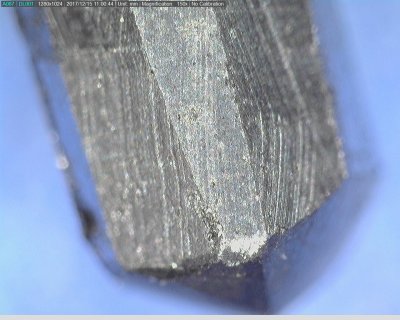
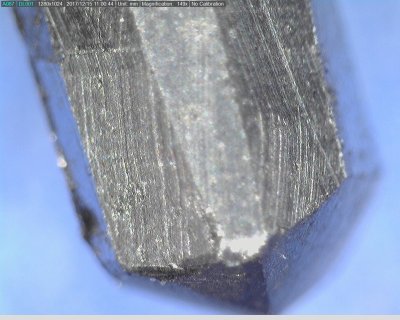
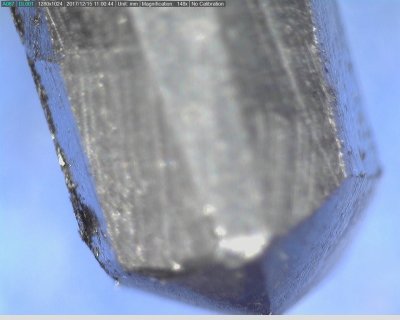
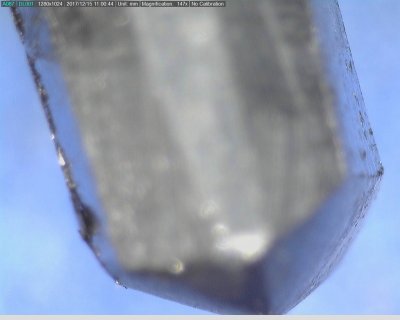
And this is the composite image the dino-lite created by merging the above 4 images:
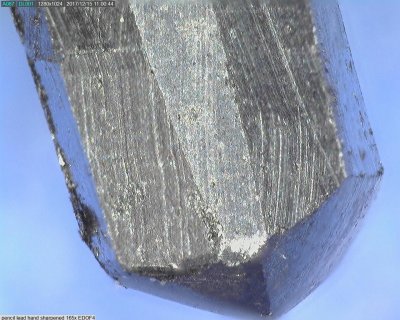
Just to give you some idea of the depth of field at 165x and that it took 4 images to construct one that had the full pencil tip reasonably in focus. This narrow depth of field at higher magnification isn’t particular to the dino-lite and it holds for all these microscopes.
12/18/2017 at 7:17 am #43180…and here’s a knife edge using EDOF. This is I think at around 150x magnification, after using Trizact A35 and A20 (I bought some aluminum blanks and cut some self-adhesive Trizact sheets to fit on the WE blanks).
In this case I only needed 2 levels of EDOF to focus the blade edge and body:
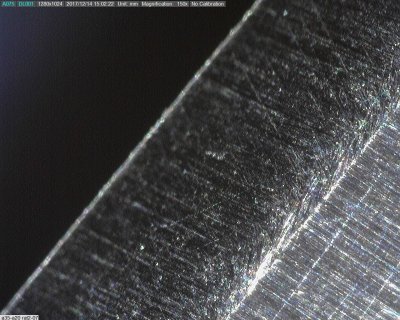

And here’s the combined image of the above 2:
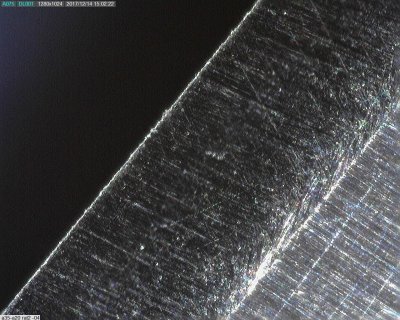
But keep in mind I just got this microscope, so I hope I’m using this EDOF and the various other settings to their best extent. The dino-lite website videos will give a better idea of what someone who actually knows what they are doing can achieve ;o).
-
AuthorPosts
- You must be logged in to reply to this topic.