Larger Right Bevel
Recent › Forums › Main Forum › Techniques and Sharpening Strategies › Larger Right Bevel
- This topic has 14 replies, 4 voices, and was last updated 02/10/2021 at 12:43 pm by
Mark.
-
AuthorPosts
-
02/07/2021 at 6:38 pm #56003
Hi,
I’m a new user with a WE130. So far I’ve sharpened about 35 knives and as far as sharpness goes I’m quite satisfied.
However, I’m having a problem with more often than not getting a larger bevel on the right side versus the left side. I usually set the position of the knife using the sharpie method using the right side of the blade to match the angle and making fine adjustments with an angle cube to “dial in” the angle. Once I am satisfied with this set up I set the same angle on the left side using the cube. I am almost always removing the marker very close to the cutting edge. I feel like my process to this point is good which leads me to believe the blade is tilting to the left, which if my thinking is correct, would result in a wider bevel on the right and narrower on the left. I’ve tried reclamping but the result is almost always the same.
On some knives the bevels match closer than on others but in pretty much every instance the right side is wider whether it be marginal or more pronounced. I have been very conscious of not working one side of the blade more than the other so I don’t believe this is the problem. This problem is apparent from the start of the process so this also lead me to believe it’s not a result of over sharpening one side more than the other
As I said I’m relatively happy with the sharpness I am getting but I would prefer to have the bevels more closely match for aesthetic reasons.
Any advice is much appreciated.
Thanks
Mark
1 user thanked author for this post.
02/07/2021 at 8:12 pm #56008Hi Mark, welcome to the W. E. forum.
The WE130 with it’s floating jaws and cam action, single lever locking Gen 3 vise should be self centering and lock your knives near vertically. From what you are describing it suggests your assessment and follows the logic, that the knife may indeed, be leaning.
The problem is, the taller bevel is associated with a more acute or lower angle setting. A shorter bevel is from a wider or more obtuse angle setting. So your assessment that the knife is leaning may be correct, but your description and understanding of how bevel height correlates with bevel angle is opposite to how it actually works and appears.
For a knife leaning or tilting to the left, the apex on the right side would then be physically further away from the ball end creating a wider angle with less stone-bevel contact to create a shorter bevel height. The closer the knife edge is to the ball end the more straight up and down or closer to parallel the guide rod is with the bevels creating the taller appearing bevel.
So if your assessment is correct, that the knife is leaning, it’s leaning towards the right side, not to the left.
There’s a couple things to try….
First I’d do a factory reset on your digital cube, if that’s possible, to do, then zero it out. (Some devices have a reset button you can press with a paper clip. Other cubes have a menu screen with a factory reset function).
Upon the initial startup some cube models suggest you follow a calibrating procedure before using the device. This is to assure it’s functioning accurately. This process may direct you stand, move and rotate the cube in a series of directions and orientations in a prescribed stepwise manner. Some of the cube models may have YouTube videos you can watch to walk you through the calibration procedure. Others models may have downloadable illustrated manuals.
Either way you go based on the cube device you are using, zero out the cube again. I suggest you remove the vise’s cam lock lever handle. Then set the angle cube on the blue vise base facing towards you where it says “Wicked Edge”, with the cube directly centered and in front of the cam shaft. Zero out the cube as it sits in this position.
Work with this properly zeroed cube throughout the entire knife sharpening session. Do not zero it out again. As long as the WE130 doesn’t move from this stable position you’ll be good to go. Every cube I’ve used maintains it’s zero even when turned off. If you prefer to zero your cube more often, only zero it out once at the beginning of the sharpening session. Work with that same initial zeroed setting the entire time you work on each knife for consistency.
Next, without anything in the vise and the jaws left open, take the angle reading on the slanted right side of the vise housing. Then compare this to the reading with the reading from the same place on the slanted left side of the vise. The angle readings should be very close to the same. I’d repeat this again with the empty vise jaws in the clamped position. This is just as a double check that clamping action isn’t effecting the vise angle.
Next, clamp something that is straight, flat and stiff in the vise jaws. I like to use a carpenter’s square or a framer’s square. The stiff magnetic steel is easy to work with. With the same properly zeroed angle cube check the angle reading on both sides of the horizontally clamped flat steel ruler.
Through these observations and angle measurements observed, it should indicate if the vise itself is leaning or has a clamping lean. If you’re using the framer’s square, with it clamped so the vertical portion is pointing up, it’ll be evident if there’s a clamping lean with the cube placed up top. Any lean should be exaggerated with the extra height. If the straight edge reads close to the same angle, side to side, I’d expect a knife to clamp pretty much vertically, too.
You can lay a metal straight edge, with the cube attached, against the sides of a clamped knife and compare the angle readings side to side for another method to check for a clamping lean.
This should help answer the question of whether there is a vise or clamping lean. We can go from there based on what you learn.
In short, if you find there is no vise or clamping lean it would seem to suggest the uneven bevel heights may be the result of your sharpening technique. Possibly something is loosening up each time, on the same side allowing for the consistent angle shift you’re experiencing. You might simply need to pay more attention to keeping your bevel work balanced from knife side to side and/or your angle adjustment features on the WE130 need to be kept tight and secure.
Marc
(MarcH's Rack-Its)02/08/2021 at 10:23 am #56012Hi Marc,
Thanks for the welcome and suggestions.
I use a Tilt Box for measuring angles. The manufacturer claims accuracy of +/- 0.1 but by their own admission 0.2 is more reflective of the accuracy that can be expected from this cube. Although the cube doesn’t have a reset feature I did recalibrate it last night before taking any measurements. I have my sharpener mounted to a granite base. I zeroed the cube on the front of the vise base as suggested. Out of curiosity I then checked the base and the cube remained zero. In moving forward I will always use the front of the vise base as my zero reference.
The following is what I came up with:
I misread your first comment and did not check the vise housing with the jaws open (out of curiosity I’m going to check the vise housing tonight when I get home), but rather I checked the empty jaws in the clamped position. I took a total of 8 readings on each side of the closed jaws doing my best to position the cube in the same orientation each time. These readings averaged out to 16.78 degrees on the left jaw and 16.54 degrees on the right jaw. I’m somewhat of an accuracy freak so I would have liked to see this difference even tighter, but given the accuracy limitations of the cube and possible error/variables in positioning I think 0.24 degrees of difference isn’t unreasonable???
Next, using a small piece of chamois, I clamped a small square (+/- 8″ x 12″) in the vise with the longer arm in the jaws and the shorter arm extending up on the backside of the vise. The portion clamped in the vise only extended maybe 2 or 3 inches beyond the back of the vise to avoid as much flex or twisting as possible when applying and removing the magnetic cube. I tried clamping this without the chamois first to avoid any erroneous readings the chamois may introduce but there was some definite shift in the square without the chamois. Besides, using a piece of chamois or taping the blade (I usually use tape) of a knife is typically how I sharpen most knives. Here again I took 8 readings on each side of the square placing the cube on the vertical arm just above the horizontal arm. The left side averaged out to 0.92 degrees right of zero and the right side averaged out to 1.05 degrees right of zero showing the vertical arm of the square was in fact leaning to the right by an average of +/- 1.0 degree.
I then clamped an 8″ chefs knife in the vise which has a wide blade and consistent blade surface to be able to apply the cube and obtain relatively accurate/reliable readings. I took 5 readings on each side of the blade portion extending beyond the back of the vise. The left readings averaged out to 1.67 degrees showing the blade had to rotate left to be vertical. The right readings averaged out to 0.92 degrees showing the blade had to rotate right to be vertical. The opposite rotation makes sense to me as this is due to the taper of the blade from spine to edge. Laying this knife flat on the granite base the degree of taper near the handle averaged 3.25 degrees. At the mid point the average was 3.12 and at the tip 2.98 degrees. Using this information I assume the blade taper angle where the cube was placed is approximately 3.00 degrees. Applying half of this to the left reading of 1.67 it would appear the blade is only tilting +/- 0.17 degrees right. Applying the same logic to the right reading indicates the blade is tilting 0.58 degrees to the right. Ideally the difference to return to zero should be the same, but here again there are a number of things that could result in these two numbers being different. I would suggest that this difference is reasonable??? Is this close enough to be considered vertical?
My last test was with a Cold Steel Code 4 which does not have consistent blade geometry near the spine.
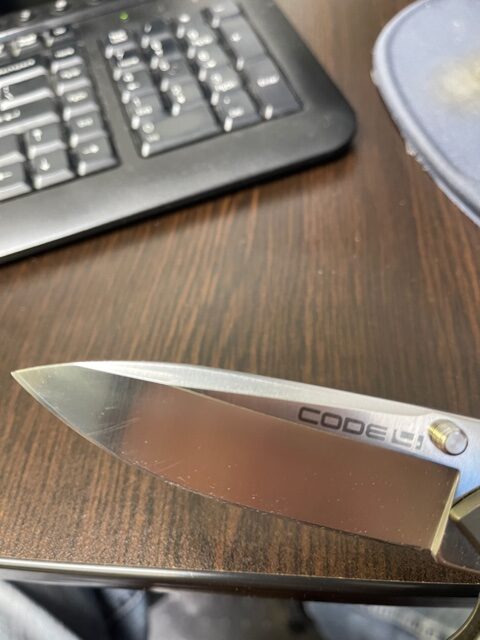
Sharpening this knife as well as a Cold Steel American Lawman was where I definitely noticed a wider bevel on the right side, but like I indicated in my original post I am seeing a larger right bevel of varying degree on all knives.
I mounted this knife in the vise with the chamois and took readings by attaching the cube to the vertical arm of the square. I then held the flat, wide portion of the arm vertically flat against the side of the blade with the cube facing me. I took four readings on each side of the blade trying to remain as consistent as possible in location and approach. Given the profile of the blade, the awkwardness of this and potential for not taken measurements exactly the same each time I am taking these results with a grain of salt. The four readings averaged 4.38 degrees on the left side of the blade indicating rotate to the left for zero and 6.31 degrees on the right side indicating rotate to the right to zero.
Hopefully you made it through this ok and understood what I am trying to convey. In all honesty I don’t know what any of this is telling me after writing this short novel because my head…and my fingers hurt. LOL But I certainly appreciate the feedback.
Mark
Attachments:
You must be logged in to access attached files.
02/08/2021 at 12:08 pm #56015Mark, to be sure, the data you provided in the written response is not so simple for me to follow and picture in my mind. A sketch with the measured angles referenced would certainly be easier to follow. I wouldn’t want to be the one to make that sketch, though.
From what I followed, it does seem the measured angle variations are not unreasonable. IMO, the absolute accuracy is less important then the repeatable precision. Predictable inconsistencies can be worked around. Also, it seems you are working with very small measured angular differences at or close to the limits of the specified precision, accuracy and repeatability of your cube device.
I’m surprised to read that the steel ruler doesn’t clamp tightly in your jaws without the chamois??? My WE130 clamps a piece of newsprint paper so tightly in the naked jaws that it’ll rip before it pulls free. Even on the minimum tension setting.
Just for another piece of the puzzle, I think I’d remove and swap the jaws, left for right, to see if the lean stays the same or switches sides. The jaw pins should press out without too much trouble. Be careful not to lose the small spring that’s between them. Also, I’m wondering if the jaw set, you are using, are the optional accessory, wider 1/4″ jaw set meant to use for thicker knives, compared with the basic included 5/32″ jaw set? I don’t know if you can even tell one set from the other without them side by side.
I think I’d look to disassemble everything taking mental note of loose hardware or gaps between the assembled components. This way as I reassembled everything, part by part, I’d become familiar with the inner workings and their functions. Then I’m assured everything is reassembled tight and secure, seated as it should be. (Besides, after 35 knives sharpened and braking in new stones, it’s probably time for a cleaning and maintenance).
I’d pay particular attention that the square bar is seated straight, flat and tight up under the base. I’d make sure the compliment of belleville washers is 12 washers or 6 pairs in the proper orientation. Then you can be confident the inner workings are seated and assembled properly.
I’m providing two links to help guide you through the process:
This is disassembly and cleaning for the older version Gen 3 Vise: https://knife.wickededgeusa.com/app/uploads/2020/10/WEClampCleaning-1-1.pdf
Read this complete thread for specifics on the newest version Gen 3 Vise: https://knife.wickededgeusa.com/forums/topic/we130-washer-stack/
When you have done this you’ll be able to eliminate any doubts that something is assembled wrong or loosely and maybe it’ll help you determine where the clamping lean is coming from.
FYI: this is the model cube some of as are working with, DXL360S (red).
Marc
(MarcH's Rack-Its)02/08/2021 at 3:47 pm #56017Thanks Marc,
Apologies for the explanation. Even writing it was somewhat confusing so I totally understand it not being real easy to follow and picture what I’m describing. In hindsight I should have taken some pictures which would have made describing this and you being able to understand it much easier.
My chamois comment may have been misleading. The jaws clamped the square quite tightly. Although I didn’t try, it’s likely clamped tight enough that I could lift the whole assembly off the table by the square. However, without the chamois it has a tendency to slightly tilt or roll side to side in the jaws when lateral pressure is applied. I’ve noticed the same thing with some knives. I was of the understanding that using tape or a piece of chamois was not only to prevent marring of the blade surface but to help to prevent this lateral movement or tilting when side pressure is applied?? Is my understanding correct? When I was checking angles on the square last night I didn’t want to introduce an error by having the ruler inadvertently tilt, especially when placing or removing the cube with the magnets. I’ll try tape tonight instead of the chamois and see if that makes a difference in the clamping and/or readings. Based on my testing last night I was getting a 1.0 degree tilt to the right with the square. Even though this may be pushing the accuracy limits of my cube I could see a tilt in the vertical arm of the square which was definitely exaggerated as you suggested would be evident in your original reply. I am going to play around with this more tonight because if anything a square should mount perpendicular as the blade is straight and flat with no taper in any direction as opposed to a knife blade which could taper from spine to edge as well as handle to tip.
I like the idea of swapping the left and right jaws to see if this makes a difference or how the reading might change. I have a small mark on the right jaw so anytime I have removed these I have always reassembled them the same way. I will definitely check this out tonight. I have the 1/4″ jaws for wider blades, but this is not the jaw set currently installed in the vise.
I was also thinking that it is probably time for a cleaning so this is another good suggestion which will allow me to ascertain if there is anything that may be slightly loose or misaligned. One thing I have noticed is that when I try pushing the jaw pins out from the handle side towards the back of the vise the pins are very tight and difficult to push out, but if I push them out from the back side towards the handle they push out moreeasily. Initially I thought this was part of the design and they were possibly meant to be unidirectional. However, I notice in the disassembly photos from the link you provided they show pushing the pins from the handle side towards the back. This was something I noticed the first time I ever tried removing the pins…not sure if this is indicative of an issue??
Once I have disassembled everything, cleaned all the parts and reassembled (likely this weekend) I will try the ruler again and check angles. In my mind, the ruler/square should clamp true because if it doesn’t a knife with varying geometry would be almost impossible to get square. Maybe this is just my accuracy OCD coming out.
Thanks for the links. I’ll check them out in more detail. I have also read some threads regarding the cube you have referenced. I am going to look into that more as well.
Mark
02/08/2021 at 5:21 pm #56019Mark, I use chamois both to protect the knife steel and to help improve clamping. I would expect both a knife and the square, to clamp securely and not twist, roll or rotate (tip up or tip down), in the jaws with out much more pressure applied than what is normally used during sharpening. If enough force is applied a securely clamped knife will shift. I like to use the carpenter square for the reason you ascertained. Being relatively flat, uniform and straight it should be expected to clamp pretty much vertically. I tried my square to see what I would experience. I noticed the steel appeared as though it was dipped in a thick clear coat. I’ll surmise that may have contributed to some of the measured differences seen.
I clamped the square and took angle readings with the vertical portion to the front side of the vise and also to the rear side of the vise. Both sets of readings were done with the square clamped high up in the jaws, to start. Then again with the square clamped lower down between the jaws. Here’s what I found:
My readings were about 0.06º difference in front of the vise and 0.07º to the rear of the vise when clamped high in the jaws. It was more like a 0.10º different from side to side when the square was then clamped positioned lower down in the jaws. Not pictured here. I think I can accept it clamps close enough to vertical to work with these knife clamping positions. The slight lean appears to be different from the front and rear of the vise. I’m not sure what to make of that difference.When sharpening I’m adjusting the guide rod angles independently to match the knife sides. So I’d expect it should be closer then just taking a reading how I did it here. Then it’s up to me to create even height bevels by the amount of sharpening work I do with the stones.
I look forward to helping you figure it out. I enjoy the challenges to help make the W.E. work well for users.
Marc
(MarcH's Rack-Its)Attachments:
You must be logged in to access attached files.
02/09/2021 at 11:41 am #56039Appreciate the feedback Marc.
I took some more measurements last night, but they’re not necessarily consistent. This could be the cube, changes in the square as it is locked up or the square itself. After my measurements last night I took a closer look at the square and although it is not grossly misshapen it does appear to have seen better days. I don’t know what, if any influence this may have on my readings but I am going to try a different one to rule out any error this may be introducing.
I’ve attached a PDF of the readings along with a couple of photos. The first set of readings aren’t necessarily terrible given the +/- 0.2 degree limitations of my cube. The second set of readings are after switching the jaws from side to side and overall they are not as close as the previous orientation readings. Here again I don’t know if this indicates some minor misalignment or something other than the vise. Here again the tolerance of the cube has to be considered. Of note, was the fact that I again had to remove the pins by pushing them from the rear to the front. As mentioned in my previous comments, the pins are just to tight to push them from the front to the rear without getting more aggressive than I feel is or should be required. This doesn’t make sense to me and leads me to believe there may be some sort of misalignment issue here.
All this being said checking the blade on a square is relatively easy given the geometry of the square. This becomes much more difficult when you have a blade that has features where you can’t simply place the cube against the blade and obtain a consistent reading, such as the Cold Steel knife I show above. I did watch the YouTube video Tom Meyer posted about the Gen 1 vise. In this video he had a small piece of flat stock that he used to place against the blade and then set his cube against. I suspect this would be the simplest way to check angles when a blade is mounted in the vise. In essence if it is mounted vertical the angle reading on the left side should match the angle reading on the right side when holding the flat stock against the blade.
My quest continues…
Mark
Attachments:
You must be logged in to access attached files.
02/09/2021 at 12:32 pm #560440.3º variation is PDG. Most of us who end up here with a W.E. are OCD and perfectionists.
I submit to you if you intend to profile the bevels to 15.00º and the knife ends up in reality at 14.70º or 15.30º it doesn’t mean the knife just suddenly stops cutting. It’ll cut just fine and it’ll look just the same. You won’t feel any difference as long as it’s been sharpened well.
What is the most important aspect is that the two bevel planes meet precisely and keenly at the sharpened apex.
Accepting we’re doing the best we can with what we’re working with does not mean we’ve been defeated. It means we are using everything to their fullest capacities while pushing as far as the limits they offer. I’m just as guilty. It’s taking me a long time to realize the job I do is really very good.
Remember this is a hand tool. Simply a good and precise vise and a hand operated adjustable jig. To get the precision we all are seeking it would need to be a $5K sharpener in a special room with a special level floor and work table.
Marc
(MarcH's Rack-Its)02/09/2021 at 1:35 pm #56045Your words are exactly what has been going through my mind over the last day or so. When is it good enough? The perfectionist in me is always striving for that little bit better, more precise, a tighter fitting joint in my woodworking, etc, etc. At the end of the day we are typically our own worst critic and more often than not we are the only ones who see the “imperfection” because we know exactly where the imperfections lie. Someone else looks at what we have done and thinks it’s perfect. In the meantime we have driven ourselves crazy trying to achieve something just a little better than last time. To a degree this is good though, this is how improvement is gained.
An old cabinetmaker once told me, “you will never make it perfect, but you can make it look perfect”. I’ve never forgotten those words and I always remember them when I’m driving myself crazy trying to “make it perfect”. LOL
That being said I am very satisfied with the level of sharpness I am able to achieve using the WE. When you can pop hair off your arm with virtually no effort I’d say it’s sharp. I will continue to check things as I move forward paying particular attention to my technique. Although I don’t think I overworked one side more than the other it is totally possible that I inadvertently did just that. I am also going to pay closer attention to the bevels on knives I haven’t already sharpened. In hindsight, some of what I am experiencing may have been pre-existing and through sharpening I magnified this slightly.
Thanks Marc. I really appreciate the insight and feedback you have provided. The perfectionist in me is going to look into that new cube…I think that’s something I just gotta have!!
Mark
1 user thanked author for this post.
02/09/2021 at 1:52 pm #56046Have you read this from an earlier thread? It may help you.
Something coming loose is quite common and very likely a cause for uneven bevel heights. This must be checked for to eliminate this in the future. If everything was tight and stayed tight through-out the sharpening process, we can look for another possible cause. The size the bevels appear, from knife side to side, are determined by the amount of sharpening effort done to the bevels. To maintain the aesthetically balanced appearance from side to side takes attention to detail to keep your bevel work balanced and even. In general, it takes more time and effort to draw the burr on the first side of the knife when you sharpen it with the W.E., with the coarsest grit. Then the burr seems to form more quickly and with less effort on the second side. This is often a false result or an incomplete second bevel. Usually you’ll have a burr at the tip, as expected but the lower edge of the bevel is unfinished and incomplete. Keep working on the second side till the bevel heights appear complete, even and equal. By checking your guide rod set angle with each and every grit change it allows you to verify your adjustment features are staying tight and secure and angles are set as desired with each and every grit. Also it helps to insure the actual outcome will reflect the expected set bevel angles. It’s up to the user to visually verify the bevel heights are staying even on both sides of the knife throughout the entire sharpening process. The work you apply to the left side bevel can affect the right side bevel because they both share the knife edge at the top. It’s a balancing act and it takes practice and attention to detail to keep these even. That is even from side to side and even down the entire length of the knife. These aesthetics can be tedious. Even if the bevels appear to be uneven in height, the knife can still be sharpened very well and perform exceptionally. It’s just off aesthetically. Probably only you will notice this. You can correct it now if you choose to, if wasting steel is not a consideration or correct it later during a touch-up if your are more conscious of the steel used.
Marc
(MarcH's Rack-Its)1 user thanked author for this post.
02/09/2021 at 2:13 pm #56050I do recall reading this at some point. I’m going to keep this in mind moving forward. With the knives that I have done that are slightly off I will try to make adjustments when I touch them up.
Thanks!
02/09/2021 at 5:07 pm #56053I do appreciate this post because I’ve been experiencing pretty much the same thing over the few years I’ve had my Gen3. Every single time I clamp a knife into it, I get angle variations off to the right and I’ve always wondered if there’s a way to correct the variation without shimming the knife back to the left. Tomorrow, I’ll do a few measurements and post the pics; maybe between us all, we can figure something out.
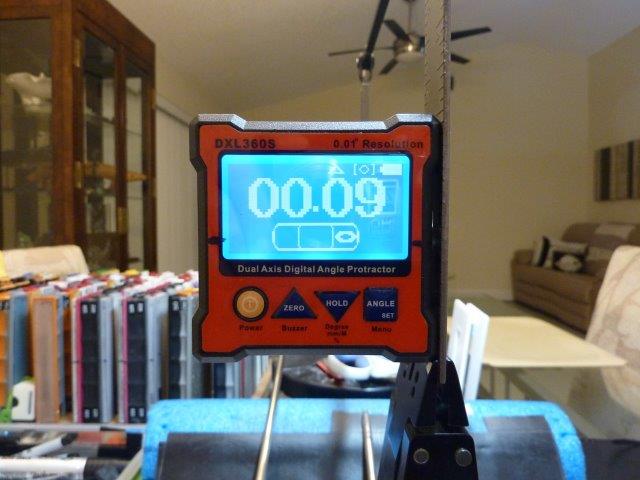
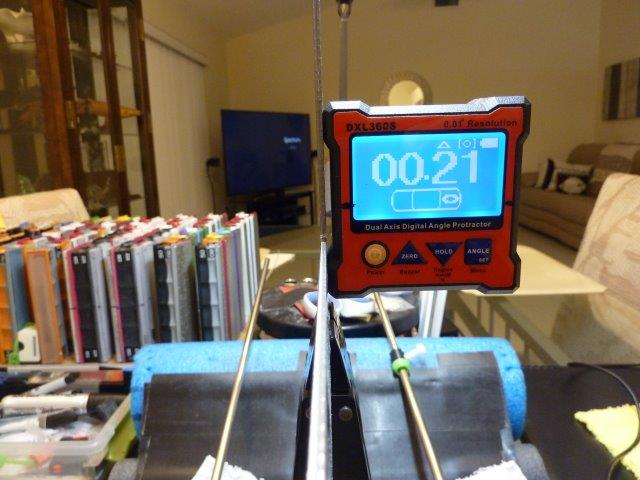
02/10/2021 at 6:53 am #56060You all got me curious enough to check this out on my own WE device – originally a 120 but updated to a 130 with the addition of the kit and new vise. One thing I felt I could add was that I have a precision machinist’s square that I used to use to tram the vise in my milling machine (when I was lucky enough to have a basement for a milling machine) and I thought it would be interesting to run this test on my own. And I was sort of astounded to find that I was seeing a greater angle on the right side than on the left – about .3 degree greater. Then I checked my angle cube (a brand new to me DXL360S) and felt it didn’t seem to be calibrated well – some of the positions involved in calibration were off by about .3 degrees. So I re-calibrated the cube and got rid of the variation and ran the test with the square again. I did find that the weight of the cube magnetically fixed to the square could be enough to flex and affect the measurement – the best way to clamp it was in the vertical middle of one leg and with the cube and vertical square leg was in front of the vise – you can sort of see this in the pics I took.
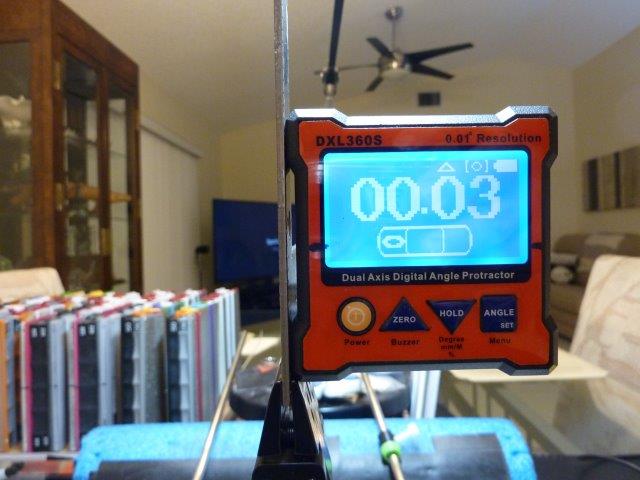
The top pic is with the cube on the left side of the vise and the bottom pic is with the cube on the right side. The cube is in zero mode and was zeroed on the base and on the blue frame (no difference between the two BTW). As the pics show – the left angle is .24 degrees from zero and the right angle is .21 degrees from zero (and the deviation from zero is in the opposite direction as you might expect because I think the weight of the cube does cause the square to lean to the left or to the right depending on which side it’s on. My take away is that what looked like a similar deviation on the right turned out to be calibration of the angle cube compounded with slight lean because of flex due to the weight of the cube.
-
This reply was modified 3 years, 2 months ago by
JimR. Reason: spelling
Attachments:
You must be logged in to access attached files.
1 user thanked author for this post.
02/10/2021 at 11:33 am #56069Through my personal experiences over years of participating in this forum I’ve observed most everyone of us is a perfectionist or at least scrutinizing, highly critical and detail oriented. Most W.E. users look first towards our new prized sharpeners for issues resulting in our sharpening disappointments. I had the expectation that all I had to do was clamp up my knives, set the guide rod angles and move the grit progressions over the knife edges and the award winning W.E. sharpeners with all their precision and accuracy would do the rest. “Easy peasy!”
Then the reality set in. It wasn’t so simple; cut and dry. It was more challenging then I thought it would be to produce results that could meet my high expectations. I bought USB microscopes. I bought digital protractors. Micrometers and calipers. More than one each. Each new one better, more expensive and more precise and accurate than the previous models. I set off on my crusade to determine what was wrong with my sharpener. Obviously there was something defective, bent or broken.
Only after I did everything in my abilities to measure, adjust, level, square and align my sharpener(s), to eliminate the errors, did I look within myself. I began to use those engineer’s toys, the ones I bought to find my sharpener’s defects, instead to examine my methods and actions and the results of them. Through hours of practice, some trials and errors, I learned to observe and recognize “cause and effect”. I began to learn how to operate my sharpener. To produce desired, predictable, and expected results.
I learned how to work my sharpener(s). Rather, to make them work for me. Now they can do for me what I need for them to do. I don’t look at them wondering how something had happened. I have learned to use them to their limits. By that I don’t mean “to the point of failure” but where I get the most out of them. That is, the best results I can produce while using them.
Along the way as I learned to operate the W.E. I did customize, modify and accessorize my sharpener(s) as do many users. These additions don’t change the sharpening results or enhance the precision. They simply make it easier and more convenient to work with the sharpener’s features and control it’s capabilities.
I like to say “the W.E is simply a well designed, well engineered, and well machined stable bench vise in combination with precisely adjustable angle jigs.” It’s still just a hand operated tool. It doesn’t sharpen knives. It allows us to use it’s features so we can sharpen our knives well.
A W.E. sharpener is not hard to use, but it’s not simple either.
You’ll know you’ve figured this out when you can clamp up a knife you sharpened over a year ago. In the same position you last used, and set it up with the same bevel angles. When you look at your touch-ups through your USB scope you’ll see the new fresh scratches are directly superimposed on top of the previous bevels. You’ll know then your using your W.E. well.
Marc
(MarcH's Rack-Its)02/10/2021 at 12:43 pm #56070 -
This reply was modified 3 years, 2 months ago by
-
AuthorPosts
- You must be logged in to reply to this topic.