WE130 Washer Stack
Recent › Forums › Main Forum › Sharpener and Accessory Maintenance › WE130 Washer Stack
- This topic has 11 replies, 4 voices, and was last updated 07/13/2020 at 3:35 pm by
 000Robert.
-
AuthorPosts
-
05/19/2020 at 10:44 pm #54280
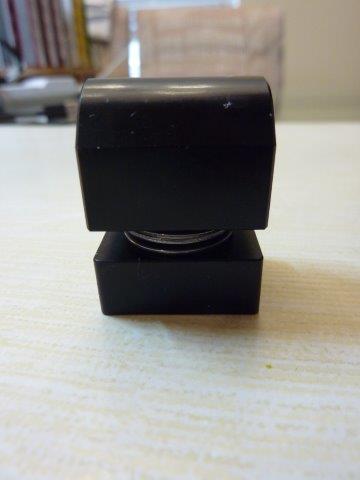
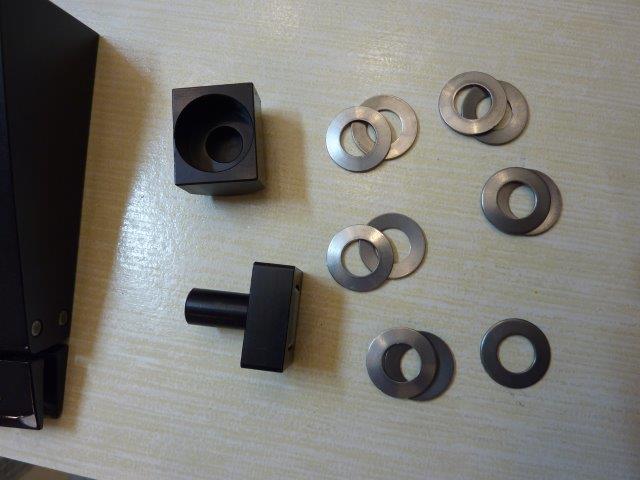
Hello guys. My WE130 just made it home today! Is the washer stack right? It has 6 sets of washers, and the photo in the Wicked Edge clamp disassembly/cleaning shows a washer stack with only 5 stacks of washers. I am wondering if there is a mistake.
Attachments:
You must be logged in to access attached files.
1 user thanked author for this post.
05/20/2020 at 3:37 am #54282It seems to be working just fine, so I guess it is ok.
1 user thanked author for this post.
05/20/2020 at 6:14 am #5428305/20/2020 at 7:54 am #54284Yeah, I figured that the washers provided the tension. The knife (first knife) that I am sharpening right now is 0.094″ at the spine. The vise clamp closed good and snug but it didn’t seem to be too tight. I’ll keep an eye on it.
Man, I love this WE130! It is awesome! They must have did some tweaking to it because I haven’t had any of the problems that others have talked about. Everything stays nice and tight except for the guide rods, but I expected that. They only loosen less than half a turn. After I get some new ball joints for my 12″ guide rods, I’ll lock them in with a tiny dab of threadlocker or Teflon tape.
But everything else stays nice and tight. And every time I’ve switched to the next set of stones, the angles have been spot on to the 10th of the degree! Just outstanding! Thanks Clay and everybody!-
This reply was modified 4 years, 7 months ago by
 000Robert.
Attachments:
You must be logged in to access attached files.
1 user thanked author for this post.
05/20/2020 at 10:03 am #5428505/20/2020 at 5:49 pm #54287Thanks, Clay! Yall did a great job. If a knife seems to fit too tight in the vise clamp jaws, I’ll just use the 1/4″ jaws.
-
This reply was modified 4 years, 7 months ago by
 000Robert.
2 users thanked author for this post.
07/11/2020 at 2:11 pm #54551I was just doing some maintenance on my Gen 3 Vise the other day. I was playing with the number of the belleville washers in the washer stack curious the effect it had on the clamping tension. I tried the vise with less washers in the stack like was shared earlier in this thread, and in another thread discussing the same washer stack issue.
My observation was when less washers were used the total range (-) to (+) in the tension adjuster was diminished. Yes the final tension when the blade was clamped was less but also the total tension at full (+) and tensioning variability, control and preodictability was negated.
The tension adjustments must be made preset, prior to rotating the the vise locking handle. The way the tensioner works is observed in the jaw spacing you begin with before you clamp your knife in place. The cam action and total cam rotation never changes. As the handle is rotated left to right clockwise it simply rotates the cam shaft and cam lobe, 180º, from laying down to standing up. If you observe the jaw spacing on (-) and compare it to the jaw spacing (+) here’s what you’ll see.
The less tension (-) the jaws start wider spaced. Twisting the little tensioner adjuster knob towards the (+) side the jaw spacing is diminished. The jaws close down together. After you preset the tension setting and your knife is placed between the vise jaws, it’s ready to lock by rotating the cam lock handle clockwise. The cam rotates it’s full 180º of rotation. As the cam shaft rotates it raises the linked cam lobe to simply elevate the cam assembly, that is resting on it. The washer stack, the cam follower and piston on top completes the cam assembly and it moves as one single unit. The elevating piston presses up into the narrowing “v” space which spreads the vise legs closing the jaws space closer together. All the while the piston is in contact with the jaw legs. The cam assembly rides up and down held in place in a channel between the hinged pinned jaw legs. As it’s elevated by rotating the locking vise handle it spreads the jaw legs. This opposite reaction closes the vise jaws together. Once the jaws are touching, further piston elevation just squeezes the jaws closed tighter and applies more holding tension.
The height of the cam assembly as designed and engineered by Wicked Edge is designed to sit on the cam lobe as it also just contacts, or almost contacts, the jaw legs. As the tension setting is rotated (-) to (+) the cam assembly is elevated engaging the jaw legs further up and reducing the jaw opening. Reducing the washer number in the stack lowers the overall height of the cam piston. On (-) tension the piston doesn’t even contact or engage the jaw legs. All the tensioning adjusters variability is wasted just to engage the shortened cam assembly. The tension variability is lost.
The distance the cam rotates and the cam lobe size is constant. It can only lifts the cam assembly that one fixed distance. The tension adjuster works by elevating the cam shaft as you increase the tension setting In (-) tension the cam shaft, is flat seated down in the curved housing’s cradle, as low as it goes. At (+) full tension, the cam shaft is elevated by two raised brass bushings, as high as the cam shaft can be raised. When the cam assembly is used as designed, it is in constant physical contact with the cam lobe below and the jaw legs above. This can be tested by rotating the tensioner. The starting height of the cam shaft and hence the cam lobe sets the starting spacing of the vise jaws. The higher the cam shaft is, the higher the resting cam assembly is, and the higher up the piston is engaged between the jaw legs, as it in turn reduces the jaw line spacing.
Using a higher (+) tension setting starts the cam elevated higher into the “v” gap in the jaw legs and closes the jaw spacing. When the vise lock handle is rotated clockwise it still completes it’s full 180º of rotation and the piston is elevated that corresponding distance pushing the piston up inbetween the pinned jaw legs and closing the jaws tight, then tighter. When the jaws can’t close any closer together they squeeze the jaws tightly and this cause the thinner aluminum jaw tips to flex.
On (-) tension you begin with the cam shaft lower, and thus, the cam lobe lower, so the lower piston is now just contacting the jaw legs, but not yet engaged enough very far up in the “v” gap so the jaws are therefore spaced full apart. After rotating and locking the vise handle the piston has still been raised the same distance by the cam but since the piston began on (-) tension it’s position was a little lower to start so it doesn’t end up as high. The jaws end up closed and touching with out as much squeeze or tension. By the springy nature and the thinned profile of the aluminum vise jaws they flex as they are closed tighter and grip the knife with increased tension. On (-) the jaws start full apart and end up closed tight. On (+) the jaws start closed somewhat and end up closed past just full closed to be squeezed shut so tightly they squeeze and flex under the tight pressure.
Now for the point of contention. By removing washers from the washer stack, you are in essence reducing the over height of the cam assembly and therefore lowering the height of the piston. So all of the tensioning settings may be reduced or negated. It was in my observation I recently made, with less washers and without the proper beginning height for the piston, even though adjusting the tension (+) did elevate the cam shaft as expected, it didn’t matter very much. Since there are less washers in the stack and the assembly is now shorter, even as the cam shaft and hence the cam lobe are elevated, by the tensioning knob, the lowered piston of the shortened cam assembly now just slightly engages the jaw legs. The tension variability begins too late and is reduced overall. What happened for me was the tension adjuster had no real variability. It started light and ended similarly light.
Yes, removing washers does reduce the final clamping tension as the original thread poster desired, but it also reduces the tensioning effects, and tension variability, overall. There’s no reason you can’t achieve the same tension results simply using the tensioner. It’s simply about finding the best beginning position to give you the desired clamping tension. As 000Robert said if that tension from the lowest (-) tension setting is too tight to use then you probably need to use the 1/4″ space optional jaw set. These start with the jaws spaced wider to begin with so the clamping pressure will be relatively less at all tension settings.
BTW: I was working with this new 6 washer pair, cam assembly, Clay referred to. Even using 5 of the 6 washers there was almost no adjust-ability.
Marc
(MarcH's Rack-Its)Attachments:
You must be logged in to access attached files.
3 users thanked author for this post.
07/11/2020 at 11:51 pm #54561Thanks, Marc. That is what I figured from examining my WE when I took it apart. Isn’t your brass pins in upside down? I thought that my clamp had them in with the radiused end up. But I didn’t take a photo of them that I can find, which is unusual for me since I normally take many more photos of things than I need. So since I don’t have a photo to look at, I could be wrong about what I remember.
1 user thanked author for this post.
07/12/2020 at 9:30 am #54566Round end down. The round end centers the bushing in a narrowing, tapered groove that rotates under the bushing as you twist the tensioner set knob. At (-) setting the groove is wide so the bushings sit deep below the housing’s curved cam shaft seat. At(+) setting the bushings are all the way up as the grooves are narrowed at that end under the curved bushings ends, elevating them. The tapered width groove gives you the tension variability between (-) and (+) as the grove is rotated under the curved bushings raising and lowering them. Flat end down the bushing simply ride on the top and wouldn’t inset as designed and intended, into the tapered grooves.
Marc
(MarcH's Rack-Its)1 user thanked author for this post.
07/12/2020 at 12:14 pm #54577I remembered it wrong. The flat side is up.
07/13/2020 at 1:10 pm #54586I did neglect to discuss the belleville washers and their function. Belleville washers have a convex curved design. They are stacked in pairs with their curves opposite to create a space between them. This curved stacked profile gives them height and allows them to function as a strong spring as the spaces between the washers are reduced under compression. The washers and the flexible jaws working together are intended to allow the give needed, when clamping a knife, to avoid damaging the steel of even a thick knife. The washer springs apply a controlled heavy pressure as the vise jaws flex.
I start clamping a knife on the minimum tension (-) setting. I like to feel a locking feel, and sound, as the handle reaches it’s right side horizontal locked position. To get a feel for the tension setting needed to clamp the knife securely, with the knife positioned, I rotate the lock handle. If the amount of pressure I need to apply seems too light, like there’s no washer compression and no jaw flex, I release the handle counterclockwise. Then I readjust the tension setting. I dial the (+) tension up incrementally, a small amount at a time. I try the lock handle again. I’m looking to feel the jaws engage the knife steel as I feel the washer springs begin to compress. I can feel the need to apply added handle pressure as the springs compress and the jaws flex. If the applied pressure I’m feeling as the springs compress feels excessive, that is I’m needing to apply what seems like too much downward force to get the handle to lock, I back off the lock handle, readjust the tension towards (-) and try locking it again.
The goal is to find that balance between the applied force needed to lock the handle and the needed clamping pressure to hold the knife securely. I find I only need to feel the springs compress some as the jaw flex some, also. I like to have a tight hold with just some slight jaw flex as the knife is clamped securely.
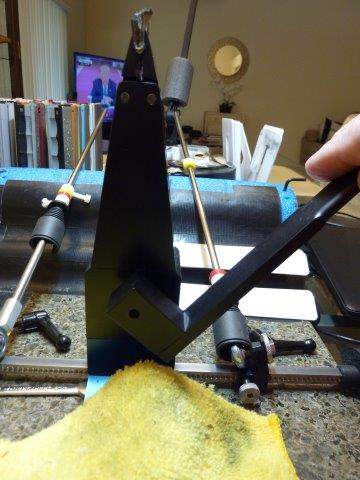
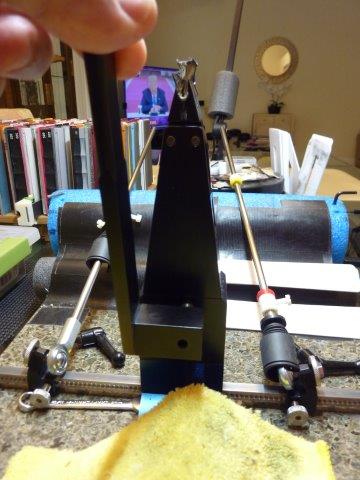
I like to work with the vise lock handle unsecured. I remove it while I’m sharpening the knife. The handle’s rotating design let’s me orient the handle so I’m always rotating down from a vertical starting position. Clockwise to lock the knife, or counterclockwise to unlock it. I found pressing down to the left is easier for me to release the vise’s spring lock than by lifting the handle, and possible the entire setup, against the springs tension.
The first (left) photo is the handle in the locking, right rotation, orientation, the second (right) photo is the reversed unlocking, left rotation, handle position.
Marc
(MarcH's Rack-Its)Attachments:
You must be logged in to access attached files.
3 users thanked author for this post.
07/13/2020 at 3:35 pm #54591I thought that using the belleville washers was a brilliant idea while I was examining my WE. Much more dependable than using a spring.
I leave my handle on while sharpening. I just turn the lever at a 45° angle to the clamp. When I want to release the clamp, I just put my fingers under the lever with my thumb on the base, then lift the lever with my fingers.
2 users thanked author for this post.
-
This reply was modified 4 years, 7 months ago by
-
AuthorPosts
- You must be logged in to reply to this topic.


