Setting the knife (ET's 'O' ring method)…
Recent › Forums › Main Forum › Techniques and Sharpening Strategies › Advanced Techniques and Sharpening Strategies › Setting the knife (ET's 'O' ring method)…
- This topic has 23 replies, 8 voices, and was last updated 02/16/2016 at 10:37 am by
Anonymous.
-
AuthorPosts
-
02/12/2016 at 7:37 am #31134
Thought I’d start a new thread on this… since I think it’s a good idea worth exploring. First, here’s ET’s post showing the idea. To give a quick summary: you set the knife in the clamp, slide an ‘O’ ring onto a guide rod so that it lines up with the edge above the clamp, then adjust the angle of the knife so that the ‘O’ ring travels along the edge. (Please feel free to correct if I didn’t get this right).
Here are a few photos I shot with a small knife.. just to give you the idea… with the O ring I was able to set the knife in the most optimum position , in just a few seconds. There is only One right way to set a blade in the vice so that the sweep follows the edge. this O ring, gives you instant visual reference to the edge. Once the knife is set. all you have to do is set the angle using the cube.


1 user thanked author for this post.
02/12/2016 at 7:40 am #31135A 2nd post where he describes it a bit more…
I slide an ” O Ring ” on one of the arms, to set the knife for the sweet spot. Once set, I simply slide it down toward the bottom of the rod when done . If the rod had indications rings, I could use the ”O Ring ” to repeat the set up , noting which indicator ring on the rod was at the tip and which indicator ring was at the trailing edge of the radius. Once I used the O ring to set the sweet spot. If the rod was modified, it would always be present, and there would be no need for an external advanced guide card.

… 3rd with a bit more description…
I’ve always thought this sharpening stuff was way over thought. Mind you I am very new here, but with a fairly active mind. At 71, I may be retired but my mind isn’t. I hope I have not stepped on any toes, with my make it simple solutions. ON another thought, you could make incremental detents in one of the rods as reference. Set the knife in the vice using my O ring, to set the sweet spot. Once the knife is set, you could then put the rod to the tip of knife and note the detent number or color code. the move the rod to the trailing edge of the radius, and note the number on the rod or color. and you have two points of reference with the locating face in the vice jaws, at a specific height. Just slide the rod to the first detent on the horizontal bar. Now you can use the rod as your measuring device. NO need for something extra… ONce the knife is set properly, you can then move your rod angles to the desired position Again… I hope this is not an unforgivable curve ball to the advanced angle guide.. the under-cuts in the rod would not effect any action ( sweep )of the stone paddles. Just my thoughts in the think tank…. I apologize if I’ve stepped over the line. Bill aka ET
02/12/2016 at 7:45 am #31136Josh (razoredgeknives) has a video where he describes it in the first couple of minutes…
02/12/2016 at 7:50 am #31137… and Readheads has a post that contributes to the method…
Simple elegance – I love it The following I think demonstrates what is going on with knife placement (either higher or angled) to the spherical pivot. The distance of the blue knife edge from the red circle shows the relative change of the sharpened angle from perfect. Perfect is defined as a red circle arc (or a perfect tangent from the end of the circle arc – ie. a straight line). When Clay angled the knife he was optimizing the knife edge profile to the spherical point, that is how he got the perfect angles (within tolerances). NOW we have a way to visualize it live with ET’s O-rings. I can’t wait to get home and try it. BTW…you need a better name What do you guys think ?

(Feel free to add others if appropriate).
02/12/2016 at 8:01 am #31138So, first I have a question. If I have a knife with no specific place to clamp (or forget where), so the first time I clamp it it looks like this (no ‘O’ ring, so I used a paper clip)…
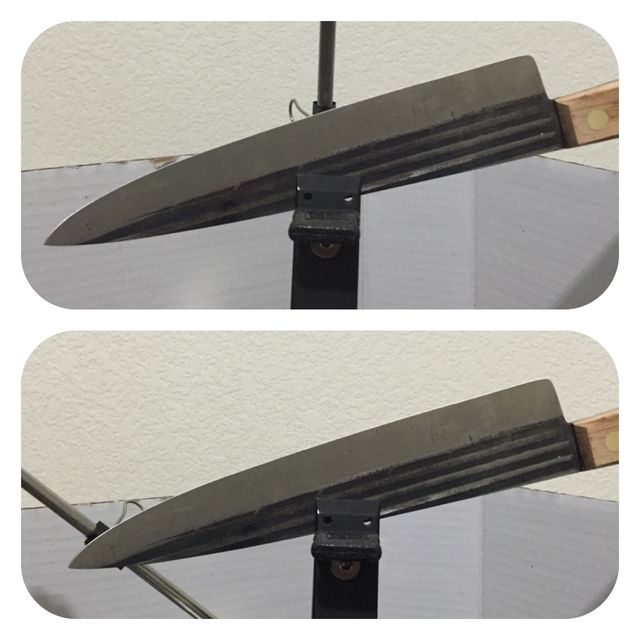
Then the next time like this…
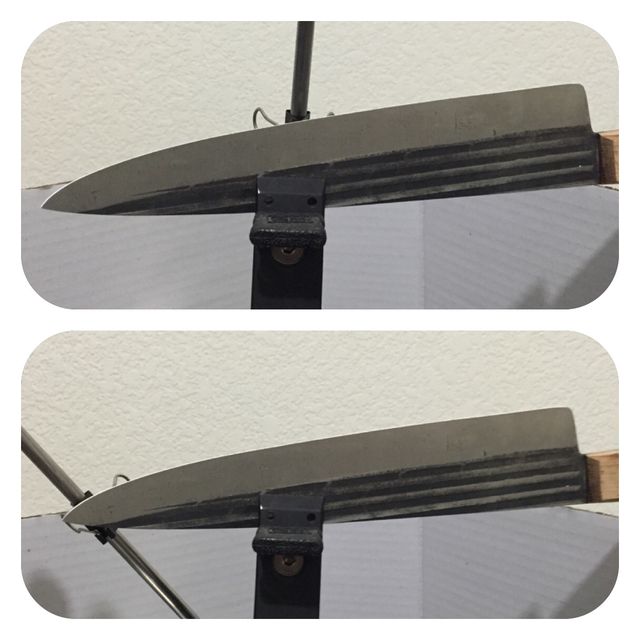
…would the results be the same? Or would I have to document exactly where I clamped the knife? (Or am I doing something wrong?)
02/12/2016 at 9:45 am #31142cbwx34: Looks to me that the results you get would be virtually the same, especially considering the results from the alignment guide topic. The main purpose of the “sweet spot” method is to avoid gross variation in angle, especially at the tip, where your eye is drawn to the bevel.
I’ve always tried to use both alignment pins, holding the spine in contact with them as I tighten the clamp. I check (as in eyeball) the position of the belly to be sure I’m not way out of position with respect to the sweet spot and move the knife forward or back to correct it. I don’t often see knives as large and broad as that pictured in your post, so I simply record which pin position and how far the tip is from the vise. Contact with the two pins is what ensures repeatability. When you give up the two-pin alignment, you need to record more data – height, distance from vise, which key point, etc.
1 user thanked author for this post.
02/12/2016 at 12:40 pm #31148Anonymous
Inactive- Topics: 14
- Replies: 427
This O ring method , is just for me, not meant to be a high level precise method.. it just a step above not knowing where to place the knife in the vice.
I’m only looking to make a relatively repeatable set up so I can slice a tomato with precision. Not to do micro surgery. More precise methods are need to produce more precise results. This method is not to defeat all the effort put into the advanced guide. While I am into precision and high quality results. Sharpening a knife is not one of them. IN one day I was able to advance my knife sharpening results to the point where I needed a bandade after testing my first wicked edge. I never realized what the WEPS did for my knives… the problem is , now that I know what a truly sharp knife is, I’m not happy unless it is truly sharp. So my active kitchen knives need a touch up every week or so. Its a good kind of problem though. Its fun, and the results are amazing.
Bill aka ET
02/12/2016 at 12:43 pm #31149Inactive- Topics: 14
- Replies: 427
also the main focus of my set up is in the radius, usually found at the tip. I noted the other day when I was making cucumber salad, that my tips are as sharp as the rest of the knife… using a very sharp tip allows for more surgical preciseness.. Something I ve never experienced before. Thanks WEPS.
Bill aka ET
OH one other thing Ive noticed, depending on the knife is the deflection of the blade , away from the vice. Deflection at the tip needs attention.. in that the amount of pressure used in the stoke at the tip had to be very light, or the angle will change. A light touch is important especially at the tip. Put the angle cube on the stone and stroke the blade and you will see what I mean. Add different pressure and you will see that micro precision is almost impossible, unless you have a means to clamp the entire blade with a rigid jig, to control any flex.
The wheels are turning LOL.. if you had two ” L” channels of angle iron and a means to clamp them to the knife and the vice jaws, any deflection would be erased as long as you could change the angle in the vice to make an optimum set up. With deviation out of the mix, a much more precise stroke could be achieved…
Not necessary for slicing a tomato.. but more necessary if you are chasing absolute precision.
If I am rambling, please tell me its time for my meds..
I take this stuff everyday some twice a day and some three times a day…
 02/12/2016 at 1:02 pm #31158Inactive
- Topics: 14
- Replies: 427
A blade brace could be something to explore ( Think Tank ) for those looking for absolute precision. You can’t have precision with deviation.
I am an expert on deviation, I am the most deviated person I know. 🙂
Bill aka ET
I
1 user thanked author for this post.
02/12/2016 at 2:05 pm #31181Thanks for starting this thread and for pulling all the different info into one thread.
I like ET’s method. Josh, I think accomplishes the same the way using putting tape with a marker line on a stone. I am wondering: with the o-ring method does it matter where you place the knife in clamp for touch ups. Let’s assume the o-ring method is precise enough. You can measure the distance of the o-ring to a fixed point for repeat setups. If you move the the knife around to fit the o-ring again it should be good ? Right?
02/12/2016 at 2:13 pm #31185Bill: I agree. I’ve thought about a similar gadget, but I’ve learned that simply holding a finger of the opposite hand against the flexing tip to minimize such deflection pretty much eliminates any visible errors. One thing it does, however, is complicate the use of alternating strokes and pushes you into stoning one side at a time. Which I’ve come to settle on as a preferred technique anyway.
We’re about the same age (I’m 71), but you’ve got me beat by one prescription. Four of mine are cardio, one is antacid and the rest are all pain control.
02/12/2016 at 2:31 pm #31192Recently I’ve been playing with a new technique for dealing with blade deflection. It only works with a downward stroke. I hold both stones against the blade, one just in front of the other and push them forward and down. It’s important to hold the stones low down on the handles to keep your hands safe. I make one stroke that way and then switch the stones so the other is in front. I went slowly at first to get the motion down and now I can go at a really nice pace. It’s important to continue alternating which stone is in front so that you don’t make a huge burr on one side.
-Clay
2 users thanked author for this post.
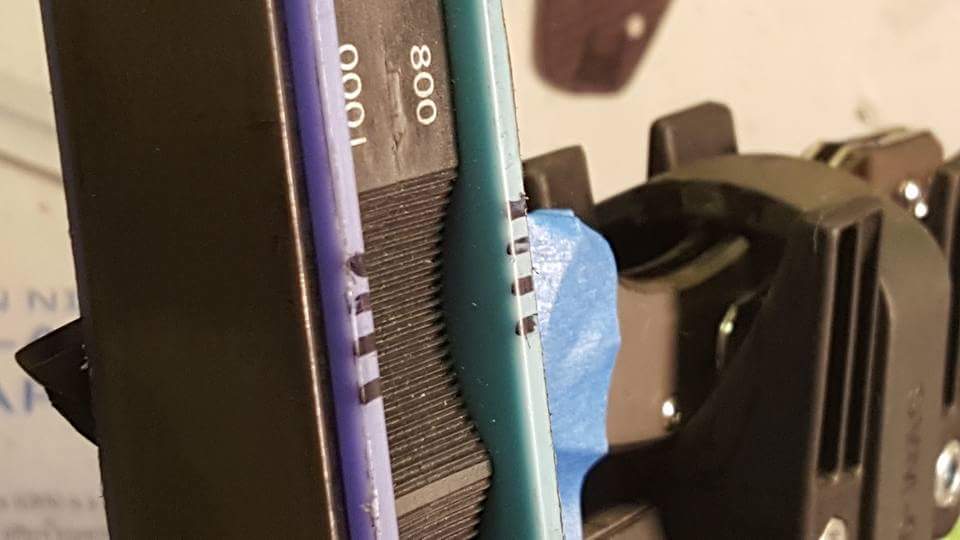
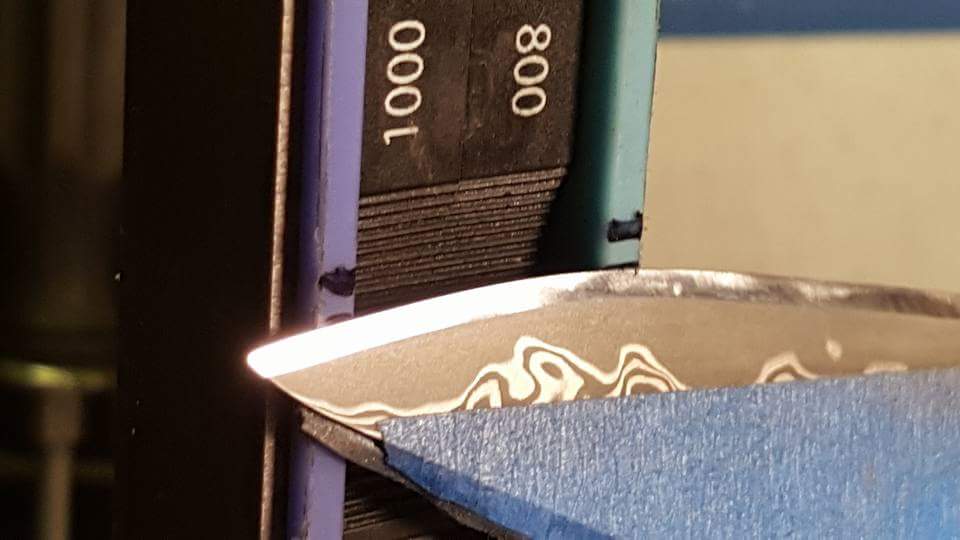
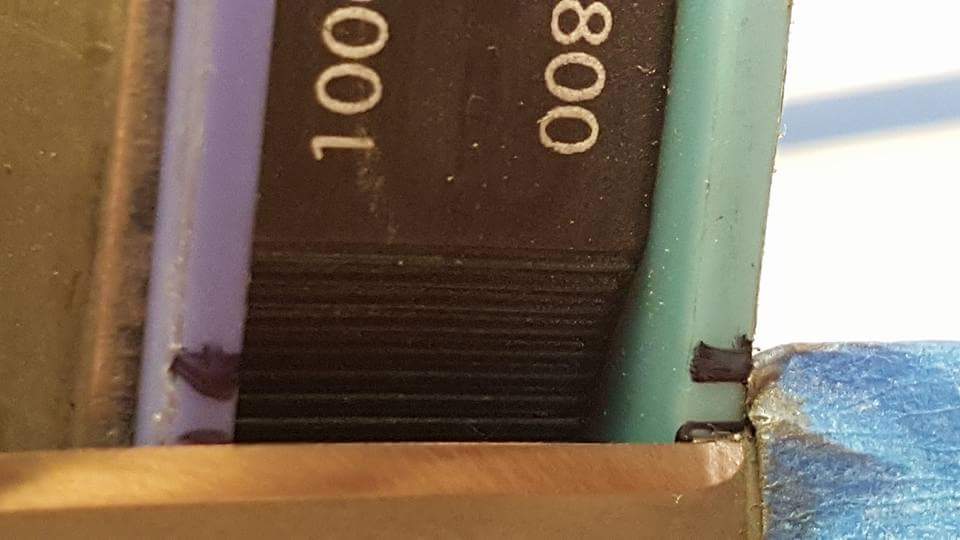
02/12/2016 at 3:28 pm #31195My 2 cents from the peanut gallery thrown in, the sweep discussion got me thinking…
We use the 1000 grit stone to mount the angle cube, we use the 1000 grit stone to angle match with a sharpie…what about using the same 1000 grit stone to find the sweet spot while doing a sweep?I marked some graduated lines on the SIDE and it works great while streamlining the knife setup even more.
Attachments:
You must be logged in to access attached files.
5 users thanked author for this post.
02/12/2016 at 3:33 pm #31199Cliff,
Can you post some pictures showing more of the blade and maybe how you use your system to set up longer blades?-Clay
02/12/2016 at 3:58 pm #31200<p style=”text-align: left;”>Sure I’ve got a practice kitchen knife. I’ll do a badly made youtube video with after I finish up this beauty later this afternoon.</p>
1 user thanked author for this post.
-
AuthorPosts
- You must be logged in to reply to this topic.