Sharpness Testing Jig
Recent › Forums › Main Forum › Techniques and Sharpening Strategies › Thoughts/Theories/Science Related to Sharpening › Sharpness Testing Jig
- This topic has 33 replies, 9 voices, and was last updated 08/22/2013 at 8:57 pm by
 wickededge.
-
AuthorPosts
-
08/07/2013 at 3:07 am #13911
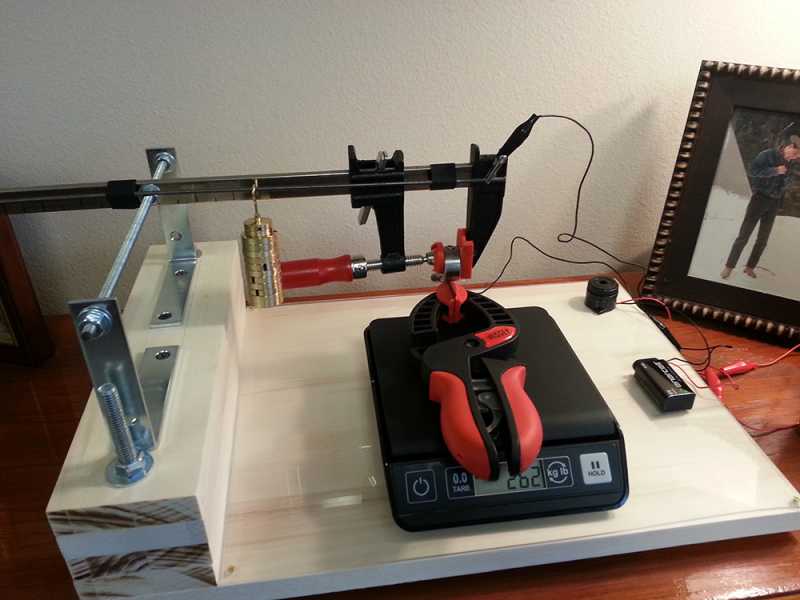
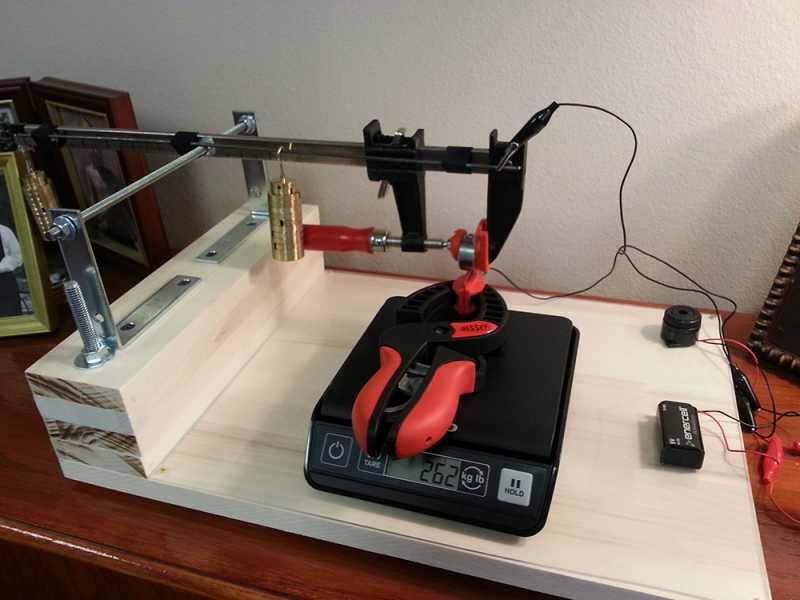
I finally got around to building one of these machines as designed by BassLakeDan, per the specs on his page here: How Sharp is It[/url]. The instructions are complete and easy to follow and the machine works great! I am really excited to extend our research by adding in the extra, crucial information provided by this machine. I’m hoping others will take heart from how easy I found the build to be, set up one of their own and start posting data. The more we can share data that has been standardized about exactly how sharp our blades are getting via different geometries, finishes and techniques, the more we’ll all learn in a hurry. I know that ‘sharpness’ is a very broad topic and means many different things to many people. In this instance we’re only examining ‘point sharpness’ as defined by Dan. A good example of how we can use this technology is to test the effects of stropping: to strop or not to strop; how much to strop; should we strop at the same angle at which we sharpened? etc… Another way to use it is to find the point of diminishing returns on the number of strokes to make with a given grit. Yet another that comes to mind is how much pressure we apply with the stones (you could put your sharpener on a scale and measure the force you’re using and then test the edge with various levels of force applied.) It’s a very exciting tool to have in the shop. Here are some pictures:
Attachments:-Clay
08/07/2013 at 3:08 am #13912I’ll clean it up a little and build a holder for the battery and buzzer and find a way to tidy up the wires. Then I’m gonna get started testing!
-Clay
08/07/2013 at 3:36 am #13916Nice Job Clay. Will be interested to see the results when you start testing.
Do you have an estimate on what you have into the project in time and money?08/07/2013 at 4:42 pm #13924Pretty cool! :woohoo:
Since you built one… maybe you could answer this. Do you think, instead of a scale, attaching a ruler (or using a rod with marks) where the weight slides, and recording that would be as accurate? If so, if it could be rigged up to test a knife that was still clamped in the WE… that would be interesting…. an easier and much quicker way to “test as you go”, especially if you want to test all the variables you mentioned.
Nice job!
08/07/2013 at 6:00 pm #13927Nice Job Clay. Will be interested to see the results when you start testing.
Do you have an estimate on what you have into the project in time and money?The build took about 2 hours at a nice casual pace. I spent about an hour and maybe $75 collecting the supplies though I probably could have done it a lot cheaper by using spare plywood and such. I also bought full packs of washers and nuts instead of using stuff I had laying around so could have shaved some money there.
-Clay
08/07/2013 at 6:10 pm #13928Pretty cool! :woohoo:
Since you built one… maybe you could answer this. Do you think, instead of a scale, attaching a ruler (or using a rod with marks) where the weight slides, and recording that would be as accurate? If so, if it could be rigged up to test a knife that was still clamped in the WE… that would be interesting…. an easier and much quicker way to “test as you go”, especially if you want to test all the variables you mentioned.
Nice job!
As designed, it is in essence a single beam scale. I added a second rod to slide my weights (because they were hard to slide smoothly on the ridged main beam,) making it a double beam scale. You could easily add another rod on the other side of the main beam to make it a true triple beam scale. From there, I think you could use a postal scale to set up the notches for the weights on each beam. You’d start with the biggest increments on one beam, find and mark the places at even weight intervals by watching the scale as you slide the weights down the beam. Once you have those set, you’d do the same for next beam with smaller weight increments and the same with even smaller increments for the last beam. I was getting results of 200g-225g yesterday, so maybe the large beam would use weight increments of 50g, the middle could use increments of 10g and the smallest increments of 1g. You’d have to build in a zero point to show when the scale is zeroed out. You would need one reference point on the beam and one on the rod supporting it.
-Clay
08/07/2013 at 6:38 pm #13929Hey Clay,
Where did the weight set that you are using come from? It looks like a set for a “real” balance scale.
They look lots better than the fishing weights…08/07/2013 at 8:04 pm #13931Hey Clay,
Where did the weight set that you are using come from? It looks like a set for a “real” balance scale.
They look lots better than the fishing weights…I got them off of Amazon: Slotted Weight Sets
-Clay
08/07/2013 at 9:42 pm #13932Clay,
Excellent job on the jig construction ! I particularly like your improvements to the weight slide bar.
As your time permits, please keep us informed as to the results you get with the jig, and if you have any data sheets of test results. Because of your extensive experience with the practical world of sharpness, I would be most interested to hear if feel that the jig provides:
1.) data that seems to make sense to your feeling about a series of blades and sharpening techiniques. In other words give us a “reality check” on the numeric feedback that the jig provides vrs “expected results”
2.) is the jig providing you an ability to look at a “finer granularity” when appraising the sharpness of a blade over your previous methods (whatever they might have been i.e. paper slicing or whatever) and is the numeric results of practical benifit that offsets the time of using the jig.
3.) your thoughts about possible new test media for the jig
Again, great that you finally, on your busy schedule, were able too put one together !
Best Regards – Dan
08/07/2013 at 10:01 pm #13934Clay,
Thanks for the link to the weight set. It looks like it would be easier to manipulate than the fishing weights, especially with the second beam in place.I tried looking closely at the pictures, but I could not figure it out. How did you attach the second beam to the main arm? Maybe some rubber tubing just taped in place ??
I am getting interested…
🙂08/07/2013 at 10:36 pm #13935Clay,
Thanks for the link to the weight set. It looks like it would be easier to manipulate than the fishing weights, especially with the second beam in place.I tried looking closely at the pictures, but I could not figure it out. How did you attach the second beam to the main arm? Maybe some rubber tubing just taped in place ??
I am getting interested…
🙂I took an 1/8″ rod and taped it to the clamp with friction tape, though any tape would do. I added a spacer (two washers and a nut) at the extreme end to give the weights enough room to slide on the rod. I might add the third rod to make the whole system even more accurate. I think another change to make would be to balance the beam (and drill the hole at the fulcrum) with just one set of weights (250g) at the end of the bar. It would (I think) give me finer incremental adjustments when sliding the second weight set along the beam. To do it again, I might just use something heavy, right around 1/2 lb for the balance and then employ the two sets of slotted weight hangers on separate beams. The first set would add an amount of force not quite enough to cut the material, maybe 50%-75% of what’s needed, and the second set would continue to add weight in fine increments to increase the accuracy. I’ve found that the quality of the slotted weight sets isn’t critical, so I’d opt for 2-3 sets of the cheapest ones. I do like the flexibility of being able to add/remove weights as light as 5 grams from the sets.
-Clay
08/07/2013 at 10:41 pm #13936I’m already starting to build some data and seeing some trends. At first blush, it looks like a blade sharpened at 15 degrees and finished w/ 14um strops is significantly sharper than a blade sharpened at 20 degrees and finished with .25um strops/. Go figure… 🙂 I also noticed an impressive deterioration in the sharpness with progressive testings, due I imagine to the repeated force applied to the edge in each successive testing. It should be fairly simple to conduct some durability/edge retention tests using the methods Dan describes on his site. This is really fun!
-Clay
08/07/2013 at 11:05 pm #13937I added the third beam and it makes a big difference! I’m able to easily increase the weight by 1 gram at a time with no fears of going over by moving the weight too far.
-Clay
08/08/2013 at 1:13 am #13941Continuing to have fun with this machine, thanks again Dan! I’ve starting to establish baseline values for different grits at the same angle:
Blade: Utility Blade
Angle: 15 degrees
Finish: 1600# ceramic
Strokes: 60+ per side till I hit point of diminishing returns
Grams of force needed to cut the media: AVG 200gOnce I’ve established a baseline for all the stones, I can start to experiment with different strops, angles of stropping etc… All of a sudden the possibilities of things to explore and test are gigantic and slightly overwhelming, in the best of ways possible.
-Clay
08/08/2013 at 1:56 am #13946Wow that will turn into some very useful data it is probable going to necessitate an awfully lot of testing and then there are all the different types materials & Rockwell Hardness to consider .
I think for the WE user this will be incredibly valuable information.
I think the angle is absolutely in hand with sharpness we know that more acute angles are used on blades for chopping and general abuse and suit softer steels whereas the really low angles like a razor blade 12Ëšor less are suited to slicing and have a high Rockwell hardness.
How many cooks and chefs love to use Japanese knives but use them incorrectly for chopping and often are nor disciplined enough to even cut on the right materials – too many sadly ! Still they generate business both for the manufactures and for us so it is all good.
I have found that since I have got into sharpening knives I almost have sympathy pains for these poor abused blades.
I like the testing device it looks cheap to make some real old school design went into that I imagine it gives very consistent results.
-
AuthorPosts
- You must be logged in to reply to this topic.