Preparing a Knife for the Wilderness
Recent › Forums › Main Forum › Techniques and Sharpening Strategies › Advanced Techniques and Sharpening Strategies › Preparing a Knife for the Wilderness
- This topic has 15 replies, 5 voices, and was last updated 09/21/2014 at 4:00 am by
 tcmeyer.
-
AuthorPosts
-
09/11/2014 at 1:15 am #20215
I’m going on a backpacking trip along a 100 mile stretch of the Continental Divide Trail soon. A friend and I have been planning it for over a year and these last couple of months have been full of preparations, thoughts and discussions on exactly what gear to take. Since we have to carry 10-11 days worth of food, other gear needs to be kept at a minimum to keep the weight down. For that reason, I decided to take only one knife. The knife I chose is the Fällknieven F1. I like it because it’s very strong, lightweight (weighing in at 6.8 ounces) and extremely ergonomic. Once I pick it up, it seems to not want to leave my hand. I also like the blade design and the way the steel takes and holds an edge. It’s VG10 so we might expect a lot of chipping but I’ve been pleasantly surprised about how well it’s holding up. The people at Fällknieven must do a good job with their heat treatments. So, this is my one knife, how best to prepare it for all the tasks it will face each day of the journey?
The edge needs to be keen enough to help with first aid if needed, cut easily through paracord and rope, able to carve and split wood and, hopefully, field dress a grouse or snowshoe hare. It has to do some or all of those things on a daily basis. The wood cutting/prep tasks will be the hardest and take the biggest toll on the edge.
The knife comes from the factory with a convex grind all the way from the spine. The edge itself is a small v-grind microbevel at 19 degrees per side. It was sharp and very toothy when I first got it and the edge held up well for a good long time before I even touched it. I wondered if I could improve on it….
The first thing I did was to match the 19 degree microbevel and finish with the 1000 grit stones. I lowered the angle one degree, made a few strokes with the 1000 grit stones, lowered the angle again and repeated. I wanted to thin the shoulders back just a tiny bit. I took it camping in the Pecos Wilderness with this preparation and used it pretty hard for three days batoning and shaving wood, cutting cord and opening packages. It was still shaving sharp when I brought it back. Here’s a video I took on my next little outing:
Once I had the knife back in the shop, I looked at it under the microscope and considered my next move. There was some micro chipping as well as about 1/16″ of the tip broken off. To be fair to the knife, the broken tip came from my selection of an elk femur as my baton. That’s an incredibly hard bone and there is no give to it so all the energy of the blow was transferred right to the fragile knife tip. In the above video, I show how I repaired the tip and touched the knife back up. Initially I decided to keep the same angle and just repair the edge with the 800/1000 grit stones. After further tinkering, I decided to strop the edge with the 14 micron strops at edge angle minus 2 degrees i.e. 17 degrees per side. I love the result of that bit of stropping. The knife instantly became much sharper but was still very aggressive. I took a few more images under the microscope and put the knife in the sharpness tester. Here are the images:
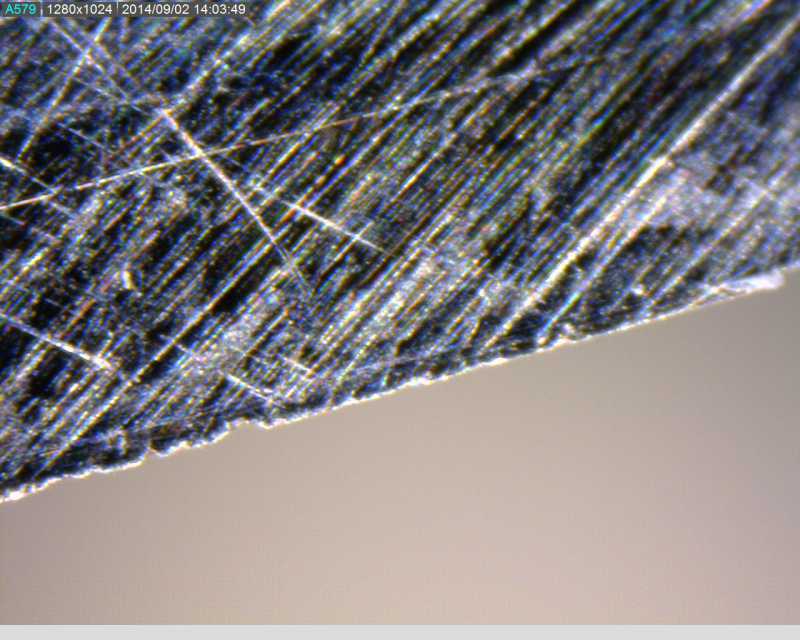
The edge after three days hard use. 500x magnification.
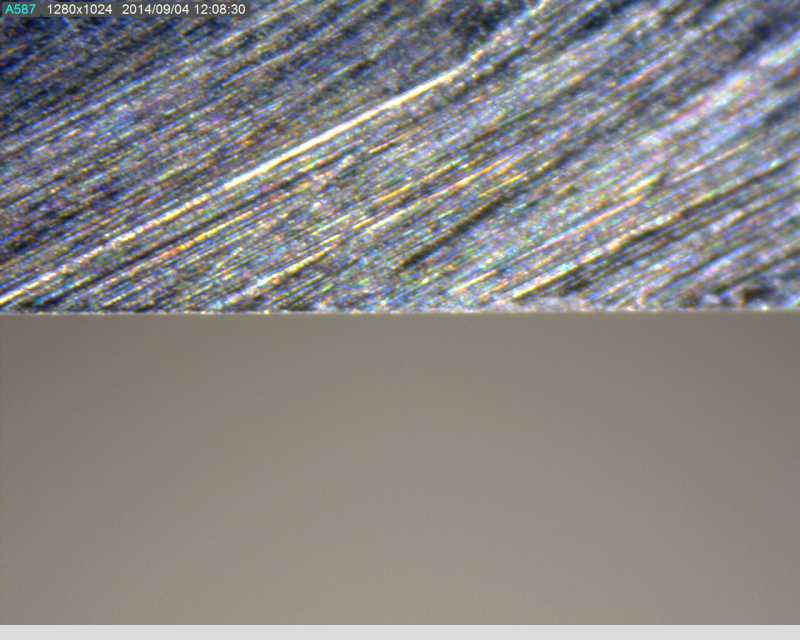
1000 grit finish. 500x magnification.
14 micron strops. 500x magnification.
The knife scored a 219 in the sharpness testing machine – that’s 219 grams of force required to rupture the membrane which is pretty good for 1000 grit at 19 degrees per side.
Part 2 coming up…
Attachments:-Clay
09/11/2014 at 1:38 am #20219I took the newly sharpened knife out yesterday to test out the edge, did a variety of cutting tasks and then came back to the shop to check out the damage. Here is the video:
and here are the images:
One section of the blade. 500x magnification. *
Some chipping. 500x magnification. *
Some chipping. 500x magnification. *
The above chip was the worst of the damage, ultimately not bad at all, especially given the cross-grain chopping/batoning that was done. The knife scored between 229-280 on the sharpness tester, depending on what section of the blade was being tested. All sections of the blade still shave hair easily.
*The captions on the images don’t reflect the magnification accurately. All the images were shot on a Dino-Lite AM-413T5 at 500x.
Attachments:-Clay
09/11/2014 at 1:38 am #20220Clay, your video didn’t post that I see… Even though I have already seen it on your yt channel. I’m excited for you and to hear your experiences!
So how many days will that take? I assume you won’t be taking the field and sport or anything, correct?
I would suggest, if you can afford the weight, just taking one 400/600 paddle, or even one crock stick from the sharpmaker for touch ups
09/11/2014 at 1:43 am #20221Clay, your video didn’t post that I see… Even though I have already seen it on your yt channel. I’m excited for you and to hear your experiences!
I think I’ve got it fixed now…
So how many days will that take? I assume you won’t be taking the field and sport or anything, correct?
We’re planning on 10 days in the field.
I would suggest, if you can afford the weight, just taking one 400/600 paddle, or even one crock stick from the sharpmaker for touch ups
That’s a great suggestion. I’ve got a few laying around the office. I could grab a coarse/brown rod and stick it in my pack.
-Clay
09/11/2014 at 6:55 am #20225Having passed my wilderness days by a long shot, I have descended to the level where edge durability is measured by how many feet of cardboard I can cut while loading up the trailer for a trip to the dump. Only the best grades of steel seem to do well on cardboard. Has anyone ever done any studies on this?
09/11/2014 at 7:09 am #20226Having passed my wilderness days by a long shot, I have descended to the level where edge durability is measured by how many feet of cardboard I can cut while loading up the trailer for a trip to the dump. Only the best grades of steel seem to do well on cardboard. Has anyone ever done any studies on this?
I did something about that a while back. If I remember correctly, I was able to get several hundreds of 24″ cuts with a particular knife before the blade started getting hot and my arm got tired. I think blade geometry and wear resistance are probably the biggest factors in retention when cutting cardboard. Maybe a nice thin M390 blade with good heat treating would do very well. I’ll do some research and find some blades to test…
-Clay
09/12/2014 at 3:53 am #20232Like this Tom?
09/12/2014 at 11:52 am #20233Exactly! Thank you Josh. Pretty much explains what I see with my Delica in ZDP-189 on Saturday mornings.
Cliff’s charts are cool, but I think I’ll run a few simple tests and compare edges with the micro-photos.
I think I’ve sharpened the Delica five times now, and have only seen two or three chinks that weren’t straightup wear. Another case of hard is good. I’ve had a batch (7) of Z-knives, which are short pocket knives which Grizzly used to sell. I think I bought ’em on closeout for $7 each. They’re Seki knives made of AUS-6. I would keep one in my pocket and when it went dull, I tossed it in the to-be-sharpened bin and picked up another. Early this year I bought the Delica just because I was intrigued by the ZDP-189 in Leo’s Rockstead. So far, as my EDC, it has amazed me. I’d have to say it outlasts the Z-knives by a factor of ten to one or better. On cardboard alone, maybe 20:1.
09/12/2014 at 4:04 pm #20235I like knives and sharpening a lot, but what strikes me most is the beautiful environment out there. And you LIVE there? :woohoo: You are a lucky man!
Molecule Polishing: my blog about sharpening with the Wicked Edge
09/19/2014 at 9:42 pm #20312Some interesting stuff:
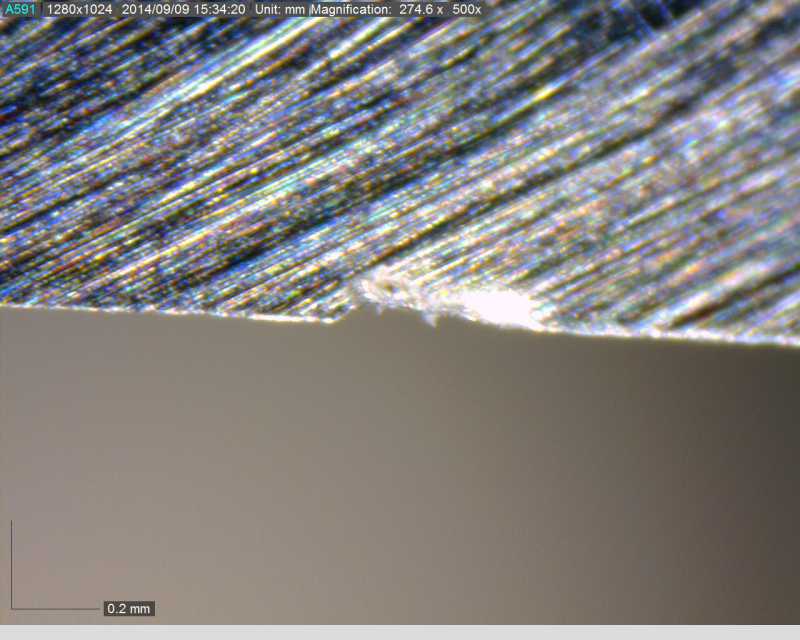
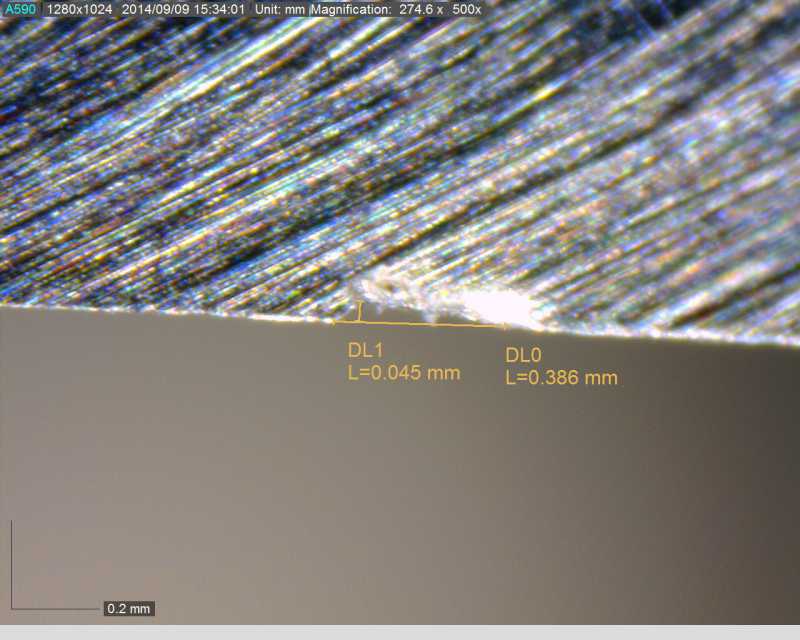
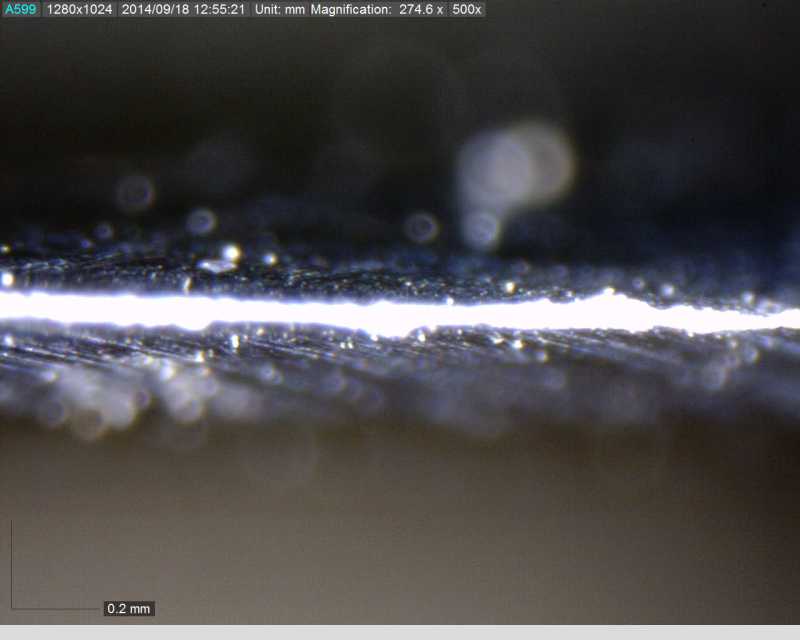
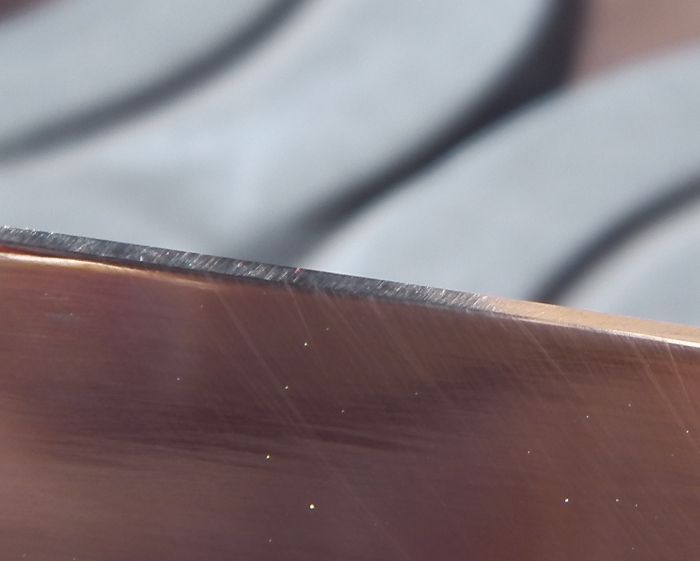
After moderate use, the edge-on photo shows a pretty narrow edge, one that is not reflecting much light. At this point the knife was still shaving easily and scored between 229-270 on the sharpness machine. After heavy use, and also cumulative use, the edge-on photo shows a wide edge, reflecting a lot of light. The knife was no longer shaving but did cut through copy paper easily enough except for snagging where the little chips hit the paper. The knife scored between 500-600 on the sharpness testing machine.
It only took 30 seconds of sharpening and 15 seconds of stropping to restore the edge to easily shaving sharp. It is now back to a reading of 228 on the sharpness testing machine.
-Clay
09/19/2014 at 9:47 pm #20316Here’s the last installment before I take off on the trip:
I went out yesterday up into the Pecos Wilderness, found a nice little clearing at 11,000 feet to do some more wood prep with the knife. I wanted to simulate multiple days use so I made a big pile of fire starting materials. I wasn’t trying to collect all the wood needed for multiple days, just enough to get fires started so I did a lot of splitting and carving, made a big pile of kindling and wood shavings. The thing I did that was probably hardest on the edge was to baton the knife through the limbs on some pieces of wood, right where they joined the main branch so I was going cross-grain, straight through the knots. Here’s the video:
And here are the after pics that I took with the microscope:
Fällkniven F1 after heavy use
500x magnification
500-600 grams of force on the sharpness machineFällkniven F1 after heavy use
500x magnification
500-600 grams of force on the sharpness machineDay3-4.jpg
Fällkniven F1 after heavy use
500x magnification
500-600 grams of force on the sharpness machineWhen I was finished with all the wood prep, the knife was no longer shaving. It could take a hair or two off my arm but not really sharp enough to say that it was shaving. It was still slicing paper well though it did snag whenever a micro-chip crossed the paper. Back in the sharpness tester, it was easy to see how much the edge had been degraded. It went from a range of 229-280 grams all the way to a range of 500-600 grams, so nearly half as sharp. Even so, I was impressed that it was working so well in the field and easily slicing copy paper back in the shop.
All in all, I’m very happy with the knife and the edge I selected for it. I feel confident that it will see me through my trip and perform whatever tasks are needed.
I’m most impressed by two things that this project highlights:1) A well formed edge can last a really long time, even with hard use. Naturally the steel and heat treatment as well as the blade design are important factors as well.
2) It only took about 45 seconds of sharpening to restore the blade to shaving sharp and trip ready.Attachments:-Clay
09/20/2014 at 2:43 am #20353Here’s the last installment before I take off on the trip:
I went out yesterday up into the Pecos Wilderness, found a nice little clearing at 11,000 feet to do some more wood prep with the knife. I wanted to simulate multiple days use so I made a big pile of fire starting materials. I wasn’t trying to collect all the wood needed for multiple days, just enough to get fires started so I did a lot of splitting and carving, made a big pile of kindling and wood shavings. The thing I did that was probably hardest on the edge was to baton the knife through the limbs on some pieces of wood, right where they joined the main branch so I was going cross-grain, straight through the knots. Here’s the video:
And here are the after pics that I took with the microscope:
Fällkniven F1 after heavy use
500x magnification
500-600 grams of force on the sharpness machineFällkniven F1 after heavy use
500x magnification
500-600 grams of force on the sharpness machineFällkniven F1 after heavy use
500x magnification
500-600 grams of force on the sharpness machineWhen I was finished with all the wood prep, the knife was no longer shaving. It could take a hair or two off my arm but not really sharp enough to say that it was shaving. It was still slicing paper well though it did snag whenever a micro-chip crossed the paper. Back in the sharpness tester, it was easy to see how much the edge had been degraded. It went from a range of 229-280 grams all the way to a range of 500-600 grams, so nearly half as sharp. Even so, I was impressed that it was working so well in the field and easily slicing copy paper back in the shop.
All in all, I’m very happy with the knife and the edge I selected for it. I feel confident that it will see me through my trip and perform whatever tasks are needed.
I’m most impressed by two things that this project highlights:1) A well formed edge can last a really long time, even with hard use. Naturally the steel and heat treatment as well as the blade design are important factors as well.
2) It only took about 45 seconds of sharpening to restore the blade to shaving sharp and trip ready.~Originally posted by wickededge
*Posted by Administrator due to database issue
09/20/2014 at 11:09 am #20361Great vid and pics again!
I recognize how you F1 behaves. (Is it the VG10 variety?) Very much like my A1. Very strong, some microchipping after battoning, but shaving sharp again in a matter of seconds.
Enjoy your trip! I’m anxious ;).
Molecule Polishing: my blog about sharpening with the Wicked Edge
09/20/2014 at 11:55 am #20363When you say it takes 45 seconds to restore an edge to shaving arm hair, I assume that doesn’t include the time it would take to remove the chips and dings. That wasn’t clear to me until I saw the photos of the used edge. Of course! You don’t need to remove every chip and ding to regain a very usable edge.
09/20/2014 at 10:29 pm #20366When you say it takes 45 seconds to restore an edge to shaving arm hair, I assume that doesn’t include the time it would take to remove the chips and dings. That wasn’t clear to me until I saw the photos of the used edge. Of course! You don’t need to remove every chip and ding to regain a very usable edge.
The chips look big in the micrographs but they were less than .1 mm, so removing them happened almost automatically in that 45 second period. After sharpening, I looked at the edge again under the microscope and saw only one tiny chip, which I left.
-Clay
-
AuthorPosts
- You must be logged in to reply to this topic.