How do you stop angle adjustment Pro3 2017 loosening
Recent › Forums › Main Forum › Techniques and Sharpening Strategies › How do you stop angle adjustment Pro3 2017 loosening
- This topic has 14 replies, 5 voices, and was last updated 12/28/2017 at 11:03 pm by
Dwight Glass.
-
AuthorPosts
-
12/25/2017 at 8:54 pm #44157
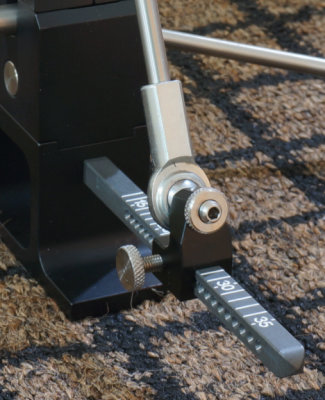
I was working on a knife and had gotten through 4 stones and started another and it felt different on left side but I was not alert enough to see what was happening but this is what… the angle adjustment outer screw had come loose as well as the inner and my angle was changed… I do not seem strong enough to tighten the adjustments . I thought I had used enough strength as fingers were almost raw but to no effect as they loosened..How do you tighten so it will not get loose while sharpening?
1 user thanked author for this post.
12/26/2017 at 1:58 am #44158I had a similar problem on my Gen 3 Pro 2017. I believe it’s caused by the fact that the adjustment threads and the locking screw threads are axially aligned. If the threads are a bit loose, movement on the ball joint can loosen the locking screw. I think you can solve it by inserting something between the two – perhaps a BB, or a piece of plastic – anything that can disconnect the locking screw from the adjustment screw. You can also solve it by rounding off or pointing the tip of the adjustment screw – anything to avoid the full flat-face-to-flat-face connection between the two, which makes them act like one long screw.
I had already planned to install a different adjustment system I had developed on my pre-Pro rig, so I didn’t mess with it much.
4 users thanked author for this post.
12/26/2017 at 5:39 am #44159I use the little nylon BB that came with 2016 “Pro-pack ll”, “Micro Adjust” inside the “L Bracket” that is on the “Angle Bar”. When I called in a order by phone I also ordered these little nylon BBs.
2 users thanked author for this post.
12/26/2017 at 9:00 am #44161I noticed the round knurled nut on the fine-adjust screw coming loose (I assume that’s what you mean by outer screw?). I was thinking maybe a star washer under the nut might do the trick but haven’t tried it yet. Or maybe a couple wraps of teflon tape on the threads.
Dwight, what do you mean by “nylon BB?”
1 user thanked author for this post.
12/26/2017 at 1:05 pm #4416312/26/2017 at 1:14 pm #44166Hi I am not sure as I am talking about the Pro 3 2017 and it has a cam for angle adjustment
12/26/2017 at 2:35 pm #44169The micro-adjusts in graphite’s photos are very similar to my home-made rig, except that I extended the adjustment screw and added a knob. I then added a 0-9 scale to the knob’s hub. For angles in the 20-dps range, each 1/10th of a turn is about 0.03 degrees.
I have the same rig on my Gen 3 Pro.

1 user thanked author for this post.
12/26/2017 at 4:21 pm #44173CMyhero,
Is this your model? The silver locking screw can be unscrewed and backed out of it’s hole in the black “end bracket” I pair of little round plastic BB’s offered by WE can be inserted in the threaded hole in the black bracket, (one BB for each side), between the two silver screws, then the screw replaced. It may help elimitae your loosening issue.
Marc
(MarcH's Rack-Its)Attachments:
You must be logged in to access attached files.
4 users thanked author for this post.
12/26/2017 at 5:03 pm #44178tcmeyer, re: “I extended the adjustment screw and added a knob. I then added a 0-9 scale to the knob’s hub. For angles in the 20-dps range, each 1/10th of a turn is about 0.03 degrees.”
I like it! Nice work. I’ve been using a “caveman” version of that, where I take the height(depth) gauge that is in the end of most calipers and just log the height of the adjustment screw end relative to the body of the L-bracket, so that I can re-create the micro-adjust as well as the coarse angle (and to replicate the micro-adjust on both sides). Until I have a better feel for how visible a .1 or .5 or 1 degree bevel difference is, I’ll probably keep doing that. It only adds 20 seconds to the process so not a big deal.
12/27/2017 at 5:40 pm #44190Thanks I called today and they did not have a part number so could not send today but I believe they will have what is needed shipped tomorrow or next day.
2 users thanked author for this post.
12/27/2017 at 6:55 pm #44191TCMeyer’s suggestion some time back: You can use a short piece of thin electric wire insulation, (maybe #12). Place it in the hole between the two metal pieces. As it compresses it keeps the parts tight and from turning.
Marc
(MarcH's Rack-Its)3 users thanked author for this post.
12/28/2017 at 1:58 am #44194The wire insulation trick is intended for a perpendicular locking screw – as opposed to the Gen 3 Pro 2017. It works something like a “NyLok” screw. The micro-adjust screw is held by the friction applied against the threads by the plastic plug, which assumes the shape of the threads. By applying pressure with the locking screw, it acts like a brake.
In the Gen 3 Pro 2017, the locking screw is in line and you really don’t want friction between the two screws; that’s what’s making it come loose. I think the best course is to file or sand the tip of the locking screw to a small point. The idea is that the small point of contact won’t transmit enough torque to work the screws loose.
It would have been nice to have a larger diameter locking screw hub, so you could crank on it. I suppose you could replace the locking screw with a 10/28 set screw, and use an Allen wrench as the tightening means. Even then I’d recommend pointing the tip of the set screw, or to use a Nylon-tipped set screw.
And yes, I’ve had a screw loose on a few occasions.
5 users thanked author for this post.
12/28/2017 at 9:04 am #44199Are you guys talking about the screw into the divots of the angle bar, or the nut on the fine-adjust screw?
On my angle bar screw, I’m not sure how you’d get the mechanism to slide to a different angle if you inserted a BB or wire insulation between the tip of the screw and the divot in the bar. And my fine-adjust screw seems like it is one piece, attached to the pivot bearing.
12/28/2017 at 10:25 pm #44232Graphite I apologize for not explaining well before. I have the “Pro Pack 2” pictured earlier mine is an older version than yours, yours has a locking nut mine has a thumb screw that apples pressure to the side of the threaded part of the universal joint. with my version the nylon BB was put in front of the thumb screw to stop damaging the threaded part of the universal joint. that is where I got the BB from to try to fix the “Pro3 2017” loosening micro adjust problem. The BB is placed between the jam bolt and the threaded part of the universal joint in the “L bracket” of the “Pro3 2017”. I mentioned the angle bar earlier as part of the description of where the nylon BB came from. For me I do not see a problem to fix with the angle bar or the angle bar screw. thanks to all who help with this forum
2 users thanked author for this post.
12/28/2017 at 11:03 pm #44237If wicked Edge put a nylon tip on either the “jam bolt” or the end of the threaded part of the “universal joint” it might help. you know like some set screw have nylon tips. But I am happy with my “Pro3 2017” micro adjust the way it is. The wicked Edge did something right, i got 4 of these Wicked Edge sharpeners.
3 users thanked author for this post.
-
AuthorPosts
- You must be logged in to reply to this topic.


