How Do You Hold Paddles? Why Does it Work?
Recent › Forums › Main Forum › Techniques and Sharpening Strategies › Advanced Techniques and Sharpening Strategies › How Do You Hold Paddles? Why Does it Work?
- This topic has 39 replies, 12 voices, and was last updated 02/22/2015 at 10:01 am by
CliffCurry.
-
AuthorPosts
-
12/10/2014 at 5:40 am #21895
Hi and May God be with you in this Season of Joy.
I do believe this belongs in “advanced” so let me just jump right in…
How do you hold your Paddles when sharpening? and Why does it work?
The second question is really the significant one. And I’ve seen such great answers in this forum, I’m hoping for the best here. 🙂 I’m unable to get consistent sharpness, and I believe this post explains why — and why I may need a new technique.
PRELIMS
I am not talking the obvious here: use the sharpie trick, measure your angles, get the precision kit, longer rods, stones may have different thicknesses, etc. Also, I have a higher accuracy inclinometer, with 0.05 degrees of error — compared to the 0.2 degrees of error in the Accuremote.
PROBLEM
I have struggled with uneven bevels for 2+ years of owning the WE. By uneven bevels, I mean that as I progress through my grit regimen, I can see that different grits have warn the bevel in different areas along the length of the blade (the edge itself is not warped). Even after I’ve set up to wipe the sharpie clean.
CAUSE
Given any set of my Paddles, the Bore Holes through the middle are always wider than the Guide Rods. This introduces “play” in the system. I followed the advice from an older (now forgotten) video/post which explained how to eliminate this play.
Basically, it’s a slight rotation of the hand while holding the Paddle. In my case, I put my index finger against the top of the Paddle and push it into the Guide Rod, while my thumb and pinkie pull the bottom away from the Rod. This eliminates all play, and keeps the Paddle at the same angle with the Guide Rod. I refer to this as the “push/pull” technique.
Unfortunately, I believe I have proven this technique is not only incorrect, it introduces error into the system. I felt illustrations would make things clearer. Image #1 and Image #4 are the important ones, #2 and #3 are just about being thorough.
IMAGES
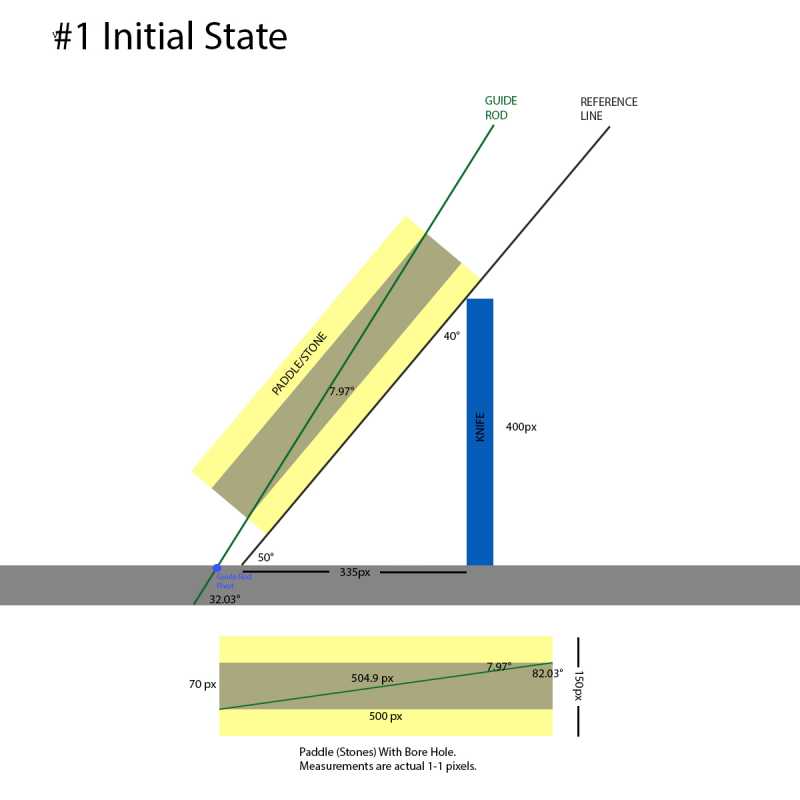
In the first image, the blue tower represents the Knife/Bevel; the yellow represents the Paddle/Stones; the grey in between represents the Bore Hole; and, the dark green represents the Guide Rod. Black lines serve as reference.
I used Photoshop to create these images, and I used both the angles it gave me, and I also used 1-1 pixel measurements to verify those angles with trigonometry. I suspect a 1 or 2 pixel error in places, but they won’t matter to the results.
The numbers in the diagrams are heavily exaggerated for illustration purposes, but accurate to the example. See my real measurements at the end.
IMAGE #1
At the bottom of the image, I drew the Paddle I used. In the image, the hypotenuse would actually be the Guide Rod.
In the main image, you can see the initial state of how I hold the Paddle. Notice how the Paddle rides against the Guide Rod at an angle of 7.97 degrees as I use the push/pull technique.
Here, I give the pixel-per-pixel measurements of the Paddle, and the calculated Guide Rod angle.
[code]
Paddle: 500 px x 150 px
Bore Hole: 500 px x 70 px
Guide Rod against Paddle Bore: 7.97 degrees
Note: Arc Tangent of 70 / 500 is 7.97 degrees
[/code]I keep the blue “knife” height constant throughout. The black Reference Line marks the point where Paddle/Stone would intersect the base at its given angle. These are important because they allow the trigonometric calculations of angles, even though Photoshop gives them.
[code]
Height of the Knife: 400px
Reference Line to Knife: 335px
[/code]As I run the Paddle up or down the bevel, I maintain that 7.97 degree angle using the push/pull technique. The Guide Rod pivots at a fixed point (circle shown in blue), so the Guide Rod can change angles relative to the base. All basic so far.
Here are my initial angles:
[code]
Paddle relative to knife bevel: 40.00 degrees
Paddle relative to base: 50.00 degrees
Guide Rod relative to base: 32.03 degrees
[/code]To sharpen, we absolutely want the Paddle to remain at 40 degrees against the bevel (or 50 degrees relative to the base), no matter how far up the Paddle has passed up the bevel.
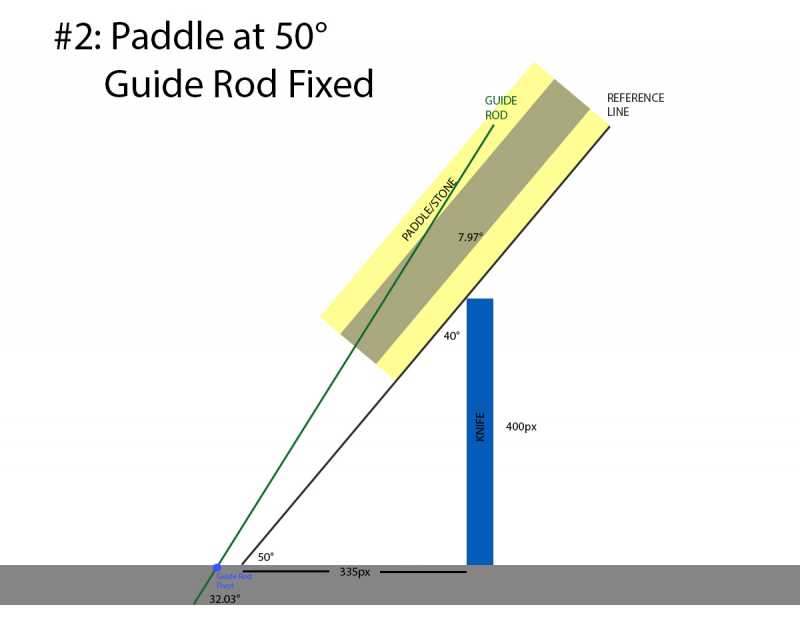
In Image #2, I demonstrate the first of 3 scenarios by simply shifting the Paddle upward, parallel to the 40 degree line, and moving nothing else.
IMAGE #2
Obviously an impossible situation, and you don’t want the Guide Rod ripping through your 10K Chosera!
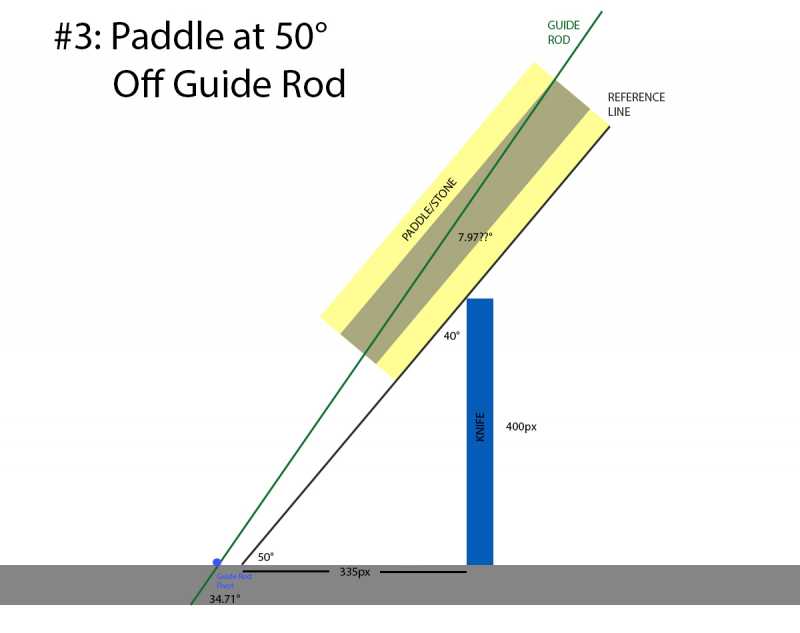
Of course, by design, the Guide Rod pivots at its attachment point as you slide the Paddle. So here’s the next case with the Paddle still sliding at a fixed 40 degree angle with the Knife.
IMAGE #3
Not exactly impossible, but this defeats the purpose of the Guide Rods. Using the push/pull technique, I’d have to actually lower the bottom of the paddle away from Guide Rod in order to maintain that 40 degree angle.
CONCLUSION
What this means is that, with a size difference between the Bore Hole and the Guide Rod, you cannot keep your stone at the exact same angle against the bevel as you slide the Paddle up the knife.
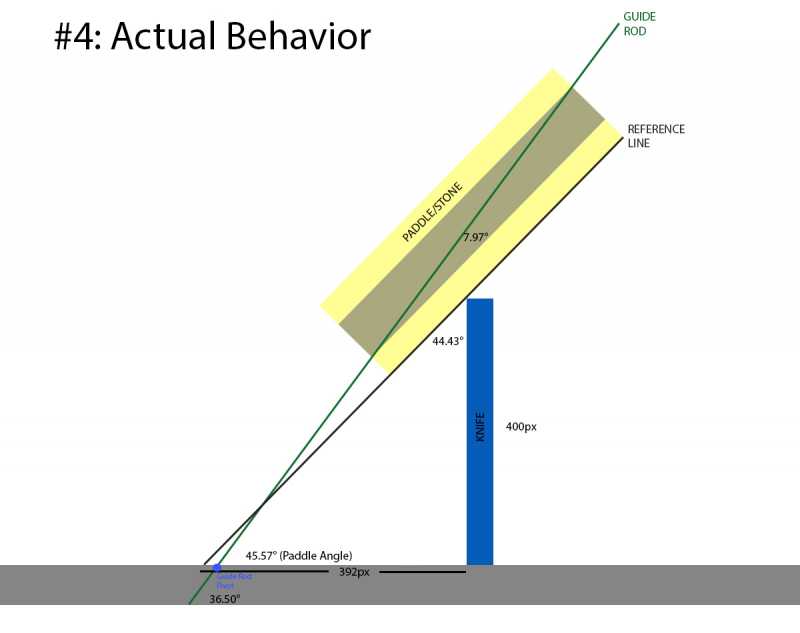
The final, and actual scenario.
IMAGE #4
[code]
Guide Rod against Paddle Bore: 7.97 degrees
Height of the Knife: 400px
Reference Line to Knife: 393pxORIGINAL
Paddle relative to knife bevel: 40.00 degrees
Paddle relative to base: 50.00 degrees
Guide Rod relative to base: 32.03 degreesFINAL POSITION
Paddle relative to knife bevel: 44.43 degrees
Paddle relative to base: 45.57 degrees
Guide Rod relative to base: 36.45 degrees
[/code]Using the push/pull technique, in order to maintain a constant 7.97 degree “lock,” the Guide Rod will have to pivot as you slide upward, and this in turn causes the Paddle/Stone to change the angle it contacts the Bevel as it passes.
In this example, the angle against the Bevel changed 4.43 degrees.
REAL WORLD EXAMPLES
Who believes Photoshop these days anyway? 🙂
Here are real-world measurements I took of three stones.
Angle Hi: With the Paddle at the lowest point on the Guide Rod, using the push/pull technique, I’m pushing on top, pulling on the bottom, creating a larger angle.
Angle Low: Paddle still at lowest point, but I push on bottom and pull back on the top.
Difference: The amount of play between the Guide Rod and Bore Hole.
Pass Bottom: Using push/pull, I measured this angle at the lowest point of the pass (ala Image #1)
Pass Top: Using push/pull, I measured at the highest point (per Image #4).
[code]
Angle Hi / Low Difference Pass Bottom / Top DifferenceRED: 21.37 / 20.96 0.44 21.37 / 21.68 0.31
YELLOW: 21.43 / 21.14 0.29 21.41 / 21.68 0.27
Blue: 21.46 / 21.09 0.37 21.40 / 21.80 0.40
800
[/code]The two sets of differences should really match, but I’m not able to pass the Paddle 100% of the way up the Guide Rod, plus there’s the 0.05 degree error of my inclinometer. I’m still left to conclude that the push/pull technique does not work, in a bad way!
So back to my original questions: How do you hold your Paddles? And why does it work?
-Pie
12/10/2014 at 6:15 am #21896Pie,
I am partially confused. In your pictures it shows 7.97 degrees of play but your actual real world measurements seem to be all less than a half of a degree off. is this correct? If so then that little of play shouldn’t really mess up your bevels at all.
I have tried your push/pull technique but didn’t like it. It takes too much time and concentration. What I settled on is:
– thumb & index finger in the top groove and the others resting below that.
– as I sharpen this automatically does the “push/pull” method. In other words, if I am pushing on the top then the bottom automatically moves away from the vise (kind of like what would happen if you push on one side of a teeter totter).
– if I am finishing at 1k grit then I view 600 as my last ‘bevel setter” and I try to go ahead and use the same stroke direction (i.e. edge leading moving from heel to tip) from there on out. If you don’t do this you will notice two different angles near the heel of the blade.But one thing I have going for me is that I got longer rods which are also slightly larger in diameter so they have less play than the old rods.
Hope this helps!
12/10/2014 at 12:04 pm #21901And I have a different take on it.
It so happens that I took some angle readings just this last week to evaluate the play in a new set of stones. My method is to lay the stone against the edge with the edge touching the approximate center of the stone. With an AngleCube attached magnetically, I took readings in two conditions: pressing against the top of the stone and when pressing against the bottom of the stone. Of course, the force (I tried to approximate the typical force I use when sharpening) was applied in the cross-direction and perpendicular to the rod. The stone “rocks” about the fulcrum provided by the edge. I came up with a difference of between 0.55 and 0.6 degrees.
Most of my stone blocks have been modified to add bronze bushings at the ends of the blocks. Using the same test, I measured 0.25 degrees in one of my modified set of stones. I know that on average, they do better than that – closer to 0.15 degrees.
Maybe I’m missing something in your diagrams, but the angle calculations don’t seem to take into account the diameter of the rods relative to the diameter of the bores. Try to keep your model more to scale with actual angles and component sizes.
My original rods (with the old linkage connectors) measure out at only 0.236″ (6mm) diameter. The diameter of the bores in my blocks after about two years was 0.261″ (size G drill would fit the bore snugly). My old HP-15C says that’s about 0.26 degrees to one side, for 0.52 degrees total. The rods I have now (non-WE issue) are about 0.248″ diameter and I’m still measuring the 0.6 degree error, so there’s additional play at work here.
As a result of these observations, as well as discussion here on the forum, I’ve changed my grip technique. I try to keep the force applied below the height of the blade edge. This is to eliminate the tendency of the stone to “rock” as the point of applied force moves past the edge. This is also a major step in terms of safety. Almost all the cuts I’ve experienced have happened when my fingers waggled above the edge.
I also have learned that blocks can twist ( Hey! The roll part of “Rock and Roll!” ) as you move along the blade, length-wise. Of course, this can affect the quality of the bevel. To reduce that possibility, I’ve learned to grip the block lightly, but to concentrate the applied force in my fingertips against the plastic lips of the block and in a direction perpendicular to the rod. This makes a huge difference in the ability of the stone to stay flat against the bevel. Try it. You’ll like it.
I am really interested to hear what some of the others here are doing as a matter of practice. Every time the subject comes up for discussion, I assume that some of us re-evaluate our own best practices.
12/10/2014 at 11:12 pm #21912My best results have come with my thumbs in the second from top grooves. I hold the stones lightly and also use my fingertips to apply slight pressure against the plastic safety lips in effort to keep the stone flat on the blade. I also keep my elbows in and keep my wrists locked. Getting too high on the stones and applying too much pressure will IMO no doubt cause the stone to rock over the edge and create dulling or chipping issues.
12/11/2014 at 5:04 am #21916I am partially confused. In your pictures it shows 7.97 degrees of play but your actual real world measurements seem to be all less than a half of a degree off. is this correct? If so then that little of play shouldn’t really mess up your bevels at all.
I definitely did cause confusion with the diagrams, and I apologize.
The diagrams are meant as a “proof of concept” rather than a real world example. The diagrams exist to illustrate that using push/pull to force the Bore Hole ends against the Guide Rods introduces more and more error as you pass upward over the bevel. The numbers are certainly exaggerated, but they leave no doubt mathematically.
I do have a caveat I italicized. I’ll go back and bold face it, and maybe reword it a bit. 🙂
I think the only way to get 100% reliability up the bevel is to have the Bore Hole fit “tightly,” causing the Paddle/Stone to run parallel to the guide rod.
It so happens that I took some angle readings just this last week to evaluate the play in a new set of stones. My method is to lay the stone against the edge with the edge touching the approximate center of the stone. With an AngleCube attached magnetically, I took readings in two conditions: pressing against the top of the stone and when pressing against the bottom of the stone. Of course, the force (I tried to approximate the typical force I use when sharpening) was applied in the cross-direction and perpendicular to the rod. The stone “rocks” about the fulcrum provided by the edge. I came up with a difference of between 0.55 and 0.6 degrees.
You explain this much better than I did! I used a little different method, but would have produced the same results. But I really like your explanation a lot better!
My real world numbers are similar to yours, a few stones going out to 0.5, but I only listed three to show a range.
Did you ever post how you added the bushings? I’ve been curious for a while.
-Pie
12/11/2014 at 11:00 am #21918Hello Pie:
I sent you a PM.
12/11/2014 at 12:41 pm #21920How do you send PM’s?
12/11/2014 at 11:11 pm #21928Under the person’s Karma rating, there’s a small group of icons. The one that looks like a cartoon dialogue balloon takes you to a Private Message page for that commenter.
For messages to you, see the upper right corner of a forum page. It may say “4 New Private Messages” as mine did today, as I hadn’t checked them in three weeks. Sorry, guys.
12/12/2014 at 3:50 am #21931Thank you TC. Every forum is different, and sometimes my age and lack of computer skills get in the way. 🙂
Huh, just looked at mine, and there isn’t that balloon icon. Is that just because I can’t send myself a PM?
12/12/2014 at 4:49 am #21935I measured my play (in just one set of stones) and it was .30 on either side… not too bad
12/13/2014 at 12:02 pm #21970So one day after I posted the above comment about keeping my fingers below the edge, wouldn’t you know it? I was doing a chef’s knife with a particularly wide blade and I reached my left hand over to set my microscope down. When I retrieved my hand I clipped the end of my middle finger on the very heel of the blade. I was only finishing up at 400 grit or it might have been worse. Imagine a cut only about 1/4 as bad as Josh’s recent calamity.
In Japan they holler “Itai! Itai!” I think that’s their equivalent of “Owie! Owie!”
I’m on blood thinners, so each of these episodes are a little more exciting than they used to be.
12/13/2014 at 1:19 pm #21971In Japan they holler “Itai! Itai!” I think that’s their equivalent of “Owie! Owie!”
I sometimes watch a Japanese movie. Over here these are translated with subtitles. But “Itai” is never translated, I wondered why B) Thanks! 😀 😀
And to end on topic: I hold my paddles exactly as Josh. With the same experience.
Molecule Polishing: my blog about sharpening with the Wicked Edge
12/13/2014 at 1:31 pm #21972Huh, just looked at mine, and there isn’t that balloon icon. Is that just because I can’t send myself a PM?
And I just moused over the house icon under your name and realized we live about 50 miles apart! Aloha 🙂 Nice to know there are a few of us out here…
As for paddle technique I was paying very close attention to this today on progression down to mirror. My jury is still out but I remember thinking that for quick sharpens to 1000 I could hold towards the top to make sure Im gonna hit the edge…but If I am going all the way down to a mirror to make sure to start with holding towards the bottom.
What happened today is I got down to 1k and realized that on the 100/200 I was leaning “forward” on the paddles (holding at the top) and now I was not hitting the apex with the finer grits at all. Big Problem. 🙁
At 800/1000 I was holding low and leaning “back” (as I think of it), to make sure and get the heavier grind marks off where the primary meets edge bevel when I noticed a rough line at the apex not getting hit anymore. I had to step back to 400 and walk it back up holding low all the way to get it right.What I think I know for sure:
Starting by holding paddles at the top then switching to the bottom = bad news.
Holding towards the bottom is safer for sure and if I can maintain it should leave the edge flatter, making mirror polishing easier too.
Switching from top grip to bottom or back n forth makes it so I have to do both on every step to get all the previous grind marks and makes the polish look wonky.
A satin finish with paper strips at 2000 grit makes all my problems go away! 😆12/15/2014 at 6:16 pm #22041.
.
they certainly are that………….. 😳 ….. 😳12/15/2014 at 7:34 pm #22043Personally, I haven’t measured the play between the rods and stones on my Wicked Edge. I will say that it’s definitely noticeable and bothers me quite a bit; although, I guess it bothers me less and less as I get better at sharpening on the system.
I’m not too sure if I got some old stock when I purchased my WEPS, but I’ve tried the Subway straw mod and couldn’t get them to fit either of the rods. I then returned to Subway for more straws in hopes that I’d have better luck if I grabbed a handful… Roughly 20 straws later and still no fit. I even tried lubricating both the rods and straws… Nada.
I honestly can’t think of any other option(s).
Can anyone else provide a possible solution?
-
AuthorPosts
- You must be logged in to reply to this topic.