Hand plane blades
Recent › Forums › Main Forum › Techniques and Sharpening Strategies › Hand plane blades
- This topic has 21 replies, 9 voices, and was last updated 09/16/2014 at 7:28 pm by
 wickededge.
-
AuthorPosts
-
06/18/2014 at 2:51 am #19140
I had a friend ask me if I could microbevel one of his hand plane blades. I don’t have the chisel attachment though if I did a lot of woodworking and such I’d probably go ahead and get it. Couldn’t a hand plane blade just be mounted vertically in the vise and just set the angle on the one side and sharpen away? I don’t really have any experience with these blades so I was just curious.
06/21/2014 at 11:14 pm #19202I don’t really have any experience with these blades so I was just curious.
Nor do I. Don’t even know what they are :ohmy: . But as long as the angle’s between, say, 13 and 40 degrees, your chances are pretty good.
Molecule Polishing: my blog about sharpening with the Wicked Edge
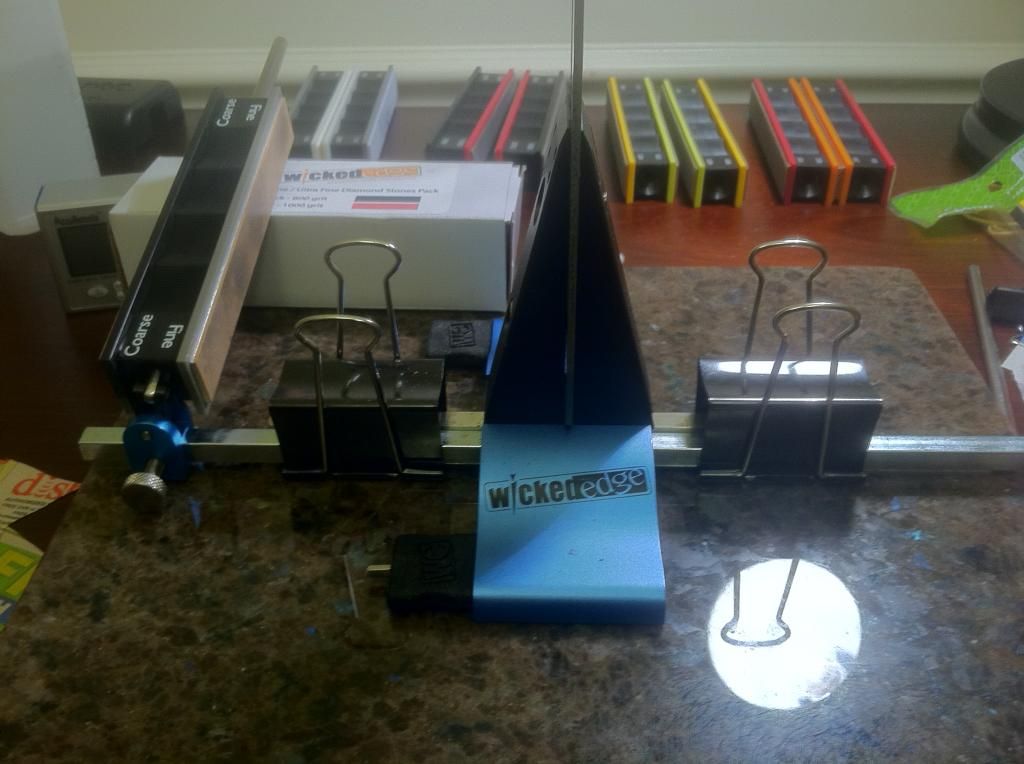
06/21/2014 at 11:29 pm #1920406/22/2014 at 12:18 am #19208The stock base rod will not work. The most obtuse angle I can get due to the height of the blade is about 20 degrees. Trying to get 30. As a workaround I tried taking the base rod out and screwing it in to one side, making it longer on one side. The most I could get out of that was about 27 degrees.
My local Fastenal had 1′ long, 5/16″ aluminum keystock for $1.84. Perfect for what I need. I was going to get two mounting holes drilled, but due to a time crunch, couldn’t find anyone with a drill press. I did rig up a workaround that has worked surprisingly well allowing me to get well beyond 30 degrees if I wanted it. I’ll put up a pic later when I can. It would just be better if the arms were longer in this situation to reduce the play as the stone gets farther out.
06/22/2014 at 1:19 am #19209Have you tried not using the depth key and seating the blade lower in the vise? Just a thought.
06/22/2014 at 6:15 am #19210No depth key at all. These blades are 7.5″ tall so they sit in the very bottom of the vise. Luckily the slot in the middle of the blade allows for the clamping screws to pass through them.
06/22/2014 at 7:52 am #19217I went to my basement and grabbed a rusty rabbet plane I had and set up the blade in the Wicked Edge. I tilted the blade to the rear until the stones evenly swept the edge with the bottom part of the plane pinched to the movable jaw with the lower jaw screw.
It worked really well and now is sharper than it has ever been. It was my father’s plane and must be at least 65 years old; I guess I should take better care of it.
Then I took the blade out of a Stanly plane I bought about 40 years ago. It didn’t need nearly the work that the older plane, but I sensed the steel was better in the old one. I mounted the blade straight up with the upper jaw screw going through the slot and the lower pinching the blade to the movable jaw; it held very tightly with little force on the screws. Another plane sharper than it has ever been.
Alternately it could be mounted at an angle like shown in the attached pictures:
06/22/2014 at 8:12 am #19218This was my crude workaround. The clips actually held very tightly with no movement when sharpening. Some little bitty vise grips or c-clamps would’ve probably been better, but it worked regardless. Only issue I had was the slop when the stone gets a certain height on the rod, but it wasn’t that bad. Took mostly short strokes due to that.
06/23/2014 at 4:36 pm #19225This was my crude workaround. The clips actually held very tightly with no movement when sharpening. Some little bitty vise grips or c-clamps would’ve probably been better, but it worked regardless. Only issue I had was the slop when the stone gets a certain height on the rod, but it wasn’t that bad. Took mostly short strokes due to that.
so you basically clamped a square bar (same size) to your existing base bar? where did you find that new one? Great work around!
06/23/2014 at 6:39 pm #19227This was my crude workaround. The clips actually held very tightly with no movement when sharpening. Some little bitty vise grips or c-clamps would’ve probably been better, but it worked regardless. Only issue I had was the slop when the stone gets a certain height on the rod, but it wasn’t that bad. Took mostly short strokes due to that.
so you basically clamped a square bar (same size) to your existing base bar? where did you find that new one? Great work around![/quote]
Local Fastenal. $2.01 with tax.
I’d like to get this one drilled out eventually rather than having to jerry rig it.
06/29/2014 at 9:00 pm #19284Another option you might toy around with, is to mount a bar 90 deg. from the base…
… I did it by mounting the original angle bar to a piece of aluminum (stuff I had around) and clamping it, but there’s probably a better way.
07/01/2014 at 12:02 am #19302As always, inspired by Curtis:
It was pretty easy to take a piece of 5/16″ key stock and drill the two holes that lined up with the back of the L-Bracket. From there, the rest was a piece of cake.
Attachments:-Clay
07/01/2014 at 3:30 am #19304wow sweet!! when is this going into a “new product announcement” thread?!
07/01/2014 at 5:09 am #19306Might help
07/01/2014 at 5:11 am #19307Hey the uploads are working again. Try another
-
AuthorPosts
- You must be logged in to reply to this topic.


