A theory of how the WE diamond pastes work
Recent › Forums › Main Forum › Stropping › A theory of how the WE diamond pastes work
- This topic has 162 replies, 16 voices, and was last updated 04/09/2013 at 3:05 pm by
Jacob Wilson.
-
AuthorPosts
-
04/07/2012 at 3:48 am #2564
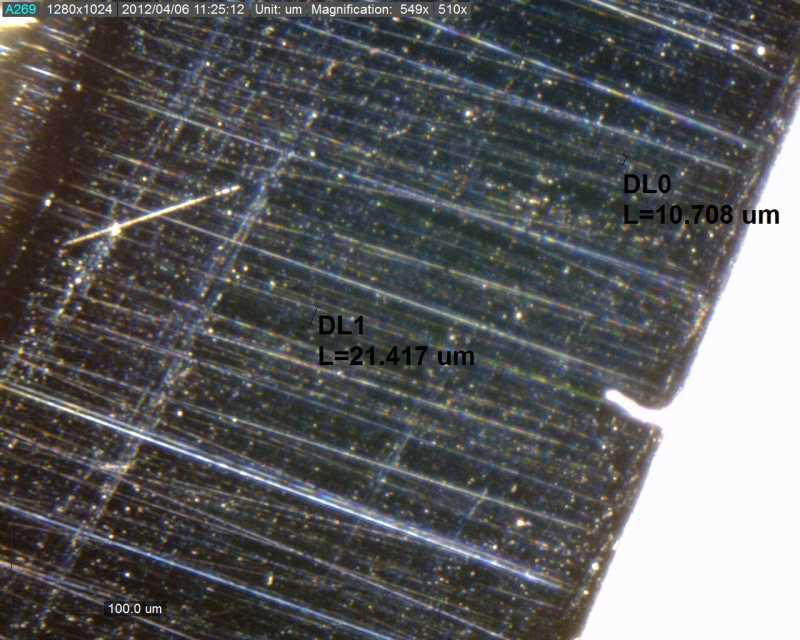
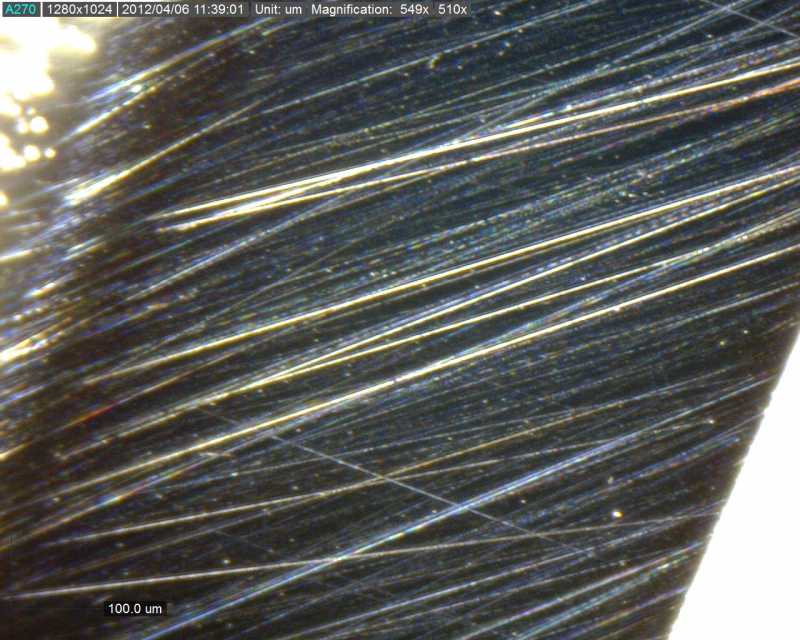
We’re finally getting some where with the images. Below are two pictures; the first is of the edge after 1000 strokes with the .5um spray and pasted diamond and leather strops, the second is of the edge after 100 strokes with the 1um spray and pasted diamond and leather strops. I purposefully angled the strokes with the 1 micron strops so we could easily distinguish the scratches. The microscope is angled so that there is minimal reflection from the flat surface and maximum reflection from the scratches:
.5um Diamond Spray/Paste and Leather Strops – 1000 passes
View the Full Sized Image1um Diamond Spray/Paste and Leather Strops – 100 passes
View the Full Sized ImageAttachments:-Clay
04/07/2012 at 10:44 am #2568Trying to reply.. test.
I did this earlier and typed the same long note twice. I hit submit and was taken back to recent threads.. Looks like nothing got posted. Trying this before I spend the time to re-compose my thoughts.Phil
Edit, looks like I am getting through… now to figure out what I said a couple of hours ago 🙂
04/07/2012 at 11:41 am #2569Ok…
The latest pics are great… WOW !
It becomes obvious that the angle and lighting are really important in capturing micron level scratches. We are seeing abrasions now that were basically invisible before using the same abrasives and equipment. Obviously we can’t depend on a single series of photos to make hard conclusions on what is happening at the micron and below levels.I do have a question though. I think that I know part of the answer, but that still clouds the issue a bit. You mention using both the WE pastes and some equivalent micron sprays. I think we have seen that compounds calling out the same level of abrasives at this small a grit size, are not all created equal. The actual distribution of abrasive sizes are not typically the same. I have not seen the size distribution published for the WE pastes, nor the sprays that were used.
I think I heard Clay say (or read actually) that he was using the sprays as a sort of lubricant to attempt to remove stiction and the resultant (theoretically) burnishing of the metal from the mix. This is a good goal, but using two compounds adds additonal variables to the mix. Where did the scratches come from?
Do I need to use both abrasives to duplicate the results?In any case, I am very happy to see that these abrasive really do “abrade” and do something to the metal other than just “magic”. I think we mostly agree on the results at the edge… it is just that seeing what is happening that is somehow comforting.. 🙂
Phil
04/07/2012 at 5:09 pm #2572An excellent thread, my friends!!! :woohoo:
As a long-time Shapton fan, I almost read this entire thread saying to myself “I told you so!” 👿 I’ve never been into pastes or sprays precisely because of the fact that Shapton goes to 30K. Just ask Ken how hard and long he had to twist my arm to even try the .125 CBN.
I see some patterns developing here:
1. Going to the current lineup of pastes and sprays off the 1K Diamond WEPS is not the most productive choice in a forward moving progression that aims to eliminate the previous grit’s scratches. However, for “polishing the grooves”, and leaving a more toothy, yet clean edge, it is.
2. While there is no doubt that the WEPS pastes are of their advertised grits, Ken Schwartz and HA products have more concentration of abrasives, which enables them to cut faster regardless of the medium.
3. Polishing and sharpening are two different animals. Sharpening employs the use of scratches, polishing works to minimize them, hence the various concentrations of abrasive in different polishing compounds for the different markets (an area where Mark’s blog is currently venturing). For example, jewelers rouge is not as concentrated as Ken’s CBN because you want to preserve the precious materials on jewelry by making a uniformly smooth surface, not to establish a plane of perfectly aligned scratches that resemble North Korean Soldiers. The Dovo paste is not an aggressive/hard abrasive because you don’t want it to quickly abrade through the very thin edge of the edge of a razor. Abrasive concentration also heavily influences the price, which should go without say about now.
Overall, I’m beginning to conclude that what I thought before has become an even stronger argument – and that is to progress as far as you can with stones and then use the pastes/sprays to “polish the grooves” the last stone’s scratches rather than to attempt to establish a “true” grit edge with them.
04/07/2012 at 9:41 pm #2573Bottom line is if we are seeing metal come off of the blade there is some amount of abrasion going on.
I wonder if perhaps the equipment that we are using to photograph the steel is just not enough to pick up visual evidence of what is really happening.
I think Clay said at one point that his Dino at 400X only had resolution that was in excess of 1.5 microns per pixel. Mark, your at 250X has to have even less resolution. Between that and the problems that we all have getting the lighting just right, maybe you just can’t see what is really happening. Of course, you should be able to see 14 micron scratches wso we can probably deduce from the fact that you do not that the scratches are smaller than 14 microns, maybe smaller that the 2.5 or so micron resolution that your shstem can probaly detect, but there is direct evidence on the paddles that abrasion is happening. That metal is coming from somewhere… Perhaps we just need an SEM at 2000X or better to really see what is happening.
Good questions about the limitations we face with our equipment, Philip.
But to prevent any misunderstandings: I am not saying the Wicked Edge pastes or the Dovo green paste are not abrasive. My strops get dark from steel filings as well. It is not a matter of either abrasion or burnishing, it is a matter of both. The stropping compounds just vary in the amount of abrasion and the amount of burnishing they cause.
I have slightly edited my post on the Dovo paste to reflect this. It was certainly not my intention to suggest this paste doesn’t do anything at all.
Then the microscope. My Veho microscope is advertised to have a 400x magnification and a 2MP CMOS lens. But I don’t know what 400x means; I can get a much higher magnification simply by using a bigger monitor. And the 2MP figure is obtained by interpolation, so that is only useful for marketing purposes.
I take pictures at a resolution of 1280×960 pixels. At the “400x†level, I then see a piece of the edge of about 0.9 mm. That means each pixel represents about 0.9 mm / 1280 pixels = 0.0007 mm or 0.7 mu. However, it appears to me that the optical resolution is about two pixels, so the smallest spots I can see are about 1.4 mu. (That means the microscope has an optical resolution of 640×480, i.e. 0.3MP. This is quite low, even for a cheap microscope, but since we are looking for the limitations, let’s assume this is the actual resolution.)
Fortunately we are not looking at small spots, but at tiny scratches which usually have a similar size and are quite evenly spaced. And fortunately the human eye and brain are very good at distinguishing patterns, both the collection of dots that together represent a scratch, as well as the collection of scratches produced by a stone or strop that abrade an edge. So in practice we can seen scratches much smaller than 1.4 mu. I am impressed with the pictures Clay has posted of 0.5 micron scratches (or better: scratches caused by 0.5 micron diamond particles; the scratches are probably smaller). But yes, when things get even smaller we’ll eventually run into the limitations of the resolution of the microscope.
A more serious limitation I’ve run into already at the level of 3 mu scratches (or so) is caused by the lighting. Sometimes the angle between the microscope and the edge of a blade is such that the scratches don’t reflect the light enough. That simply means the scratches hardly or not show up at the pictures. The good news is that I can recognize the situations at risk quite well. They are the pictures in which scratches seem rather shallow, light is reflected in all directions and the pictures are generally grey or have a lot of spots of quite different shades of grey close to each other. The bad news is that I cannot always prevent it. I still have to experiment more with the microscope.
That is one reason why it is important that experiments are repeated, preferably by different people who have different equipment.
A third problem is that of contamination. Cross-contamination between strops is often mentioned. But quite often you simply don’t know where the contamination came from. I have stropped with clean strops that came straight from th plastic and already caused some scratches.
So if anyone has got a cleanroom and a scanning electron microscope up for grabs… 😉
Molecule Polishing: my blog about sharpening with the Wicked Edge
04/07/2012 at 9:46 pm #2574We’re finally getting some where with the images. Below are two pictures; the first is of the edge after 1000 strokes with the .5um spray and pasted diamond and leather strops, the second is of the edge after 100 strokes with the 1um spray and pasted diamond and leather strops.

These are the first really good photographs of the effects of 1 micron and 0.5 micron compounds I have seen in my life. Great!
The research program you’re carrying out with an external institution sounds interesting. Would you care to tell us a little more about it, Clay?
Molecule Polishing: my blog about sharpening with the Wicked Edge
04/08/2012 at 12:15 am #2575An excellent thread, my friends!!! :woohoo:
Welcome back, Tom! Work even continues when the master is not looking B).
Overall, I’m beginning to conclude that what I thought before has become an even stronger argument – and that is to progress as far as you can with stones and then use the pastes/sprays to “polish the grooves” the last stone’s scratches rather than to attempt to establish a “true” grit edge with them.
I think you are largely right with your “I told you so” :cheer:. However, I’ve got two questions/reservations.
First, the burnishing/polishing occurred only (at least visibly) with the Wicked Edge pastes. My gut feeling says (and maybe Clay’s pictures show) that this is not the case for Ken’s and HA’s particles in spray. If these spray are diamond or CBN particles in water or a similar liquid, I don´t think they burnish well. (I experimented with water on a leather strop, but it didn’t make the leather the slightest bit more sticky.) Clay’s pictures show that these particles do cause scratches and abrade.
My other big question is what burnishing the edge, or polishing the grooves, does to the edge of the edge. You wrote that when we polish the grooves after, say, the 1000 grit or 1600 grit stones, we get a toothy, yet clean edge. But couldn’t it be that the burnishing also removes (or at least polishes) the teeth at the edge of the edge? After all, the edge of the edge is part of the edge, isn’t it?
This is also why I asked Clay whether he had done any cutting tests. If the burnishing removes/polishes the teeth, it should result in a very good edge for push cutting. If it doesn’t, we would indeed have a more toothy edge that is more suitable for slicing.
Molecule Polishing: my blog about sharpening with the Wicked Edge
04/08/2012 at 12:25 am #2576An excellent thread, my friends!!! :woohoo:
Welcome back, Tom! Work even continues when the master is not looking B).
Overall, I’m beginning to conclude that what I thought before has become an even stronger argument – and that is to progress as far as you can with stones and then use the pastes/sprays to “polish the grooves” the last stone’s scratches rather than to attempt to establish a “true” grit edge with them.
I think you are largely right with your “I told you so” :cheer:. However, I’ve got two questions/reservations.
First, the burnishing/polishing occurred only (at least visibly) with the Wicked Edge pastes. My gut feeling says (and maybe Clay’s pictures show) that this is not the case for Ken’s and HA’s particles in spray. If these spray are diamond or CBN particles in water or a similar liquid, I don´t think they burnish well. (I experimented with water on a leather strop, but it didn’t make the leather the slightest bit more sticky.) Clay’s pictures show that these particles do cause scratches and abrade.
My other big question is what burnishing the edge, or polishing the grooves, does to the edge of the edge. You wrote that when we polish the grooves after, say, the 1000 grit or 1600 grit stones, we get a toothy, yet clean edge. But couldn’t it be that the burnishing also removes (or at least polishes) the teeth at the edge of the edge? After all, the edge of the edge is part of the edge, isn’t it?
This is also why I asked Clay whether he had done any cutting tests. If the burnishing removes/polishes the teeth, it should result in a very good edge for push cutting. If it doesn’t, we would indeed have a more toothy edge that is more suitable for slicing.[/quote]
My everyday experience with knives heavily stropped with the different compounds is about what you’d expect: the very edge also gets super polished and with thicker blades and/or wider angles loses effectiveness for slice cutting. So far we’ve just been trying to look at abrasion patterns of the various media, next week I’ll start imaging the actual edge to examine the effects of the various particles.
*As a side note, one think I like to do with a lot of my knives is t thin and polish the shoulders of the blade and then add a slightly toothy micro-bevel a few degrees wider.
-Clay
04/08/2012 at 3:22 am #2577From a previous post of mine.. ”
John D. Verhoeven. Emeritus Professor. Department of Materials Science and Engineering. Iowa State University states two important frames of reference for his definition of a sharp edge in any discussion of knife sharpening systems….(edit for brevity..) he mentions his set of “standards of comparing blades sharpened (in his study)†to the following metrics: 1.) edge width 2.) straightness along the edge 3.) smoothness of the face surface. “From Mark76 …” My other big question is what burnishing the edge, or polishing the grooves, does to the edge of the edge. You wrote that when we polish the grooves after, say, the 1000 grit or 1600 grit stones, we get a toothy, yet clean edge. But couldn’t it be that the burnishing also removes (or at least polishes) the teeth at the edge of the edge? After all, the edge of the edge is part of the edge, isn’t it?”
From Clay… ” So far we’ve just been trying to look at abrasion patterns of the various media, next week I’ll start imaging the actual edge to examine the effects of the various particles.”
Great news! I have been waiting for this discussion to migrate from the ‘sides’ to the ‘end’ of the edge’ Notice that the good professor lists ‘edge width’ then ‘straightness of that edge’ then smoothness or burnish or polish or call it want you will as the last factor.. I assume that he knew of what he speaks. For very critical blade use the edge width is probably the most important factor in true sharpness. It is well known that the sharpest of surgical scalpels (made from obsidian) are in some cases *one* molecule wide !
So it will be great to see your photographs and measurement of width and how you achieve the narrowest widths with the WEPS.
04/08/2012 at 9:02 pm #2581First, the burnishing/polishing occurred only (at least visibly) with the Wicked Edge pastes. My gut feeling says (and maybe Clay’s pictures show) that this is not the case for Ken’s and HA’s particles in spray. If these spray are diamond or CBN particles in water or a similar liquid, I don´t think they burnish well. (I experimented with water on a leather strop, but it didn’t make the leather the slightest bit more sticky.) Clay’s pictures show that these particles do cause scratches and abrade.
There was definite proof that HA and Ken Schwartz sprays cut more than the pastes – Clay’s adding the 1 micron diamond spray to the 1 micron paste showed how much more action the strop had and how uniform the resulting scratches were. This is directly related to the concentration of the abrasive particles, and not so much as to the type of medium they are suspended in/on (although the suspending mediums can influence overall effects – but that’s not a factor in this case).
My other big question is what burnishing the edge, or polishing the grooves, does to the edge of the edge. You wrote that when we polish the grooves after, say, the 1000 grit or 1600 grit stones, we get a toothy, yet clean edge. But couldn’t it be that the burnishing also removes (or at least polishes) the teeth at the edge of the edge? After all, the edge of the edge is part of the edge, isn’t it?
Let’s limit this to the 1K diamond -> WEPS Paste argument first. For the most part, the depth of the 1K scratches combined with the lesser concentration of abrasive will polish the grooves, leaving the 1K scratches very clean, and what is essentially a polished 1K serration at the edge of the edge. To some degree, there will be abrasion/scratches at at the edge of the edge from the paste, but it won’t necessarily reflect a “true” Paste grit edge. I’ll get to this more in the next section.
As we have seen, coming off the ceramics to the pasts is much easier leap because the depth of the diamond scratches has been reduced by the ceramics, paving the way, so to speak, for the less intrusive pastes.
Overall, I think abrasive concentration is the most obvious influencing factor.
This is also why I asked Clay whether he had done any cutting tests. If the burnishing removes/polishes the teeth, it should result in a very good edge for push cutting. If it doesn’t, we would indeed have a more toothy edge that is more suitable for slicing.
The polishing of the grooves allows for a smoother “feeling” cut, even though the edge is rather toothy. If I took a WEPS 200 Diamond edge and stropped it with the 3.5 micron paste, it would cut much more smoothly than just the 200 diamond edge. It would still be ripping, but there would be no burr or hanging metal pieces to catch the paper as it is test cut. With there being some abrasion from the 3.5 at the edge of the edge, you could push cut. However, this doesn’t feel even remotely the same as taking a “true” 3.5 micron edge.
Great news! I have been waiting for this discussion to migrate from the ‘sides’ to the ‘end’ of the edge’ Notice that the good professor lists ‘edge width’ then ‘straightness of that edge’ then smoothness or burnish or polish or call it want you will as the last factor.. I assume that he knew of what he speaks. For very critical blade use the edge width is probably the most important factor in true sharpness. It is well known that the sharpest of surgical scalpels (made from obsidian) are in some cases *one* molecule wide !
To continue with the polishing of the grooves effect and the “true” edge, we must look at edge thickness. The general rule is that as you get more refined, the edge becomes thinner. This is not always the case, as we can now discuss.
The aim of sharpening is to reduce the width at the tip of a triangle (the edge of the edge) to approach 0 width. Lets say we use a 16 micron diamond plate. In theory, the thinnest the width of the edge can be is ~16 microns wide. This is because the scratches in the bevel will theoretically be 16 microns deep, and if the edge of the edge is thinner than 16 microns, the abrasive will cut through to the other side. This is what causes the serrated-like edges at coarser grit stones.
Following this line of thinking, if you scratch the depth of each grit, then a 2 micron stone (8K) will create an edge width that is 2 microns wide. This is regardless of the edge geometry. If we listen to Prof. Verhoeven, the optimal thickness of an edge is about 2 microns wide (IIRC), which happens to be 8K. Anything past that, and is argued that the edge becomes less stable, which I agree with.
For a “true” finish, you have to establish those corresponding scratch depths on the bevel, thus creating the complimentary edge width. So, a true .25 micron edge is theoretically .25 microns wide at the edge of the edge.
This is a different approach to the polishing of the grooves. Let’s divide this up to two things – the larger scratches are the “host” scratches, and the smaller scratches that polish are the “guest” scratches. If the “host” scratches are 16 microns deep, then the edge width should theoretically be 16 microns wide, with a serrated edge. When you add the “guest” scratches, let’s say .25 micron for a major difference, they will get into the peaks and valleys of the serrations and scratches, making them smoother, and taking away some of the width of the edge of the edge by adding 64 tiny scratches (16 divided by .25) within each 16 micron scratch, but not making the edge .25 microns wide.
Both approaches have advantages and disadvantages – the “true” edges have the advantage of being able to slice/push cut more easily, although they become more fragile and more prone to rolling at the finer grits. The polished grooves leave an edge much thicker and therefore more durable, but at higher grits, there is instability caused by the “host” scratches which leads to an edge chipping out.
The fun in this game is knowing when and where to employ both methods. As I’ve stated earlier, I generally sharpen to 1 micron, then polish the grooves with remaining finer grits. However, if you are sharpening a knife not worthy of such refinement, then a 8 micron wide edge with a 1 micron polishing of the grooves will serve the owner well.
04/10/2012 at 2:04 am #2604Thanks a lot, Tom! Of course stones work like that! I should have made that up myself, but somehow I didn’t. (Which reminds me of a quote of my old professor, who said that the best articles are the ones that seem so simple you wonder why they were written.)
With your explanation of host and guest scratches, I think I can also make a bit more sense of some stropping spray progressions I read about on your blog. (But only a bit :-).) For example, you stropped your Spyderco Military with 0.25 micron spray and then with 0.05 micron spray. It seems the difference between 0.25 and 0.05 (factor 5) is too much to be able to wipe out the 0.25 scratches. Did you try to create 0.05 micron guest scratches on top of 0.25 micron host scratches?
If so, I understand that makes the edge sharper. However, wouldn’t the edge get even sharper if you did try to wipe out some of the 0.25 micron scratches, for example with 0.125 micron spray, then 1 and then 0.05 micron spray? Or do things work differently in the submicron rabbit hole?
Molecule Polishing: my blog about sharpening with the Wicked Edge
04/10/2012 at 2:44 am #2605The biggest challenge is examining the effects of those finer grits because our imaging doesn’t get that fine. If we can get to >1000x we might be able to do a little better. If we’re trying to get below .1 microns, then we’re going to need access to much better imagining…. I’ll post some pics a little later this morning of the edge with a variety of grits.
Thanks a lot, Tom! Of course stones work like that! I should have made that up myself, but somehow I didn’t. (Which reminds me of a quote of my old professor, who said that the best articles are the ones that seem so simple you wonder why they were written.)
With your explanation of host and guest scratches, I think I can also make a bit more sense of some stropping spray progressions I read about on your blog. (But only a bit :-).) For example, you stropped your Spyderco Military with 0.25 micron spray and then with 0.05 micron spray. It seems the difference between 0.25 and 0.05 (factor 5) is too much to be able to wipe out the 0.25 scratches. Did you try to create 0.05 micron guest scratches on top of 0.25 micron host scratches?
If so, I understand that makes the edge sharper. However, wouldn’t the edge get even sharper if you did try to wipe out some of the 0.25 micron scratches, for example with 0.125 micron spray, then 1 and then 0.05 micron spray? Or do things work differently in the submicron rabbit hole?
-Clay
04/10/2012 at 3:00 am #2606The biggest challenge is examining the effects of those finer grits because our imaging doesn’t get that fine. If we can get to >1000x we might be able to do a little better. If we’re trying to get below .1 microns, then we’re going to need access to much better imagining….
Very true. However, if it works (I assume Tom and others do sensible things), it’d be interesting to know how it works at least in theory.
Molecule Polishing: my blog about sharpening with the Wicked Edge
04/10/2012 at 10:36 am #2611It’s true – I really can’t determine much of a scratch pattern past 30K or .5 microns on any of the equipment I have.
However, the edge of the edge starts to really become a point, and if you do too much, you begin to see the edge of the edge begin to fray from structurally being too thin.
04/11/2012 at 5:58 am #2625It’s true – I really can’t determine much of a scratch pattern past 30K or .5 microns on any of the equipment I have.
👿
OK, then I’ll stay in the area of multiple microns :cheer:.
I made a new blog post, on stropping with the 14 micron paste after the 1600 grit stones. With today’s knowledge the results won’t surprise: it works beautifully. However, two weeks ago, I would be baffled.
And even now I am surprised by how effective the paste is. Only 50 strokes were required to obtain a very smooth edge. The 200 more I did were really not necessary.
Molecule Polishing: my blog about sharpening with the Wicked Edge
-
AuthorPosts
- You must be logged in to reply to this topic.