A theory of how the WE diamond pastes work
Recent › Forums › Main Forum › Stropping › A theory of how the WE diamond pastes work
- This topic has 162 replies, 16 voices, and was last updated 04/09/2013 at 3:05 pm by
Jacob Wilson.
-
AuthorPosts
-
04/05/2012 at 6:52 am #2517
I thought I’d go for something completely different.
So yesterday I did some stropping with a stropping paste from Dovo, a German company that makes straight razors. It is probably the most used stropping paste where I live. (Yes, next to Germany.) I went for the “green paste”, since it is the coarsest stropping compound they offer, which should leave most traces. It supposedly contains 5-8 micron chromium oxide.
I wanted to know whether it worked like the Wicked Edge pastes, with a lot of burnishing. And I wondered whether it would be more abrasive than the Wicked Edge pastes, leaving wider scratches. Perhaps of a 5-8 micron size or a little lower?
I can reveal already that the Dovo paste hardly (or not at all) burnishes. And for abrasion… well, read my blog[/url] :cheer:.
I am happy with my Wicked Edge pastes.
Molecule Polishing: my blog about sharpening with the Wicked Edge
04/05/2012 at 6:57 am #2518I did another 100 strokes with the 1 micron strops after the spray had dried. The stiction returned and the surface smoothed out immediately. I believe that once the spray dried, burnishing resumed and abrasion was minimized.
That is an interesting observation! The diamonds in the paste were also very good at hiding. What is that paste doing?
Makes me think of that old joke of two diamonds in a jewellery shop when two rich ladies come in. The diamonds immediately hide in some stropping compound… :cheer:
I am still interested in why you thought the results of the tapes were not overwhelming, Clay. It was my impression they resulted in a pretty even scratch pattern (in your second series of photographs) resembling that made by a stone.
Molecule Polishing: my blog about sharpening with the Wicked Edge
04/05/2012 at 7:00 am #2519I did another 100 strokes with the 1 micron strops after the spray had dried. The stiction returned and the surface smoothed out immediately. I believe that once the spray dried, burnishing resumed and abrasion was minimized.
That is an interesting observation! The diamonds in the paste were also very good at hiding. What is that paste doing?
Makes me think of that old joke of two diamonds in a jewellery shop when two rich ladies come in. The diamonds immediately hide in some stropping compound… :cheer:
I am still interested in why you thought the results of the tapes were not overwhelming, Clay. It was my impression they resulted in a pretty even scratch pattern (in your second series of photographs) resembling that made by a stone.[/quote]
I think we were looking at it differently – you were looking for scratches and I was looking for smoothness! 🙂 Now that I understand a little better, I’d agree that the edge does look good in terms of a nice, even and well distributed scratch pattern.
-Clay
04/05/2012 at 7:12 am #2520Nice write up on your blog. Thanks for making that test.
-Clay
04/06/2012 at 7:53 am #2549Clay, some of the edges you’ve posted photographs of are among the smoothest I’ve ever seen. Have you ever done any cutting test with them? My thoughts are that they should be very good in push cutting, but I don’t know exactly what this smoothing does to the edge of the edge?
Molecule Polishing: my blog about sharpening with the Wicked Edge
04/06/2012 at 10:20 am #2550Awesome info Clay. Given these findings, I wonder if you have any tips to simplify my sharpening regimen?
Currently (mostly sharpening stainless such as VG-10, CPM 154, S30V, ZDP189, S90V, etc), I am coming off the 1000 grit, through both ceramics, and then onto 5u, 3.5u, 1u leather strops. I often finish with some clean paddles that have just a touch (looks like regular leather with a couple of diagonal crayon marks on it) iron oxide jewelers rouge which seems to increase the polish . I should probably stop doing that last step, I may be imagining the benefit.
Is there a step or two I could reduce? Maybe coming off the ceramics and just doing 3.5 and 1 u? I am doing about 150 strokes on each side.
I’m not looking for mirror perfection, All of my blades are users, but I do like a wicked edge 😉
04/06/2012 at 11:33 am #2551Clay, some of the edges you’ve posted photographs of are among the smoothest I’ve ever seen. Have you ever done any cutting test with them? My thoughts are that they should be very good in push cutting, but I don’t know exactly what this smoothing does to the edge of the edge?
Hey Mark, thanks for asking. I do a lot of cutting with all my knives and I’ve mostly found out that a lot of the common thinking about polish vs. teeth is essentially correct. As Ken said it so well, geometry and finish work together to create cutting performance and I try to evaluate both factors while keeping in mind the kind of steel I’m using and the kinds of material I’ll be cutting. If the blade has great steel and a narrow profile, then a polished edge will go through most anything but may not be desirable if your cutting really hard materials. If the blade is thicker and you’re cutting tough materials, a little more tooth is good and so on….
-Clay
04/06/2012 at 5:02 pm #2552Awesome info Clay. Given these findings, I wonder if you have any tips to simplify my sharpening regimen?
Currently (mostly sharpening stainless such as VG-10, CPM 154, S30V, ZDP189, S90V, etc), I am coming off the 1000 grit, through both ceramics, and then onto 5u, 3.5u, 1u leather strops.
Hi DSchur, very good question! I’m also curious as to what Clay would recommend. I have been doing some experiments as well and find that my results are quite different from what I expected.
What I expected was that the 14 micron paste would leave scratches of around 14 micron in width and depth (or a little less, for example about half of it, since only a part of every diamond particle scratches the edge), that 5 micron paste would leave 5 micron scratches, etc. That would make sense of your progression and based on micron size that progression could definitely be recommended.
As I said, my results were different from what I expected: 14 micron paste does not leave scratches anywhere near 14 (or 7) microns, not does 10 micron paste leave 10 micron scratches, etc. I haven’t measured them yet, but I would guess each of the pastes leave scratches that are around 1 – 3 micron in width. Still, I would recommend the progression you use, since it works well.
Why? The Wicked Edge pastes have a very strong burnishing power. By stropping with these pastes you essentially polish the edge, you smoothen out existing scratches, but make only very tiny new scratches. My experiences are that after 50-500 stropping strokes (depends a little what grit size stone you finish with, I think that after 1600 grit 150 stokes are fine) you get a very smooth edge.
Is there a step or two I could reduce? Maybe coming off the ceramics and just doing 3.5 and 1 u? I am doing about 150 strokes on each side.
Well… I think you might be able to. In fact, my gut feeling is (but I have not done any experiments to confirm it) that all of the WE pastes, from 14 micron to 3.5 micron (I don’t have the 1 micron and 0.5 micron pastes) have about the same abrasive power: the scratches the 14 micron paste leaves do not seem (much) wider than the scratches the 3.5 micron paste leaves. And all pastes have a comparable burnishing power.
So what I think is that 100 strops with 14 micron paste, followed by 100 strops with 5 micron paste, followed by 100 strops with 3.5 micron paste will work about as well as 300 strokes with the 3.5 micron paste. In fact, this latter exercise might work about as well as 300 strokes with the 14 micron paste.
I often finish with some clean paddles that have just a touch (looks like regular leather with a couple of diagonal crayon marks on it) iron oxide jewelers rouge which seems to increase the polish . I should probably stop doing that last step, I may be imagining the benefit.
When I started doing my research on stropping compounds I was surprised by all sorts of things people strop with: from cigarette ash to newspaper ink. And I’d say: if it works for you, do it. But if we do not know what the active ingredient of the stropping compound is and what its effects are on the edge of the blade, it is very hard to give general recommendations on their use. I just googled iron oxide and found particle sizes ranging from 0.1 micron to 500 micron…
Success!
Molecule Polishing: my blog about sharpening with the Wicked Edge
04/06/2012 at 11:20 pm #2553I am curious. I have paddles with the 5 and 3.5 micron paste from WE. I als use a set of paddles with 1 micron paste from DMT and .25 micron diamond slurry from US Products (listed as “heavy” diamond concentration). When I use the strops I can tell that they all are removing metal, if nothing else by the gray or black streaks that are left on them after sharpening.
I had an interesting conversation with Ken Schwartz the other day about his .1 micron CBN. He said he can strop with his nano cloth with nothing on it for long periods and get no coloring on the cloth at all. After applying the .1 micron CBN and stropping just a few strokes, he gets streaks of metal particles. Ken is almost a fanatic about knowing what is in his compounds and the precise amount of material in the mix. So we can assume that .1 micron CBN on a non abrasive substrate is in fact removing metal. I can’t visualize any way that this would happen other than micro scratching.
Bottom line is if we are seeing metal come off of the blade there is some amount of abrasion going on.I wonder if perhaps the equipment that we are using to photograph the steel is just not enough to pick up visual evidence of what is really happening.
I think Clay said at one point that his Dino at 400X only had resolution that was in excess of 1.5 microns per pixel. Mark, your at 250X has to have even less resolution. Between that and the problems that we all have getting the lighting just right, maybe you just can’t see what is really happening. Of course, you should be able to see 14 micron scratches wso we can probably deduce from the fact that you do not that the scratches are smaller than 14 microns, maybe smaller that the 2.5 or so micron resolution that your shstem can probaly detect, but there is direct evidence on the paddles that abrasion is happening. That metal is coming from somewhere… Perhaps we just need an SEM at 2000X or better to really see what is happening.
I ordered some of the 1, 0.5, and 0.1 micron CBN from Ken. I will be interesred to see what is does. Will I be able to see removed metal particles on my paddles, will I be able to see scratches with my Veho at 400X, will it make my edges better? I will let you folks know when I do.
Phil
04/07/2012 at 12:22 am #2554Here is a post from another topic that shows the different grits really well. I started with a very smooth bevel and then worked backwards and forwards, hoping we could see a clear difference in grits: Stock stone/strop progression. I also alternated stroke directions so we could really see the difference.
-Clay
04/07/2012 at 12:42 am #2555I think Clay said at one point that his Dino at 400X only had resolution that was in excess of 1.5 microns per pixel. Mark, your at 250X has to have even less resolution. Between that and the problems that we all have getting the lighting just right, maybe you just can’t see what is really happening. Of course, you should be able to see 14 micron scratches wso we can probably deduce from the fact that you do not that the scratches are smaller than 14 microns, maybe smaller that the 2.5 or so micron resolution that your shstem can probaly detect, but there is direct evidence on the paddles that abrasion is happening. That metal is coming from somewhere… Perhaps we just need an SEM at 2000X or better to really see what is happening.
Phil
I just re-checked the specs on both my scopes. The images from the Dino-Lite AD-413ZT are at 230x with a micron/pixel ratio of 1.76um/pixel. The images from the AM-413T5 are at 510x with a micron/pixel ratio of .78um/pixel, so in theory, we should be able to see the 1 micron scratches easily.
-Clay
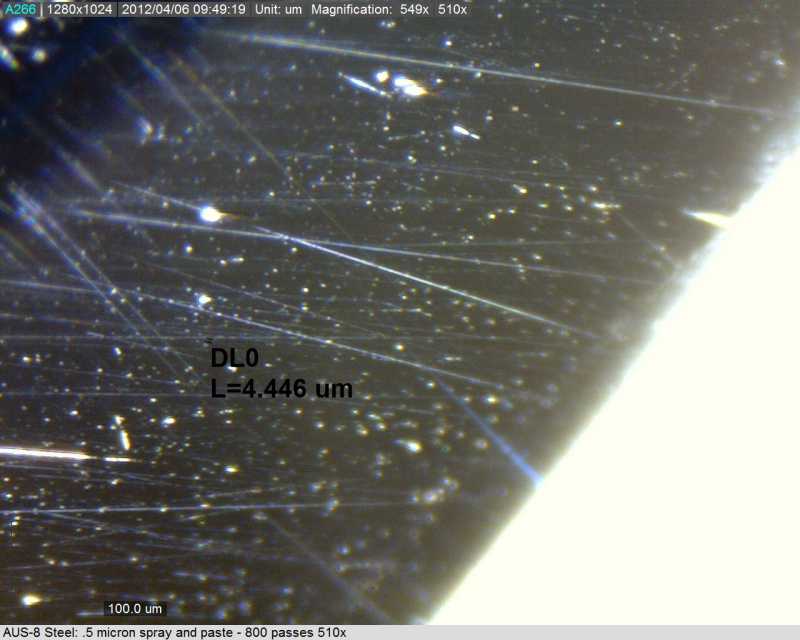
04/07/2012 at 1:56 am #2557I changed things up a little with my scope and I think this following image will help:
The above image was taken with the Dino-Lite AM-413T5 at 510x and we should be seeing a micron:pixel ratio of .78um:1px. I completed 800 strokes with a set of stops loaded with WE .5um paste and HA .5um spray. I added the spray to the strops to reduce the stiction (and therefore burnishing) in hopes of getting more visible abrasion. Looking at the scale and the finest of scratches, it’s pretty easy to imagine getting 4-8 of those scratches inside the scale. I’ll do another 200 strokes with the .5um strops and then move back to the 1um strops.
I realized after posting this that the scale is too small to see on the image as is. I uploaded the image to my blog where we can see it at its full size: 1/2 Micron – 800 Strokes – 510x
Attachments:-Clay
04/07/2012 at 1:58 am #2558From “1 micron diamond and top grain leather strops (Wicked Edge paste)” that photo it does show scratches at the 1 micron level and with the alternating strokes even at the .5 micron level. I think those were taken with the Dino at 230X (??).
I guess that my thought was simply that is were are removing metal as evidenced by the particles on the strop, there must be abrasion going on, not simply burnishing.
Burnishing is another thing that I want to learn more about. The definition is the smearing of a material when enough force is applied to exceed the material’s yeild strength. I wonder how we do that with hardened steel and force being applied by relatively soft leather. I could see that possibly enough force may be applied on a very small scale by the tips of the abrasives to deform or smear the steel, but then we should see no burnishing from plain leather. The razor guys swear that stopping on clean leather smooths out (burnishes) an edge. In fact I have seen evidence or burnishing from a clean leather belt used on a belt grinder. The edge definitely gets polished.
Lots to think about!
Phil
04/07/2012 at 2:24 am #2559I guess that my thought was simply that is were are removing metal as evidenced by the particles on the strop, there must be abrasion going on, not simply burnishing.
I agree completely that if we’re seeing metal on the strop, then we are getting abrasion.
Burnishing is another thing that I want to learn more about. The definition is the smearing of a material when enough force is applied to exceed the material’s yeild strength. I wonder how we do that with hardened steel and force being applied by relatively soft leather. I could see that possibly enough force may be applied on a very small scale by the tips of the abrasives to deform or smear the steel, but then we should see no burnishing from plain leather. The razor guys swear that stopping on clean leather smooths out (burnishes) an edge. In fact I have seen evidence or burnishing from a clean leather belt used on a belt grinder. The edge definitely gets polished.
I agree with you here too – burnishing by definition seems to require a lot of force, much more than we’d expect from the leather alone. This is a topic I’m exploring with Sandia Natl Labs right now, trying to learn how it is that we accomplish the burnishing effect. I’m hoping we’ll be able to see at the molecular level what’s happening. My theory is that the ‘stiction’ applies enough local force at the minute scale to achieve the burnishing.
-Clay
04/07/2012 at 3:30 am #2561I tinkered some more with lighting and angle in the scope so we could see the scratches a little better. I also did another 200 strokes with the .5mu strops. The new image is posted on my blog so we can see it full size: 1/2 Micron – 1000 Strokes – 510x
-Clay
-
AuthorPosts
- You must be logged in to reply to this topic.