Hi and May God be with you in this Season of Joy.
I do believe this belongs in “advanced” so let me just jump right in…
How do you hold your Paddles when sharpening? and Why does it work?
The second question is really the significant one. And I’ve seen such great answers in this forum, I’m hoping for the best here. ![]() I’m unable to get consistent sharpness, and I believe this post explains why – and why I may need a new technique.
I’m unable to get consistent sharpness, and I believe this post explains why – and why I may need a new technique.
PRELIMS
I am not talking the obvious here: use the sharpie trick, measure your angles, get the precision kit, longer rods, stones may have different thicknesses, etc. Also, I have a higher accuracy inclinometer, with 0.05 degrees of error – compared to the 0.2 degrees of error in the Accuremote.
PROBLEM
I have struggled with uneven bevels for 2+ years of owning the WE. By uneven bevels, I mean that as I progress through my grit regimen, I can see that different grits have warn the bevel in different areas along the length of the blade (the edge itself is not warped). Even after I’ve set up to wipe the sharpie clean.
CAUSE
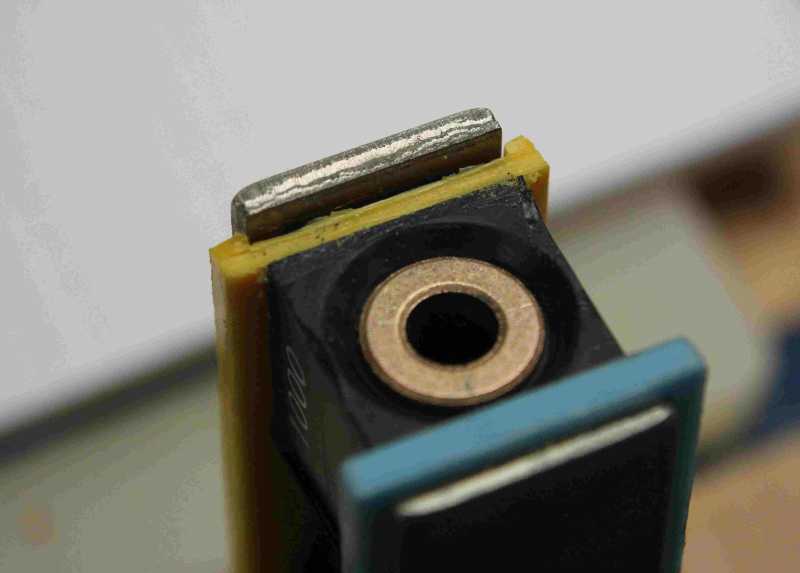
Given any set of my Paddles, the Bore Holes through the middle are always wider than the Guide Rods. This introduces “play” in the system. I followed the advice from an older (now forgotten) video/post which explained how to eliminate this play.
Basically, it’s a slight rotation of the hand while holding the Paddle. In my case, I put my index finger against the top of the Paddle and push it into the Guide Rod, while my thumb and pinkie pull the bottom away from the Rod. This eliminates all play, and keeps the Paddle at the same angle with the Guide Rod. I refer to this as the “push/pull” technique.
Unfortunately, I believe I have proven this technique is not only incorrect, it introduces error into the system. I felt illustrations would make things clearer. Image #1 and Image #4 are the important ones, #2 and #3 are just about being thorough.
IMAGES
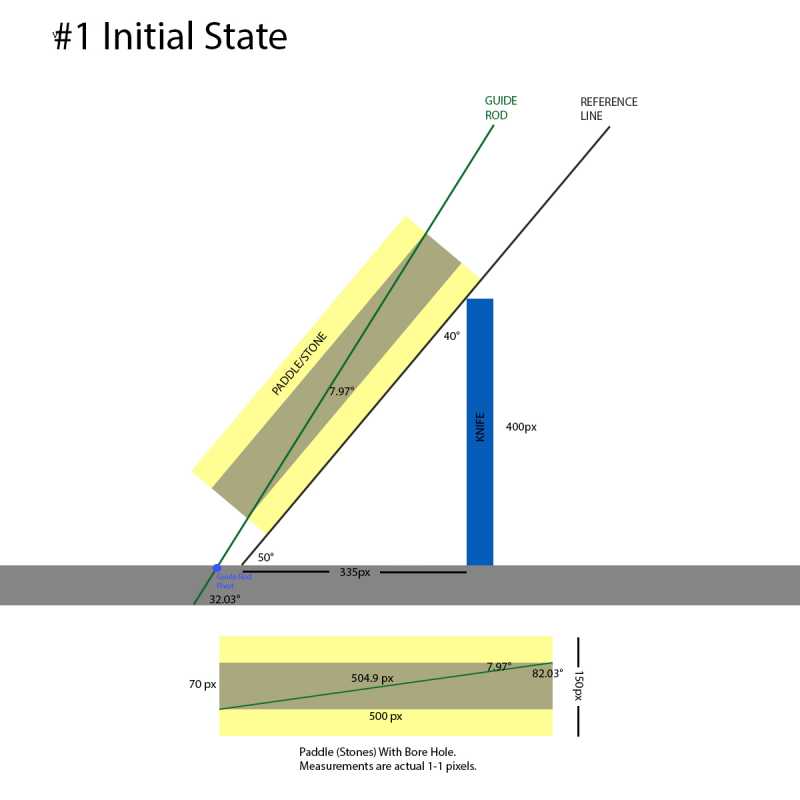
In the first image, the blue tower represents the Knife/Bevel; the yellow represents the Paddle/Stones; the grey in between represents the Bore Hole; and, the dark green represents the Guide Rod. Black lines serve as reference.
I used Photoshop to create these images, and I used both the angles it gave me, and I also used 1-1 pixel measurements to verify those angles with trigonometry. I suspect a 1 or 2 pixel error in places, but they won’t matter to the results.
The numbers in the diagrams are heavily exaggerated for illustration purposes, but accurate to the example. See my real measurements at the end.
IMAGE #1
At the bottom of the image, I drew the Paddle I used. In the image, the hypotenuse would actually be the Guide Rod.
In the main image, you can see the initial state of how I hold the Paddle. Notice how the Paddle rides against the Guide Rod at an angle of 7.97 degrees as I use the push/pull technique.
Here, I give the pixel-per-pixel measurements of the Paddle, and the calculated Guide Rod angle.
	Paddle:				500 px x 150 px
	Bore Hole:			500 px x 70 px
	Guide Rod against Paddle Bore:	7.97 degrees
	Note: Arc Tangent of 70 / 500 is 7.97 degrees
I keep the blue “knife” height constant throughout. The black Reference Line marks the point where Paddle/Stone would intersect the base at its given angle. These are important because they allow the trigonometric calculations of angles, even though Photoshop gives them.
	Height of the Knife:		400px
	Reference Line to Knife:	335px
As I run the Paddle up or down the bevel, I maintain that 7.97 degree angle using the push/pull technique. The Guide Rod pivots at a fixed point (circle shown in blue), so the Guide Rod can change angles relative to the base. All basic so far.
Here are my initial angles:
	Paddle relative to knife bevel:	40.00 degrees
	Paddle relative to base:	50.00 degrees
	Guide Rod relative to  base:	32.03 degrees
To sharpen, we absolutely want the Paddle to remain at 40 degrees against the bevel (or 50 degrees relative to the base), no matter how far up the Paddle has passed up the bevel.
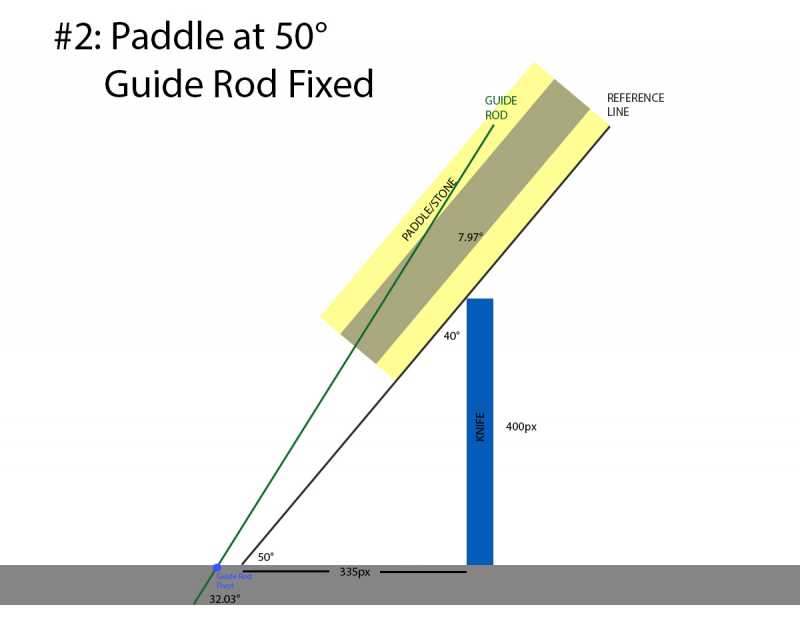
In Image #2, I demonstrate the first of 3 scenarios by simply shifting the Paddle upward, parallel to the 40 degree line, and moving nothing else.
IMAGE #2
Obviously an impossible situation, and you don’t want the Guide Rod ripping through your 10K Chosera!
Of course, by design, the Guide Rod pivots at its attachment point as you slide the Paddle. So here’s the next case with the Paddle still sliding at a fixed 40 degree angle with the Knife.
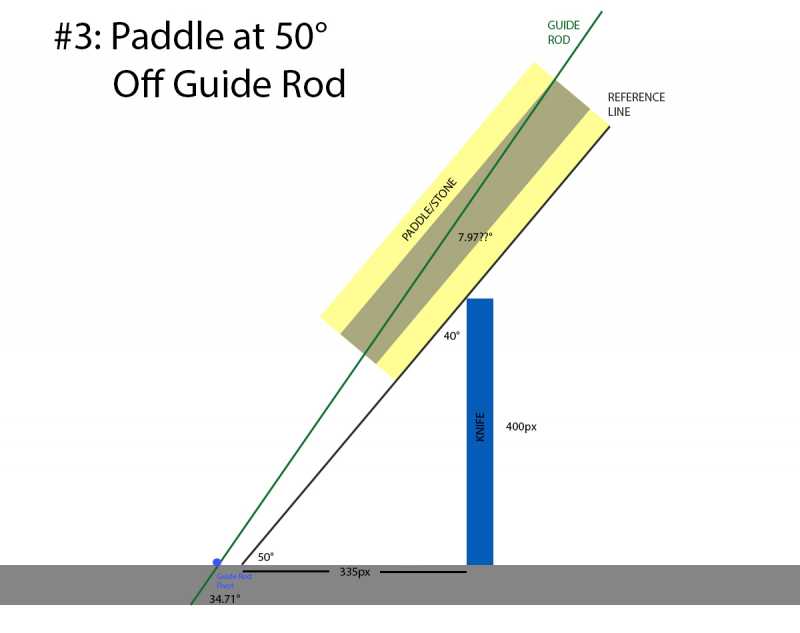
IMAGE #3
Not exactly impossible, but this defeats the purpose of the Guide Rods. Using the push/pull technique, I’d have to actually lower the bottom of the paddle away from Guide Rod in order to maintain that 40 degree angle.
CONCLUSION
What this means is that, with a size difference between the Bore Hole and the Guide Rod, you cannot keep your stone at the exact same angle against the bevel as you slide the Paddle up the knife.
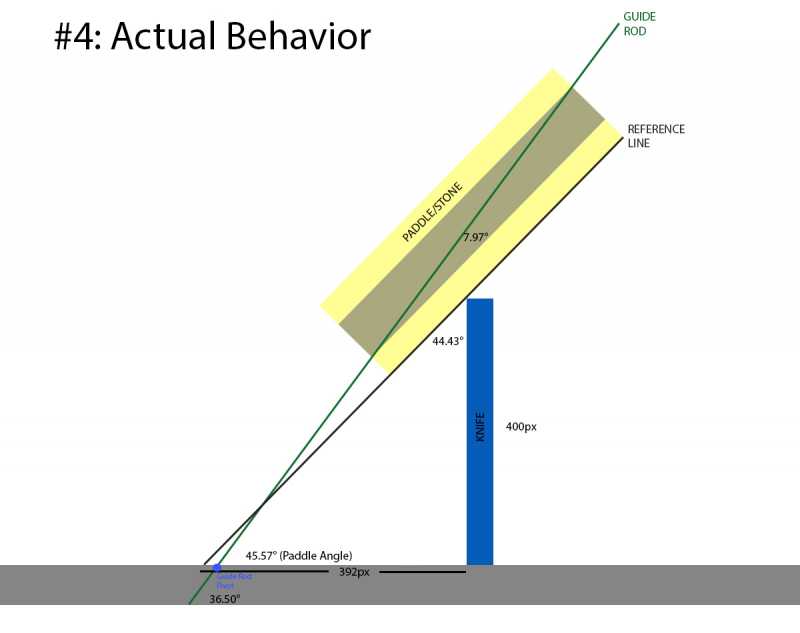
The final, and actual scenario.
IMAGE #4
	Guide Rod against Paddle Bore:	7.97 degrees
	Height of the Knife:		400px
	Reference Line to Knife:	393px

	ORIGINAL
	Paddle relative to knife bevel:	40.00 degrees
	Paddle relative to base:	50.00 degrees
	Guide Rod relative to  base:	32.03 degrees

	FINAL POSITION
	Paddle relative to knife bevel:	44.43 degrees
	Paddle relative to base:	45.57 degrees
	Guide Rod relative to base:	36.45 degrees
Using the push/pull technique, in order to maintain a constant 7.97 degree “lock,” the Guide Rod will have to pivot as you slide upward, and this in turn causes the Paddle/Stone to change the angle it contacts the Bevel as it passes.
In this example, the angle against the Bevel changed 4.43 degrees.
REAL WORLD EXAMPLES
Who believes Photoshop these days anyway? ![]()
Here are real-world measurements I took of three stones.
Angle Hi: With the Paddle at the lowest point on the Guide Rod, using the push/pull technique, I’m pushing on top, pulling on the bottom, creating a larger angle.
Angle Low: Paddle still at lowest point, but I push on bottom and pull back on the top.
Difference: The amount of play between the Guide Rod and Bore Hole.
Pass Bottom: Using push/pull, I measured this angle at the lowest point of the pass (ala Image #1)
Pass Top: Using push/pull, I measured at the highest point (per Image #4).
	Angle Hi / Low	Difference	Pass Bottom / Top	Difference

RED:	21.37 / 20.96	0.44		21.37 / 21.68		0.31

YELLOW:	21.43 / 21.14	0.29		21.41 / 21.68		0.27

Blue:	21.46 / 21.09	0.37		21.40 / 21.80		0.40
800
The two sets of differences should really match, but I’m not able to pass the Paddle 100% of the way up the Guide Rod, plus there’s the 0.05 degree error of my inclinometer. I’m still left to conclude that the push/pull technique does not work, in a bad way!
So back to my original questions: How do you hold your Paddles? And why does it work?
-Pie
