I’m challenged by the depth of the math – reawakening old math memory cells I haven’t used in awhile.
That being said, I’ve got a VG-10 Shun in my WE vise right now…
Excellent, heady stuff.
I’m challenged by the depth of the math – reawakening old math memory cells I haven’t used in awhile.
That being said, I’ve got a VG-10 Shun in my WE vise right now…
Excellent, heady stuff.
Yes, and most people say the opposite. Here is why it is wrong :

These two crudely drawn triangles reflect a very low edge angle and a very high edge angle. Note the red lines represent the same thickness of a worn apex. The thickness of the apex is a very strong influence on the sharpness (it isn’t the only thing, but it is a heavy factor).
Which one do you think will happen sooner, which knife will reach the red line faster, the one on the left with the very low angle or the one on the right with the very high angle?
–
Now there is where you might jump to “Hey, doesn’t this just say we should sharpen at zero degrees for ultimate performance - that is obviously wrong.”
Yes, this is true, the relationship in the above graph will not just continue beyond 13 dps in a straight line, at some point a very dramatic change will be made and the performance will decrease rapidly and at some further point the edge retention will fall to zero. This happens because at some point the micro-bevel will be so low that the apex is no longer strong and/or durable enough and it will just grossly deform/fracture. The trick then is to find the lowest angle this doesn’t happen as that give the optimal performance. This will depend on the steel, the material being cut and operator skill/experience.
–
As a bit of math, the reason this happens is because the edge retention behavior in total has not only the affect I have noted in the above which is just a linear relationship it also includes step functions on strength and toughness. Step functions are particular functions because the basically do nothing until a certain limit is reached but at that point they can cause dramatic effects. The math is a bit wonky as step functions are written similar to this for the effect of angle on the stiffness of the edge which is related to it deforming to failure :
s(x) = (1 if x > Ao; 1/x^3 for X < Ao; 0 for x < Ac)
Thus the edge retention would be written as :
E(x) = l(x) * s(x)
Where l(x) is that linear equation and s(x) is the step function. This jibberish translates to :
-if the angle is above some angle (Ao) then the edge won't really deform/fracture significantly and just slowly wears, deforms and chips at a very small micro-level
-however if you go below that angle then the strength/toughness is no longer there to keep the micro-bevel stable and it will just deform/fracture beyond the apex, the entire micro-bevel will start to take damage and the blunting will be very rapid
-if you go beyond that point further and reach a critical angle, Ac, then the strength/toughness is so low that the micro-bevel will just crack of the first time you try to cut with it
–
Now the math is a bit complicated and the language possibly foreign, but it is easy to understand as we see things like that every day. For example the life of tires on your car has a number of step functions. If you drive on the highway you get tire life which is a very slow process of small wear and little rips/tears. If you go off road at some point the rocks can be jagged enough that they will start to damage the tires beyond the normal tread wear. But if the rocks are not jagged enough this doesn't happen and you just see slow wear. If you hit a nail there is sudden and catastrophic failure.
This is a significant factor, especially if you are doing cutting which requires a lot of force. It is also why things like handle ergonomics can affect cutting. Imagine just filleting a fish with a knife which is slipping in your hand vs one where you have perfect control. Think about the bone contacts, the wasted cuts, etc. that happen in one vs the other. This and many other reasons are why trying to determine the edge retention of steel by looking at one knife to another different one is very hard. It is like taking two people, having them run 100m and deciding based on who won which had better shoes. Unless the guys run very close to each other in general, it likely doesn’t gotta be the shoes.
Cliff,
So, in regular sharpening like most of us do (most of us don’t zero then micro bevel) is there a general guide line such as 15 dps being the highest one would want to go?
Is what you are speaking of (the failure point at a given angle) what marthinus experienced here?
VG-10 is an interesting steel . When it first came out there was a little bit of press about how it was a “better” knife steel than ATS-34 . ATS-34 has a lot of Molybdenum as it was designed for high temperature resistance and it needs the molybdenum for that strong secondary hardening. However after makers/manufacturers found out that it actually performed better as a knife steel if you didn’t actually use that and did cold tempering it seemed obvious to make a ATS-34 type steel without all the molybdenum. VG-10 has just enough Molybdenum to give it the crevice corrosion that does and for a very brief period it had some press as a knife steel. However just as people were getting interested the steam roller that was the S30V marketing machine crashed into the knife industry and VG-10 never recovered and isn’t seriously used outside of Japan where it is well regarded.
[quote quote=“razoredgeknives” post=19150]
So, in regular sharpening like most of us do (most of us don’t zero then micro bevel) is there a general guide line such as 15 dps being the highest one would want to go? [/quote]
It is going to depend on the steel, what is being cut and the person. For example if you cut hemp rope and similar materials it takes a very low angle to make the edge actually fail directly and not just take that slow wear/damage to the very apex. However if you are slicing into plywood and hitting knots and glue you likely need twice the micro-bevel angle and a larger edge angle as well.
The most I would say in general is that for some reason, modern sharpening in the west has produced very high edge angles. If you read for example Cook’s axe book and similar older books you find that 15-18 degrees per side were bevels used on full size felling axes and angles like 18 dps were only used for very hard woods and/or unskilled users (or crappy axes). But yet now these are considered low angles for knives which don’t even do any impact work? What happened to that?
Just think about if you need an angle on you knife similar to a felling axe. If you do then your knife is doing some pretty hard work indeed.
[quote]
Is what you are speaking of (the failure point at a given angle) what marthinus experienced here?[/quote]
Yes, he passed it dramatically when the edge took visible damage, he is basically at the zero-edge retention point there.
One of the many benefits of the high apex stability steels (AEB-L, White/Blue) is that they can take very low edge angles and not have that dramatic failure which is why a steel like 1095 properly sharpened can easily have better edge retention than say D2 cutting ropes / cardboard etc. .
This is a sort of secret known to guys like Fikes who would chop / cut up massive amount of ropes with their knives while “factory” knives would go blunt much sooner even with “super” alloys. Fikes however was running much lower angles and more coarse finishes and the two of them amplify each other and thus they can do massive amounts of work.
[quote quote=“CliffStamp” post=19148]
[/quote]
Excellent graphic, Cliff! It makes something so counterintuitive to many people very clear at a glance. It seems a bit similar to arguments why a convex edge isn’t (necessarily) stronger than a straight edge.
It occurs to me that these are exactly the steels that are popular in Japanese kitchen knives, which are usually sharpened at very low angles…
I have one remaining question. I now understand the TCE, but I don’t understand yet how you measure sharpness (as a percentage of maximum sharpness). You don’t use a jig as I understand it, but how do you measure it? Perhaps I missed something.
Thanks for the great work! I’m really interested when you have any updates.
There are few things in the industry which have the kind of polar discussion about them as convex bevels and you can even find people argue the exact opposites.
The critical aspect of any bevel is the cross section, a very thick/heavy convex bevel will be very durable and won’t cut well unless it is a splitting based tool. But a very thin convex bevel will cut very well but won’t be very durable. Now you can make an argument about optimized cutting ability and durability and how it favors a convex bevel in many cases but this is critical on the cross section in question.
For example if you take a standard 0.035"/20 dps edge and you apply a convex bevel to the edge and increase the apex to ~25 dps or you take a convex bevel by blending the transition line into the primary bevel - both are convex bevels, but they are very different in how they effect the knife.
[quote quote=“CliffStamp” post=19152]
It occurs to me that these are exactly the steels that are popular in Japanese kitchen knives, which are usually sharpened at very low angles…[/quote]
There is an odd disconnect that happened in knives. It is hard to pin point when and how it happened but knives and steels have really moved away from all sense of reality in many cases from how steels perform. If you asked a tool maker to make a hot stamping die from O1, or to use D2 to stamp 420 then they would out right note why these are not sensible choices (O1 has very poor hot hardness, D2 will have high adhesive wear against 420). Yet in the knife industry there are knives made out of steels which have no sensible property alignment.
If you look in the literature the properties of steels are clear and even how they are that way and why they are that why. Why is F2 for example a steel used for holding a fine cutting edge / high sharpness but D2 isn’t. But it appears to be in the West that a lot of makers/manufacturers are really opposed almost to applying metallurgy to steel selection in knives. Now not everyone of course, lots of makers are very out spoken about how metallurgy should be used in knife making (Kevin Cashen for example), but at times they seem like a minority.
Tie a weight to the end of a specific cord, clamp the other end of the cord. Insert knife under the cord, lift the knife to put the cord under tension, draw the knife back - a sharper knife cuts with less draw. This sounds a lot more complicated than it is, just try it directly.
I didn’t used to do it this way, what I used to do originally was much better in that it had more precision and accuracy. I had a electronically controlled tension and I could just adjust the tension so as to make a cut in say 2" of draw. In this way I varied the force and the lower the force needed to make a cut in 2" is a higher sharpness. This is the ideal way but it is much more complicated.
Now this is similar to how people make a cut on 3/8" hemp to measure sharpness. I have done that as well, in fact I started doing that as that is what everyone did (Phil Wilson learned it from Wayne Goddard). The problem is I soon realized that at best I was +/- 0.5 lbs on the cord but this was a huge change in sharpness. It would be like trying to see who won a 100 m dash if your watch was incremented only in seconds. Hence I switched to lighter cords to focus the measurement in on sharpness and not cutting ability as a whole.
–
As of late I have actually been running parallel sharpness measurements, I use 35 grams on bergia spinning thread and 500 grams on 1/8" jute twine are used for both high/low tension measurements. For awhile I was curious if you could have two edges and one was sharper on the low tension and another sharper on the high tension.
Cliff,
Could you post of photo of the way you do your sharpness testing? Maybe some of us can duplicate it and share results, even by anecdote if all can’t do the same level of data collection and processing, so we’re all talking apples to apples.
Clay,
I wrote about this some time ago here : http://www.cliffstamp.com/knives/articles/sharpness_review.html . I will put up some pictures/film later. The thing to keep in mind however is that the method in particular isn’t that critical you can determine sharpness in many ways all you have to be able to do really is put some kind of number on either :
-the force used to make a cut
-the length of edge to make a cut under a given force
Realize further that the more you can concentrate the force at the apex itself the more you will measure sharpness directly. For example if you slice a piece of 1/2" hemp with a very sharp knife with a high cutting profile you should be able to do it with 4-5 lbs. However only about ~0.25 lbs or less is actually the force due to the sharpness. Thus if you use the knife a little and the force increases by a pound then that shows a blunting which isn’t :
-4.5/5.5 or the knife is at ~80% of optimal .
It shows a blunting of :
-0.25/1.25 or the knife is at ~20% of optimal
Thus while you might want to cut large ropes to blunt the knife, if you want to measure sharpness you want to cut very thin ones as you will more accurately measure the sharpness.
Very interesting read, Cliff! I’d visited your site before, but I’ve now also begun to read the longer articles. Very educational.
[quote quote=“CliffStamp” post=19175]Clay,
I wrote about this some time ago here : http://www.cliffstamp.com/knives/articles/sharpness_review.html . I will put up some pictures/film later. [/quote]
I would also be very interested in seeing a video on how you do this… seems simple, cheap, and effective, something that basically anyone can replicate. Thanks cliff!
I’ve mentioned my Spyderco Delica in ZDP-189 quite often here and I’ve extolled its virtues whenever I could. Up until this week, resharpenings have been touch-up, using 800s and 1000s. This week, I had cause to sharpen it when a chip appeared near the tip. I can’t recall what I hit with it, but I do recall thinking “Uh-oh. That’s gonna leave a mark.”
I took some micro photos of it, but haven’t yet transferred them to my main computer. I’ll do that soon, but for now, let me say that the chip was not especially severe - more inline with what I routinely see on my other knives. The problem lies with the hardness of the steel. I’ve seen comments in posted reviews where people have mentioned being put off by the difficulty in sharpening the ZDP-189 with normal equipment. Shoot. I’ve got diamonds, ain’t I?
I’ve become acclimated to the feel of the ZDP stuff when using my diamond stones, and so I no longer sense that the steel is anything but normal. I do recall saying that with the first sharpening, I sensed that the knife may have had a grandmother who was ceramic.
Anyhoo, this little chip took me about 400 strokes of my 400-grit diamond stones on each side to eliminate it.
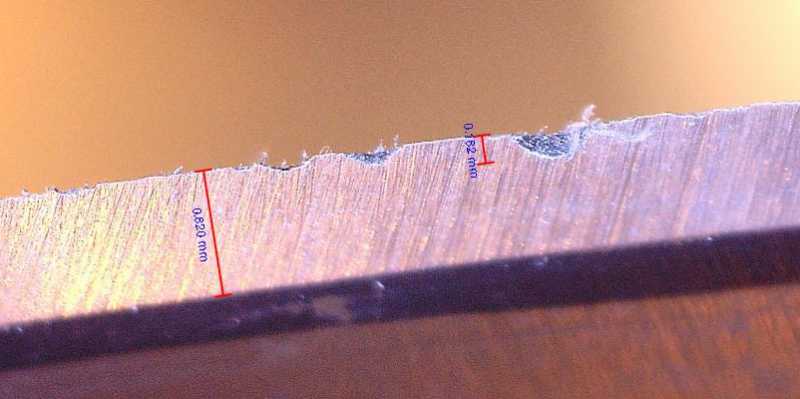
So here’s some photos of the subject chip(s). This first one shows the depth measurement of the chip and the bevel width. Not being sure of the angle of the bevel relative to the camera, the measurements could be off by a small amount, but not enough to buy lunch with.
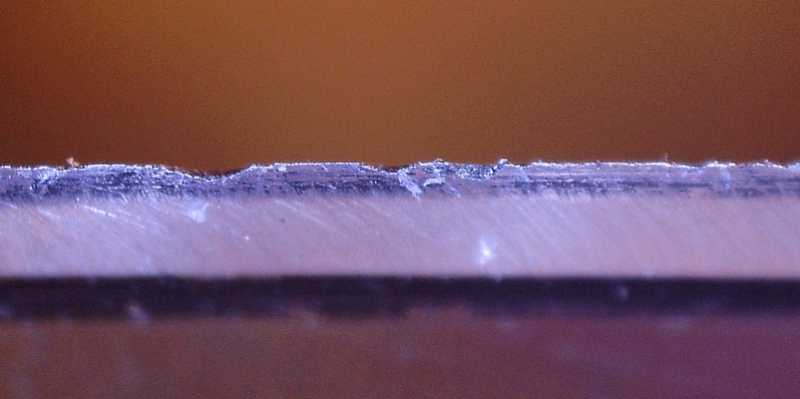
The second and third photos are different views of the same chip(s):
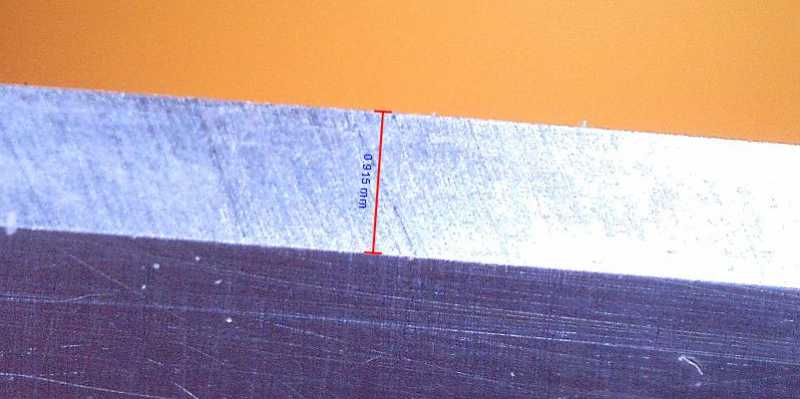
The fourth photo is of the edge after sharpening. Not necessarily the same area that the chip had been. It shows the width of the bevel as less than one millimeter.
A few final notes: All four photos were cropped identically, so their fields and images are all the same width and height. The chip, as measured in the first photo, is 0.182 mm deep, which is only 0.007" deep :ohmy: . Think about it. It took 400+ strokes with 400 grit stones to take the edge down about eight thousandths of an inch. Tuff stuff. B)
Someone’s sure to ask… The angle is 20 dps. The finished bevel is at 1000 grit diamond stones. The last photo was taken with the camera held perpendicular to the bevel.
Those are serious chips do you recall how these were formed.
I would treat this steel as a Japanese knife so slicing movements rather than chopping movements avoid anything as hard as bone or frozen food if you are careful with its use and it still micro chips perhaps it was poorly tempered and I would consider asking Spyderco to replace it since if the tempering was not correct perhaps the steel is harder and more brittle than it should be.
Leo:
this is a Spyderco Delica I use as my EDC. The blade is less than 3" long and is not used for kitchen work, except to open packages. the chips are actually quite small; the largest was only 0.007" deep and barely visible to the unaided eye. As I stated above, I don’t recall what I hit, but the chips were not unexpected. This ZDP-189 steel is hardened to RC64 - 65. It stays sharp a long time and the trade-off for that is being brittle. I love it and wouldn’t give it up.
Tom
Those are some very detailed shots, what exactly did you take them with?
I have a Rockstead Un ZDP 189 with VG10 hardened to 67 RC although I admit that I do not use this I have it both as an investment and to enjoy for its looks.
I only mention keeping an eye on the micro chipping since it is high tech steel and it is possible that there was a possible fault with tempering I know that your knife is not a cheap knife but in comparison to a Rockstead it is so ; it could be possible that certain aspects of the production standards are not quite what they should be.
I think it is an attractive knife and I have even considered getting one myself or a chefs knife made with this ZDP 189 there are quite a few laminated knives of this type I think on the cktg website.
When I mentioned kitchen work I was referring more to the density and hardness of certain things that should be avoided copper staples for instance are probable about the same hardness as bone and are often imbedded in cardboard boxes.
A lot of people have found that VG10 found in Shuns is prone to chipping but many cooks & chefs abuse their knives and I think that this can be the cause of the chips more than faults in the metal.
As someone that both sharpens and collects knives I would not expect chips due to missuse to be the cause on your knife which is why I would keep an eye on the situation I am sure that if it turns out that the tempering was not correct that they would gladly replace it especially since you sharpen knives and therefore deal with people I would expect that they would wish to keep you sweet.
I hope to dig into my zdp stretch this weekend again now that I have my usb microscope to use. I hope mine does not chip easy..I got mine at the seconds sale and will just have to live with it..lol.
Great pictures.. Amazing how big a mm is. I thought at first holy crap only a mm of bevel! Then I looked at mine..which is 17dps while yours is at 20 and mine is just shy of over 1mm.
Cliff, if I am not mistaken he has the celestron 5MP usb microscope. Obviously I need to play with mine some more because my pictures do not turn out that nice just yet. But I just put mine on my starett Flex-O-Post Assembly so I can try and get shots while the blade is still mounted in the vise and take all wiggle out of my pictures.
Eric"s right, I use the Celestron 5MP. Those pictures, however, are taken at the lowest resolution setting; 1280 X 960, or 1.3 MP. On a computer monitor, there is nothing to be gained in the image at higher res.
The difference is the magnification setting. Like most, if not all of these “barrel type” microscopes, it will focus on a given distance at two different magnifications. Since I use the end of the shroud as the focal point (so I can rest the 'scope on the edge) the two magnifications are 58X and 179X on my monitor. I’ve pretty much abandoned the high setting as too difficult to keep in focus and the depth of field being too narrow. So I use the lower setting and it shows me virtually everything I need to see, and makes it easy to hold steady.
if you think about the geometry of a simple magnifier, you’ll have a lens which you move relative to the object and your eye. Consider the distance between eye and object as fixed. The closer the lens if to the object, the larger the image. The closer the lens is to the eye, the smaller the image. In the case of these microscopes, the “eye” is a small sensor on a circuit board at the top of the barrel. In my case, the 'scope focuses at some point near the sensor (low mag) and again with the lens away from the sensor (just past the LED ring) for higher mag.
Try moving your 'scope down in magnification to see if there is another focal point. Solved my problems.