Workstation layout
Recent › Forums › Main Forum › Off Topic › Workstation layout
- This topic has 20 replies, 7 voices, and was last updated 05/10/2014 at 10:11 pm by
Ron Migdal.
-
AuthorPosts
-
01/23/2014 at 1:53 pm #16554
I recently purchased a 5-compartment tool tray from Grizzly, looking for something to better organize my collection of stones and clean up my continually cluttered bench. It probably wouldn’t work for those of you who need portability, but it has turned out to be a very pleasing improvement for me, so I thought I’d share it with you fellows.
The tray is made of oak, with the exception of its bottom panel, which is a fiber-board material with a flocking of green fibers made to look like a pool table felt. Actually it’s pulled off rather well. The left side panel had been knocked loose when it arrived, but a little Titebond II adhesive and a couple of clamps solved that nicely. With shipping, the cost was $25. About.
As is obvious from the photos, I lined the bottom of each compartment with the same foam drawer liner material I have on the bench surface.
As soon as I attempted to set a pair of stones into place, I could see that there would be a problem with the grit on the stones beating up the margins of the compartment. I solved that by covering the edges with clear packing tape. Except now the stones are a tight fit when laid back-to-back. Easy solution is to lay the stones side-by-side, with a common grit facing up. This turned out to be a non-problem. Probably better for the stones not to be banged against each other.
The major benefit so far is the ergonomics of the thing. The stones are presented at a very comfortable angle and the transition from laying one set down and picking up the next is very smooth. Best of all is that there’s no danger in reaching to the back of the bench to retrieve a set of stones.
As you can see in the photos, I keep four sets of stones in their respective compartments. From left to right they are: 100/200, 400/600, 800/1000 and 1200/1600. In the fifth compartment I currently have my angle cubes and my Carson 10X loupe. When I get my new micro-fine ceramic stones, they’ll take their place in the fifth slot.
I’ll continue to keep my strops in separate containers to protect them from cross-contamination.
Since the photos were taken, I’ve done some rearranging, moving the stone tray to the left front and placing a blue-tooth mouse and mini-keyboard on the right. I’m left-handed, but after 25 years of running a mouse right-handed, I had to put the mouse on the right. The laptop has been moved to a lower shelf.
The laptop is obviously for the microscope, which I’ve upgraded to a Celestron Handheld Pro. The camera is 1.3 to 5MP. The pictures aren’t really any better, but it really does make handheld use possible. You can adjust the focus to fall on the plane of the clear plastic shroud. Touch the camera to the knife’s edge and presto! You’ve got a clear picture, or something very close to it. Slide the camera along the edge and look for nasty stuff, like chips and nicks. The software is also a big improvement over the no-name clone of the Veho. Measurements down to 2-3 microns is a snap. Snap! Oh yeah, there’s a separate image capture button conveniently located in the cable.
Any questions or suggestions would be very welcome.
01/23/2014 at 2:23 pm #16555Hey TC, sounds very interesting, but the photos are missing…
Molecule Polishing: my blog about sharpening with the Wicked Edge
01/23/2014 at 9:58 pm #16559Aargh!! It did it again. Getting message “500 Internal Server Error” I hate when that happens. I tried two times last night to upload, got errors on the first one, then climbed into bed on the third try without checking. The second try drops the images. I think that two 650K images is too much.
When I try one at a time, I still get an internal server error. I’ll try to compress the photos even more.
01/23/2014 at 10:10 pm #16560Sorry Gents:
Even with my 16MP image compressed down to 515 KB, it crashes. Any ideas?
I just remembered that the last time I tried this, had to crop the photos. try no. 5:
01/24/2014 at 2:03 am #16568Hey TC, that is beautiful! Can this tool tray be bought online?
This internal server error stuff is not pretty, indeed. I’ve notified Clay and he’s working on it.
Molecule Polishing: my blog about sharpening with the Wicked Edge
01/24/2014 at 11:20 am #16577Yup, it’s available online. Try http://www.grizzly.com/products/T10073
I just reviewed my order and it was for $17.95 plus $7.95 shipping for a total of $25.90
I ordered it on Jan 10th and it was delivered by UPS on the 16th.
I’ve ordered a lot of stuff, including probably a dozen or more SEKI pocket knives from them over the years and have never had any problems. Almost everything is made in China and the quality and the prices match up pretty well. For instance, a dial indicator with a magnetic base for $19.50. I bought one just to use the mount for my microscope. Very happy with it.
01/24/2014 at 12:30 pm #16579Thanx!
Molecule Polishing: my blog about sharpening with the Wicked Edge
03/01/2014 at 10:43 am #17485Hi Gents:
I was inspired by a recent fellow’s post of a bunch of beautiful add-ons he had done to his system. Was it Voodoodaddy?
Since I don’t have any other expensive hobbies, I went to McMaster as he suggested and found what I needed. I ordered the hardware last Sunday and had it in hand on Tuesday afternoon. Great service!
In the process of installing the upgrades (I didn’t need the blade stabilizer) I quickly found that it’s not practical to use the front screws to lock in on middle-of-the-detent positions and the fine adjusts don’t give you all that much range. So I reversed the angle bar, to put the detents on the opposite side. I then installed the original detent screws on the opposite side, so I have the option of locking in on any position with the locking levers in the front, or using the screws on the opposite side to lock in on a whole-number detent position. The degree numbers are upside down, but I can live with it.
They didn’t seem to have a 10-32 knurled knob in the right size, so I ordered a bakelite version, drilled it out and tapped it thru. They were a little too big in diameter, so I took ’em to my sanding wheel and gave ’em a spin. I used 10-32 SS lock nuts (which I happened to have) as jam nuts to hold the knobs in position on the studs.
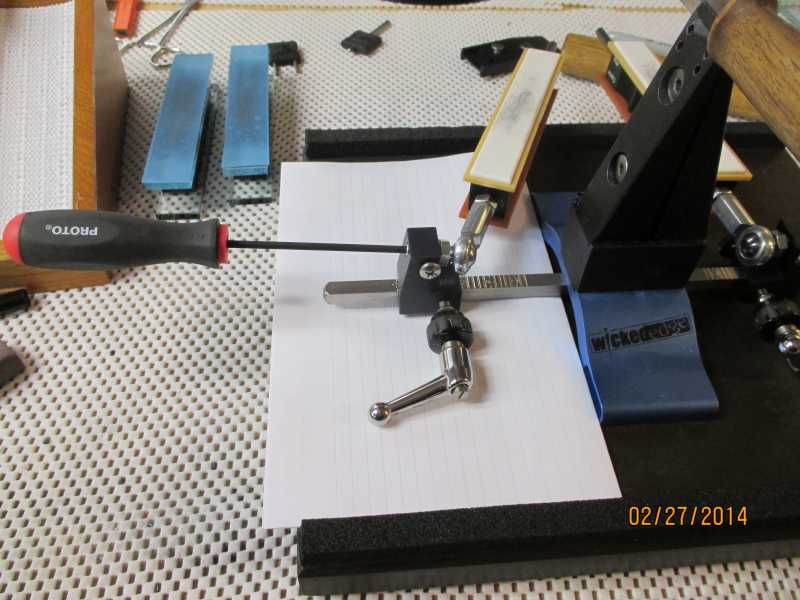
While browsing at McMaster, I ordered a 1/8″ allen key tool, which I can use in lieu of the stubby little key which WE supplies. Not much of an improvement, but I like it. Since I use it to make fine angle adjustment frequently, I leave it in position as shown in the photo below. Yes, I move it over to the right side when needed.
I also happened to make some plate glass blocks for using abrasive tape and I was concerned about the really nasty clunk they made whenever I’d drop one, so I added two strips of 1/2″ X 1/2″ close-celled foam tape along the front and back edges of the base. This turns out to be a big improvement and I suggest it strongly, whether you’re using glass blocks or not. It’s amazing how much quieter sharpening becomes.
Check it out. I placed a sheet of paper on the base so you could see details in the photo better.
Attachments:03/01/2014 at 10:58 am #17486I turned my bar around a long time ago and never looked back. With the new locking levers and the bar turned around adjustments are a snap! Voodoodaddy really came out with some great stuff! I’m having the blade stabilizer done. I get a lot of long knives and am really looking forward to it!!! :woohoo:
03/03/2014 at 11:16 pm #17531I just changed my main workbench to include plenty of space for my WEPS. The coffee roaster toward the other end couldn’t be moved since the window and necessary exhaust fan is directly above it. My reloading equipment is being set up in a new location. Now that I’ve seen TC’s setup (above), as soon as I find my two sided tape, I’ll be adding a foam strip to the rear of the base.
 03/04/2014 at 1:35 am #17533
I just changed my main workbench to include plenty of space for my WEPS.
My reloading equipment is being set up in a new location.
You know you have gone down the rabbit hole when the reloading bench gets moved! 😛
03/05/2014 at 3:10 am #17553The coffee roaster toward the other end couldn’t be moved since the window and necessary exhaust fan is directly above it.
Is that a Quest I see sitting there? Home Barista much? :cheer:
03/05/2014 at 3:39 am #17554Not many people would even know that’s a Quest M3. Not many of them out there. A HotTop is on the back porch, but hasn’t been used much since getting the Quest
 03/05/2014 at 7:42 am #17564
The M3 is a great machine, I think I’ll roast me up a batch of monkey blend this weekend 😛
03/05/2014 at 3:06 pm #17570That is certainly some coffee roaster I have not ascended to that level yet . I do however have this great coffee expresso machine.
I think it will take a while before I would be allowed to buy that M3.Attachments: -
AuthorPosts


- You must be logged in to reply to this topic.