Stropping Angle
Recent › Forums › Main Forum › Stropping › Stropping Angle
- This topic has 33 replies, 9 voices, and was last updated 11/26/2014 at 5:37 am by
Mark76.
-
AuthorPosts
-
10/04/2012 at 1:44 pm #5896
When stropping what angle should be used?
If I sharpen a knife at 20 degrees should I strop at the same angle or should I strop at a lessor angle, say 19 degrees? The only strops I currently have are leather.
Or is this practice only used when you are trying to convex the bevel. Say you sharpen at 17 degrees, micro bevel at 20 degrees then should you strop at 19 degrees?
This knife sharpening sure can get involve 😉 but I am having a blast! :woohoo:
10/04/2012 at 1:53 pm #5897All of that is valid. The real key is to strop lightly. It’s ok to strop at the same angle lightly. By increasing to 19 your attempting to effect the angle only and not touch the edge. For touch ups it’s ok to strop at the same angle.as the final bevel.only by trial and error to you figure out what’s right for you. If this is your personal knife and it becomes maintenance it’s one thing. If your doing some else’s knife to hand off you might be using a different technique based on what you negotiate with the other person.
10/05/2012 at 12:08 am #5899I think the short answer is, find what works for you. I’ve come to the conclusion that good stropping results depends on a lot of factors that “intertwine”, so what works for one person, may not work for another. For example, one person can strop at the same angle with light pressure, another might lower the angle and increase the pressure. I actually get good results with light stropping at a higher angle, (which is why I was bummed that Clay’s microscope pic doing this showed a lot of rounding… my results seem to differ). :blink: Add to that the variety in leather, compounds, etc., and it’s easier to just experiment with a few variables, like the ones you mentioned, and “dial in” what works for you.
I’ll add, in addition to angle, pressure, etc., another factor to work with is the amount you do. Try a few strokes, like 1/2 dozen, vs. doing a bunch (which is what a lot of sharpeners do to polish the bevel). Another factor to play with. B)
…only by trial and error to you figure out what’s right for you.
After writing all the above… Wayne had it in his answer. :silly: 😆
10/05/2012 at 12:50 am #5900I keep bouncing back and forth between -1 degree and keeping the same angle. Both work very well, but for some reason with my technique (which is very light pressure, after some practice) I seem to get a much sharper “feel” when keeping the same angle. I’m not sure why that is, because both cut equally well in my basic tests and normal use.
So I guess I can just add +1 to the trial and error advice!
10/05/2012 at 2:01 am #5901The strops work mostly by drawing or smearing the metal across the surface of the bevel, burnishing it. If you’re stropping on the same angle, it’s conceivable that you’re drawing the metal right to the edge and actually pulling it out to a finer apex. This is a topic I’m really curious about but will probably need access to a SEM to study it. Even at 2000x I can’t get a good clear measurement of the edge thickness.
I keep bouncing back and forth between -1 degree and keeping the same angle. Both work very well, but for some reason with my technique (which is very light pressure, after some practice) I seem to get a much sharper “feel” when keeping the same angle. I’m not sure why that is, because both cut equally well in my basic tests and normal use.
So I guess I can just add +1 to the trial and error advice!
-Clay
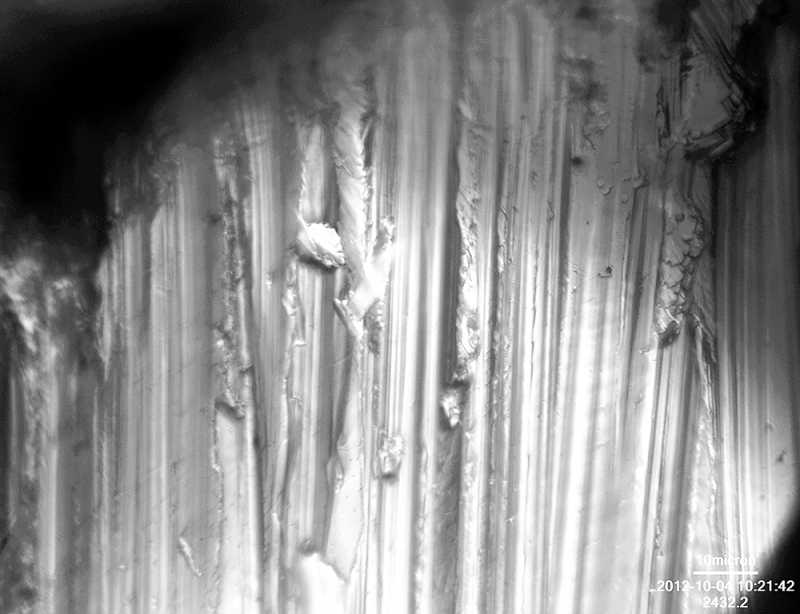
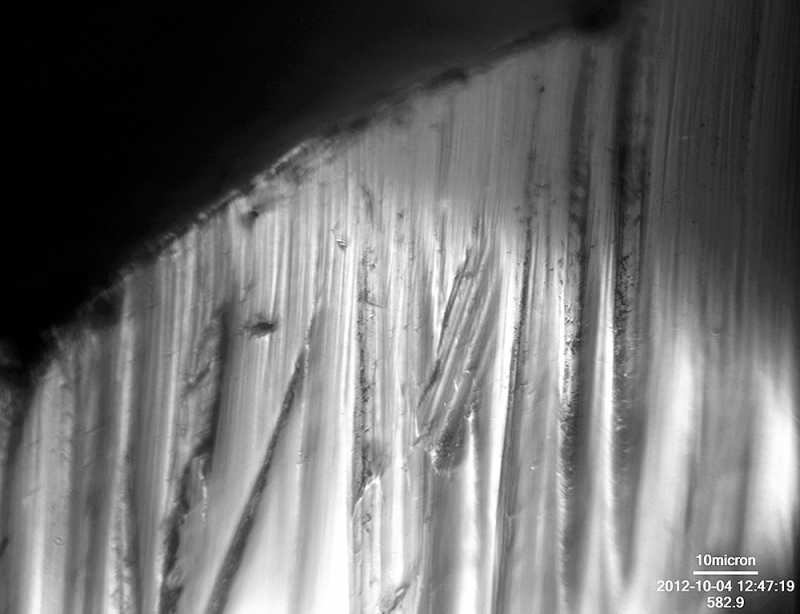
10/05/2012 at 4:56 am #5904Here are a nice pair of images at 2000x:
The image above is of the edge after being sharpened with relatively new 200# diamond plates.
The image above is of the edge after I completed 40 strokes with the 14 micron diamond and leather strops immediately after the 200# diamond plates. It’s easy to see how the metal was both abraded by the stropping paste and moved around by the ‘stiction’ of the leather, pushing the peaks of the ridges into the valleys and rounding them out.
Attachments:-Clay
10/05/2012 at 5:13 am #5905Great pictures Clay, in your copious free time I would like to see the same experiment done with the 400 grit stones.
Great scope
10/05/2012 at 12:28 pm #5921Thanks for all the input! I keep reading about stiction. Could someone give me a working definition? Conceptually I understand the Wiki definition. When stropping a knife what level, quantity or quality (not sure how do ask) of stiction works best?
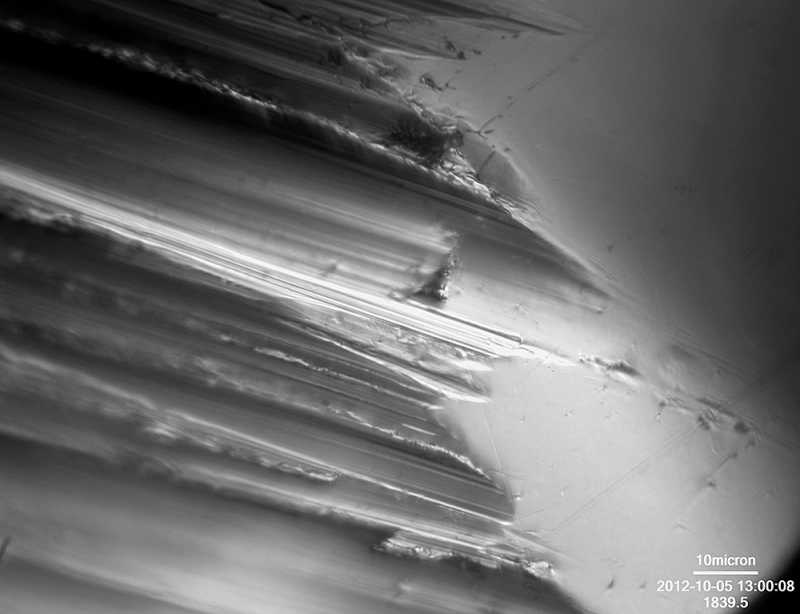
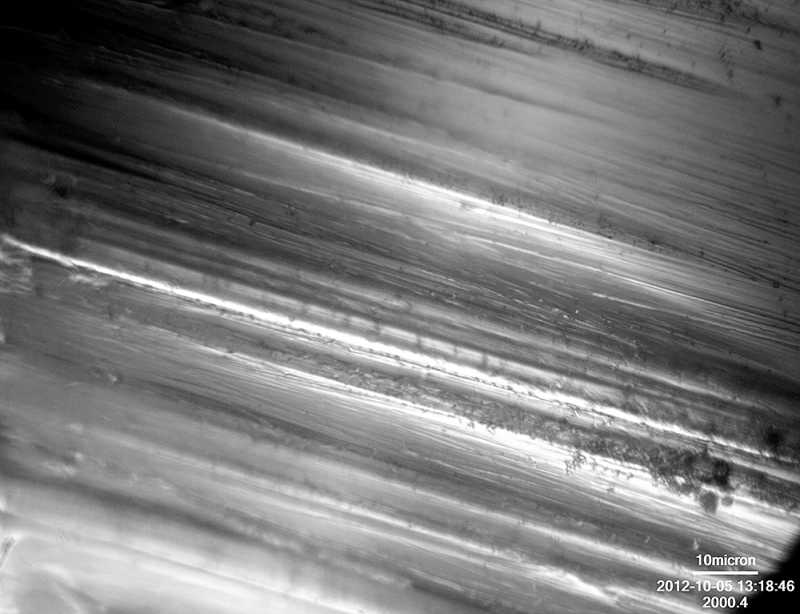
10/06/2012 at 5:37 am #5936This next little study was fun to do though also time consuming since prepping the samples takes a long time for the 2000x images. There is a long process of cleaning the samples and lens, then applying clean immersion oil for each iteration. In order for the 2000x lens to gather enough light and present a clean image, it needs a continuous bond of the oil between the end of the lens and the sample. Every time I take the sample out, I have to add more oil and re-form the bond. Still, all the work aside, it’s a blast 🙂 So without further ado, here are some images of an edge that started as nearly perfectly smooth and to which I applied a micro-bevel 30um wide with the 400# diamond plates:
The above image shows the smooth shoulder at the start of the micro-bevel where the diamonds started digging in and cutting little troughs out to the edge.
The above image is showing the middle of the bevel.
Next I lowered the angle three degrees and completed 40 strokes with the 14um diamond and leather strops. I was surprised by some parts of the results. The first image shows the transition at the shoulder between the formerly smooth section and the micro-bevel:
The 14um strops clearly created their own very distinct scratch pattern and wiped out the smooth section. The also had an impressive affect on the scratches from the 400# diamond plates:
It’s exciting to see the combination of burnishing and abrading going on with the strops.
As a footnote, these are the same 14/10 strops I’ve had for a long time and the paste hasn’t been refreshed in months. I did apply some rubbing alcohol to increase the ‘stiction’.
Attachments:-Clay
10/06/2012 at 5:41 am #5937In the first image of the post above we see the clear junction of the 400# micro-bevel where it cuts into a very polished primary bevel. In the third image I’ve lowered the angle by three degrees and completed 40 strokes with the 14um diamond and leather strops. The effect is dramatic and illustrates why it’s so easy to create a convex edge with a couple of facets and the strops. The strops easily smooth over any peaks. In the next little study I’ll try to image the vertex of a pair of facets and then smooth it over with the strops.
-Clay
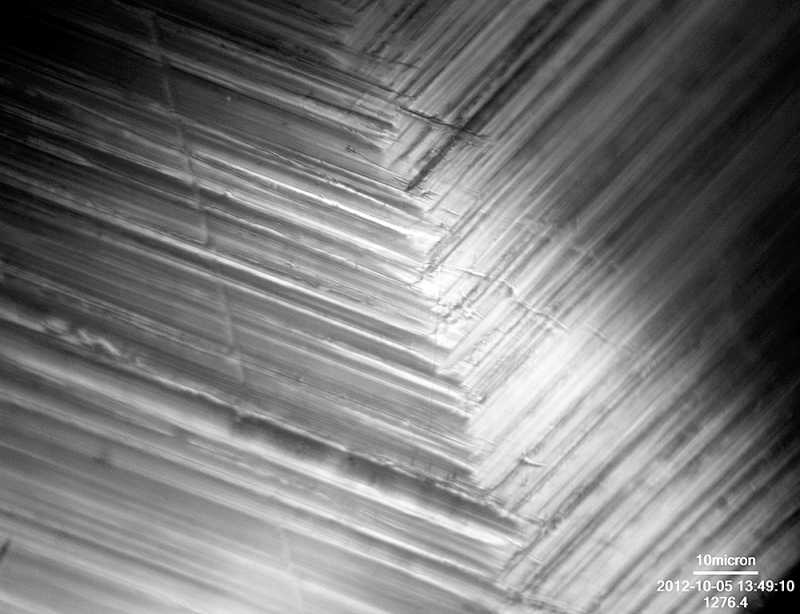
10/06/2012 at 5:54 am #5939Here is a nice view of two facets I created using the 1600# ceramic stones at 20° and at 25° so there is a 5° difference between the two facets:
Attachments:-Clay
10/06/2012 at 6:03 am #5941I admit that I’m shocked by the image below. I changed the angle to 22° and completed 40 strokes with the 14um strops. There is almost no evidence of the junction between the facets – it’s been almost entirely erased by the strops:
The only way I can even find where on the bevel to image is by the direction of the scratches. I’m now extremely thankful I used alternate directions with the 1600# stones when making the facets.
Attachments:-Clay
10/06/2012 at 6:07 am #5942It’s amazing to see how “plastic” metal can be. This is an incredible learning tool
10/06/2012 at 6:09 am #5943It’s amazing to see how “plastic” metal can be. This is an incredible learning tool
Agreed! It really moves around quite easily. I think we’re all going to learn a lot from each other on this forum 🙂
-Clay
10/06/2012 at 6:33 am #5944There is a long process of cleaning the samples and lens, then applying clean immersion oil for each iteration. In order for the 2000x lens to gather enough light and present a clean image, it needs a continuous bond of the oil between the end of the lens and the sample. Every time I take the sample out, I have to add more oil and re-form the bond.
I wanted to highlight this… I find this almost as interesting as the pictures themselves… had no idea it was this involved. :woohoo: That’s dedication!
-
AuthorPosts
- You must be logged in to reply to this topic.