Scissor Sharpening… how to rig your own
Recent › Forums › Main Forum › Techniques and Sharpening Strategies › Advanced Techniques and Sharpening Strategies › Scissor Sharpening… how to rig your own
- This topic has 29 replies, 13 voices, and was last updated 02/11/2014 at 9:10 pm by
Mark76.
-
AuthorPosts
-
10/17/2013 at 11:47 pm #15354
Ok, you probably though this was a how to… but its not yet =)
I have an event I’m sharpening scissors for in the near future (a fabric store) and one thing I KNOW will come up is corrugated scissor sharpening. The problem is that I don’t have a corrugator, so I have to rig one up! I normally sharpen scissors on the Twice as Sharp system, but their corrugator is very expensive.
Here is a pic of what it will look similar to… This fixture is by Wolff Industries that I will be simulating, but w/ the WEPS =)

I already have my WEPS mounted in a Panavise (this is an old pic, I have differrent rods now)

I recall curtis having made something similar to what I am thinking about… Curtis, post a pic again if you don’t mind of your scissor jig that you made?
I am thinking of having a horizontal 1/4″ round bar (same as rod arms on WEPS) that I will rest in between two blocks of wood… Then, I will rest another 1/4″ round bar on top of the first bar, but perpendicular to it. I will have to figure out some way of attaching the two so that way the top bar can still slide horizontally as I move from heel to tip of the scissor blade. Then I can attach the corrugating file to my WEPS paddle which will slide over the second bar and then sharpen away! I will try to draw up what I am thinking soon…
Stay tuned!
10/18/2013 at 1:41 pm #15356When you say corrugated scissors I am a little confused do you mean pinking shears if you do; the part that needs to be sharpened is the face behind the triangles also do check to see if they work before you sharpen for some reason many people have very poorly made cheap pinking shears that simple do not work(they think anything over 20$ is too much where as anything much below 30¢ is too low a price)
. So either try them first or ask if they have ever cut properly .
To test them you need some good quality cloth and the cuts should be absolutely clean.
These in the picture do not work I have tried several times and they just are badly made; plus as you can see there is a lot of steel to sharpen so bear that in mind when pricing them.Attachments:10/18/2013 at 5:29 pm #15364This picture?
Not sure if it’ll help with what you’re doing. For what you’re doing I think you’re on the right path, you’re going to also have to have movement along the edge, so you can keep the stone perpendicular.
10/18/2013 at 8:42 pm #15366When you say corrugated scissors I am a little confused do you mean pinking shears if you do; the part that needs to be sharpened is the face behind the triangles also do check to see if they work before you sharpen for some reason many people have very poorly made cheap pinking shears that simple do not work(they think anything over 20$ is too much where as anything much below 30¢ is too low a price)
. So either try them first or ask if they have ever cut properly .
To test them you need some good quality cloth and the cuts should be absolutely clean.
These in the picture do not work I have tried several times and they just are badly made; plus as you can see there is a lot of steel to sharpen so bear that in mind when pricing them.Thank’s for pointing this out Leo, you are absolutely correct. I was talking to another sharpener a few months ago that said they have something like a 30% failure rate from the factory so you need to ask them “what’s wrong with how they cut” and ” have they always cut like that” and then also sample test a few cuts before sharpening. If they say that they have always cut like that then you might as well give them back because there’s nothing you can do. Apparently the reason for this is because they are heat treated through “induction” at the factory, basically where they lay the edge on a super hot plate and heat just the edge. You can actually see how deep the heat treatment goes on some of them. but anyway, these are not what I’m talking about in this instance =)
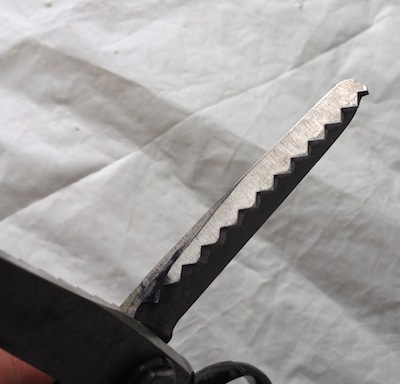
Here is a pic of corrugated scissors… one blade is plane but the other is corrugated.
 10/18/2013 at 8:45 pm #15367
This picture?
Not sure if it’ll help with what you’re doing. For what you’re doing I think you’re on the right path, you’re going to also have to have movement along the edge, so you can keep the stone perpendicular.
Exactly! Thanks Curtis… yeah, I just actually have to have mainly horizontal movement so I can fit the corrugations perfectly as I go down the blade. I will be able to tilt my panavise mount to mostly the right height/angle I think.
10/18/2013 at 8:55 pm #15368Ah I see micro serrated – normally only one blade is done so you can sharpen the plain blade only which normally ids enough .
10/18/2013 at 9:00 pm #15369Ah I see micro serrated – normally only one blade is done so you can sharpen the plain blade only which normally ids enough .
Yeah, I’ve done that in the past but at the recent quilting guild they brought me some jacked up corrugated scissors that I didn’t even bother with lol.
10/19/2013 at 5:33 am #15373This picture?
Not sure if it’ll help with what you’re doing. For what you’re doing I think you’re on the right path, you’re going to also have to have movement along the edge, so you can keep the stone perpendicular.
.
.
.
.
.
god i need one of these ticket curtis.interesting with a big I
thanks10/19/2013 at 8:08 am #15383Curtis, it looks to me that for the added vertical arm you used some extra WEPS key stock . . . Hence bolts situated in the middle, or is there some other method in your 🙂 madness 🙂 !!!
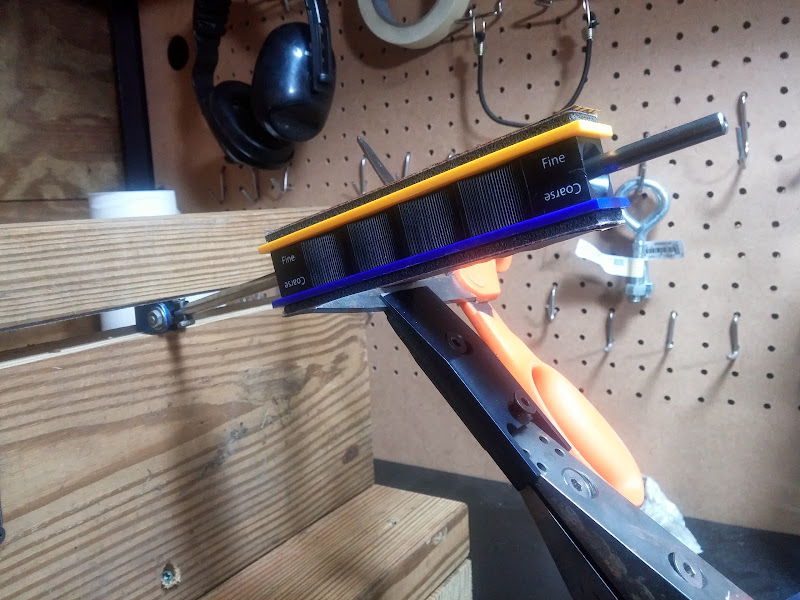
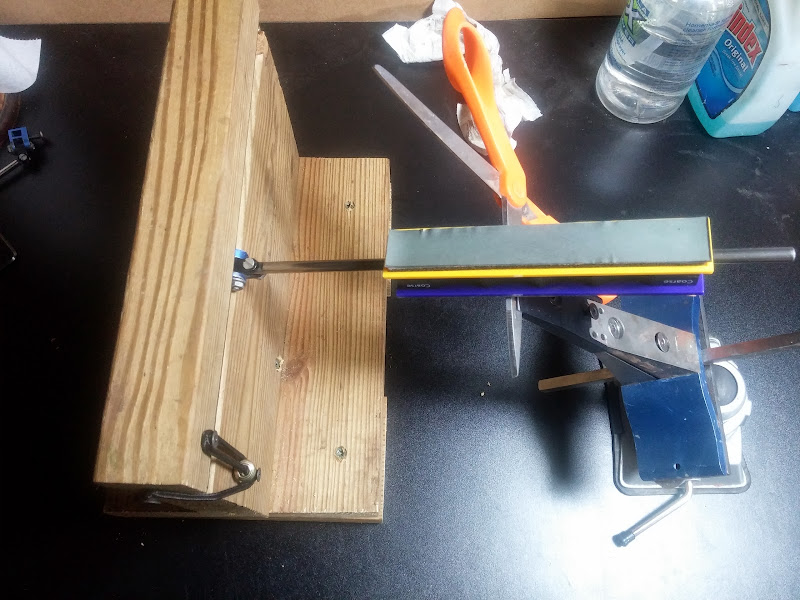
10/24/2013 at 3:43 am #15436Got’r’dun! Was easy enough to build… I can get any scissor angle I want and still use my stock arms (I put a hinge on the back side of the wooden “arm” and bungee’d the front). I also now have complete lateral movement for my corrugated sharpening (I will have to move the file 1/4″ at a time down the length of the blade) so I can just pull up on the wooden “arm” and slide it down a bit. Then I used some JB Weld and epoxied the corrugation file to a WEPS paddle…


 10/24/2013 at 3:44 am #15437
Note: I used the Low angle Accessory because otherwise I couldn’t get the scissors to open all the way since the handle would bump into the WEPS base.
10/24/2013 at 12:05 pm #15447Nice. Very creative looking!
Molecule Polishing: my blog about sharpening with the Wicked Edge
10/24/2013 at 6:34 pm #15458This question maybe silly to some, but can someone explain the fundamental process during a scissors cut. The reason I ask is that I presumed that you have two sharp blades that meet at an apex to perform the cut, but I’ve noticed that one side can be sharp and the other side can be blunt, and it cuts just as well. So do both sides need to be sharp, or only one side…is this done for safety reasons? Also for fit and purpose some scissors are very specialized, like for instance hair/stylizing cutting scissors…..I understand there is a difference? So what are the basic principles and considerations of maintaining scissor edges?
10/24/2013 at 6:36 pm #15459Got’r’dun! Was easy enough to build… I can get any scissor angle I want and still use my stock arms (I put a hinge on the back side of the wooden “arm” and bungee’d the front). I also now have complete lateral movement for my corrugated sharpening (I will have to move the file 1/4″ at a time down the length of the blade) so I can just pull up on the wooden “arm” and slide it down a bit. Then I used some JB Weld and epoxied the corrugation file to a WEPS paddle…
[/center]
.
.
.
very interesting Josh…..thanks12/01/2013 at 8:07 pm #15933This question maybe silly to some, but can someone explain the fundamental process during a scissors cut. The reason I ask is that I presumed that you have two sharp blades that meet at an apex to perform the cut, but I’ve noticed that one side can be sharp and the other side can be blunt, and it cuts just as well. So do both sides need to be sharp, or only one side…is this done for safety reasons? Also for fit and purpose some scissors are very specialized, like for instance hair/stylizing cutting scissors…..I understand there is a difference? So what are the basic principles and considerations of maintaining scissor edges?
I was hoping someone would answer your inquiry. I’m not going to be of any help either.
I think I observed in Curtis’ setup that there was no movement along the length of the scissor blade. RazorEdge has the ability to quickly move the paddle arm down the length of the scissor blade.
Is that correct?
Is that specifically for pinking shears?
For other scissors and shears, does either the paddle arm or the scissor blade need to be moved?
That is… on normal scissors, can you set them in the vise, set the angle and then sharpen that side of scissors without having to make further adjustments?
Or is the lateral/length-wise movement critical?
Wondering…. I’ve got a small stack of scissors & shears requests piling up.
~~~~
For Now,Gib
Φ
"Everyday edge for the bevel headed"
"Things work out best for those who make the best out of the way things work out."
-
AuthorPosts
- You must be logged in to reply to this topic.