One of my first edges on the WE.
Recent › Forums › Main Forum › Knife Photos › One of my first edges on the WE.
- This topic has 14 replies, 5 voices, and was last updated 02/23/2014 at 8:16 am by
Stephen Sharkey.
-
AuthorPosts
-
01/17/2014 at 3:54 am #16484
Got a WE pro pack 1 + the MicroFine ceramics. Mainly just for pocket knives, and a few kitchen knives.
I did a Kershaw Leek with it first, but I made the mistake of stropping it without reducing the angle first. So after stropping it was shinier, but didn’t seem as sharp. Haven’t gotten around to fixing it.
Next I did a really cheap kitchen pairing knife. It wasn’t quite butter knife dull, but it was definitely close. Finished it with the ceramics only. It now easily shaves hair. And cuts whatever food you want.
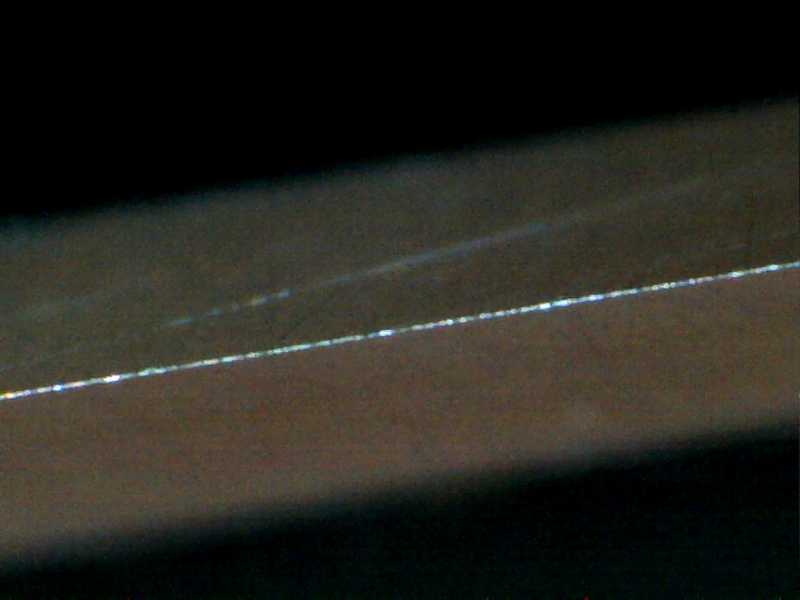
At this point I wanted a closer view of exactly what the stones were doing, so I bought one of those cheap veho “400x” microscopes. Not sure exactly what their magnification is. I found the ‘edge on’ shots to be best for me. I like seeing those compared to the ‘bevel on’ or side shots.
I did a Benchmade Barrage drop-point that still had a factory edge on it. With the felt tip trick, I meaasured angles at ~22 on one side, and ~26 on the other. I corrected both angles to 22 on the WE. Here’s photo’s of the edge as I progressed:
I started at the 400 grit stones. I didn’t feel I was removing enough metal to need anything corser.
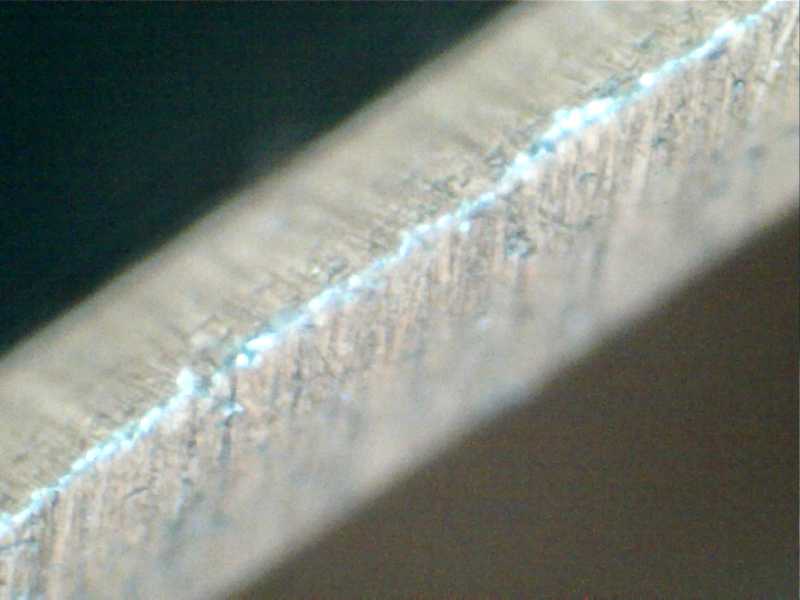
After 400 grit:
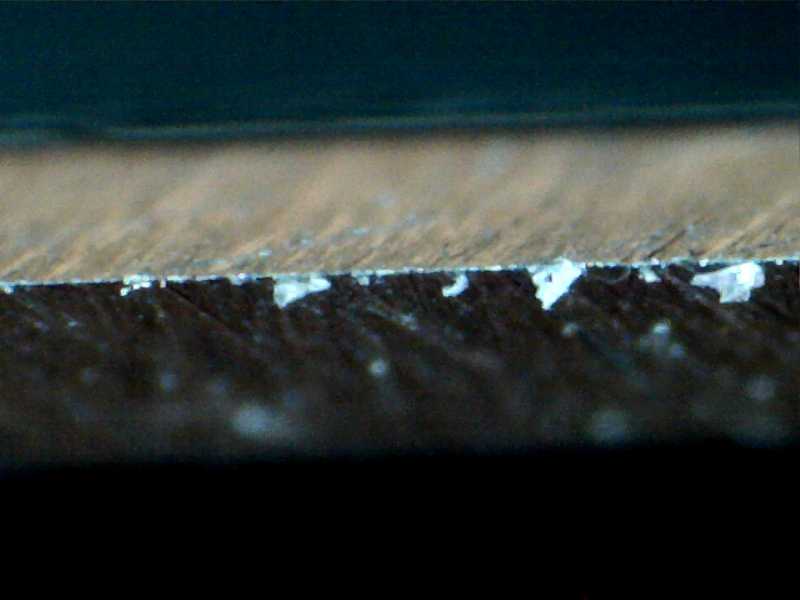
I then did the 600 grit stones. Here’s after finishing with the 600’s:
Did the 800 grit stones but didn’t bother with a picture.
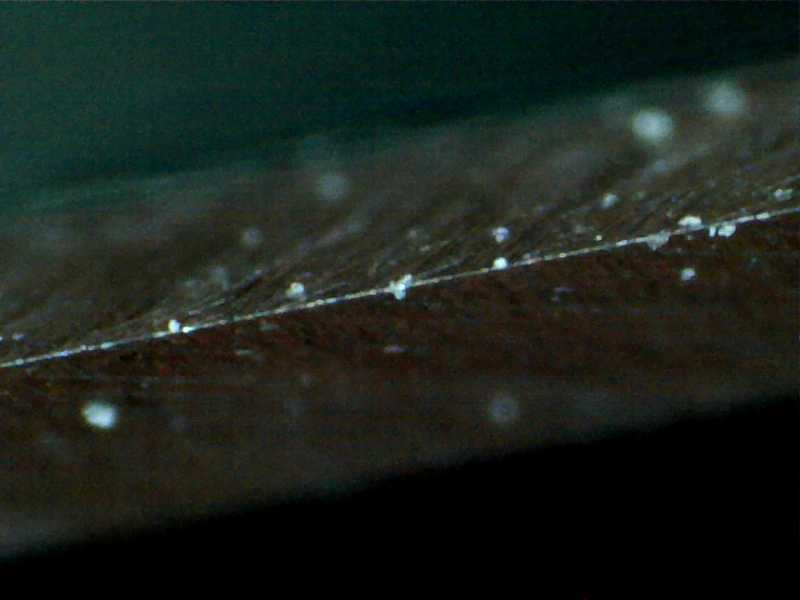
This is after the 1000 grit stones:
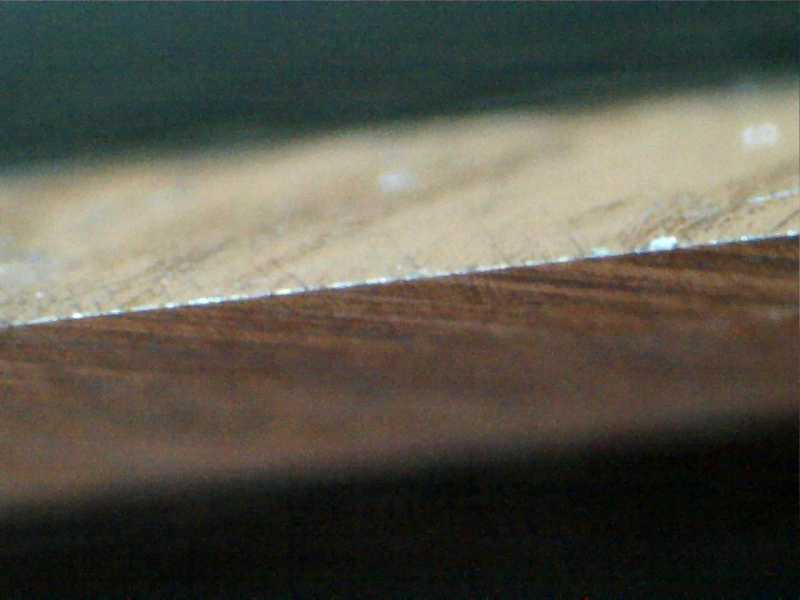
Then to the ceramics. This is after the 1.4 micron:
And this is after the 0.6 micron ceramic:
I did a few more passes of the 0.6 ceramic after this picture as I wasn’t totally happy. Took another picture, but it turned out blurry. The veho is definitely a ‘cheap’ microscope compared to some.
Took the pictures with just the very apex in focus, but I think you can see enough of both bevels to get an idea. On the more refined edges, the bevels weren’t even showing up as they were reflective enough that all the light was bouncing away, and you only saw the very apex. In order to get the bevels to show on this microscope I simply used my hands to bounce some of the light sideways into the bevel. Took a little bit to figure out how to hold my hands near the blade while holding the microscope and focusing at the same time.
Didn’t bother with the strops. I’m perfectly happy with this edge.
Anyway, for only my 3rd or so blade sharpened, I’m quite happy. I’d never be able to sharpen anywhere near this freehand.
01/17/2014 at 10:36 am #16485Well, you’re certainly doing well enough for the amount of experience you have. But I must say that I’m more impressed by your photos. I have a (supposedly) 800X no-name camera which is obviously made by the same people that make the Veho. I recently upgraded to a 5MP Celestron Handheld Pro and my photos aren’t any better than yours.
Here are a couple of tips I’ve learned that might help you.
Getting the keenest edge requires that you remove all traces of edge chipping, which is caused by the coarser stones. Your photos say you’re doing fine, but remember to go easy with the 100/200 grits.
You can easily check your microscope’s magnification by taking a snapshot of the scale along the edge of a machinist’s 6″ ruler. If you use the 1/64th divisions, measure the distance between the edges of two graduation marks and then divide by the reciprocal of the scale – for instance if 1/64th of an inch appears as 3-1/4″ on the screen, divide 3.250 by 1/64 (0.0156). The result is 208X.
I focus my Celestron on the plane of the edge of the clear plastic shroud. This lets me check my progress along the edge easily, and is a huge convenience as there is no need to set up a stationary mount. My no-name ‘scope (and probably yours as well) has a variable magnification. At some magnification the focal plane could be made to fall on that same plane. Mine would not focus at the higher magnifications unless I cut away part of that shroud.
Lastly, I don’t recommend sharpening kitchen knives to a high level. They generally need some “tooth” to cut fibrous material effectively. Some complain that their WEPS kitchen knives seem to dull more quickly. Try stoning to only 600 grit or so, then stropping to put a low-friction surface on the toothy edge.
Second lastly, I am an amateur and not qualified to do more than share my experience. There’s lots of highly qualified guys on this forum who might add to the discussion. I invite their comments.
Keep enjoying your WEPS!
01/17/2014 at 11:03 am #16486Yea, I haven’t even been using the 100/200 grit stones. I re beveled the side that was 26 to 22 with the 400 stone.
As far as the scale, yes I guess that would work. But it would be resolution dependent. And also monitor DPI (more technically ppi, pixels per inch) dependent. For example, I have an old laptop with a 15″ screen that runs at 1600×1200. Compared to my 24″ monitor that is also 1200 pixels high. Measuring the distance on one compared to the other will result in different magnification values.
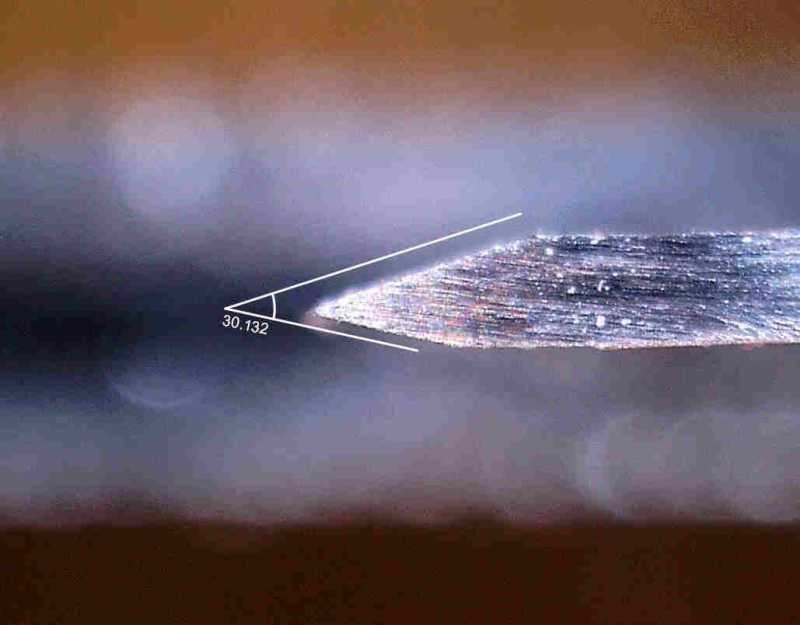
One thing I did do was calculate the approximate width of the actual apex. I have a set of calipers that tell me the widest part of the bevel (which you can see in the photo’s) is right around 0.020 inches. Converting that to Metric (mm), and taking the width of the bevel in pixels compared to the width of the apex in pixels gave me an apex of 7-8 microns if I remember right.
Using the bevels width, I can also calculate that on my monitor here, I’m seeing 275x magnification (5.5 inches / 0.020 inches).
But all that is assuming the microscope actually has the optical resolution to provide a picture that’s 1280×960. Which I don’t this this does. I’ve read the native optical resolution is more like 640×480. Which would about half the magnification to 137x or so.
Been thinking about getting one of the dino lite’s. I’ve seen the awesome pictures Clay gets from his.
01/17/2014 at 12:14 pm #16490One thing that is interesting to do with the Veho at high mag is to film with it put the knife onto the clear plastic part and swing the back of the blade through 90Ëš the blade remains in focus and it provides a great view of the business end of the knife .
I think it has already been mentioned but it does away with the need for a costly stand .01/17/2014 at 1:01 pm #16491To Leo:
That’s exactly how I use my Celestron. Set up to focus on the edge as the plastic shroud rests on the edge, I can then smoothly slide the ‘scope along the edge, watching for flaws as I go. I have also done a video capture so that I can compare any part of the edge to how it appeared in the last video. Files are huge; with the res set at 5MP, my first video was about 6-7 minutes long and nearly 300 megabytes.But yes, this setup allows you to pick a spot on the edge and then rock the scope left or right to see the side profile of the edge, or the scratch pattern on the bevel faces.
To Titanrw:
The resolution of your screen shouldn’t effect your magnification. I have the same set-up: an old Dell laptop with XP and a 17″ non-HD monitor. My Celestron software allows me to capture an image, then, having calibrated the software to a known reference (they supply a little scale graduated in 1/16″ or 0.5mm), you can measure the distance between any two points (or radii) as you would in a CAD program. You can zoom in on a very small part of the image and measure very accurately. You can measure in inches, mm or camera pixels. Yesterday, I measured a hair I’d shaved from my belly and found it to be 52 microns in diameter. {What can I say? I’ve got very fine hair, where I still have hair.} I then measured it in pixels and found that the image was indeed 5MP. Photo capture or video rec/off can be done either with the mouse pointer or with a switch/dial attachment in the camera cable. Nice gadget, but I’m just not happy with the clarity of photos when you bump the resolution over the default (1.3MP). Apparently higher resolution is done via interlacing – more scanning time is needed and that always means less crisp images. When you zoom in, the images get even less crisp.
01/17/2014 at 1:07 pm #16492If you want to keep the files and reduce their size try Handbrake http://handbrake.fr you can process and compress video file for different devices so if you process these files for a mobile device the size should be reduced its a free app useful if space is at a premium .
01/17/2014 at 7:00 pm #16493The resolution of your screen shouldn’t effect your magnification. I have the same set-up: an old Dell laptop with XP and a 17″ non-HD monitor. My Celestron software allows me to capture an image, then, having calibrated the software to a known reference (they supply a little scale graduated in 1/16″ or 0.5mm), you can measure the distance between any two points (or radii) as you would in a CAD program. You can zoom in on a very small part of the image and measure very accurately. You can measure in inches, mm or camera pixels.
My microscope’s software doesn’t give you any calibration or scale. And you set whatever capture resolution you want in the software. Even though the cmos sensor obviously has a fixed, and fairly low resolution.
Even if the software does give you a scale, it’s not going to change the fact that different size displays will give you different magnification ‘values’ when calculated based on display / realsize. For example, my phone has a resolution of 1920×1080 on a screen that’s about 5 inches. Lets say your microscope gives you a true 1920×1080 resolution file. Lets also say the microscope captures an area a total of 0.050 inches across. 5 / 0.050 gives a magnification of 100x.
But lets say you’re doing a presentation, and you have the same 1920×1080 resolution file on an HD projector that’s projecting onto a 10 foot screen. Now your magnification is 120 inches / 0.050 = 2400x.
Both are ‘correct’. But the source file only has so many pixels. So this is basically a form of digital zoom. The projector example is the rough equivalent of ‘zooming in’ on your image viewing software on your pc. Or my microscopes software letting me capture to basically any size image I want when the sensor is really only good for about 640×480.
I’m mainly saying the stated 400x magnification of the veho is inflated. The software can up-sample the image, or I can zoom in digitally and make the display image bigger, therefore more magification, but the quality just isn’t there. Maintaining a sharp picture requires relatively low resolutions and therefore smaller display resolutions. This is how I get the 137x mag I stated previously.
01/17/2014 at 9:04 pm #16495Welcome to the forum titanrw! Very nice work for one of your first knives!
Molecule Polishing: my blog about sharpening with the Wicked Edge
02/19/2014 at 9:03 am #17250I’ve definitely noticed from my 1st edge to my 15th edge, as my diamond stones break in, I can achieve a keener edge and “edge of the edge”. I like to follow a step by step procedure similar to Jende Industry’s blog[/url]
To tcmeyer:
I have found that following this procedure requires progress checks via usb microscope quite a few times along the way. I liked to set the focus on my no name microscope (I’ve found that some are better than others) while the plastic shroud rests on the edge to do this.The problem I’m having, while these no name microscopes are fairly inexpensive, is that they’ve worn out on me. I thought I could solve this problem by purchasing a Veho 400x. However, the Veho seems to have two planes that it focuses it on, one around 20x (too small) and one around 400x (too hard to keep in focus manually).
I see, by reading this thread, that some of you use a Celestron microscope. It seems like it may be of higher quality than my no-namers, will you please give me more details on your Celestron use? What is the model?
02/19/2014 at 11:51 am #17251Thanks
02/20/2014 at 12:34 pm #17263I’ll try to get some photos and info on the Celestron together, then will reply. Stand by.
02/20/2014 at 12:38 pm #17264Excellent thanks
02/21/2014 at 2:00 pm #17285So! Celestron! I have the cheap little version they call the Handheld Digital Microscope Pro, Model Mo. 44308 I paid $108 to Amazon in Dec, but now they’re down to $76.
I hoped that the 5MP would let me see edges clearer, but your images look every bit as good.
Here’s a link to the pdf of the instruction manual:
http://www.celestron.com/c3/support3/index.php?_m=downloads&_a=viewdownload&downloaditemid=552&nav=0,1The major improvements lie mostly in the software, which is a major upgrade, but has a number of shortcomings. My favorite feature is that it has a fixed magnification – 10X according to the manual. Of course current display monitors put the magnification up in the 180X range. The image area is about 2.5mm wide. Resolution ranges from 1280X960 (1.3MP) to 2592X1944 (5.0MP) which is about 1 pixel per micron.
I’ve had trouble getting 5MP photos in the handheld mode, so something seems to be taking extra time. Celestron claims it’s a true 5MP sensor, but it acts more like interlacing.
For a given focus setting, you can do a quick calibration, after which you can measure features (distances, angles, radii) on the photos you capture. The thumbwheel on the housing is to adjust focus. If you look into the camera lens area, you’ll see that it moves axially with the thumbwheel. Since changing the focus moves the camera’s distance to the object being viewed, it would change the magnification and invalidate the calibration.
Each photo or video you capture is held on the current strip of image captures. If you close the session, you can’t necessarily reopen previous captures, except in other image or video viewers.
Here’s a photo of a cross-section of a scalpel I was measuring:
Here’s a cropped portion of a 5MP photo of an edge taken from a fixed stand
Here’s a video I just took of a Delica 4 edge that’s showing just a little wear: I don’t think this is going to work… It’s 17 MB, about 35 secs long. But it shows how you can slide along an edge, looking for defects. Crossing my fingers…
Attachments:02/21/2014 at 8:43 pm #17289Sorry, but the video didn’t upload, which explains why the other gents use Youtube.
Are there any other questions I can answer for you?
02/23/2014 at 8:16 am #17318that is great…. Thank you very much.
-
AuthorPosts
- You must be logged in to reply to this topic.