New Grit Photos at 800x
Recent › Forums › Main Forum › Techniques and Sharpening Strategies › Abrasives › New Grit Photos at 800x
- This topic has 9 replies, 5 voices, and was last updated 01/21/2013 at 1:31 pm by
Ken Schwartz.
-
AuthorPosts
-
12/08/2012 at 5:42 am #7959
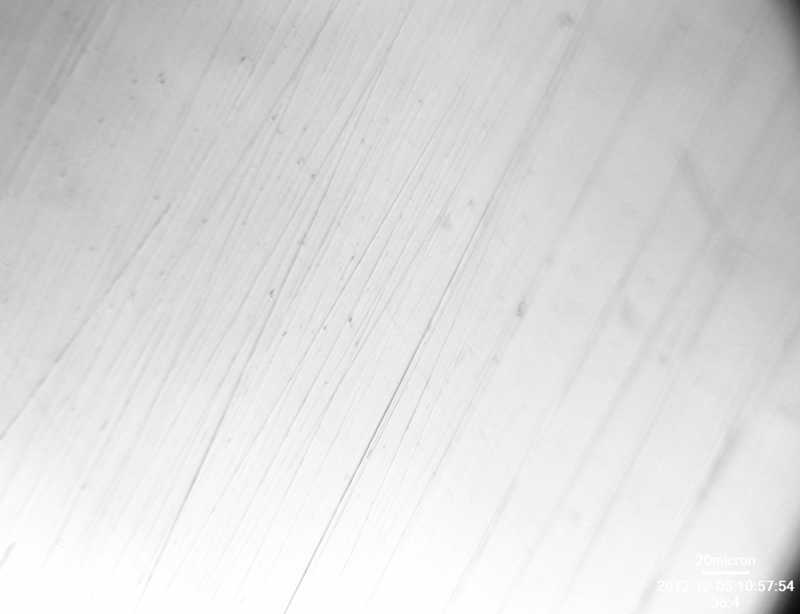
I’m busy preparing samples to begin a new series of micro-photos of the effects of the different abrasives we offer. My goal is to update the product pages with the images, as well as the grit chart. I settled on 800x for the magnification because there is plenty of detail and the field of view is big enough to see the actual scratch pattern whereas at 2000x, you can’t really discern a pattern in the small field. I’m prepping a batch of identical blades to a good, .5um finish so that we can be sure we’re only seeing the scratches from the grit in question. I won’t spend quite as much time preparing the samples for grits over 1um, but will do so for the finer grits. I won’t try to image anything below .25um because my scope won’t pick it up anyway. Here is an example of the samples I’ll be using for grits 1um and coarser:
I’ll post a picture of the sample level for the sub micron grits soon…
Attachments:-Clay
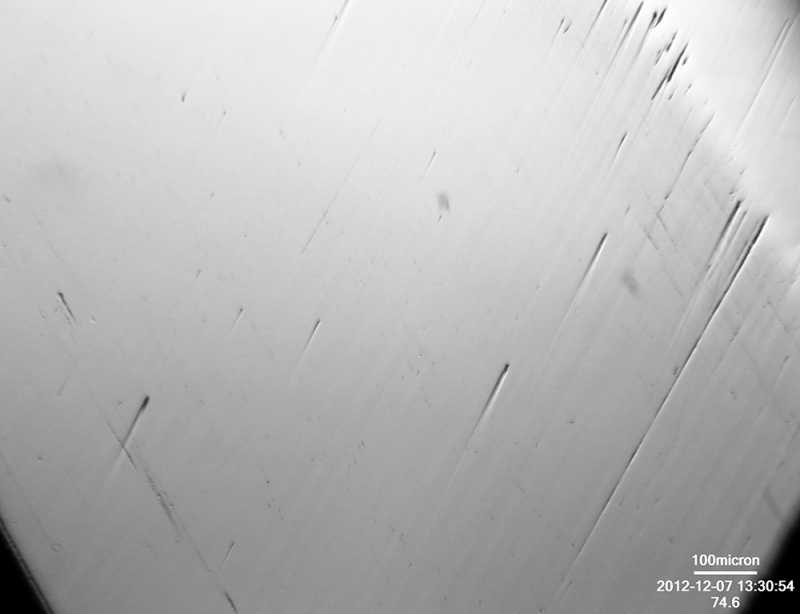
12/08/2012 at 6:25 am #796212/08/2012 at 7:35 am #7967Another sub-micron sample complete and ready for a stone:
Sometimes I need a reality check and hunt around on the sample for some scratches because I still find myself shocked that the bevels can get that clean. So here is another look at the second sample I prepped:
And just to be sure, I zoomed out to 200x:
In this last one, you can see the shoulder of the bevel and where I’d sharpened it before with various other grits.
-Clay
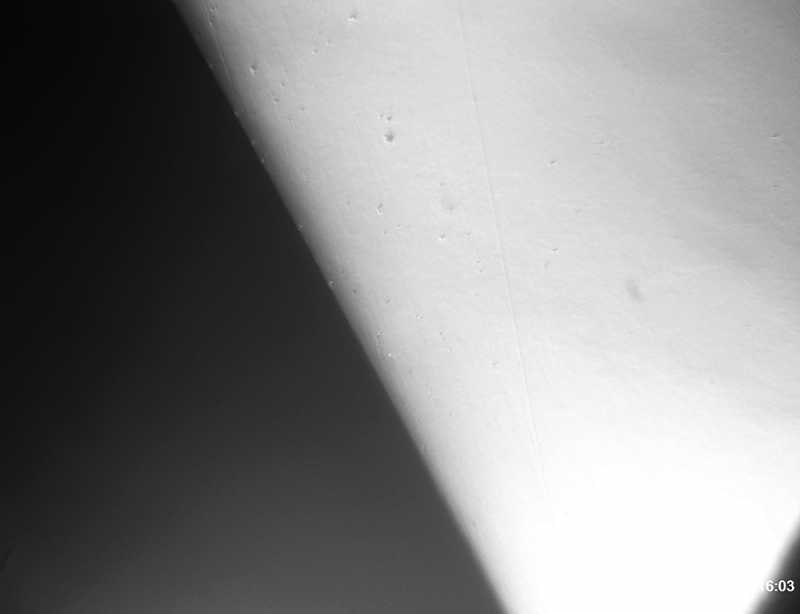
12/08/2012 at 10:52 am #7970Here are a couple of fun photos of a sample after .125um CBN on Kangaroo:
The image above shows a nice clean edge and a very slight curvature resulting from the strops.
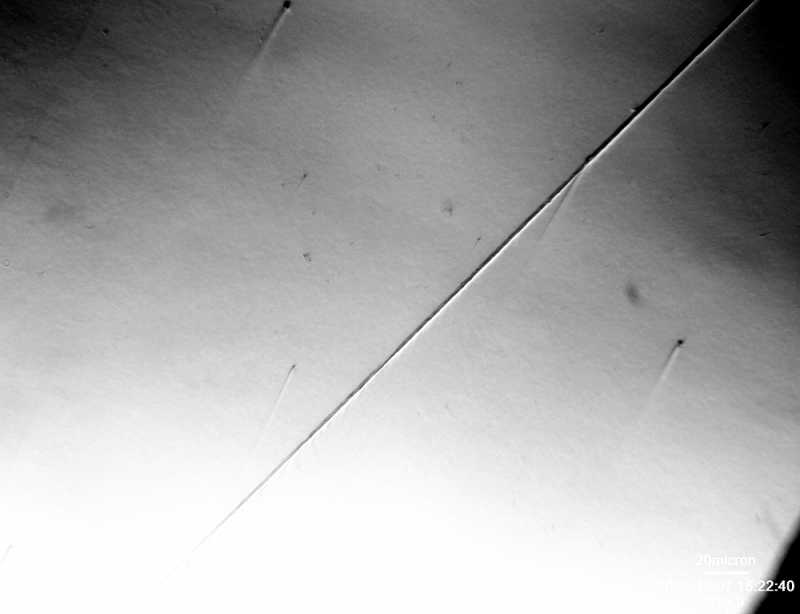
The blade in the image above is nearly totally smooth with the exception of a lone 1-2um scratch left over from one of the stones, either a diamond embedded in a strop or one of the actual diamond plates. It’s nice to have a reference point when looking at such smooth surfaces.
-Clay
12/08/2012 at 1:25 pm #7971Wow! That’s some lunar surface imagery going on there Clay. I can hardly believe the surface can get that clean either. It’s pretty crazy to see the mirror finish on that level where only tiny pockmarks (carbides?) and the occasional errant scratch dot the landscape.
12/08/2012 at 3:57 pm #7972Clay, would you mind posting what grit progression you did to get to that ultra smoothness level and approximate number of passes at each level if you get time? Thanks!
12/09/2012 at 2:23 am #7980Clay, would you mind posting what grit progression you did to get to that ultra smoothness level and approximate number of passes at each level if you get time? Thanks!
Funny you should ask… I got four different samples ready yesterday and used a different route for each. With all of them, I used the 600# diamond plates to set the bevel and then cleaned them up with the Superfine Ceramics. On the last one, I went too fast and didn’t spend enough time with the Superfines and the whole process took a lot longer, so my first lesson was not to skimp on time with the Superfines. On one sample, after the Superfines, I went through the following strops: 14um>10um>5um>3.5um>1um>.5um all diamond on cow leather, then .5um>.25um diamond on kangaroo and then .125um CBN on kangaroo. On another sample, after the Superfines I went to 3um diamond lapping film (which we’ll be carrying soon) then .5um and .1um diamond films (also soon to come) and then back to the .25um diamond and .125 CBN on kangaroo. On another sample, I went from the Superfines to the 1um diamond on cow to the .5um diamond on cow, back to the 1um diamond on kangaroo to the .5um diamond on kangaroo, .25 diamond on kangaroo, .125um CBN on kangaroo, .125um CBN on nano-cloth, back to the .125um CBN on kangaroo. I don’t even remember the other sample, as I bounced around so much, playing with the different effects of each option but I do know it involved the diamond films which I found really impressive! Another lesson I learned was about applying the stropping paste: when recharging my strops, I put the usual amount and then sprayed a very small amount of rubbing alcohol on before rubbing the two sides together. It prevented the paste from coming off on the blade and got me right to where I wanted to be regarding both ‘stiction’ and abrasion. Very impressive little tweak to my process which I’ll be sure to use in the future. I have no idea of the number of passes on grit for each sample but I promise I’ll keep track on the next one I do and post about it. All four samples took me all afternoon, but I was constantly imaging them, both with the handheld 60x loupe and with the microscope and was routinely answering questions around the office, so I don’t really have an accurate sense of how long it would have taken if I’d worked straight through on one sample, but I’m guessing that 1/2 hour would have probably done it. I was only working on samples for the microscope, not on an actual knife so I wasn’t concerned with getting every last scratch out along the entire blade, just sections big enough under the scope to take the upcoming grit pictures. Doing a whole knife to that level would take longer.
For the diamond films, I need to find a source for some glass platens and then we can start listing them. They are a wonderful, fast tool to get an extremely refined edge and mirror polish.
-Clay
12/09/2012 at 3:19 am #7990Lots of good information. Can you tell a difference between roo and nano at a constant grit, such as .125 CBN?
12/09/2012 at 3:28 am #7991Lots of good information. Can you tell a difference between roo and nano at a constant grit, such as .125 CBN?
Not at .125 CBN, it’s too small for my scope, but maybe at .25um and definitely at .5um. My plan for the fine sprays >=.25um is to start with the clean sample and then use the sprays on nano-cloth (thanks Ken Schwartz!) to show the scratches from the pure abrasive. I’ll then repeat the process with the abrasive on kangaroo. I’ve already done a lot comparing horse and cow leathers and fine abrasives, so I probably won’t repeat those right now.
-Clay
01/21/2013 at 1:31 pm #8986Clay, I have the glass platens for the Wicked Edge – and diamond films too. Please send me a PM about them.
—
Ken -
AuthorPosts
- You must be logged in to reply to this topic.