Microtech's "Closer"
Recent › Forums › Main Forum › Techniques and Sharpening Strategies › Microtech's "Closer"
- This topic has 16 replies, 5 voices, and was last updated 03/27/2016 at 3:03 pm by
 cbwx34.
-
AuthorPosts
-
03/24/2016 at 10:03 pm #32580
Hi there!
I’m fairly new to the forum and to WE system – got my first WE gen. 3 in early February. Immediately used it on my kitchen knives with outstanding results. A couple of days ago I decided to buy a Microtech Closer knife. Naturally, the first thing I tried to do is to figure out how to sharpen it. But I’m not sure how to proceed. I tried to figure out micro bevel angle, but it looks like it stays constant from the hill of the blade up until it starts curving, but after that it starts going more and more obtuse towards the tip of the blade. Flat part – about 20 degrees or so but I couldn’t even figure out bevel angle at the tip – it looked like it was over 27 degrees that my WE system allows. How do you sharpen a blade like that? Without reprofiling it. Is it even possibles with WE system?
Cheers!
03/25/2016 at 2:28 am #32588This is a skill that every new user has to learn. How you position the knife in the clamps can have a major effect on the angle of the bevels. Generally, you move the knife forward or back so as to match the angle of the bevel as the stone follows the belly of the blade on down toward the tip. Imagine the sweep of the stone describing a cone as it moves through its path. You’d want the arc of the belly to fall as close as possible along the line described by the sweep of the stone.
Josh of Razor Edge Knives describes a method in the following video:
03/25/2016 at 6:16 am #32593I haven’t sharpened that particular knife, so I looked it up. First, WOW… if it’s like the ones I looked at, very nice!
From the pictures it doesn’t appear to be sharpened unusual, so my first question is, how are you determining the angles? If you’re clamping it in the WE, be aware that, as the stone travels around the belly toward the tip, the farther away the tip is from the clamp, the smaller the actual angle is…
… from this page: https://www.wickededgeusa.com/does-the-angle-change-along-the-length-of-longer-blades-on-the-wicked-edge/
As tcmeyer posted, it may be a matter of positioning the knife properly, to cover the entire knife.
Like I said, I’m just going on pictures. It might help if you can post a picture or two of your setup… to see how it looks and if anything stands out. Maybe also how exactly you’re determining these angles?
Attachments:
You must be logged in to access attached files.
03/25/2016 at 12:53 pm #32614tcmeyer and cbwx34 – thanks for replying and tips!
cbwx34: I’m using sharpie trick to determine bevels angle.
Here are 2 links – first one is after the sweet spot setup that was recommended in the video. The other one is close up of the knife’s tip. Sorry, I don’t have digital microscope, so I had to dig up my old macro lens. Result wasn’t great as I tried to focus on the tip of the knife so everything else is out of focus.
Tip of the knife after sharpie test
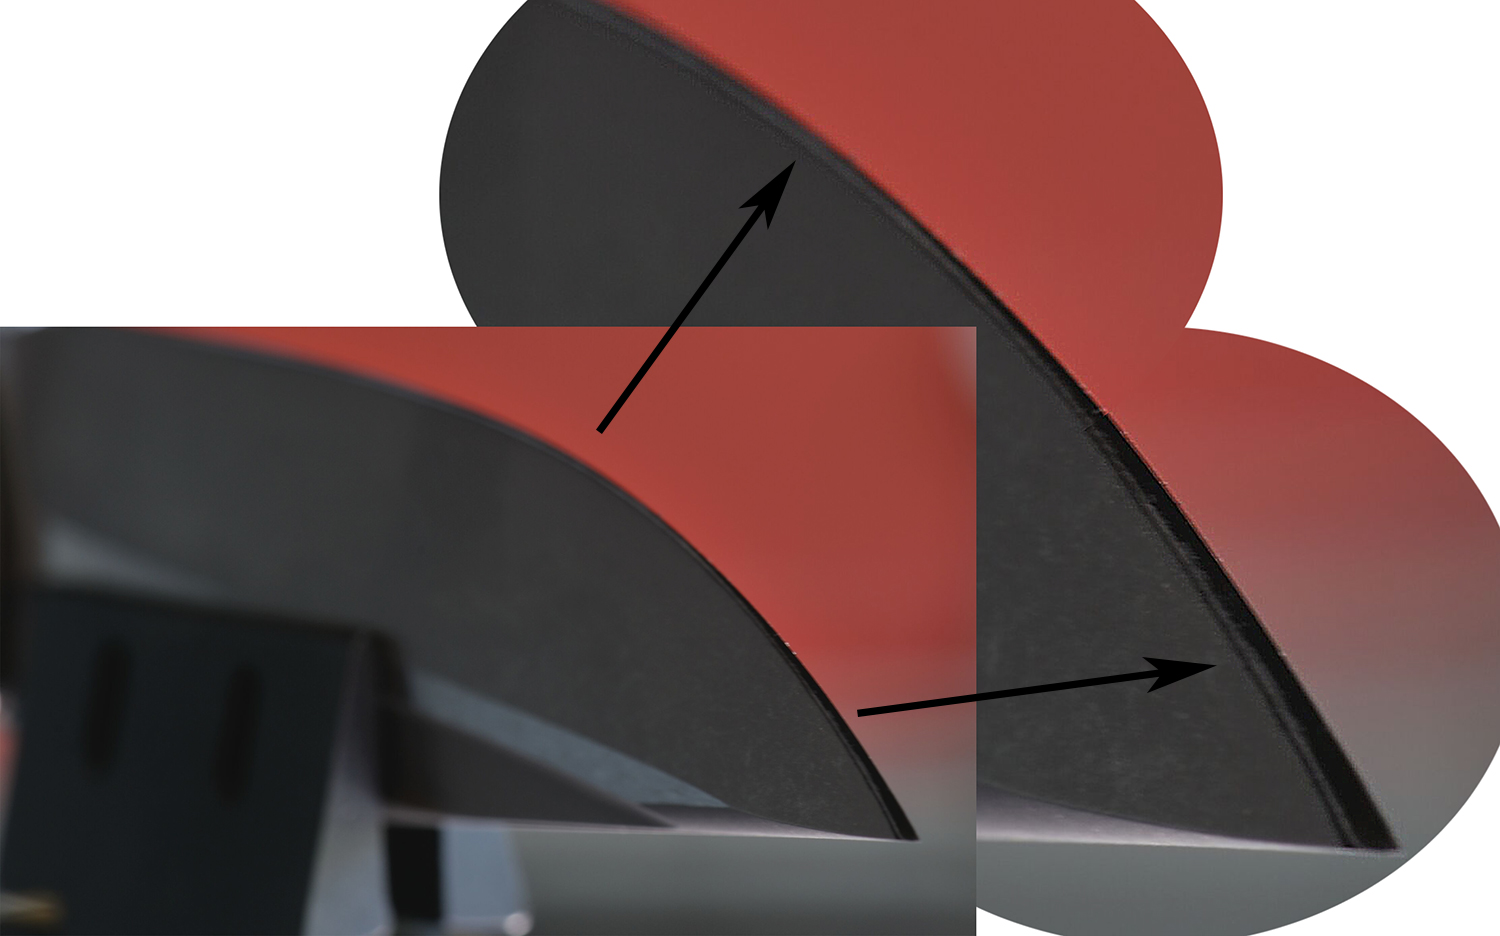
At any rate, the belly of the knife has sharpie color completely removed, but as it gets to the curving part closer to the tip of the blade, you can see that sharpie is barely touched which tells me that closer to the tip of the knife bevel angle increases by quite a bit.
Even if I move clamp as close to the tip as possible and set WE to 27 degrees, I still can’t remove sharpie.
Any thoughts on this?
Thanks for the help!
03/25/2016 at 1:55 pm #32616Hi dima,
Thanks for posting. Just to be clear on terminology and what’s happening with your angles, what you’re seeing with the stone track through the marker is that the stone is removing the marker from shoulder to edge along most of the blade but as the stone hits about midway through the belly, it’s only removing the marker from the shoulder, possibly indicating that the angle of the stone to the blade is dropping as it approaches the tip (there is another possibility that I’ll discuss below the image.) I did a little markup on your photo (nice photo by the way) so that you can see it more clearly:
The stone track is easier to see in the section blowups behind the regular image.
I can’t tell for sure from the image you provided, nor from the ones I can find online, but it appears that there is not much distal taper to the spine i.e. the spine does not taper toward the tip. If that’s the case, then the bevel through the belly and especially towards the tip is being cut from thicker stock, in which case the angle could remain similar throughout the blade but you’d be ending up with a wider bevel at the tip anyway. If you’re using an Angle Cube, you might be able to test it by checking the angle above the clamp and again at the tip, but you have to be sure that the Angle Cube is plumb when it’s out on the tip portion. You can use a square or you can attach some string to the cube to check for plumb. If you’re reading similar angles at both locations, the issue is the thickness of the stock at the tip. If you’re readings are very different e.g. more than a degree, then you still haven’t found the sweet spot and you might want to experiment with rotating the tip of the blade downward.
-Clay
Attachments:
You must be logged in to access attached files.
1 user thanked author for this post.
03/25/2016 at 2:45 pm #32625Ahh, that explanation certainly helped! I ended up rotating tip of the blade way down. I also made sure that angle measurements are identical at the hill and at the tip of the blade with an angle cube. Thanks a bunch, Clay!
1 user thanked author for this post.
03/26/2016 at 9:54 am #32660Glad you got it figured out… pictures always help.
If you can, post how you finally got it set up… and also the results. (A good excuse to see more pictures of that knife).
1 user thanked author for this post.
03/26/2016 at 9:13 pm #32691cbwx34 – gladly!

However, I don’t have the “results” yet, as I just figured out how to sharpen this knife. Don’t have necessary tools yet – just ordered a set of ceramics and strops yesterday. Once it arrives, I’ll try to take a photo of the finished edge.
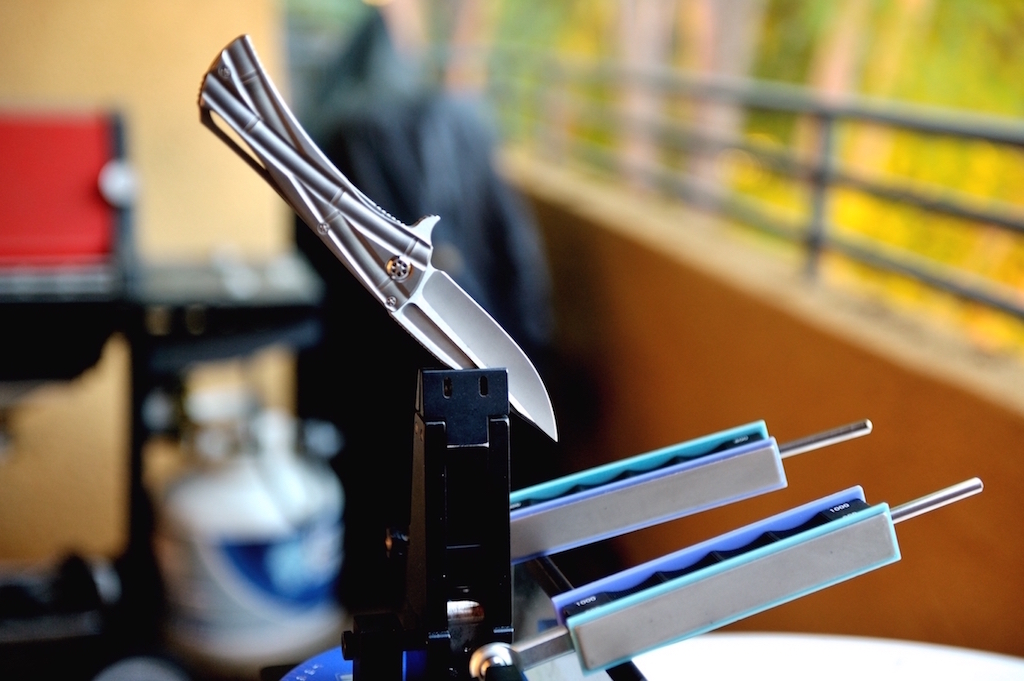
Setup looks like this (this is an approximation):
As for the photos of the knife itself, check out these:
Attachments:
You must be logged in to access attached files.
1 user thanked author for this post.
03/26/2016 at 9:31 pm #32694Forgot to mention – Clay so kindly agreed to make a demo video on how to sharpen this knife. Coming soon, I hope!

1 user thanked author for this post.
03/27/2016 at 1:05 am #32700Yikes! I don’t like to see an edge mounted vertically so near to the vise. I would think that the effective angle at the tip would be quite high – maybe up to 40 dps or more. I’ll be very curious as to how it turns out.
03/27/2016 at 3:45 am #32706cbwx34 – gladly!
 However, I don’t have the “results” yet, as I just figured out how to sharpen this knife. Don’t have necessary tools yet – just ordered a set of ceramics and strops yesterday. Once it arrives, I’ll try to take a photo of the finished edge. Setup looks like this (this is an approximation)
Hia
My guess you might get a hard time when it comes time for touch up

You also might want the Advanced alignment guide many of us waiting for
 03/27/2016 at 9:26 am #32710
Yikes! I don’t like to see an edge mounted vertically so near to the vise. I would think that the effective angle at the tip would be quite high – maybe up to 40 dps or more. I’ll be very curious as to how it turns out.
Probably not… If you rotate the image so that the knife is horizontal (since the pivot can’t tell the difference)…
… it doesn’t seem as bad as it looks in the original photo.
Attachments:
You must be logged in to access attached files.
03/27/2016 at 10:10 am #32714Yikes! I don’t like to see an edge mounted vertically so near to the vise. I would think that the effective angle at the tip would be quite high – maybe up to 40 dps or more. I’ll be very curious as to how it turns out.
I don’t know about 40 degrees, but it certainly is higher than 27 that WE allows with conventional mounting.
03/27/2016 at 11:05 am #32717You have to consider the pivot point of the arm relative to the point of contact (the tip). The stone is rotated almost 90 deg. from normal. If this point were on the left edge of the vise, the angle would be right around 90 deg, no matter how high the contact point is. The sweep of the tip should be about as far forward of the pivot point as the heel of the edge is above the pivot point.
Incidentally, the Gen 3 vise has two contact points – one at each of the upper corners of the vise. From the photo, it looks like the blade is held at only one point, which might let the blade rotate about that point.
1 user thanked author for this post.
03/27/2016 at 2:16 pm #32720You have to consider the pivot point of the arm relative to the point of contact (the tip). The stone is rotated almost 90 deg. from normal. If this point were on the left edge of the vise, the angle would be right around 90 deg, no matter how high the contact point is. The sweep of the tip should be about as far forward of the pivot point as the heel of the edge is above the pivot point. Incidentally, the Gen 3 vise has two contact points – one at each of the upper corners of the vise. From the photo, it looks like the blade is held at only one point, which might let the blade rotate about that point.
I had to clamp a knife in the vise to figure out what you were saying… and you’re right… you can mount a knife in such a position (not saying this one for sure, but in general), with the tip close to the clamp, that the angle as you approach the tip can rapidly change to the point it is 90 deg. If you try and keep the stone from rotating (around the axis of the rod), it won’t contact the tip at all.
in the case of the the Microtech… from what I can tell with the knife I was trying this on… I wonder if it would be better to clamp it closer to the heel, then rotate it down as needed to match the bevel.
Thanks for the explanation.
-
AuthorPosts
- You must be logged in to reply to this topic.


