Micro Bevels
Recent › Forums › Main Forum › Techniques and Sharpening Strategies › Advanced Techniques and Sharpening Strategies › Micro Bevels
- This topic has 15 replies, 10 voices, and was last updated 05/05/2014 at 7:15 am by
Mark76.
-
AuthorPosts
-
01/02/2013 at 11:40 am #8529
How to you set a micro bevel?
I assume you completely finish the knife first, stropping etc.
1. In reference to the primary angle how do you set the micro bevel? I.e. 2 degrees greater than the primary angle.
2. What stone/progression/number of strokes to you use?
3. Do you strop the micro bevel?
4. How do you “touch” up an edge with a micro bevel after moderate use? Can you strop? Do you touch up at the micro bevel angle? Do you re apex at the primary angle and apply a micro bevel again?
5. Anything else I need to know about how to make a micro bevel?
6. When do you use a micro bevel and when not?01/02/2013 at 1:39 pm #8536I don’t claim to know anything and I’d love to have this picked apart…
I was doing a couple knives for my brother-in-law today, one being his EDC. I’ve seen shark bait less mangled than this edge :blink: The factory angle on it was 17~18 (no angle cube), and he uses this thing hard so what I did was finish the blade at the factory angle then up it 3 notches/degrees and just use the 800/1000 stones. It was easy to see the secondary bevel form and I even brought up a slight burr. I’m not counting strokes, but it wasn’t that many (30 a side?) ~ and I don’t own strops.
I’m hoping that this will maybe help the blade stand up to the punishment… if not, then I might be trying to track down a blade more suited to his use. Can’t hurt anything and it’s a nice starting experience.
01/03/2013 at 2:23 am #85381&4 I set my micro at 30° so I can quickly touch it up on a Sharpmaker.
2 Varies by need but generically, 1000 WEPS-> 2000 Naniway SS
3 Not generally
5 Just that it’s a personal preference thing
6 Depends on the steel (how well it will stand a low angle) and how low I want that angle to be, but generally I micro bevel below 24° inclusive.
Ken
01/03/2013 at 6:19 am #8554If your looking to convex your edge you should really check out clays video on you tube. I believe he does a chris reeves knife and it is extremely educational. I started with just one micro bevel and it helped but convexing makes a WORLD of difference. Seeing clay actually walk you through it step by step really makes a different also.
01/03/2013 at 12:52 pm #8573Yes, it does! It’s actually how I first learned to do my own Sebenza back to “factory” edge. I love the look that convex gives you!
01/23/2013 at 10:33 pm #9048A microbevel is just a tiny bevel less acute than the original bevel.
So you can make a microbevel from a single stroke of a high grit strop (and see it under a scope) or make a much larger one with a coarser stone too. The level of refinement, the number of degrees difference is up to you.
The purpose of a microbevel is to make the edge less acute. This gives you a more durable edge, trading acuteness for toughness. You typically use it if the existing angle is too acute FOR THE TASK you wish the knife to perform.
You can do a series of less and less acute microbevels and combine or blend them into a convex grind, or just use a softer substrate to generate a convex grind (with precision when using a Wicked Edge. For this task, I utilize neoprene mounted on a paddle with an abrasive substrate (nanocloth or Kangaroo usually) over it with abrasive applied (CBN or diamond usually). Harder substrates produce less convexity.
—
Ken01/30/2013 at 7:55 pm #9216How to you set a micro bevel?
I assume you completely finish the knife first, stropping etc.
1. In reference to the primary angle how do you set the micro bevel? I.e. 2 degrees greater than the primary angle.
2. What stone/progression/number of strokes to you use?
3. Do you strop the micro bevel?
4. How do you “touch” up an edge with a micro bevel after moderate use? Can you strop? Do you touch up at the micro bevel angle? Do you re apex at the primary angle and apply a micro bevel again?
5. Anything else I need to know about how to make a micro bevel?
6. When do you use a micro bevel and when not?Excellent questions!
A micro bevel has two general definitions, IMO.
The first is a raised (more obtuse) angle formed with minimal amounts of strokes after the majority, if not all, of the sharpening is finished. For example, if you sharpen a knife at 20 degrees per side through a progression of paddles and then take the final grit and raise the angle 1 or 2 degrees for 10-20 strokes, you will have a micro bevel.
The second is an actual secondary bevel, formed before the final grit, or is retraced at the higher angle after the full progression is completed at the lower angle. For example, if you sharpen (or thin) a knife at 18 degrees per side on the diamonds, then increase the angle to 20 degrees on the ceramics/Choseras for the final edge. OR, if you progress at 18 degrees per side throughout the full progression, then raise the angle and redo the entire progression (or majority of) again at 20 degrees. This creates two distinct bevels.
Technically, they equal the same thing, but the first micro bevel is used more to confirm that the edge of the edge has been abraded, or the burr has been fully removed . The second is for more durability, strength and ease of cutting.
The third, and less talked about micro bevel is when the arm or knife slips and you don’t realize it! :angry:
When touching up a micro bevel, it should be done at the micro bevel angle, since that is the one with the cutting power. If the edge is still intact (no chips) and is just dulled, then a few strokes of the final grit should suffice (there is no official number, but I’d start with 5 light alternating strokes, then increase in sets of 5 if necessary).
The micro bevel in both definitions will eventually become too obtuse and will need to be fully redone, but you should get several touch ups before that happens. If you have the time and inclination, you could also equally strop the lower angle as a maintenance step to try to keep the same ratio of thickness at the edge and behind it, but that kind of makes touching up like work, IMO.
05/04/2014 at 5:50 pm #18542I was just scanning this pleathera of information and thought I could maybe add something. My number 1 reason for creating a micro bevel is to aim the teeth backwards on knives that do mostly pull type slices since I like to do my entire profile from 50 grit up to strops in scrubbing/sweeping motions with the swapping motions heading up and away (teeth faxing forward). For me this is the most natural feeling sweeping stroke but I can’t speak for everyone.
Sent from my Nexus 10 using Tapatalk
05/04/2014 at 7:27 pm #18544I quite like Japanese knife Imports version of the micro bevel after finishing honing the primary bevel raise the angle maybe as much as 5˚-10˚ then hone the new bevel with abut 4/5 passes each side the bevel should be barley visible except with a loupe the honing stroke should be done on the finishing stone so either the fine ceramics or the Chosera 5K if you do to much more than 5 passes then especially on Western steel the bevel will get too large . The object is to just increase durability .
It is almost the same as the secondary bevel thinning the primary and then the primary thinning the micro bevel .
Directing the micro serrations is one of Murray Carters tricks so if the micro serrations face back towards the handle then this knife will draw cur beautifully reverse them for more of a push cut or make them vertical so the teeth bite in either direction.
These advanced sharpening techniques are suited to working blades – hunters knives kitchen knives etc .
if all you want is a mirror polished edge then it is not necessary .
The aim with any additional bevels is to keep them minimal just enough to get to the edge so say 5 passes then check with a loupe this minimises the risk of removing too much precious steel.
Note very little pressure and edge trailing only !!!You can see from the picture that the primary edge ideally should be very small and the micro bevel probable should be about 0.1 the size of the primary bevel . The aim is not to make the edge too thick again something that happens on knife in the mid to highish 50’s on the Rockwell scale if it becomes too big then you need to go back to the starting point the secondary bevel once more so the trick is to observe as you work either outside or with a loupe with illumination.
Jende Industries makes some very fine points over maintenance if you are short on time .
I think that if some of the facets are missed it is okay but ultimately it will be necessary to do all facets .
I think what is possible is if you have a run of similar knives to do then it may be possible to do all the knives at each angle so if you have 5 8 inch chefs knives that are of similar proportions it may be possible to do the secondary bevel first on them all then the primary and lastly the micro making only 3 angle changes for the 5 knives rather than 15 if each is done individually. Sure the angle will vary between the knives but the differences will be a constant . Bearing in mind a taller blade decreases the angel and a shorter one increases it so start possible setting up for the less tall blades you may also be able to lower the taller blades in the clamps to decrease the angle reduction.Leo Nav
Attachments:05/04/2014 at 8:37 pm #18547I quite like Japanese knife Imports version of the micro bevel after finishing honing the primary bevel raise the angle maybe as much as 5˚-10˚ then hone the new bevel with abut 4/5 passes each side
That’s funny, Leo. I had a chat with Jon when I bought my Suisin Inox honyaki from him. This is what he told me. Without knowing much about sharpening then, I did this and I was very happy with the result!
Any idea, by the way, why he would recommend this for the Suisin but not for many other Japanese knives?
Molecule Polishing: my blog about sharpening with the Wicked Edge
05/04/2014 at 9:53 pm #18553That I could not say I think that many of these tweaks that can be done are down to the individual. I think once you get to a certain level with Japanese knives it is taken for granted that you may thin it make the edge on a double bevel knife something other than 50-50 add more of a convex to it or add micro bevels( I believe that some of the best knives are virtually blunt OOTB since the individual will have their own preferences for the edge . The most complicated are the Debas since he suggests and ~I have done it on mine that the last 1/4-1/3 near the handle is given a double bevel where as most Debas are single bevel knives his reasoning for this is for separating vertebrae the edge is stronger for the straight arm body push through the neck or spine of the fish so the Deba will have a secondary bevel with a single sided primary bevel with a micro bevel then further back a double or if you like a V bevel with the uraoshi sharpening on the Uri so the Deba becomes multi faceted having 6 different angles on it .
Ps I would like to see a picture of you Inox Honyaki .
My top two knives currently are a blue steel Honyaki Nakiri and a Takeda Petty.
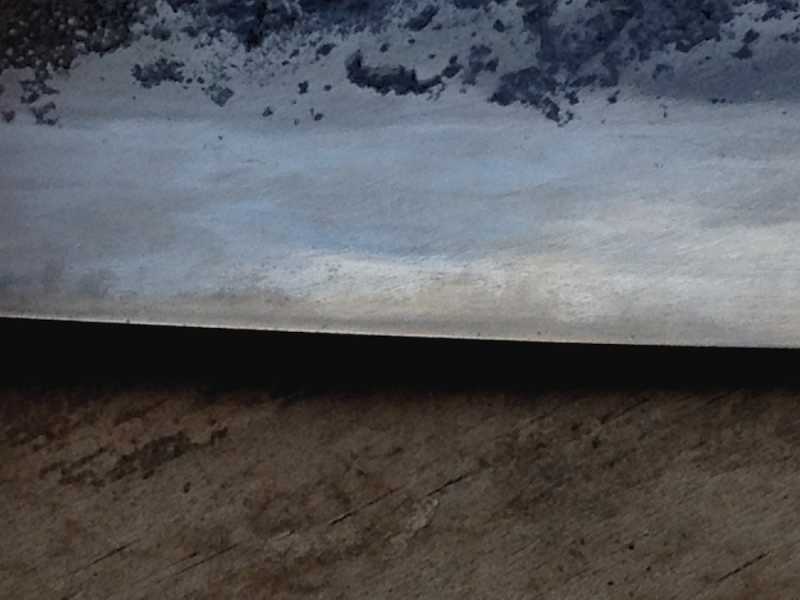
My honyaki is about the cheapest I could find but it gets better every time I sharpen it since I decided I needed to thin it to begin with then I put too high a convex edge on it so I am currently trying to loose that with each sharpening so that there is virtually no secondary bevel like a Takeda I think I have about two or three more sharpenings to achieve this still I will be patient with this since it takes a lot of work to sharpen as the secondary bevel accounts for 1/3rd of the blade and the blue steel is very tough so the last time I sharpened it a week or two ago I spent about an hour on the secondary.The dots on the primary are not chips they are probable small bits of cardboard from the box since it has Camellia Oil on it so it picks up all sorts.
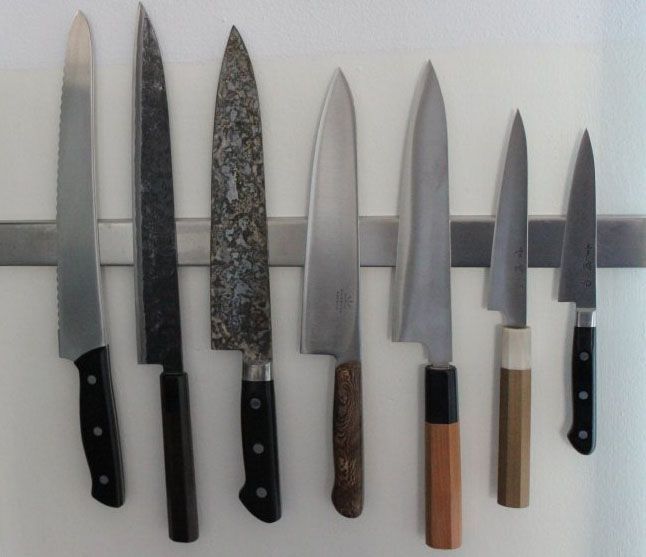
Attachments:05/04/2014 at 10:26 pm #18555Leo, no close up at hand, but the Suisin is the third one from the right. And the yanagiba is a Takeda.
Molecule Polishing: my blog about sharpening with the Wicked Edge
05/04/2014 at 10:41 pm #18557What a fabulous collection the Honyakis and Takeda almost feel organic to me.
I like the look of that petty next to your honyaki . That also looks like a Tojillo bread knife which by all accounts has nice wavy serrations that Ken Shultz sharpens on the edge of a bench stone . If it is a Tojillo & how did you get it? I note that CKTG are not allowed to ship them out of USA.05/04/2014 at 11:17 pm #18559If it is a Tojillo & how did you get it? I note that CKTG are not allowed to ship them out of USA.
Well, if you ask them nicely… 😉
It is a great bread knife that lives up to all expectations. Hardly any crumbs, which is really surprising. A butt-ugly handle, though. I’m looking to have it rehandled. Does anyone have any recommendations?
Molecule Polishing: my blog about sharpening with the Wicked Edge
05/05/2014 at 1:13 am #18560And whats the petty with the white ferrule on the handle it looks interesting.
I would look on KKF for people that do handles. -
AuthorPosts

- You must be logged in to reply to this topic.