Getting a mirror finish on your edge?
Recent › Forums › Main Forum › Welcome Mat › Getting a mirror finish on your edge?
- This topic has 55 replies, 14 voices, and was last updated 02/22/2015 at 2:14 pm by
CliffCurry.
-
AuthorPosts
-
02/17/2015 at 11:24 pm #23495
I had to lap the micro fines as well as the super fines. The micro fines took forever to lap. They are extremely hard. I also had to start at the 100’s and go up to the 1000’s to smooth them out. But now I get edges like this with them!!
Sent from my iPhone using Tapatalk
IS that edge the result of only ceramics or did you do some lapping film and or strop work on it after the ceramics?
Nice work!
02/18/2015 at 12:34 am #23497What does “lap” mean?
02/18/2015 at 12:46 am #23499What does “lap” mean?
Well..for our intent it would be #5.
2lap
verb
lappedlap·ping
Definition of LAPtransitive verb
1
a : to fold over or around something : wind
b : to envelop entirely : swathe
2
: to fold over especially into layers
3
: to hold protectively in or as if in the lap : cuddle
4
a : to place over and cover a part of : overlap
b : to join (as two boards) by a lap joint
5
a : to dress, smooth, or polish (as a metal surface) to a high degree of refinement or accuracy
b : to shape or fit by working two surfaces together with or without abrasives until a very close fit is produced
6
a : to overtake and thereby lead or increase the lead over (another contestant) by a full circuit of a racecourse
b : to complete the circuit of (a racecourse)02/18/2015 at 12:50 am #23500I had to lap the micro fines as well as the super fines. The micro fines took forever to lap. They are extremely hard. I also had to start at the 100’s and go up to the 1000’s to smooth them out. But now I get edges like this with them!!
Sent from my iPhone using Tapatalk
So your getting an edge like this by doing diamonds grit 100-1000 then ceramics super and micro fine? Are you using any leather strops after?
02/18/2015 at 1:38 am #23501I had to lap the micro fines as well as the super fines. The micro fines took forever to lap. They are extremely hard. I also had to start at the 100’s and go up to the 1000’s to smooth them out. But now I get edges like this with them!!
Sent from my iPhone using Tapatalk
IS that edge the result of only ceramics or did you do some lapping film and or strop work on it after the ceramics?
Nice work![/quote]
No……lol. Thats diamonds (100-1000) then ceramics (Super fine and micro ceramics) then strops (14,10 on leather)(5 & 3.5 on balsa),(1 & .5 on kangaroo) and (.125 and .050 on nanocloth.)
02/18/2015 at 2:17 am #23504wepsflana:
To explain further, “lapping” in our application is where you use a very flat, hard abrasive surface to flatten a softer stone which has become dished by repeated uses in a small area. If your super-fine ceramic stones become “dished” you might flatten them by rubbing them on the face of a larger diamond stone. Of course, this means you remove the material which is higher than the lowest “dished” point of the stone. You should try to keep the thickness of the stones equal at both ends. A 0.010″ difference in height (between the top of the stone and the top of the rod running thru the bore) from one end to the other will cause about a 0.1 degree error in angle. Since we don’t really use the full length of the stones, the error is actually less.
In other applications, lapping one surface to fit perfectly against another is accomplished by rubbing the two surfaces together with a semi-liquid media known as “lapping compound” brushed on one or both of the surfaces. For instance, gunsmiths might use lapping compound to create a tight, but smooth fit between the slide and the frame of an automatic pistol.
Technically, the diamond paste WE supplies for use with strops is a form of “lapping compound” and can be used as such.
One other comment – and please correct me if I’m wrong – If you lap a super-fine ceramic stone with a 100 grit diamond stone, that super-fine ceramic will still have its same super-fine grit rating. I don’t believe there is a need to go to higher lapping grits. The grit of the ceramic is homogeneous and unaffected by the lapping stone’s grit..
02/18/2015 at 2:42 am #23505wepsflana:
One other comment – and please correct me if I’m wrong – If you lap a super-fine ceramic stone with a 100 grit diamond stone, that super-fine ceramic will still have its same super-fine grit rating. I don’t believe there is a need to go to higher lapping grits. The grit of the ceramic is homogeneous and unaffected by the lapping stone’s grit..
That is correct. But it just MIGHT effect the way the stone provides feedback to your hand. (I do not know since I never used the lower grit) It may feel rougher even though it is not physically removing more material or being “rougher” on your edge. I am sure my stones were removing the material the same way as before but they just felt strange to me. Now they “feel” better when using them so the feedback works better for me. I did all my lapping on the fine and there was a lot of lapping to be done to get rid of the grooves and such that were there for some reason.
Maka sense?
02/18/2015 at 2:43 am #23507My point i the standard ceramics will give you the mirror look until you put them under micro scope, or look at them in a very oblique angle. Then you can begin to see the fine serrations and scratches that remain. To call them a mirror polish is a bit of a misnomer. It gives you the mirror effect, but it has not really been polished down sufficiently.
this is the 2nd half of a knife post i made else where looking specifically for a mirror polish. Trying to explain the limits of such a thing.
Here is the knife after. Re profiled to 20.20 or 40.40 inclusive. Flat bevel. I have not put a micro bevel on it yet.
Near the base of the knife.

The more middle of the cutting edge.

This is the area where i had the first bit of damage. It caught the light a bit better than the other photos.

These are where i had the more heavy damage


Tiny micro chip from trying to over polish.

This is the top of the flat spot at the tip.

The tip re profiled.

So how does it look not under magnification, just like this. It looks like a mirror polish.

 02/18/2015 at 8:45 am #23517
It all depends on what you define “sufficient” as. “I did not put a mirror polish on that woman…”
02/18/2015 at 12:04 pm #23524It all depends on what you define “sufficient” as. “I did not put a mirror polish on that woman…”
Yeah, sufficiently is rather subjective. Light and magnification reveal what is hidden and invisible to the naked eye. If grit size and magnification were infinitely accessible, then what? How could you even begin to use the word?… Don’t get me wrong, I’m not judging. I’m really picking on myself. Sometimes I have to tell myself, “STOP! Or you’ll go crazy!” 🙂
02/18/2015 at 3:06 pm #23532One of the things I find satisfying about achieving the mirror edge is very similar to the process of sanding wood I experienced when I did that type of work earlier in my life…
Many times (early on) I would be finishing up a wood piece like a kitchen table with say 400 grit and in the final sanding phases these ghastly 80 grit orbital marks would be revealed clearly. Obviously I hadn’t sanded them out completely with the 100 or 200 grit, but suddenly they would really pop out for all to see at the 400 grit level.
What this taught me, and the exact same thing applies to “sanding” the edge of a knife….To be thorough and double check my work at each grit stage to make sure ALL remnants of the courser grit sanding marks have been removed. If not many times it can be several grits later that the marks show up clearly. And who likes to go back and redo several grit stages just to remove a few deep scratches?
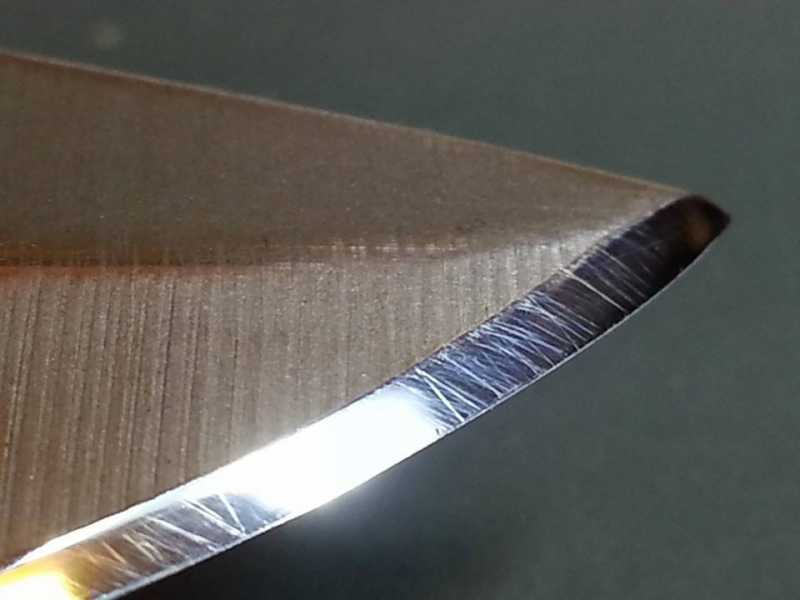
The mirror finish is also interesting because the better it gets the more it reveals the scratches that are left. For me it seems to look much worse before it gets better. Here is an example of a very early attempt. You can see its getting highly reflective but you can also clearly see where I missed many deep scratches early on and WOW do they show up now!
When I was first attempting to achieve a true “chrome-like” mirror finish, I used another technique I picked up from woodworking, which is to alter the direction of the strokes when changing grits. That way under magnification I can easily see if the marks are angled going heel to tip, or tip to heel, and I will alternate like that all the way down the rabbit hole with a good degree of confidence that I wont have to backtrack several levels. Doesn’t hurt to do a bit more then the bare minimum to remove the scratch lines as you go too! :whistle:
Attachments:02/18/2015 at 4:48 pm #23533The changing of the grit direction is something Josh has mentioned to me before a few times and I use it as well. Great advice!
02/18/2015 at 7:12 pm #23544Sorry a very bad habit, I was referring to a set of terms used in the auto detailing world. Where the abrasives are diminishing, meaning they start out at x grit and finish down to y point. I view that action the same way we are now changing stones. As a form of continually diminishing abrasives. (Typing this on my phone so bear with me)
The issue in the detailing world is when you think you have achieved one finish but do not verify with the correct lighting or 60x micro. With my photos above I simply was trying to illustrate the difference between a mirrior like finish versus a mirror polish. Which really should be verified via secondary sources, Ie oblique lighting or a microscope.
I also wanted to illustrate that the 1300/1600 stones are not fine enough by their own to finish down sufficiently to a mirror polish.
Personally I use several styles hand movements to try and remove those deep imbeded scratches. Am I the best at it no, just bringing comparable knowledge from a different skill set as a way to validate and verify the work produced.
For me that is oblique lighting and stereo microscope. These to validate the method, the motions, and the stone choices I use. In the short term it shows me mistakes before I carry them to far. In the long term it makes that learning curve of this skill set a lot less steep.
02/18/2015 at 8:12 pm #23549The changing of the grit direction is something Josh has mentioned to me before a few times and I use it as well. Great advice!
Yeah, after watching/listening to Josh and many others, I do my best to create a crosshatch pattern with the grind lines. Bob from Oldawan briefly mentions crosshatching in one of his WEPS product vids. From what I understand laying down new grind grind lines that are perpendicular (or as close to perpendicular as possible) to the previous grind lines helps to bettter erase them than if they’re done parallel.
02/18/2015 at 10:19 pm #23555Deleted.
-
AuthorPosts
- You must be logged in to reply to this topic.