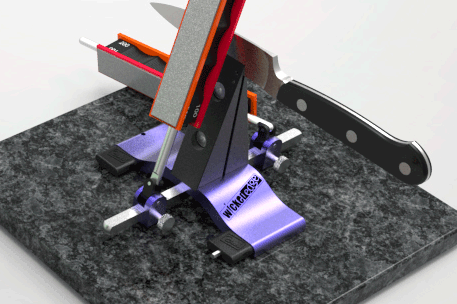
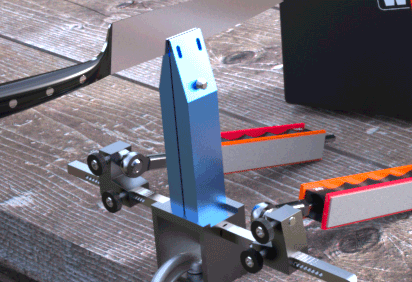
Generation 3 vise jaws
Recent › Forums › Main Forum › Techniques and Sharpening Strategies › Generation 3 vise jaws
- This topic has 11 replies, 7 voices, and was last updated 11/23/2016 at 9:01 am by
 tcmeyer.
-
AuthorPosts
-
09/20/2016 at 4:20 pm #35075
So, I recently purchased the above jaws to replace my old “tighten the screws” jaws. At first glance, the new cam type lockdown seems great. However, when you really look at it, it is only suited for one thickness of blade +/-.010 or so. With all other blade thicknesses, the jaws are tilted one way or the other, with the end result being, it does not have a good grip on the blade. In other words, you cannot adjust the jaws with screws top and bottom to get the jaws to have an even (parallel to the blade) grip on it.
Bottom line is, with the new jaws, my Strider slicer, is not even sharpenable. Forget all the bull about “sweet spot”. No matter where on the blade you try to grip it, with the full flat grind, these jaws do not grip the blade to where it will not move during sharpening.
Like a dumb ass, I threw away my old screw type jaws thinking this was the greatest. And yes, i have both the “thick blade” and the “thin blade” jaws for it. Didn’t realize that until after I had purchased them.
I am one of the biggest fans of the WE, but this is appears to be a major blow it on their otherwise great design.
Any ideas? I could not find a similar topic in the forum, but I am not the greatest at looking around in here.
John
1 user thanked author for this post.
09/21/2016 at 6:17 am #35082I too have noticed issues of slipping from side to side in the vise unless you have the perfect thickness. I help stabilize this by either wrapping something around the spine or using the Tormek small knife jig. Still have issues sometimes but I do like the functionality of the new vise.
I would call wicked edge… I’m sure they will hook you up with an old vise jaw 🙂
09/21/2016 at 7:50 am #35084With the exception of two knives; one which has very steep tapers from heel to tip and from edge to side flat and another which was too thick, I’ve had no problems with my Gen 3. WE designed in a small amount of looseness to let the vise conform to the blade and this seems to work better than the old vise for me.
I almost always apply masking tape to protect the blade at the contact points. Besides protecting the blade from scratches, this also serves to prevent metal-to-metal slippage. The vise contacts the blade at two pads, each located high and to the front/back. If they designed the clamping force to be the same as with the old vise and if you use something like masking tape, it should have the same holding power. Truthfully, I think the holding power is somewhat less than the max you could get out of a Gen 1, but cranking that hard on the old vise screws is probably bad for it.
The old vise required that you take care to keep your vise jaws both parallel to the blade’s sides. This need is completely eliminated with the Gen 3 and from my standpoint, is the major advantage.
Tossing your old vise out is a bummer. I swapped stuff with another forum member to get an extra paper-stone base, so I could have either setup available as needed. I bought a 12″ length of 5/16″ stainless square stock, fabricated an ABS base and mounted it with the old vise on the extra base. All I need to do is move the rod assemblies back and forth to exchange vises.
09/22/2016 at 9:58 am #35103I’ve got some updates on this topic and a note for John:
John – give us a shout and we’ll get you set up with the WE100 style jaws. No worries.
I should have some samples in hand by early next week of a few things:
- The first are a series of jaw profiles playing around with different draft angles on the inside faces of the jaws. I’ve already tested a few configurations and now will test some new ones based on what I’ve learned. We’re trying to improve the grip on a wider range of knife profiles by making these tweaks. In the interim, Tom’s suggestion of taping the blade is good. I had a similar issue with a very thin santoku knife the other day and found that just a little tape over the spine did the trick perfectly.
- The next thing I’ll be testing are some shims that can be placed between the spring and cam follower to tighten up the clamping power of the vise. I’ve already had good success with inserting a washer inside the pocket of the wedge that pushes the jaws apart. Something about 0.100″ thick is a pretty good start. To try this at home, you need to disassemble the vise by removing it from your sharpener, then removing the four #10-32 screws that connect the cam housing to the vise uprights. You should make note of the orientation of the cam housing in relation to the front of the machine because the cam shaft is offset in the housing to allow for the correct alignment with the cam follower and wedge. (When you’re reassembling the unit, the cam shaft should be offset to the right when facing you at the front.) After removing the screws, lift the vise uprights from the cam housing, insert the washer into the pocket of the vise wedge, followed by the spring. Then reassemble everything and install it back on your machine. If you have questions about the procedure, please let me know and I’ll put up a video about it.
Please add feedback as you have it.
-Clay
3 users thanked author for this post.
09/22/2016 at 10:25 am #35104Great, the tape worked ok on the Strider and I appreciate everyone’s comments. I am anxious to know what the WE100 jaws are as I cannot find them on the site.
Believe me, I am spouting off to anyone that listens about the WE and at least three friends have purchased one as a result. I also have the $1500 commercial version too, so whatever the fix, I would like to get that one up to speed also. It seems to clamp more securely than my Gen 3 lever does, but I am anticipating having the same issues with jaw angle because I believe it has the same setup. It is located in Colorado, so I cannot look at it at the moment. The shims make sense also.
I will give you a call.
Thank you
John
1 user thanked author for this post.
09/22/2016 at 2:30 pm #35107John: WE100 is the part number for the old vise. WE doesn’t advertise the individual parts for their sharpeners, but will work with you cooperatively to fill any of your needs. For those of us who are dedicated users, the result is outstanding customer service. See the Warranty page under the “About Us” pull-down menu.
1 user thanked author for this post.
09/22/2016 at 8:12 pm #3510809/23/2016 at 9:56 am #35117The width of the jaws in both units is the same, 1″. The screws are a little different. The WE100 uses flat head screws whereas the WE200 uses socket head screws. The height of the vise jaws in the WE100 are 3.75″ whereas the height of the jaws in the WE200 are 4.60″. The distance between the screws is roughly the same, so the clamping power is nearly identical.
-Clay
1 user thanked author for this post.
09/25/2016 at 5:43 am #35126The next thing I’ll be testing are some shims that can be placed between the spring and cam follower to tighten up the clamping power of the vise. I’ve already had good success with inserting a washer inside the pocket of the wedge that pushes the jaws apart. Something about 0.100″ thick is a pretty good start. To try this at home, you need to disassemble the vise by removing it from your sharpener, then removing the four #10-32 screws that connect the cam housing to the vise uprights. You should make note of the orientation of the cam housing in relation to the front of the machine because the cam shaft is offset in the housing to allow for the correct alignment with the cam follower and wedge. (When you’re reassembling the unit, the cam shaft should be offset to the right when facing you at the front.) After removing the screws, lift the vise uprights from the cam housing, insert the washer into the pocket of the vise wedge, followed by the spring. Then reassemble everything and install it back on your machine. If you have questions about the procedure, please let me know and I’ll put up a video about it.
Please add feedback as you have it.
Clay, how about a small rubber insert that fits over the top of the WE100 jaws? This might negate the need for moleskin or foam tape on FFG blades for those of us with the Pro Pack 1 or 2.
09/26/2016 at 11:28 am #35131Clay, how about a small rubber insert that fits over the top of the WE100 jaws? This might negate the need for moleskin or foam tape on FFG blades for those of us with the Pro Pack 1 or 2.
We’ve thought about doing that. The issue I see is that we’d be adding thickness to the outside of the jaws which would limit the lower end of the angle range. We’re still tinkering with ideas though. Maybe I’ll try some heat-shrink over the tops of some and see how it does.
-Clay
1 user thanked author for this post.
11/18/2016 at 9:31 am #35877On the issue of knives slipping, I have mostly been using synthetic chamois material wetted, with pretty good results. I was trying a Schrade SCHF9 with the new 1/4″ jaws and it was still slipping, so I tried some electrical heat shrink tubing cut to size and it worked great to keep knife from slipping. The tubing is a rubber like material, and really grips the knife.
Attachments:
You must be logged in to access attached files.
1 user thanked author for this post.
11/23/2016 at 9:01 am #35955A few questions:
- Does the 1/4″ jaw still manage to clamp very thin blades? Or do we need to change jaws back and forth?
- What is the thickest blade possible with the 1/4″ jaws? The thickest blade I’ve had so far miked out at 0.257″.
I still use patches of the blue Scott shop towels to line the vise – both to protect the finish on the blade and to improve the clamping. These towels are much tougher than ordinary towels and they have a gritty feel to them, which I believes helps the clamping efficiency.
1 user thanked author for this post.
-
AuthorPosts
- You must be logged in to reply to this topic.

