Had my system a few months–but a REAL amateur
Recent › Forums › Main Forum › Welcome Mat › Had my system a few months–but a REAL amateur
- This topic has 24 replies, 7 voices, and was last updated 01/05/2018 at 12:45 pm by
Frank B.
-
AuthorPosts
-
01/01/2018 at 8:55 pm #44353
Hello Everyone–
I have been reading posts on this forum, but am finally getting around to registering so that I can correspond with everyone. I’d like to thank you for your helpful remarks. They are only now beginning to make sense. You have to use the system for several months to really understand how it works. I’ve sharpened about six knives and I’m getting better each time.
I have only worked on cheap knives thus far–this was great advice from other users. Agreed that the best approach is to go slowly and be patient. The Wicked Edge system is a complicated tool and requires precise attention to detail. However, I have never been very successful in sharpening knives until I bought the Wicked Edge. It is a great system, and it affords the kind of precision that can yield great results.
I would also agree that safety is a critical concern with this system, as the blade edge faces upward towards the user. Last August, I was sharpening a knife, it was late, I was tired, and wanted to finish the job. I also was having trouble with seeing the edge with a jeweler’s loupe and a flashlight. I decided to shift positions to look at the opposite side of the blade, paying no attention to the position of my right hand as I moved. A trip to the ER and seven stitches later, I had learned a valuable lesson. I also invested in a USB microscope, protective guards for the honing stones, and some cut-resistant gloves.
I still need additional practice in getting the bevel even on both sides of the blade. The instructions indicate that the user needs to work on one side of the blade to create a burr along the entire edge. I find that by doing so, I remove a lot of metal. However, it is then quite easy to raise a burr on the opposite side. But the resulting apex is lopsided. I have decided to use a finer stone when starting out. I also am now trying to raise a minimal burr on that one side and begin to hone the opposite side in an attempt to even things out. But this makes it harder to establish an even burr along the length of the blade. When I finish sharpening, there are places where the blade is much sharper.
Does anyone else have any advice on how to keep the two sides evenly ground and have a uniformly keen edge along the length of the blade?
Thanks.
2 users thanked author for this post.
01/01/2018 at 9:40 pm #44356Welcome to the forum, Frank. You are exactly right when you observed that once you have drawn the first burr it’s quick, easy and often uneven to draw the second side. Even though you are working one side of the knife at a time, switch to the other side and work on that side for an even length of time. Keep switching back and forth between sides in an attempt to keep the amount of metal removal the same and balanced. Don’t work exclusively on the one side until you draw your burr. As you draw the first burr you’ll be closely behind it on the other side’s burr and you’ll be more even. You still may need to balance it out but you’ll be a lot more even to begin with.
After you have a burr on both sides, try then to even them out with alternating bilateral strokes.
Also look over your knife well at the start. You’ll be surprised just how uneven the bevels can be side to side before you ever start to sharpen them. Right out-of-the-box they’re often uneven.
Marc
(MarcH's Rack-Its)4 users thanked author for this post.
01/01/2018 at 11:39 pm #44359Welcome and sounds like you are on the right track, minus the cut which I have recently done as well.
My suggestion for keeping the primary grind even is to start off by correcting it without focusing on the burr. Just take note of everything (literally helps for me as I get interrupted often by kids), and go about getting it as correct as you want to. You will often find by that point you have already got past the burr part. As you have a microscope, technically there is no reason for you to create a burr as you can observe when you have reached the apex. Creating the burr is simply a foolproof technique to ensure you have got all the way to the apex, you can do that with your scope without wasting the metal.
So I would setup the knife after observing, even marking (I use sharpie on the tape I used to protect the knife) what you want to do, get it setup in an appropriate spot, then get to evening out those bevels. Once you achieve that, you have probably hit the apex. So take out your scope and see how the apex looks. If you have already got to it, and your edge is satisfactory, go through your progression working both sides evenly, and you should have excellent results. If not, get to the spots you need to, but keep the bevel even. Match the opposite side. You should be good at that point.
In the future your work should be much simpler.
5 users thanked author for this post.
01/02/2018 at 3:21 am #44362Hi Frank,
I’m a newbie myself, so probably in the same position as you regarding experience (though no cuts requiring ER yet…).
I received some good advice on here recently regarding uneven bevels and in my case, I think it is because the knife isn’t perfectly vertical in the old-style two-screw clamp. I also find that the second burr occurs quickly, but for me, because the knife was canted slightly to the left, I was sharpening at a larger angle on the left (always the second side for me) and this also brought up a burr more quickly. The net effect of the cant is slightly different angles (and therefore depth of bevel) left and right.
If that is also the case for you, then simply spending more time on the second side will only go so far to evening out the bevels.
For reference, the thread that discusses this can be found here.
AlieN
6 users thanked author for this post.
01/02/2018 at 10:47 am #44367The answers you have received already are correct, but I figure it is sometimes nice to have it written another way to make it easier to understand.
Before you begin sharpening, examine the bevels to see if they are of equal width on both sides of the knife. If they are uneven, work the smaller side until the bevels are even. Then, work both sides of the knife with alternating strokes until you can cleanly remove all of the sharpie from both sides of the bevel with just a few strokes after a fresh application. Using a microscope or a loupe is helpful to really see if you got it all. Now you do a few strokes on one side of the blade and feel for a burr. You will likely have one in short order. If so, you can then raise a burr on the other side with just a few strokes as well and then finish off that grit with several alternating strokes using light pressure. This process should give you even bevels.
6 users thanked author for this post.
01/02/2018 at 6:35 pm #44377Hey Frank,
The sharpie is the easiest and quickest visual feedback on what is actually happening between the blade and medium
If your uneven bevel is caused by blade tilt you can correct for this. With the knife clamped in the vise if the bevel is wider on the right side you can move the adjuster out on the right side and in on the left. Say you want a 20 deg. sharpening angle and the blade is leaning 2 deg to the left in the clamp. You need to set the left side at 18 deg. and the right at 22 deg. This will compensate for the lean of the blade.
I try to work both sides evenly. Whatever I do to one side I do to the other and I don’t work one side to long at any one time, no more than 5 passes before going back to the other side.
3 users thanked author for this post.
01/03/2018 at 8:46 am #44384Hello Marc–
I appreciate your thoughtful reply. In my working life I wrote technical manuals and related instructions. So I tend to follow manuals literally, as the instructions that I used to write were complete and accurate (if only the users would take the time to follow them…). The Wicked Edge manual emphasizes the need to raise a burr along the entire length of the blade, and it also discusses starting out with the coarsest stone. When I did those things, I ground down one side of the blade A LOT. But I began to realize, as you have pointed out, that these instructions provided general guidance. I also purchased a very nice knife recently and haven’t had the courage to sharpen it. And again, as you stated, I was surprised that upon close examination, its apex was surprisingly asymmetrical, particularly at the tip. As I have worked my way through sharpening several cheap knives, I began to adopt the approach you specifically suggested and I’m getting better at creating uniform bevels and apexes.
2 users thanked author for this post.
01/03/2018 at 8:58 am #44385Thank you Frank, I owe my experience to those other Forum members here before me that took the time and patience to answer my questions. I pride myself on sometimes being able to put things down clearly and concisely in writing. Like you said the WE instructions are a general guide. Now that you have a better understanding the guide will be more valuable. I highly recommend you subscribe to “Clay Allison’s” YouTube Channel and watch all his videos. There are also a ton more videos to glean by searching “Wicked Edge”. Enjoy.
Marc
(MarcH's Rack-Its)5 users thanked author for this post.
01/03/2018 at 9:00 am #44386Hello SKS–
I appreciate the tip on setting the angles differently on each side when necessary. I have the Gen 3 Pro 2017 model, and according to the Wicked Edge literature, the new vise is supposed to correct for this automatically. That said, I also use a black sharpie to check my progress and my bevels. I also use a digital angle gauge to maintain exact angles for the stones. And I frequently check to see that these angles remain unchanged. The fine adjustment screws have a tendency to loosen. And I’m not sure whether individual stones themselves vary in their angular incidence. I guess this is all part of the learning curve.
4 users thanked author for this post.
01/03/2018 at 9:03 am #44387Hello Marc–
Before I invested in the Wicked Edge, I viewed a lot of these videos. It’s now time to go back and watch them again. As you pointed out, they make more sense now that I own the system.
2 users thanked author for this post.
01/03/2018 at 9:07 am #44388Hello Organic–
Your specific approach–checking and evening out the bevels right from the start–is valuable. When reading the official Wicked Edge instructions, I followed them literally. While they offer a general approach, they are really more of a guide to sharpening principles. By the way, despite my uneven apexes, the knives ended up VERY sharp. And I still would like to have even bevels/apexes so that I minimize metal loss as well as achieving better esthetics. Your suggestion will help me a great deal.
2 users thanked author for this post.
01/03/2018 at 9:17 am #44389Frank, Here is a picture of my older (first release) Gen 3 Pro.
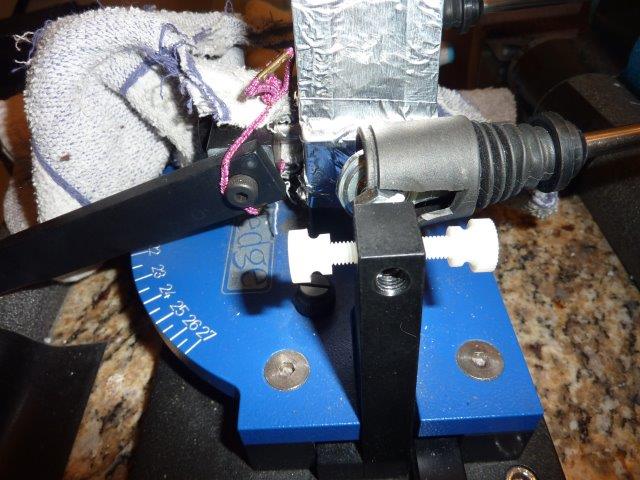
You’ll see that I made a modification to the locking screws on the micro adjustment. I have replaced the original metal screws with the black plastic knurled knobs with these two plastic thumb screws of the same thread size. The dual screws seem to hold the adjustment tight and secure and the nylon material won’t damage the ball joint screw threads. Also if you look closely you can see a wisp of Plumbers Teflon Tape in the center ball joint screw hole. I find that wrapping the screw with Teflon tape tightens that up too so there is less tendency for the main adjustment screw to want to roll and it makes it all the more easy for the two locking screws to hold it secure. (This modification suggestion does not apply to your model 2017 Gen 3 Pro with the newer center opposed locking screw, although the Teflon tape may be just the ticket). I have seen the suggestion to replace the original locking screw with a nylon tipped screw of the same thread size.Many WE users have modified and customize their setups to their particular needs with simple changes or adaptations. I invite you to read the Forum area, “Sharpening and Accessories” then “MODS” section.
Marc
(MarcH's Rack-Its)Attachments:
You must be logged in to access attached files.
2 users thanked author for this post.
01/03/2018 at 2:04 pm #44394Hello–
Somewhere around this house I believe I have roll of that Teflon tape, and if not, I need to run to Lowe’s this evening. I’m still not sure which screw is working loose–the one holding the ball joint or the center-opposed locking screw. I typically check the ball joint screw first, but who’s to say which one has worked loose? But at that point, you can tighten either the ball joint screw or the center-opposed locking screw. My gut is that it’s the ball joint screw, so if the Teflon tape works at that location, voila…I’ve fixed the problem. If not, I may elect to try the center-opposed locking screw. But either way, to me it’s remarkable that with a locking nut at one end and a center-opposed locking screw well-cinched at the other end, the adjustment still manages to loosen.
And…I’ll head over to the “Mods” section to see what else I can find. Thanks for the suggestion.
1 user thanked author for this post.
01/03/2018 at 3:48 pm #44395Frank, you might try to lubricate the arm ball joint assembly and move the mounted rod arm like a handle around and around to all the far margins. Then I’d remove the rod arms and move the still mounted rod arm swivel mounts around just the same way by hand, also to the far margins. I would do it while still mounted and again also after disassembled. That way you can isolate one side while moving the other separately. Helping to loosen up the joint may help it to roll freer taking some of the binding motion out that’s seems like it may be allowing it to get transmitted through the mounting screw. It certainly won’t hurt anything.
When I used the Teflon tape on my rod arm screws I did not wrap the tape around the screw because when I did that it seems to make it too tight to still turn and adjust and I still need the motion for micro-adjustment. I took one long strip and threaded the straight strip, (sometimes folded in half lengthwise), through the threaded hole and out the other side. That way I had a little tag end of Teflon tape to hold onto as I got the screw threaded in the hole. Just that little piece of strip would tighten it up substantially. It generally will stand up for quite a few knives and adjustments.
Marc
(MarcH's Rack-Its)3 users thanked author for this post.
01/03/2018 at 11:31 pm #44397I’d like to offer a technical comment regarding use of nylon screws or nylon-tipped screws as locking devices on the micro-adjust screws. It might not make a huge difference in practice, but when you tighten the nylon screw, you rip the tip all to hell as it turns against the micro-adjust threads. Which is why I recommend use of a separate plug of plastic; it will take on the form of the threads and stay in position when you rotate either screws. In fact, I suggest that you file or sand flat the tip of the locking screw so that it can rotate without disturbing the position of the plastic plug.
That having been said, if you do shred the end of the nylon screw against the threads of the micro-adjust screw, after several adjustments you’ll probably produce a plastic plug from the bits of shredded nylon that accumulate. Same same, I guess. I just wanted to point out what is a technically incorrect practice.
3 users thanked author for this post.
-
AuthorPosts
- You must be logged in to reply to this topic.