Newbie
Recent › Forums › Main Forum › Welcome Mat › Newbie
- This topic has 37 replies, 10 voices, and was last updated 11/07/2017 at 12:12 pm by
 Marc H.
-
AuthorPosts
-
11/05/2017 at 8:59 pm #41944I finally got around to sharpening my first knife on the WE last week. Decided to jump in with my most used kitchen knife, a 45 year old Chicago Cutlery 10-inch Chef’s knife that is part of a set my wife and I got from her uncle (who was a CC sales rep) two years after we got married. I know I said I would practice on unused cheap knives before tackling my more important knives but I couldn’t wait to see if I could restore my baby. This knife had very little bevel left and was extremely blunt. I imagine when it was new it had a 20 to 25 degree bevel but I went for a 20 degree angle. Progression started with the 100 grit stone and I took each step up to 1,000. I had difficulty keeping the bevel angle the same on both sides. As I would finish with each grit level I would check the angle with the digital level and the difference would be anywhere between .5 and 1.0 of a degree. Then I would then correct the discrepancy before moving on to the next grit level. Ended up with 19.4 on the left and 19.8 on the right after finishing the job. (Is this discrepancy within normal tolerances?) Not the prettiest job but OMG, it just slices tomatoes so incredibly thin with what feels like only the weight of the blade doing the job. Before it was only capable of smashing tomatoes unless I made a puncture with the tip of the knife before slicing and I could never slice as thin as I can now. What is it going to be like when the stones are broken-in?Last night I tried the WE on a 6″ CC utility knife. Decided to try a 20 degree bevel but did not like the cutting ability after using the chef knife at 20 degrees.I wasn’t able to strop the knives after sharpening but I can’t imagine the knife cutting better than it is now. I did receive a cheap barber’s strop today which I will have to try. I can’t believe USPS is doing Sunday deliveries from Amazon.
Attachments:
You must be logged in to access attached files.
1 user thanked author for this post.
11/06/2017 at 2:45 am #41948Congratulations with sharpening your first knife! And great it worked out so well.
The discrepancy in angles you describe is pretty normal. As you may have noticed, only one of the two jaws moves when you clamp a knife, so this causes a very small discrepancy in angles between both sides. Moreover, the angles may have been different already when you started or you removed a little more steel from one side than from the other. But this is absolutely nothing to worry about. As I’ve said in other topics, I think one of the reasons we’re so busy with precise angles etc. on this forum is because the WE allows you to be so precise, not because it is necessary. If you sharpen a knife by hand (or with most belt sanders) you’re happy with a tolerance of a few degrees.
Molecule Polishing: my blog about sharpening with the Wicked Edge
3 users thanked author for this post.
11/06/2017 at 8:00 am #41949Tango Sierra, just to make sure I’ve under stood you. Did you check the angle setting on the stone prior to sharpening with the angle cube, and it was set at 20.0º on each side? If I understand you correctly, then you checked it again, after you finished with the stone and found it to be 19.4º on the left and to be 19.8º on the right.
I, myself, have never checked the set angles both before and after using the diamond stone, or even read about anyone else who has done this on the Forum. This is interesting the differences you achieved. Did you see this similar difference trend between before readings and after readings with each and every grit in the diamond stone progression; 100 grit, 200 grit, 400 grit, 600 grit, 800, grit and finally with 1000 grit. Or was this difference only noticed once or twice?
I’d be interested in other information about your technique. The less than set angles results suggests you’re removing less metal from the tip of the bevel then from the bottom or shoulder side of the bevel. Possibly if you held the stones higher up, that is with your fingers higher up on the stones you could balance out the metal removal and keep it more consistent and closer to the intended set angle. The difference could also be achieved by too much pressure being applied low on the stone as opposed to an even amount of pressure across the height of the bevel. Have you used a visual aide to monitor your scratch pattern? A loupe or microscope, maybe? I would expect to see a thinner density or less scratches reaching the apex then reaching the shoulder with your final angle results.
What Mark76 says is true, when using the older style screw type clamp, you will see a difference is the height of your bevels, from right to left side, due to the angle tilt or lean caused when clamping. If the measured angle had been set at 20º per side at the beginning without adding in a correction factor for the vice tilt then the measured angle after sharpening should still be pretty similar to 20º from side to side if your technique is similar on both left and right side, specifically grip, pressure and number of strokes.
I’d like to say 19.4º to 19.8º is really not that different in the scheme of things considering new user, with new stones and young less experienced technique. There too is technique in using the angle cube. Where you place it on the diamond stone, how high or low. How the stone is held against the knife bevel with the angle cube attached, resting down on rod bolt or being held in a similar manner and placement from side to side. Whether the cube was zeroed out before using and not zeroed out between each side readings. Whether you took several sequential readings in the same manner from side to side without zeroing between these sequential readings.
Finally to agree with Mark76 again:
As I’ve said in other topics, I think one of the reasons we’re so busy with precise angles etc. on this forum is because the WE allows you to be so precise, not because it is necessary. If you sharpen a knife by hand (or with most belt sanders) you’re happy with a tolerance of a few degrees.
Marc
(MarcH's Rack-Its)4 users thanked author for this post.
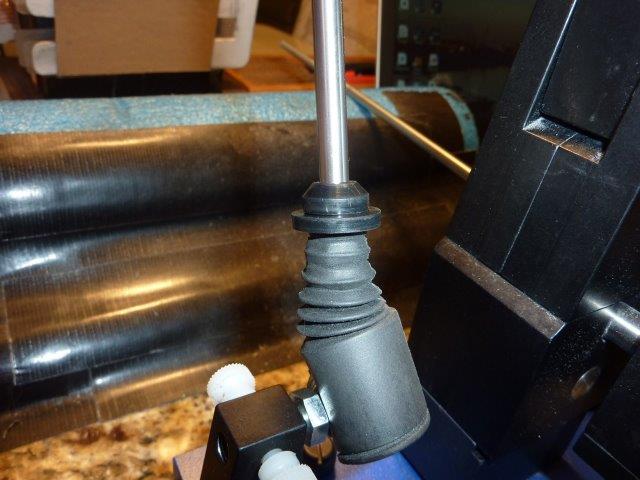
11/06/2017 at 11:13 pm #41953I did not have as much trouble keeping the angle for the second knife I sharpened at 20 degrees as I did with the first trying to get a 15 degree angle. Tonight I took the second knife and tried to steepen the angle to 15 and I discovered what may be a flaw in my WE that may be causing my problem. The adjustment bar is not centered in my Gen III (2016) vice which I think is causing my problem. With a set of calipers I measured the distance from the edge of the vice base to the 13 degree mark. The left measured 0.9915 of an inch and the right 1.0265 inches for a difference of 0.035. I then measured from edge of the vice to the inside edge of the L bracket when the arms are set to the dimple closest to 20 degrees and got 1.897 on the left and 1.927 on the right for a difference of 0.03. That may not seem like much but set at 15 degrees, the stone doesn’t touch the blade on the left side until the stone is raised high enough to clear contacting the vice on the left side. The first photo shows the damage to the vice caused by the stone (and I was wondering why the feel on the left was so rough compared to the right stone). The second photo shows the stone not making contact with the blade.
Attachments:
You must be logged in to access attached files.
11/06/2017 at 11:25 pm #41956MarcH
I place take readings with the angle cube set at the half way point of the stone and then place the stone at the bottom in it’s lowest position, then I place the mid mark of the stone at the blade edge and then follow a reading with the lowest point of the stone at the blade edge. The angle cube is left at the same spot on the stone for all the readings. I use the mid point placement for my final comparison.11/07/2017 at 8:23 am #41958The adjustment bar is not centered in my Gen III (2016) vice which I think is causing my problem. With a set of calipers I measured the distance from the edge of the vice base to the 13 degree mark. The left measured 0.9915 of an inch and the right 1.0265 inches for a difference of 0.035. I then measured from edge of the vice to the inside edge of the L bracket when the arms are set to the dimple closest to 20 degrees and got 1.897 on the left and 1.927 on the right for a difference of 0.03.
Hi TangoSierra, can you clarify a little? I think I’m understanding you to say that the angle adjustment lever is not centered on the machine when it’s set to 20 degrees, is that correct? If so, then it’s not the issue because the 20 degree mark is not centered. It’s slightly biased to the left.
-Clay
11/07/2017 at 9:34 am #41961First, to address your worries about the uneven mounted “Degree Bar”. It doesn’t matter! As long as the bar is secure and tight, doesn’t move around and is held in the same consistent position during the entire sharpening process, that’s all the matter. The length of each side doesn’t matter. You’re measuring and setting your sharpening angle with your digital angel device. It doesn’t matter if one side of the degree bar is 2 inches longer or two feet longer than the other side as long as both sides, the angle is set the same way, using the digital angle device. The angle you are sharpening the knife at is a relative angle, relative to the plane, (i.e., the flat spot where you placed it) when you zeroed your Digital Angle Device. You are setting each side independently at the same angle, (i.e., relative angle). The length of the bar extending out past the mini “L” brackets has no bearing on anything.
If your stone is rubbing against the vice clamp you have chosen a “set angle” lower than the limits of your sharpening combination; knife, knife position and set angle. The lower limits will differ from side to side just by the nature of the clamp design. The length of the degree bar has no bearing on the lower limits of set angle. A degree bar that is longer will allow for a wider range on the upper limits of your set angle. The length of the degree bar already corresponds to a higher angle than most people will ever chose to use on a edge.
I don’t follow you, in your Forum Post, with the different readings done at different placements and different times. For me it sounds like too much data, which may be confusing.
Let me go through my process with you:
I start by first zeroing my Digital Angle Meter at the beginning of a sharpening session by placing it on a flat portion, (plane), of the WEPS mounting base that’s close to the vice. Now, I am done zeroing it. If I don’t move the WEPS placement on the table or move or jar the table I don’t need to zero it again this sharpening session, no matter how many knives I work on.
Here is a picture showing my zeroed Digital Angle Device:
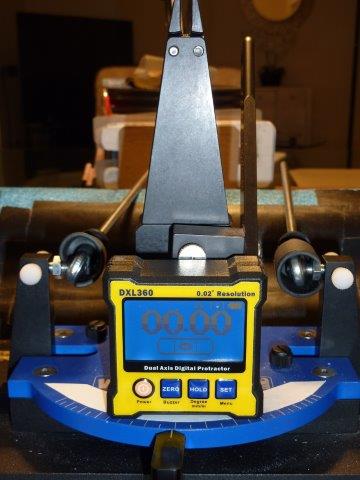
All of my sharpening angles are now “relative” to that plane where the device was placed when zeroed. If you zero your digital angle device similarly then all your set angles will also be relative to that plane.Next I choose a grit to start with based on what I intend to do. Coarser grit for profiling, finer grits for touch ups.
Then I place my zeroed angle meter against the outside of the stone. The meter has fairly powerful magnets, so it is held in place well, against the WEPS Diamond Platen Stones. With the stone resting down at the rod bottom on the rubber “bump stops” I have slid down over my rods to a position just on top of the rod securing nut. The stone is resting down flat and tipped over against the clamped knife resting on the bevel.
With the stone slid down the angle rod and resting at the bottom on top of my “bump stops” I make my angle readings and micro-arm adjustments to the decided sharpening angle.
Here is a picture of my “bump stops”:
(When sharpening a wider knife I can raise the “bump stops” to hold the stone to rest just on the bevel, in a position at the centerline of the clamped knife.)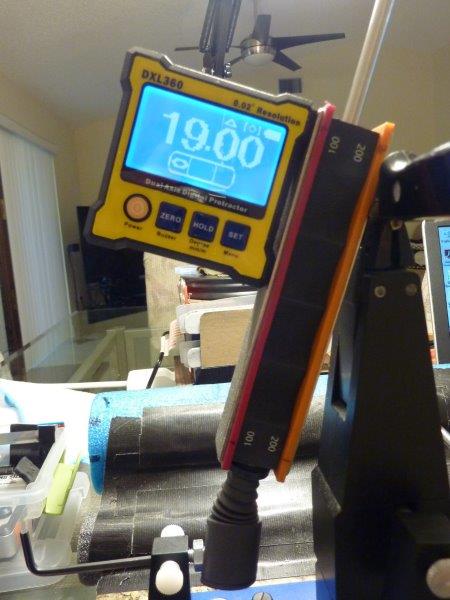
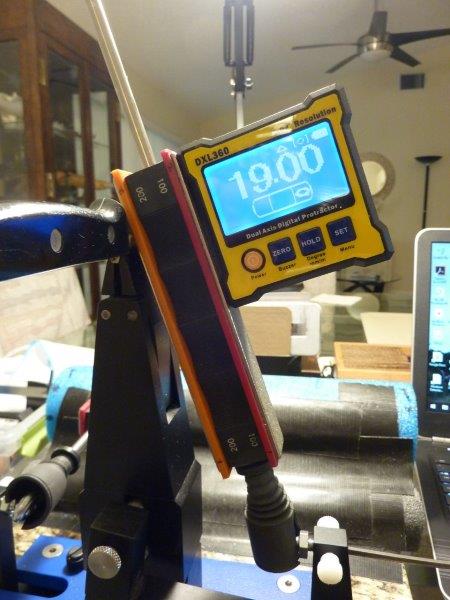
It doesn’t matter that I’m showing this process to you using my Gen 3 System and you have a different WEPS model. The theory an process are the same. The hardware is different but it works in exactly the same way.
I repeat this process, only at the beginning of each and every grit change throughout the sharpening progression using the same stone placement. I use as close to this same stone placement or positioning as I can, on both sides when doing my angle setting, each and every time. Consistency in technique ensures repeatability in results.
Marc
(MarcH's Rack-Its)Attachments:
You must be logged in to access attached files.
11/07/2017 at 12:12 pm #41966Just to add something, In the above post I set the angle with the stones in that position, just to use, for this example and to make a point and get the photographs. I could have just as easily and just the same, slid the bump stops up to hold the stones where they would meet the knife edge more in the center of the stone. It doesn’t matter, as long as you do it the same way on both sides and do it the same way each and every time you take an angle reading. Again, the angle is a relative angle to the initial zeroed position of the digital angle device. Also the positioning of the angle gauge on the stone doesn’t really matter, either, as long as it’s the same position from side to side and the same position on the stones each and every time the angle is measured. Again it’s all relative. The most important aspect is consistency from side to side and consistency throughout the entire sharpening process for that knife.
The real proof for consistency is when I reclamp a knife for a touch-up, using the settings I recorded in my log, from the initial sharpening, and I visually can see that metal is removed across the entire flat portion of the bevel, when I inspect it right at the beginning of the touch up process, using the USB Microscope. When the new scratch pattern is dead-on the entire width of the previous bevel I have all my settings correct and consistent.
Marc
(MarcH's Rack-Its) -
AuthorPosts
- You must be logged in to reply to this topic.