While playing with my AngleCube and the PP2 micro-adjusts one day, I came to the conclusion that my angle cubes (I have two, the Wixey and the older Igaging version) simply didn’t have the repeatability or accuracy to make the adjustments I was attempting. I had an idea pop into my head which wouldn’t seem to go away. The following is what happens when you have too much time on your hands and just enough money to tickle your fancies.
Don’t get me wrong… the AngleCubes are both plenty accurate enough for practical use, but this was an itch I had to scratch and had nothing to do with practicality. Plus I really didn’t like the fact that each time I moved the ball-joint micro-adjusts, I lost my ability to go back to an exactly repeatable angle setting used for a prior knife.
The idea of the thing was based on the hope that a screw adjustment (think ball screw or Acme) would provide rapid, repeatable adjustments with resolution exceeding the accuracy of the angle cubes. My original approach was to remount the rod pivot ball joints to blocks that would be threaded onto screws which would be mounted in the same position as the Base Rods. This seemed like the most elegant solution, but would require some form of bellows to protect the screw from filings and grit falling from the sharpening process happening directly above. Unfortunately, I couldn’t find a bellows out there that would fit my needs and fall into my budget. The cheapest one was about $35 and I would need four of them. Not to mention the need to provide mounting adapters.
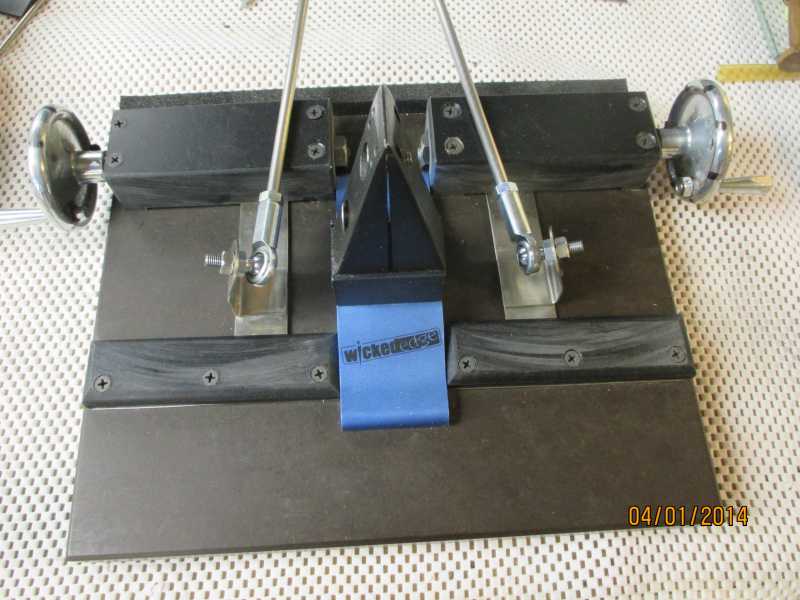
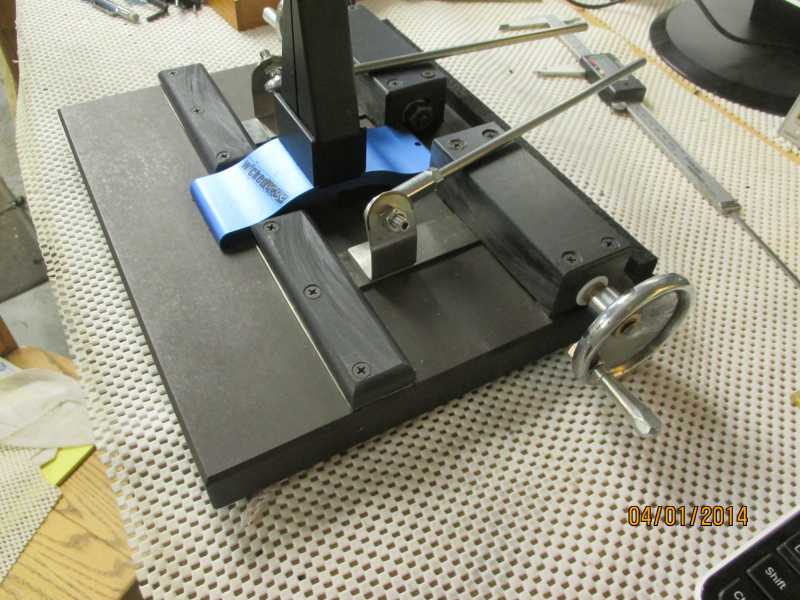
This all drove me to the version you see in the photos below. I tucked the Acme screws up under shrouds and mounted the rod-end ball joints on stainless plates extending out from under the shrouds. The plates are silver-soldered to brass lead nuts, which are pre-loaded with jam nuts. To stabilize the plates, I installed guide blocks with slots a few thousandths wider than the plate material is thick. The rod-end ball joint fittings are mounted in simple straps of stainless bent with a mallet in my 4” vise. The straps are attached to the plates with Rhino CA glue. Everything you see here was done with woodworking tools - with the exception of a $50 DeWalt angle grinder I used to cut the steel.
The hardware from McMaster-Carr was $71 with shipping. I bought a 12” square sheet of 18 gauge stainless from Amazon – shipping included for about $22. The black parts you see are made from a section of UHMW plastic I had laying around. I have no doubt I could have made them to the same quality with some hard maple I have on my wood shelf. There are no bearings needed. You could add bronze bushings, but the screw shaft material spins happily in the self-lubricating UHMW. So I’m into it for less than a hundred bucks. And a couple week’s worth of spare time.
Next question of course is “Does it work?” In the first couple of hours after it was done, I was thinking I’d really gone over the deep end on this one and I’m going to be the laughing stock on the WE forum. I was absolutely flummoxed by the need to relate movement at the adjustment wheel with the angle of the stones. I was thinking that this was going to be one of those projects you hide in a bucket under your bench. But by the middle of the second knife, that problem (my brain’s eye-hand coordination) had resolved itself. Move the wheels up and away from you and the angle is reduced. Toward you and it’s reversed. Yes, one screw is right-hand and the other is left-hand. Sweet. I like it and I’m going to keep it.
I designed the assembly to keep the rod-end ball joints in their original axes and with the same 15-35 degree range of motion. The Acme screws are 12 turns per inch so each turn of the handwheel moves the ball joint 0.083”, for very close to 0.8 degrees angle change per turn. There is about 0.012” backlash when changing from CW to CCW or vice-versa. From a few tests I’ve run, if you approach a handwheel setting from the same direction each time, the position seems to repeat within +/- 0.005”, which is at least twice as accurate as my angle-cubes. If you make a 1/8 rev motion of the handwheel back and forth, you can see corresponding movement in the slide plate. This suggests that the pre-load of the lead nuts is working very well. The one area that needs improvement lies in the robustness of the straps supporting the rod-end ball joints.
What are the advantages? Making angle changes requires no tools and nothing is going to go out of adjustment (excepting mechanical breakage). Any and all settings are achievable with a single adjustment. In practice, once you have found your starting bevel angle, changes as small as 0.1 degrees are easy and repeatable.
Is this something you should do? Hell no. This was done for fun just so I could see if I could do it. It took about four times as long as I thought - mostly because I was working with materials with which I was not familiar. If you have a granite base, jump to another topic, quick. If I were so inclined, I’d make the version with a set of home-made bellows. This would eliminate most of the position error which is caused by the lead nut slop, amplified by the ratio of the plate length to nut radius. In an axially-mounted system, motion error would be limited to the axial position error of the nut. When I assembled the lead nut, jam nut and lead screw, there is absolutely no detectable axial play.
I haven’t yet had a chance to look underneath the deck of the new WE professional Series Sharpener, but I’m guessing there’s some of this in that. Now if I could just figure out how to incorporate Clay’s floating jaws. Hey Clay! What do you think about offering kits to upgrade us to the floating jaw?
So let the giggles commence!