CBW isn’t allowed to guess since he’s been the main engine behind this project.
Attachments:
CBW isn’t allowed to guess since he’s been the main engine behind this project.
No guesses yet? ![]()
My guess is that it’s an adaptation of the drill stop collar trick from the EP…???
Yep! ![]() I’ve never actually seen or used one on the EP, but Curtis was kind enough to firmly shove me along to designing this variation on the idea. The testing I’ve done so far indicates it should be really nice for anyone wanting to use stones of varying thicknesses.
I’ve never actually seen or used one on the EP, but Curtis was kind enough to firmly shove me along to designing this variation on the idea. The testing I’ve done so far indicates it should be really nice for anyone wanting to use stones of varying thicknesses.
Maybe CBW will get to try it soon??? :dry: :huh:
Maybe CBW will get to try it soon??? :dry: :huh:[/quote]
Maybe… ![]()
Excellent Clay. I’m liking the thought here.
Bring it!
Ken
Looks good.
I’ve had a somewhat similar idea for often repeated settings for particular knives.
Looks like the arm holder is a wee bit longer too.
Hey, what’s that other knob near the vise?
[quote quote=“Mikedoh” post=11117]Looks good.
I’ve had a somewhat similar idea for often repeated settings for particular knives.
Looks like the arm holder is a wee bit longer too.
Hey, what’s that other knob near the vise?[/quote]
The knob sitting just above the degree bar locks the collar’s location on the degree bar. The one at the end of the angled portion allows you to lock down the position of the steel rod for further adjustability.
I think it is fabulous! I want one bad. I really like the arm linkage in the pic also, very nice!!
Clay,
I will bite. For those of us not familiar with the concept of the design enhancement, how about a little more information on what the purpose of the design change is and how it works?
Thanks,
Mark
I am curious. With the EP, the drill stop is set with a reference stone to the correct angle. The offset for different thickness stones is gauged using the stone thickness. How would that work with the proposed setup?
It is not quite as easy to use the stones mounted to paddles as a gauge.
The arm linkage and set screws does look mighty nice. Is that a direction that you may be heading for production?
Mark, this should give you an idea about the concept.
http://www.youtube.com/watch?v=WDsFi5os1LI
Now this is just the concept. The mechanics will be different with the WEPS, though it comes down to using the stone thickness as a gauge to set your angles once a reference is established.
[quote quote=“MarkMassie” post=11128]Clay,
I will bite. For those of us not familiar with the concept of the design enhancement, how about a little more information on what the purpose of the design change is and how it works?
Thanks,
Mark[/quote]
Great question Mark. It’s not a design change, just a proposed accessory. The idea is to use the little collar attachment (in between the guide rod assembly and the blue base) as a positive stop to be able to use stones of differing thickness and repeatedly hit the exact same angle without having to use an angle cube. The basic procedure is as follows:
[ol]
[li]Slide the stop collar (SWAT Jig as named by Curtis) onto the degree bar in between the blue base and the guide rod assembly.[/li]
[li]Set the angle with the thinnest stone you plan on using. [/li]
[li]Take the stone off the guide rod and rest the inside of one of the plastic trays against the inside edge of the guide rod assembly (you would use the inside of the Blue Collar if you’re using the Basic Kit or Pro 1 and you would use the inside edge of the upper portion of the L-Bracket if you’re using the Pro 2 set up.)[/li]
[li]Slide the stop collar over until the pin makes contact with the face of the stone.[/li]
[li]Lock the stop collar in place.[/li]
[/ol]
To change stones and keep the same angle, loosen the guide rod assembly, align the inside of the plastic tray to the inside of the guide rod assembly, then slide the stone and guide rod assembly over to the stop collar until the surface of the stone contacts the pin on the stop collar. Lock the guide rod assembly in place. You should now have the exact same angle as you did with the previous stone, regardless of thickness.
Clearly I’ll need to write better instructions along w/ diagrams once we’re ready to release it. Hopefully you get the gist for now.
That answers my question… but I will have to setup one time soon and see how the paddle fits in there so the inside is against the L bracket and that the stone thickness can be gauged.
PS.
Clay, did you get my email with the thread question?
Clay,
Thank you for the response, I was about there but your post provided full clarification. Thanks for taking the time to provide more insight to the potential accessory. Since many of us us the diamonds, ceramics and choseras, I believe you will have great interest in this accessory. I can tell you that I would for sure be interested especially if the concept proves out to be as accurate as using the angle cube.
Phil - thanks for the link!
Thanks again,
Mark
[quote quote=“wickededge” post=11131]The idea is to use the little collar attachment (in between the guide rod assembly and the blue base) as a positive stop to be able to use stones of differing thickness and repeatedly hit the exact same angle without having to use an angle cube. The basic procedure is as follows:
[ol]
[li]Slide the stop collar (SWAT Jig as named by Curtis) onto the degree bar in between the blue base and the guide rod assembly.[/li]
[li]Set the angle with the thinnest stone you plan on using. [/li]
[li]Take the stone off the guide rod and rest the inside of one of the plastic trays against the inside edge of the guide rod assembly (you would use the inside of the Blue Collar if you’re using the Basic Kit or Pro 1 and you would use the inside edge of the upper portion of the L-Bracket if you’re using the Pro 2 set up.)[/li]
[li]Slide the stop collar over until the pin makes contact with the face of the stone.[/li]
[li]Lock the stop collar in place.[/li]
[/ol]
To change stones and keep the same angle, loosen the guide rod assembly, align the inside of the plastic tray to the inside of the guide rod assembly, then slide the stone and guide rod assembly over to the stop collar until the surface of the stone contacts the pin on the stop collar. Lock the guide rod assembly in place. You should now have the exact same angle as you did with the previous stone, regardless of thickness…[/quote]
Haha… SWAT (Stone Width Adjustment Tool) growing on you? ![]()
You actually don’t need the thinnest stone to set it… you can use any stone… once you set the angle it stays the same no matter what… thinner or thicker. There’s actually a couple of scenarios you can use… for example you could set it with the stone/strop you want to end with, tie it in to a “divot” on the angle bar, then when you need to do a touch up, just set the angle like normal. A couple of other things worth noting… it’ll work better with the angle screw on the side without the divots… an unattended benefit that the bracket has threads on both sides (now I’ve probably confused everyone) :S and the micro adjustment won’t be used, once the initial angle is set and the stop collar is locked, the adjustments will be made by moving the entire assembly.
Glad to see there’s an interest in this! I think people will find it valuable, especially as the variety of stones continues to grow.
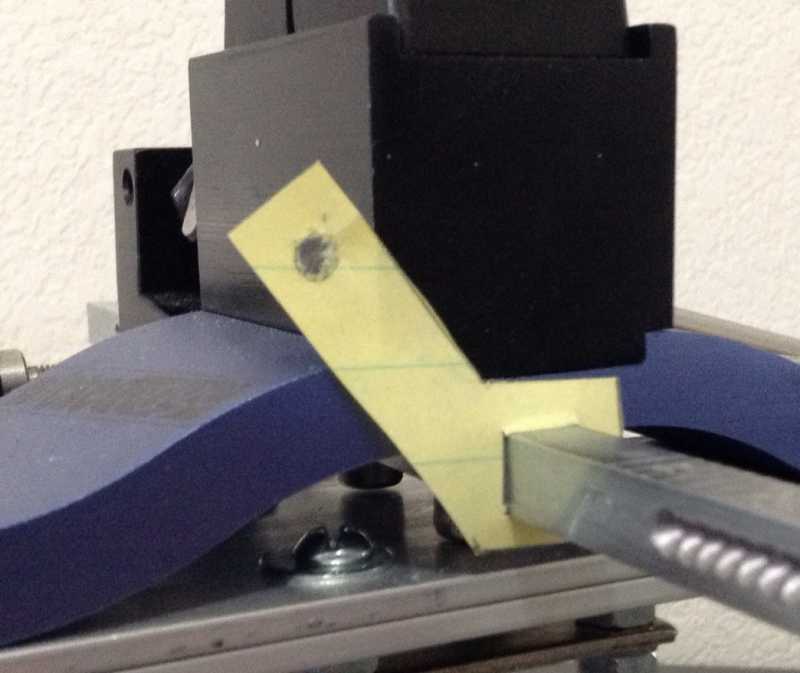
Here’s my high tech design…
Hey Clay, make this!.. :lol:
3D printer… we don’t need no stinkin… :side:
(Hope this makes up for breaking the serrated prototype.) :whistle:
Clay,
So the big question, any ideas on approximately when this accessory will be available? Put me down on the waiting list NOW!
Thanks,
Mark
[quote quote=“MarkMassie” post=11156]Clay,
So the big question, any ideas on approximately when this accessory will be available? Put me down on the waiting list NOW!
Thanks,
Mark[/quote]
I have a couple of small changes to implement (already incorporated into the drawings) that I’ll want to test when the new 3d printer comes in. Assuming I like the changes, lead time should be about 2-3 weeks, so sometime before the end of June.
Thank you, please put me on the waiting list!
[quote quote=“wickededge” post=11157]
I have a couple of small changes to implement (already incorporated into the drawings) that I’ll want to test when the new 3d printer comes in. Assuming I like the changes, lead time should be about 2-3 weeks, so sometime before the end of June.[/quote]
That’s incredibly fast! Are we allowed to vote for what should be next? I’m dying for the low angle attachment…