Thought I’d start a new thread on this… since I think it’s a good idea worth exploring. First, here’s ET’s post showing the idea. To give a quick summary: you set the knife in the clamp, slide an ‘O’ ring onto a guide rod so that it lines up with the edge above the clamp, then adjust the angle of the knife so that the ‘O’ ring travels along the edge. (Please feel free to correct if I didn’t get this right).
A 2nd post where he describes it a bit more…
… 3rd with a bit more description…
Josh (razoredgeknives) has a video where he describes it in the first couple of minutes…
… and Readheads has a post that contributes to the method…
(Feel free to add others if appropriate).
So, first I have a question. If I have a knife with no specific place to clamp (or forget where), so the first time I clamp it it looks like this (no ‘O’ ring, so I used a paper clip)…
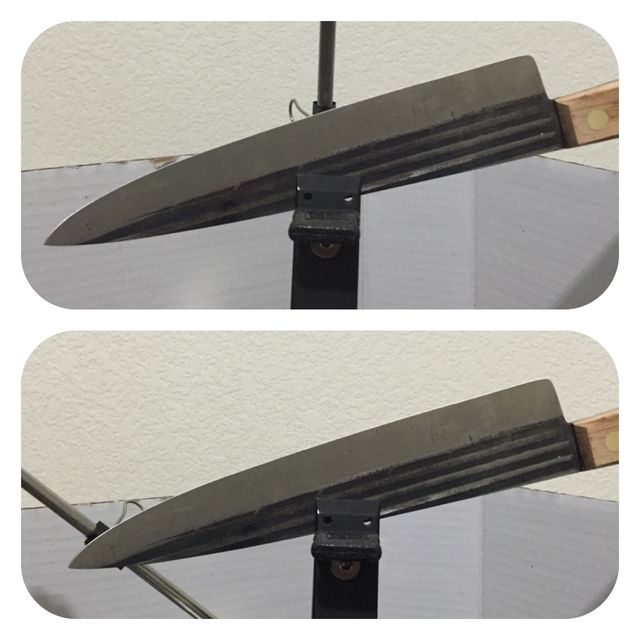
Then the next time like this…
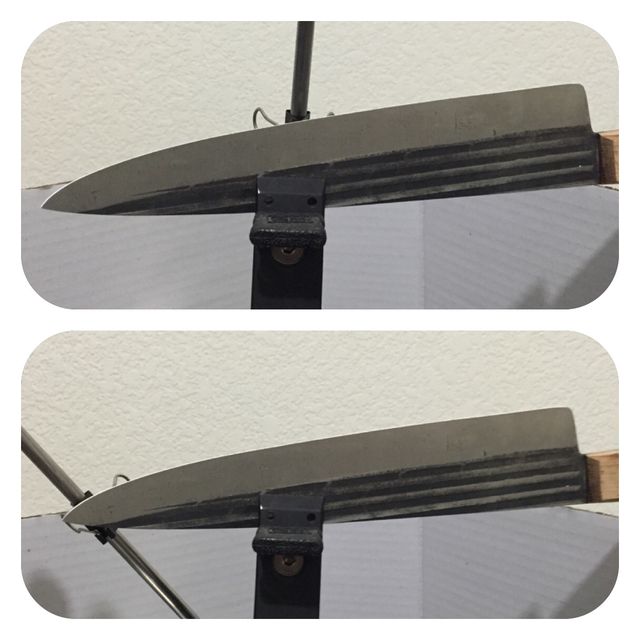
…would the results be the same? Or would I have to document exactly where I clamped the knife? (Or am I doing something wrong?)
cbwx34: Looks to me that the results you get would be virtually the same, especially considering the results from the alignment guide topic. The main purpose of the “sweet spot” method is to avoid gross variation in angle, especially at the tip, where your eye is drawn to the bevel.
I’ve always tried to use both alignment pins, holding the spine in contact with them as I tighten the clamp. I check (as in eyeball) the position of the belly to be sure I’m not way out of position with respect to the sweet spot and move the knife forward or back to correct it. I don’t often see knives as large and broad as that pictured in your post, so I simply record which pin position and how far the tip is from the vise. Contact with the two pins is what ensures repeatability. When you give up the two-pin alignment, you need to record more data - height, distance from vise, which key point, etc.
Thanks for starting this thread and for pulling all the different info into one thread.
I like ET’s method. Josh, I think accomplishes the same the way using putting tape with a marker line on a stone. I am wondering: with the o-ring method does it matter where you place the knife in clamp for touch ups. Let’s assume the o-ring method is precise enough. You can measure the distance of the o-ring to a fixed point for repeat setups. If you move the the knife around to fit the o-ring again it should be good ? Right?
Bill: I agree. I’ve thought about a similar gadget, but I’ve learned that simply holding a finger of the opposite hand against the flexing tip to minimize such deflection pretty much eliminates any visible errors. One thing it does, however, is complicate the use of alternating strokes and pushes you into stoning one side at a time. Which I’ve come to settle on as a preferred technique anyway.
We’re about the same age (I’m 71), but you’ve got me beat by one prescription. Four of mine are cardio, one is antacid and the rest are all pain control.
Recently I’ve been playing with a new technique for dealing with blade deflection. It only works with a downward stroke. I hold both stones against the blade, one just in front of the other and push them forward and down. It’s important to hold the stones low down on the handles to keep your hands safe. I make one stroke that way and then switch the stones so the other is in front. I went slowly at first to get the motion down and now I can go at a really nice pace. It’s important to continue alternating which stone is in front so that you don’t make a huge burr on one side.
My 2 cents from the peanut gallery thrown in, the sweep discussion got me thinking…
We use the 1000 grit stone to mount the angle cube, we use the 1000 grit stone to angle match with a sharpie…what about using the same 1000 grit stone to find the sweet spot while doing a sweep?I marked some graduated lines on the SIDE and it works great while streamlining the knife setup even more.


Cliff,
Can you post some pictures showing more of the blade and maybe how you use your system to set up longer blades?
<p style=“text-align: left;”>Sure I’ve got a practice kitchen knife. I’ll do a badly made youtube video with after I finish up this beauty later this afternoon.</p>
That sounds like a good idea, Clay. I’m going to try it. But why does it work only with a downward stroke? Because you use less pressure then?
I’m still playing with the idea of making an app that tells you the “ideal” position of the knife in the clamp. If we’re all satisfied with the approximate method that doesn’t take the planes into account (like ET’s O ring method) it should not be that difficult (once I’ve mastered the programming side ![]() ).
).
But the problem is, zero angle variation along a curved blade is impossible, except in special cases where it is possible to clamp the blade so the entire edge coincides with the straight line or the circle. This is the special case:

In all other cases, the question is: what do you want to optimize? Do you want the sharpening angle at the tip to be the same as the angle at the straight portion of the edge? Or do you want the sharpening angle halfway curve towards the tip to be the same? Or do you want to minimize something else?
I quote Redhead’s picture because it also shows you have various options.
Ok so no calc or trig from this kid…but I do have a badly made youtube video with shoddy cardboard props…Im attempting the video making learning curve so please go easy.
https://youtu.be/M88Go3AfEG8
With the Delica I just did there was no room for error. I know Josh and others deal with expensive knives everyday but this was my own and one of the nicest I own so failure was not an option, especially at 10dps!
Heres the bevel half way to rough reprofile and you can see the sweep served me well as I made sure the paddle arc matched the blade curve precisely and the results tell me Ill be ok.[attachment file=“Even bevel reprofile.jpg”]
I like precise and I also like practical. I hope the video added something to the conversation. I know for me it gave me a to-do on my mod list…any guesses? ![]()
Thank you for your coherent Vid and your cardboard props is great!
Similarity, I use marked paddle side for initial line up, then, flip to grit side for witness check, very simple and practical.
Welcome, Victor. Thanks for your contribution. If you want to share more, please feel free!
[quote quote=31220]
Recently I’ve been playing with a new technique for dealing with blade deflection. It only works with a downward stroke. I hold both stones against the blade, one just in front of the other and push them forward and down. It’s important to hold the stones low down on the handles to keep your hands safe. I make one stroke that way and then switch the stones so the other is in front. I went slowly at first to get the motion down and now I can go at a really nice pace. It’s important to continue alternating which stone is in front so that you don’t make a huge burr on one side.That sounds like a good idea, Clay. I’m going to try it. But why does it work only with a downward stroke? Because you use less pressure then? [/quote]
It only works with a downward stroke because your hands are moving away from each other in that direction whereas they’re moving toward each other in an upstroke and they bump into each other.