Removing burr and unequal sharp sides

The video bluntcut linked was one I watched early on that lead me to be not so dainty with my burr removal efforts. The guy is fun to watch do his thing.

I’m really looking forward to examination under a scope to see what scraping wood down a burr does initially and on following grits. My thought, which could be wrong, is wood shouldn’t do anything to the edge I should worry about… its wood right?

As a force of habit, I run my pine block down the blade a few quick times in between paddles changes and never really see a burr get going enough to mention which is what I want. The idea of metal bending back n forth getting soft like a paper clip before it breaks kinda drives me nuts! :blink:

As Josh said, I mainly use it on belts, but have used it on WEPS as well … when called for.
And, important to note, the wood is soft .. you might be right Josh, Balsa most likely, I like the cheapo sticks as they give quickly.
I find it, as well as the hard felt cube, stops the problem of shifting the burr side to side.
PITA knives, a paper wheel actually will curl the wire off :slight_smile:

PLEASE NOTE!!! With those blocks, knife in hand or in vice … BE CAREFUL!!!
Especially when knife in hand, block in other … my bad habit … easy to get overzealous with too much pressure as the tip passes through. Do it with the block held down, and lightly, its meant for the final stages.

That’s the thing, there are all sorts of methods and means to the end, soft wood is just one, and also applicable to the “right” metals or sharpening results.

One great use for wood .. saving time.

I am not talking about critical precision specs on a Sebanza.

I’m talking more primarily from a business aspect, like when you have 30 blades to do, all a variety of metals (good and OMG this sucks!)
It’s got to get done, and you’re gonna batch them.
AND, they look like all re-profiles and you know some the metal is fatigued, you just don’t know yet how bad.

In the primary stages, each knife reacts different say on a belt.
You see it, feel it, hear it.
The wood not only helps knock off the burr, but also lets you know how good the metal is in your hand, allowing you to have an idea of what it will take to get to the end product.

For me, if fatigued, I’ll notice it in how the metal flakes off, not shears off. I go back to re-profile and wood till I hit paydirt and see the difference and feel it.

Once the batch is at the re-profiled and mostly deburred stage, I have a base level and idea of what I’m in for and a plan of attack.
Then sharpen accordingly on WEPS or whatever you like.

Thank you both. I am starting to get a much better idea of how you are using this. I have never sharpened on a belt grinder so likely I have no appreciation for the issues involved. I also am not sharpening a bunch of knives at once or in a hurry so it makes sense that time saving approaches are of somewhat less interest to me. I asked the questions I did because I had not found deburring on wood or cork to improve my edges (sometimes it made them worse) but I see now that my application may be more in error than my technique.

I’m sorry, but I haven’t been following this thread and am maybe off topic, but I don’t think so.

On another thread, I mentioned that there was an article in Fine Woodworking’s Oct issue where the author teaches about sharpening your woodworking tools (e.g.: hand plane blades) on a hardwood blocks loaded with diamond paste. He then describes how to deburr the edge by running it through end grain on the same block - also loaded with paste.

As Arte Johnson would say… “Verrry Interestink.”

[quote quote=“tcmeyer” post=20584]I’m sorry, but I haven’t been following this thread and am maybe off topic, but I don’t think so.

On another thread, I mentioned that there was an article in Fine Woodworking’s Oct issue where the author teaches about sharpening your woodworking tools (e.g.: hand plane blades) on a hardwood blocks loaded with diamond paste. He then describes how to deburr the edge by running it through end grain on the same block - also loaded with paste.

As Arte Johnson would say… “Verrry Interestink.”[/quote]

Tc,
I like to use the felt block on finer, end stage burrs.
Very useful to the weps imho.
And I drop 1 micron Boron on the block.
You can feel the slide and hangup if the there are rough spots.

On end grain, think cutting boards.
Whats the best type?
Butcher block … why?
All other boards are cross grain, butcher, end grain.
Imagine a brush and squeeze the bristles together … end grain.
It gives.

Thus soft wood and hard felt … they give.

So now I am starting to see in my head this..

you sharpen to a burr to make sure the apex is there. Now you have a fatigued piece of metal on the edge. There are many ways to remove it. If you start to make another accidentally or do not remove the burr properly as you sharpen with the finer grits you can just end up aligning this burr nice and straight and it will be sharp as heck..But weak. Some people will refer to this as a “wire edge” you make some cuts and it folds over easily. (The same can happen if you make a weak steels apex with too low of a sharpening angle.)
The edge will deform to easily and roll.

Does anyone have a good microscope or loope picture of a “wire edge” vs a properly apexed edge at the same angle?

Does this make sense or do I have it wrong?

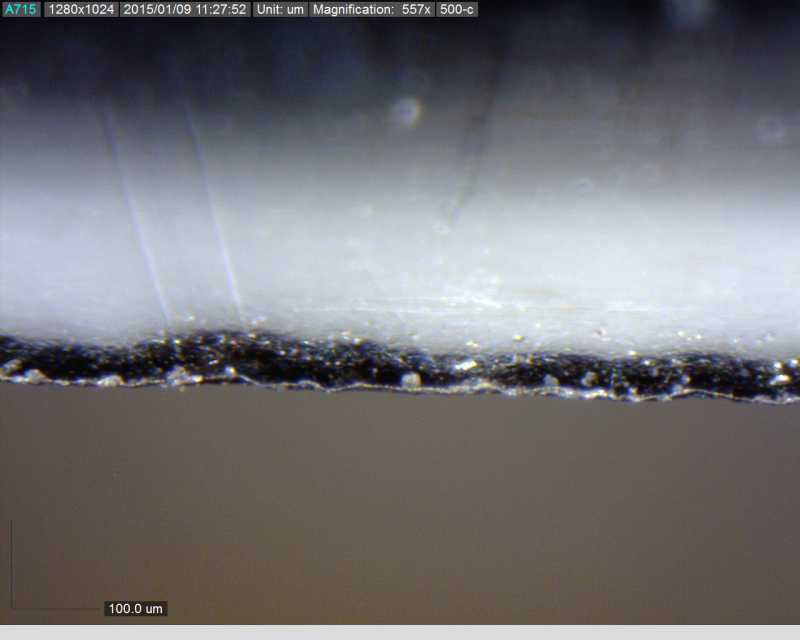
Here’s a picture of a wire edge I just created:

Wire Edge at 500x

It’s taken at around 30 degrees off of vertical which is where I was best able to image the burr. At other angles the reflection was a problem. It’s also not done on the best sample because this one had been highly polished and is somewhat convex, so the backside, which we’re looking at isn’t as crisp as it could be. When I get back from Shot Show, I’ll prepare a better sample with a cross section we can examine as well.

This is really more of a classic burr that is pushed to one side by me only sharpening one side of the sample with 100 grit diamond plates.

Attachments:

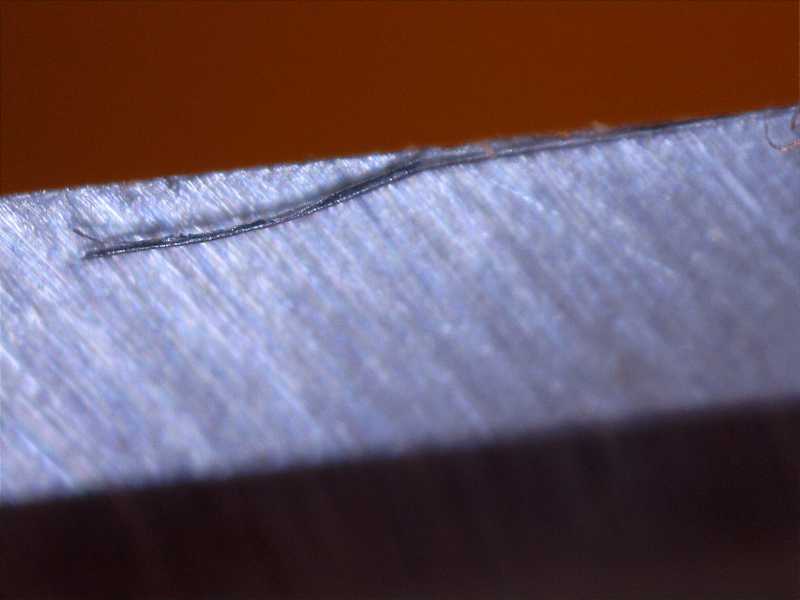
Here’s a burr I happened to catch just as it was separating from the edge…

Attachments:

Ok..this is EXACTLY where I wanted this topic to go! Freggin awesome pictures guys.

Great photo! I like over at the very right side of the image where it is still fully attached. I can see easily missing that on a casual check with a lower power loupe etc…

Maybe its overkill, maybe its not needed all the time, maybe Im ripping micro-serrations along the apex… When I get a scope images will tell me more. Until then Ill keep wiping the blade down with my pine block in between every few grits. Its working and gives me some assurance that a “micro-burr” isnt hiding on me waiting to fold over forst time I use it.. :wink:

Ackkkk, an edge worm! :ohmy:

Very nice. What had taken place just before this? Was this burr coming off as the result of normal sharpening strokes or something else?

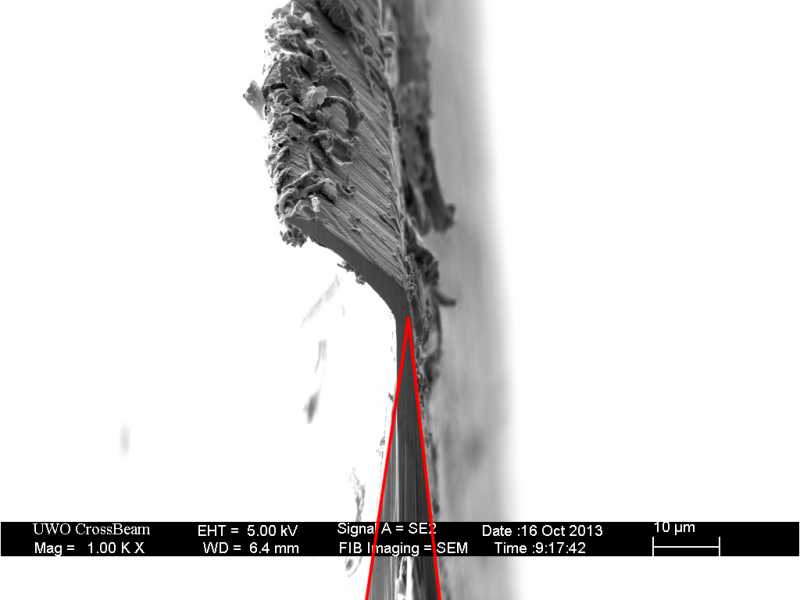
Here’s another great picture of a burr, not really a foil or wire like in Tom’s photo, but it shows how the overhanging metal can easily be pushed from side to side until it weakens and peels off like in Tom’s photo:

Science of Sharp blogThe photo is from the . There are some other great photos of burrs on the page.

Another great image from scienceofsharp! That one is a perfect example of what I meant when I said a burr is any metal that remains past the target geometry. In that image I suppose the target geometry is something like this:

It’s also a good example of why at least with some burrs ripping it off with wood doesn’t work so well; it’s not going to leave behind a pristine and level edge.

Attachments:

[quote quote=“Mr Wizard” post=20692]Another great image from scienceofsharp! That one is a perfect example of what I meant when I said a burr is any metal that remains past the target geometry. In that image I suppose the target geometry is something like this:

It’s also a good example of why at least with some burrs ripping it off with wood doesn’t work so well; it’s not going to leave behind a pristine and level edge.[/quote]

Yeah what I think me and Ziggy are talking about more are images like Tom’s where it has been been bent back and forth so much it is so weak and falling or about to fall off that dragging it through wood helps remove it. But in situations like this image I don’t really see how it would help, this is where I am curious what Bluntcut’s method looks like under an SEM.

Indeed. I think there is probably quite a large difference in effect with that between the two types or stages of burr.

Is Bluntcut’s method to scrape or fold it to one side, then grind into it on the next pass?

[quote quote=“razoredgeknives” post=20696]
Yeah what I think me and Ziggy are talking about more are images like Tom’s where it has been been bent back and forth so much it is so weak and falling or about to fall off that dragging it through wood helps remove it. But in situations like this image I don’t really see how it would help, this is where I am curious what Bluntcut’s method looks like under an SEM.[/quote]

Most definitely used then things are bad , weak, or early staged.
Even then, you can see by eye where some sticks, some doesn’t.

For me, the real objective is when coarse grits no longer easily make a visible burr, that’s when I mention rock bottom.
MW, correct, from that stage on, its a different burr.
At that point, I’m then starting to smooth the edge out as well.

By the time I’m not using wood, I’m making a burr anywhere from 400 to 800, depending on metal quality.

For me, in later stages after wood, the burr is minimal and can be almost pushed off, that’s when I like the felt.
At the end, even felt and boron.

Its not unlike abused bread knives, when you can really see the bent metal in the scallops and popping on the backside.

Aggressive action at first, softening as you go on till the flakes stop forming in the scallops when you do the backside.
Its almost as if the scallop itself is one big burr until you get to solid metal, sometimes surprising on how long it takes to get there.

I can see how something like this would be removed w/ felt/soft wood>

I am eagerly waiting Todd’s conclusions about burr minimization techniques to create the strongest edge!

[quote quote=“Mr Wizard” post=20697]Indeed. I think there is probably quite a large difference in effect with that between the two types or stages of burr.

Is Bluntcut’s method to scrape or fold it to one side, then grind into it on the next pass?[/quote]

Yes… watch his video in that link when you get time. I am leaning toward agreement w/ Cliff Stamp on this one though, that that will make weak/fractured metal at the very apex.

Thanks. I did watch most of that video but I didn’t read the rest of the thread. I wanted to make sure that that is the method people were referring to.