Understood Clay, and I think that’s a great thing. Just pointing out there may be (I don’t really know) a point where more magnification isn’t more helpful.
But you’ll figure it out if true.
Ken
Understood Clay, and I think that’s a great thing. Just pointing out there may be (I don’t really know) a point where more magnification isn’t more helpful.
But you’ll figure it out if true.
Ken
I was going to say you’re just a big tease… but in this case, I guess you’re a little one! :cheer:
Hi Clay,
Have you considered a contact profilometer at all? It’s a device used to measure surface-roughness, and is typically used in some metal-working and/or machine-shops. It runs a tiny stylus over the surface and reports back a numerical measurement. The “advantage” is that while it is very expensive (thousands of dollars), it is not insanely expensive (like an scanning electron microscope). The downside is that it returns numbers, not an image. Or, I suppose, it may return a single line of data as a graph (ie: a 2d plot where x-axis is horizontal position of the stylus and y-axis is the stylus height). So it’s not as simple to interpret the results. And if the surface is directional (like lots of parallel scratches), then the scanning direction will affect the results.
There are non-contact profilometers; they’re typically based on light scanning. But non-contact profilometers are insanely expensive (at least from what little I’ve heard).
I know almost nothing about profilometers, except what I’ve read on wikipedia:
http://en.wikipedia.org/wiki/Profilometer
http://en.wikipedia.org/wiki/Surface_metrology
Example of a contact profilometer by Mitutoyo (high quality Japanese company):
http://www.amazon.com/Mitutoyo-178-561-02A-Surftest-Surface-Roughness/dp/B003Y74RE6/ref=pd_sim_sbs_indust_1
Probably not worth buying. But if you have any friends who work in a lab for manufacturing, machining, or metrology, it might be worth asking them for a favor? ![]()
I kind of got curious about metrology in general, and got sucked into browsing Wikipedia for hours and hours.
Sincerely,
–Lagrangian
This is fascinating. I’d never even heard of a contact profilometer before. It might be what CoorsTek uses for their stones since they measure in RA (roughness average). I’ll definitely check them out. Thanks for the tip!
[quote quote=“AnthonyYan” post=5572]Hi Clay,
Have you considered a contact profilometer at all? It’s a device used to measure surface-roughness, and is typically used in some metal-working and/or machine-shops. It runs a tiny stylus over the surface and reports back a numerical measurement. The “advantage” is that while it is very expensive (thousands of dollars), it is not insanely expensive (like an scanning electron microscope). The downside is that it returns numbers, not an image. Or, I suppose, it may return a single line of data as a graph (ie: a 2d plot where x-axis is horizontal position of the stylus and y-axis is the stylus height). So it’s not as simple to interpret the results. And if the surface is directional (like lots of parallel scratches), then the scanning direction will affect the results.
There are non-contact profilometers; they’re typically based on light scanning. But non-contact profilometers are insanely expensive (at least from what little I’ve heard).
I know almost nothing about profilometers, except what I’ve read on wikipedia:
http://en.wikipedia.org/wiki/Profilometer
http://en.wikipedia.org/wiki/Surface_metrology
Example of a contact profilometer by Mitutoyo (high quality Japanese company):
http://www.amazon.com/Mitutoyo-178-561-02A-Surftest-Surface-Roughness/dp/B003Y74RE6/ref=pd_sim_sbs_indust_1
Probably not worth buying. But if you have any friends who work in a lab for manufacturing, machining, or metrology, it might be worth asking them for a favor? ![]()
I kind of got curious about metrology in general, and got sucked into browsing Wikipedia for hours and hours.
Sincerely,
–Lagrangian[/quote]
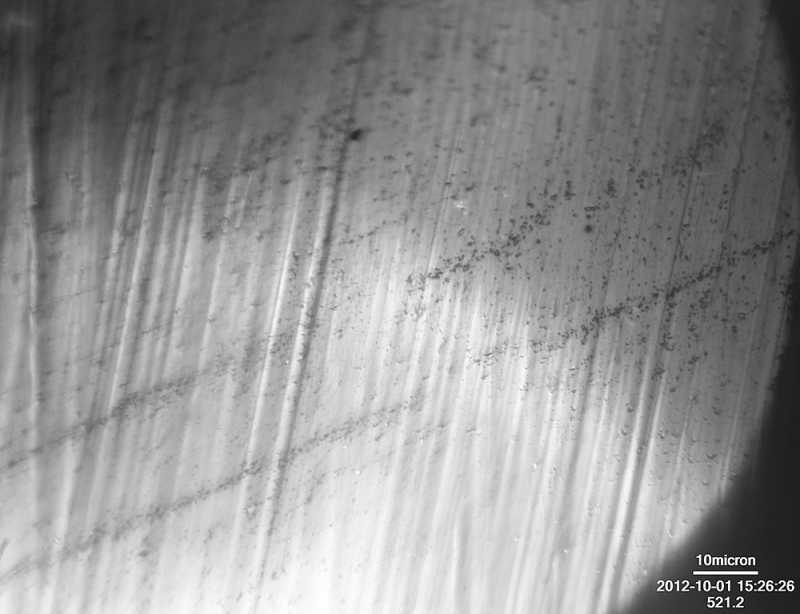
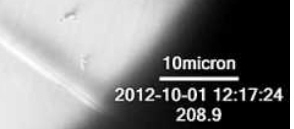
While not pretty to look at at 2000x, here is another image of a blade that I polished mostly smooth and then used the fine side of the Micro-Fine ceramics to lay in a a scratch pattern:
The fine scratches going from lower left to upper right are left over from the kangaroo strops with .5um diamond spray. The couple of big scratches coming from lower right to upper left are from the Micro-Fine stones. I took 4 measurements: .57um, .64um, .68um and .72um. I calibrated my scope and the lens with a NIST traceable stage micrometer so I feel confident about the accuracy of the measurements inasmuch as I could find the correct edges of the scratches to measure. As can be seen in the photo below, those edges can be tricky to choose and can affect the measurement by +/- .05um:
I really wanted to verify the grit of these stones since I’ve had questions since they came in. I’m happy to report that they look spot on to my amateur eyes.
Awesome! The one I’m curious about though is the MicroFine - Coarse. I think that’s the one that seems rougher than rated.
That’s next on the chopping block ![]() I’ll go back through with the kangaroo strops and smooth out the bevel and then use the Micro-Fine - Coarse stones and see what we get.
I’ll go back through with the kangaroo strops and smooth out the bevel and then use the Micro-Fine - Coarse stones and see what we get.
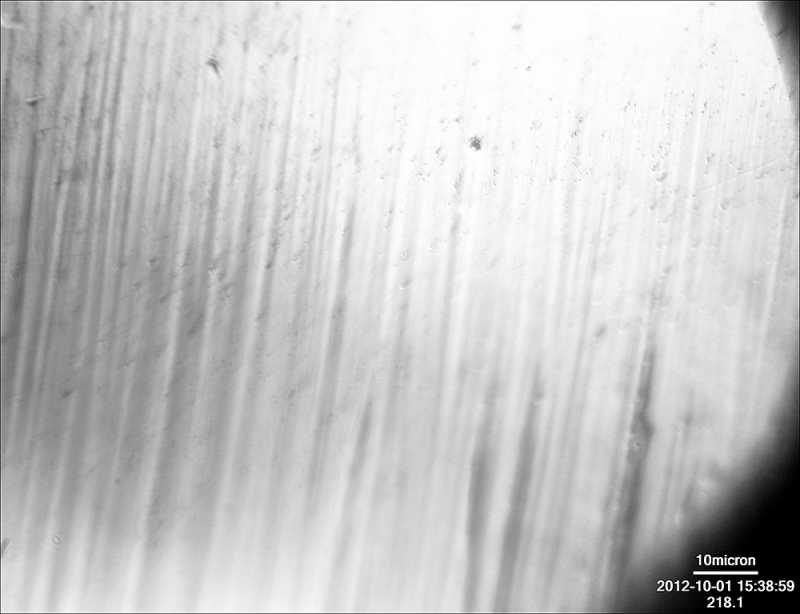
Here is the first look at the Micro-Fine - Coarse stones:
I’m surprised not to see more work done and I’ll have to go back and get after it a little more. I did complete 50 strokes, starting from a very smooth bevel. In this photo, you can still see bits of Sharpie marker in the low places since I didn’t clean it with alcohol before putting it under the microscope. I measured the largest of the scratches and they averaged between 1 and 2 microns.
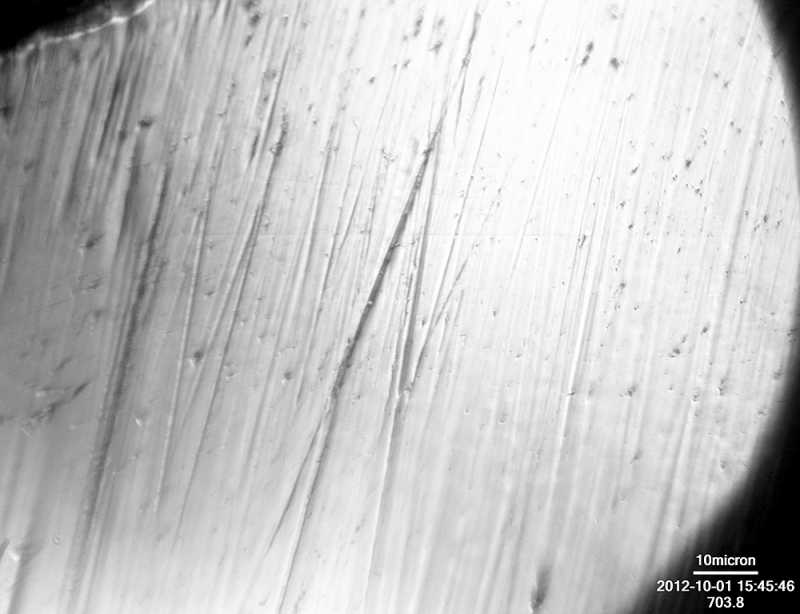
These next two images explain a lot:
Above - 150 strokes with the Micro-Fine 1.4um Coarse Side stones LAPPED to 3um on diamond plates
Above - 50 strokes with the Micro-Fine 1.4um Coarse Side stones NOT LAPPED
The scratch size is in the right range with both stones but the depth of the scratches is greatly exaggerated with the unlapped stones.
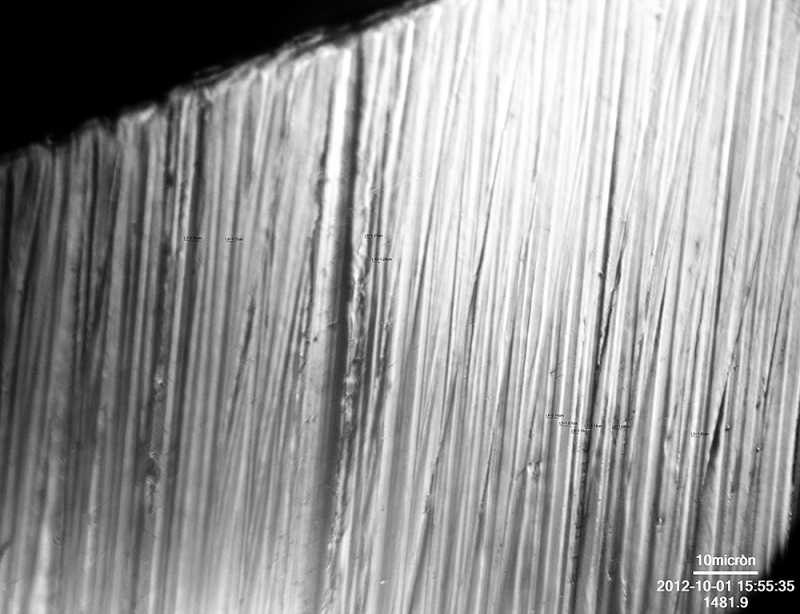
I’m getting better with the software provided with my scope. Here is a shot of the blade after the Superfine - Fine stones, 50 strokes:
The scratches are in the 1.5um-3um range.
Hi Clay,
Wow, that last image is amazing! More please. ![]()
btw, I think the forums are re-sizing your images, so the measurements/annotations you made to the image are too small to really see or read. Is there a way for you to show us those images without so much resizing? Maybe post them to your blog and then link that?
You also mentioned that CoorsTek gives measurements for surface-roughness of their ceramics in Ra. I’m not sure how they do those measurements, but I’m feeling unsure that they would use a contact profilometer to do it. This is because the extremely hard abrasives might wear out the stylus. The stylus that is dragged over the surface needs to be very sharp and precise. If it were dragged out along any very abrasive material, I think it would be damaged, or at least worn out. Maybe it’s a diamond stylus. I don’t know.
My guess (just a guess!) is that they use some type of non-contact profilometer to do their measurements. Since they are a huge company, one of the largest producers of technical ceramics, I would suppose they have invested in high-end optical (non-contact) profilometers and other fancy machines for doing surface measurements. Don’t know if they would tell you, but maybe you could ask them out of curiosity? ![]()
If you don’t mind me getting a bit philosophical:
I also only recently learned about profilometers. I call this an example of not-knowing what I don’t know. For example, I don’t know how to speak German, but I know enough to realize that, and I also know where I could go to learn to speak German. This is an example of knowing what I don’t know. I think this is an important point for two reasons:
If I know what I don’t know, then:
(1) I know how to gain more expertise.
(2) I can begin to assess my own level of expertise.
It’s very difficult to do (1) and (2) if you don’t know what you don’t know. There is always trial-and-error… But it’s probably better to leverage huge areas of research which have already been done.
One way I’m trying to figure out what I don’t know, is to read up on engineering. Engineers and manufacturers have had to measure cutting performance, material strength, friction, and surface properties for centuries (even if you start counting as late as the Industrial Revolution, not to mention the ancient Egyptians). So along these lines, I’ve been browsing engineering, manufacturing, and science topics in places like Wikipedia, research papers, the library, YouTube, Amazon.com, and company websites. Ideally, it would be great to also do some sharpening tests, and talk to knife makers, etc.
I would humbly invite others to do the same, and then share with us what they find.
Sincerely,
–Lagrangian
Lagrangian,
As always, I love reading your posts and hearing your perspective. I think I can ask CoorsTek directly about what they’re using. As for me, I’m grateful to everyone that occasionally hits me over the head and says “hey dummy, somebody already thought of that and there’s a well defined method in place!” I’ll continue to keep looking and hopefully will adopt some of the wisdom of your approach and I will, of course share.
My blog also shrinks the images but maybe I can stash them on Dropbox or a similar service and link the posts to the full sized images.
–Clay
[quote quote=“AnthonyYan” post=5644]Hi Clay,
Wow, that last image is amazing! More please. ![]()
btw, I think the forums are re-sizing your images, so the measurements/annotations you made to the image are too small to really see or read. Is there a way for you to show us those images without so much resizing? Maybe post them to your blog and then link that?
Sincerely,
–Lagrangian[/quote]
Hey Anthony,
Just a data point, I am seeing the notation perfectly here. I am linking a small capture of the corner of one of Clay’s images. If this is what you can’t see…
I wonder if it is your browser or a setting that you are using?
Phil
If anyone is having difficulty viewing the images, maybe due to scaling being weird or cutting off the image, you can try grabbing the raw image by clicking and dragging it onto the address bar/tab list. Forum software likes to scale stuff pretty aggressively to save server resources, so even the raw image posted through the forum itself will be scaled down to whatever the built in size limit is.
They look fine on my end using Chrome and a 1920x1200 display, just as another reference point.
In one of Clay’s images, he has very very tiny annotations. I can barely see them, and they are unreadable to me. I took Clay’s image and marked where I see the annotations in red.
Clay’s original image is here.
This is the same image with the areas of interest marked in red:

I was hoping to read what these were. Are you guys able to read these? I’m using Internet Explorer 9 in Windows 7.
Sincerely,
–Lagrangian
Heck no I can’t read them…
I did not even see them before you circled them in red…
Would have never known that they were notations…
Phil
I didn’t notice those either, good catch! With the full resolution images they’ll be legible I’m sure. Hopefully Clay will work out a quick and easy hosting solution!
Superfine 2000xI added the image to Dropbox:
Thanks Clay! It is super interesting to see those detailed measurements. ![]()
It’s challenging to pick out starting and ending points for the measurement so suggestions are most welcome. It is some consolation to know that the grooves do match the stated grits of the stones and strops so far. Hopefully it’s not a case of finding what you’re already looking for…